Deploy and execute an operation in Jitterbit Studio
Introduction
This page describes how to deploy operations to the Harmony cloud. After you deploy an operation and its dependencies, you can execute those operations. You can execute an operation using existing deployed dependencies, or you can have dependencies automatically deployed at the time of execution.
For information on resolving certain errors that may occur when you execute an operation, see Operation troubleshooting.
Visual indications of operations with undeployed changes
Operations with undeployed changes display two visual indicators:
-
The operation's name appears in blue on the project pane's Components tab. For more information, see Component name in Project pane Components tab.
-
An Undeployed icon and a blue underline appear on the bottom left section of an operation.
Deploy an operation
You can deploy operations using three methods:
- Deploy: Deploys an operation directly. When you select this option, the system immediately deploys the operation and its dependencies, or reports validation errors that prevent deployment.
- Deploy and Run: Works the same as the Deploy option, except that after a successful deploy, the system also executes the operation and any downstream operations. For more information, see Execute an operation later on this page.
- Configurable Deploy: Deploys selected operations. When you select this option, a deployment configuration screen opens where you can choose which operations to deploy.
Note
When you rename a project that you previously deployed, the new project name is automatically deployed and updated in Harmony. No other part of the project is automatically deployed.
Deploy
You can access the Deploy option for an operation from the following locations:
- The project pane's Workflows tab (see Component actions menu in Project pane Workflows tab).
- The project pane's Components tab (see Component actions menu in Project pane Components tab).
- The design canvas (see Component actions menu in Design canvas).
- The operation action bar.
When you select Deploy, the operation and its dependencies are immediately deployed. For the deploy to succeed, the operation must be valid. If the operation is invalid, a dialog displays the specific validation errors. For documentation on each error and how to resolve it, see Operation validity.
Deploy and run
The Deploy and Run option is accessible from these locations:
- The project pane's Workflows tab (see Component actions menu in Project pane Workflows tab).
- The project pane's Components tab (see Component actions menu in Project pane Components tab).
- The design canvas (see Component actions menu in Design canvas).
- The operation action bar.
When you select Deploy and Run, the operation and its dependencies are immediately deployed. For the deploy to succeed, the operation must be valid. If the operation is invalid, a dialog displays the specific validation errors. For documentation on each error and how to resolve it, see Operation validity.
If the deploy succeeds, the operation and any downstream operations also run. For details, see Execute an operation later on this page.
Configurable deploy
You can access the Configurable Deploy option from the following locations. This option opens a deployment configuration screen with the operation and its dependencies selected by default.
- The project pane's Workflows tab (see Component actions menu in Project pane Workflows tab).
- The project pane's Components tab (see Component actions menu in Project pane Components tab).
- The design canvas (see Component actions menu in Design canvas).
When you select Configurable Deploy, a deployment configuration screen opens where you can define a tag and comment and choose which workflows or operations to deploy.
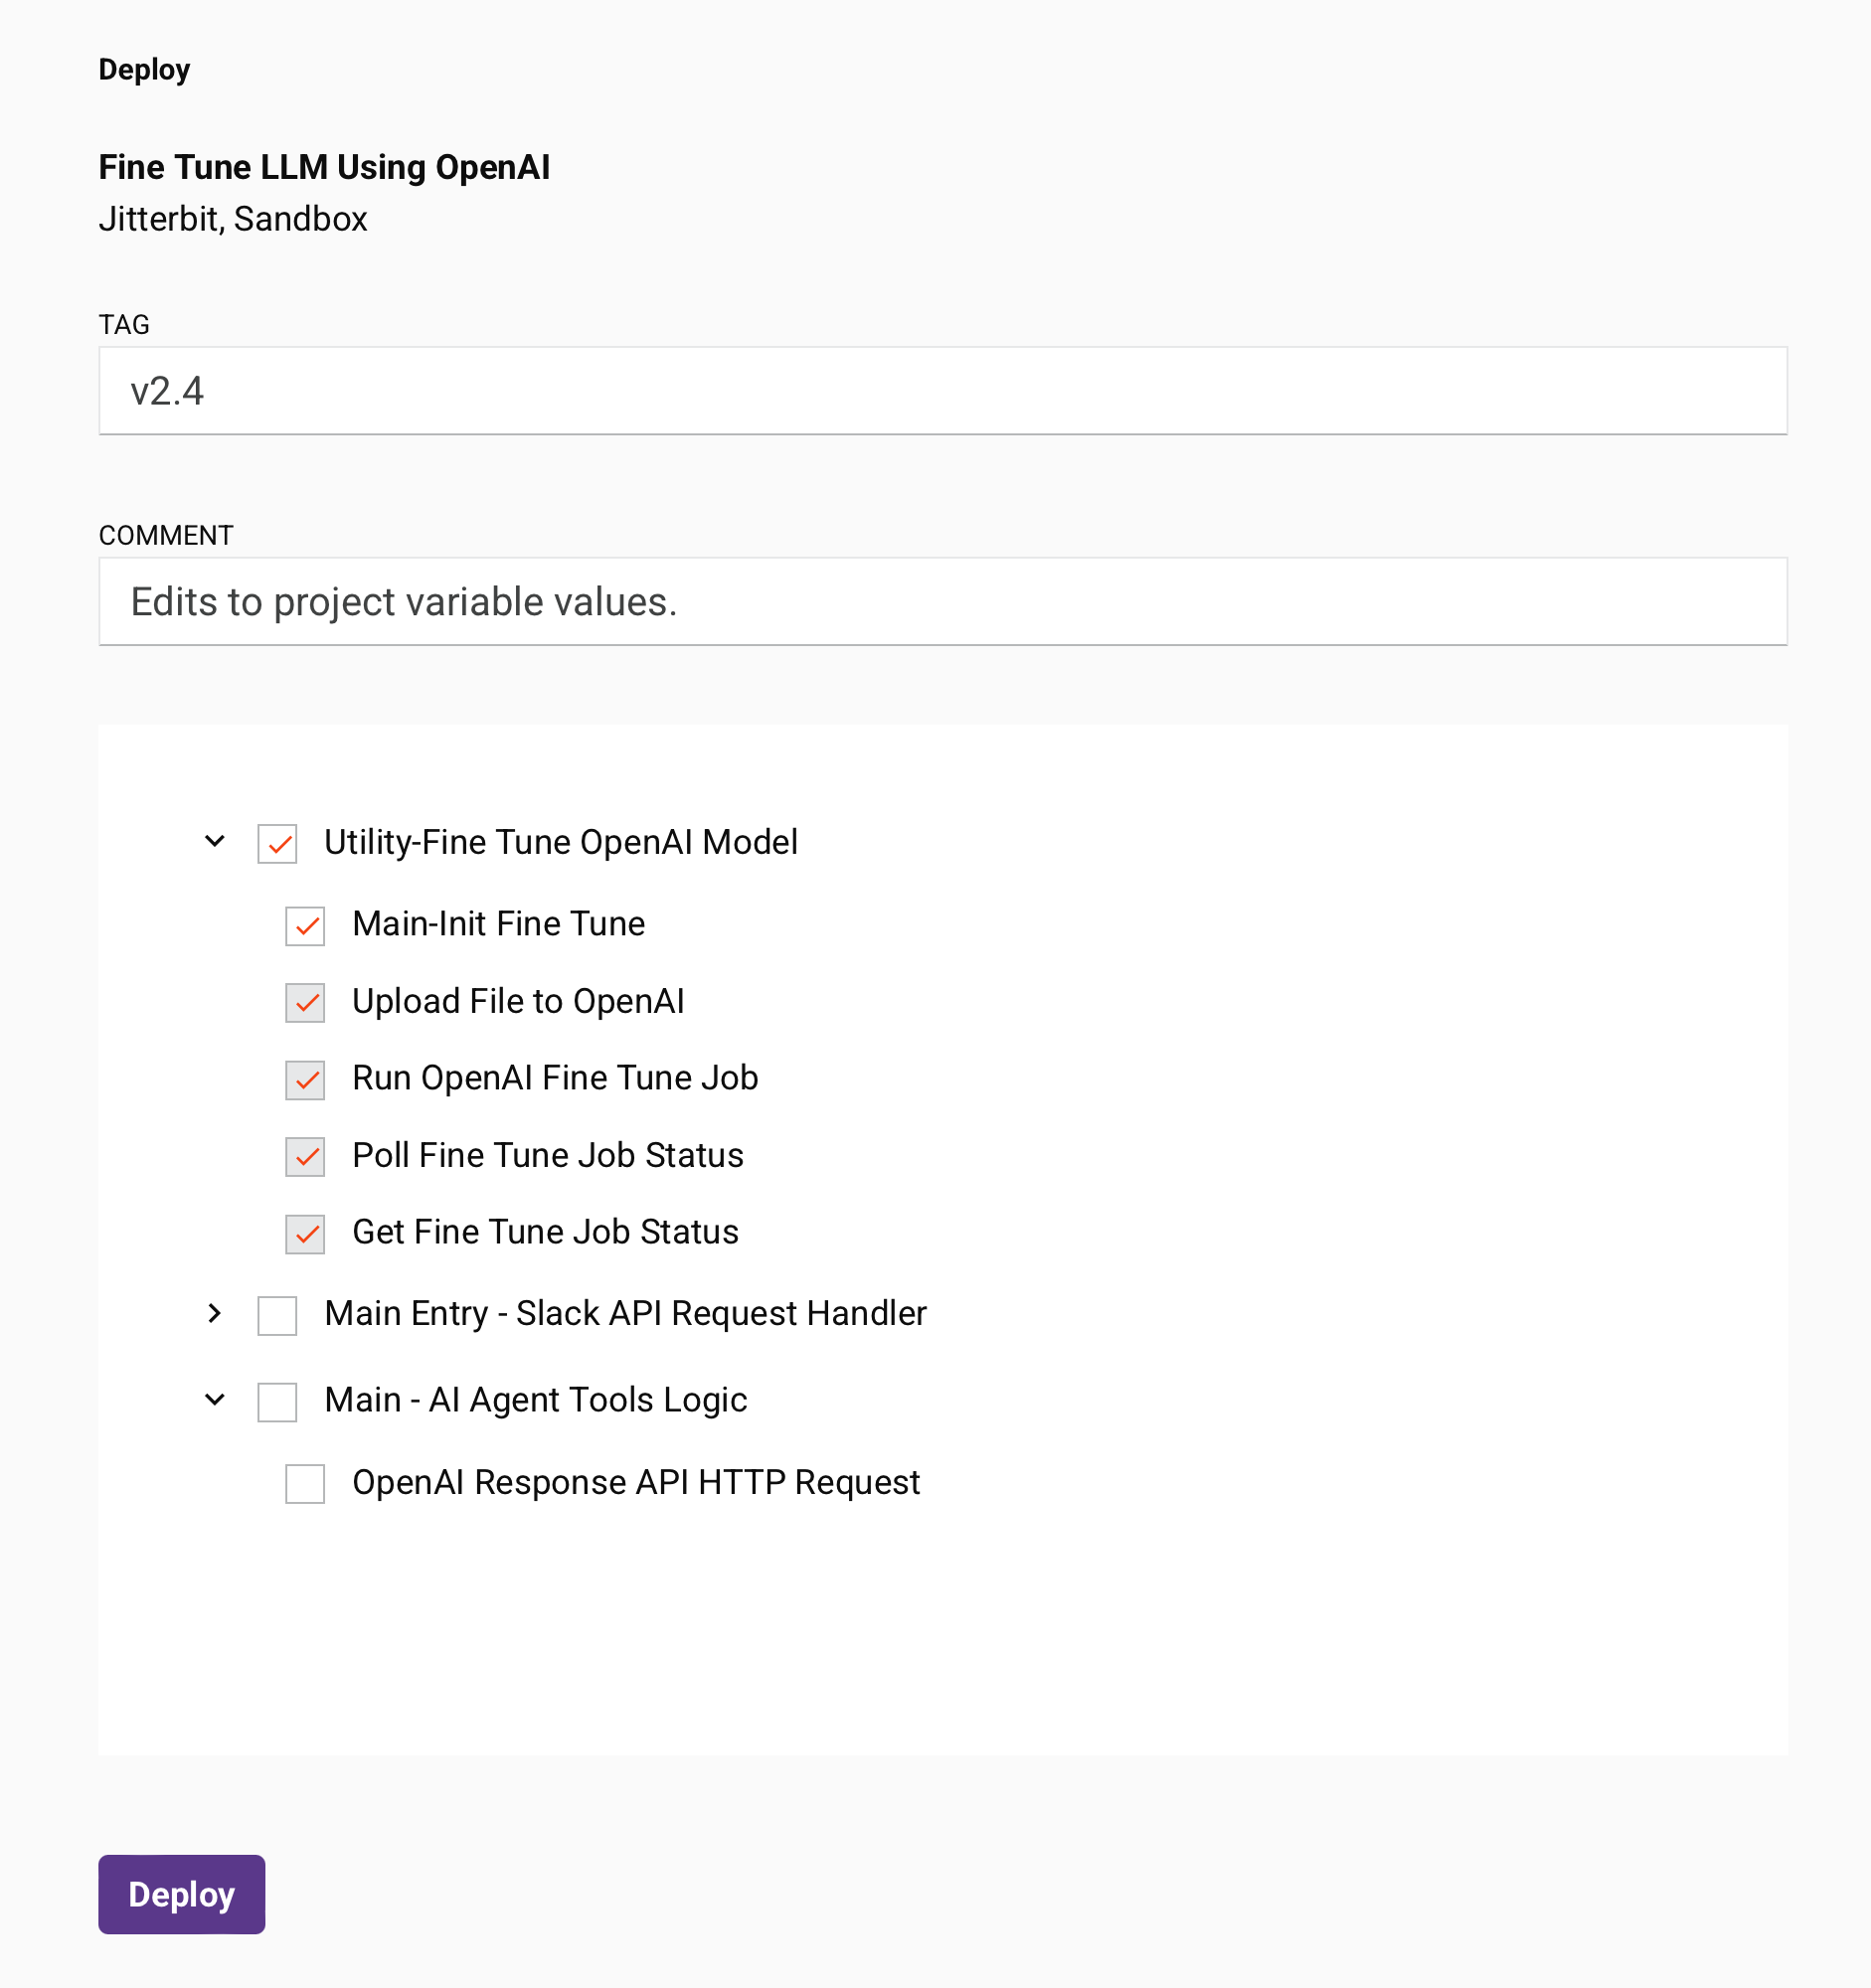
-
Project Information: The top of the screen displays the project name and the Harmony organization and environment where the project exists.
-
Tag: Enter a tag to label the deploy event. The tag appears as a label on the deploy event and is recorded in the deploy details accessible from the project history. This field may be required depending on project-level deployment settings.
-
Comment: Enter a comment to describe the deploy event. The comment is recorded in the deploy details accessible from the project history. This field may be required depending on project-level deployment settings.
-
Select Workflows and Operations: Select the workflows or operations to deploy. The operation and its dependencies are selected by default. You must select at least one item to enable the Deploy button.
When you select a workflow or operation, any dependent workflows or operations are also selected and cannot be cleared.
To collapse or expand workflows and operations, use the carets displayed to the left of the workflow or operation name.
Invalid workflows or operations appear in red italicized text. You must select only valid items to enable the Deploy button.
-
Deploy: Click to deploy the selected workflows or operations.
Execute an operation
After you deploy an operation and its dependencies, you can execute those operations. You can execute an operation using existing deployed dependencies, or you can have dependencies automatically deployed at the time of execution. When you run an operation, any downstream (linked) operations are also executed.
You can execute operations manually at design time, using a script (in either Studio or Design Studio), from a command line on an agent, using an API trigger, using a listener, or using a schedule. After you execute operations, you can validate proper behavior by checking operation logs.
For information on using a schedule versus an event-driven approach, see Batch and event-driven processing.
Execute manually
Manual execution of an operation is commonly used during project development to test select operations or the entire project. You can execute operations manually in Studio as described below, or from the Projects page of the Management Console for operations that you have already deployed.
You can execute most operations manually, with the following exceptions:
- Operations triggered through the Harmony API Manager. These operations use an API or API SOAP Request activity that provides source data to the operation.
- Operations triggered by a listener. These operations use a listening activity that receives an event that triggers the operation to run.
You have two options for manual operation execution:
- Run: If you have already deployed an operation and its dependencies, this option immediately executes the operation and any downstream operations using existing deployed dependencies. The executed operations do not include any design changes made after the latest deployment. To run the operation with the latest design changes, use Deploy and Run.
- Deploy and Run: This option immediately deploys the operation and all its dependencies (or reports validation errors that prevent deployment), then executes the operation and any downstream operations using newly deployed dependencies.
Operations that you manually run by either method display the real-time operation status on the design canvas, as described in Operation status below.
Run
You can access the Run option from the following locations:
- The project pane's Workflows tab (see Component actions menu in Project pane Workflows tab).
- The project pane's Components tab (see Component actions menu in Project pane Components tab).
- The design canvas (see Component actions menu in Design canvas).
- The operation action bar.
When you select Run, if you have already deployed an operation and its dependencies, the operation and any downstream operations linked with operation actions are also kicked off based on the configured conditions.
If you have not yet deployed an operation or its dependencies, a message indicates that the operation failed to run:
Dialog text
Failed to run operation
The specific operation has not been deployed or has been deleted.
Click Continue to return to the previous screen. To deploy the operation and its dependencies, as well as run the operation, use the Deploy and Run option.
If you have deployed an operation or its dependencies but have made changes in the Studio project designer since the last deployment, a prompt indicates there are undeployed changes:
Dialog text
Operation Has Undeployed Changes
This operation or its dependent components have undeployed changes. Click Continue to run the last deployed version of this operation.
Click Continue to acknowledge that there are undeployed changes that will not be deployed, and to run the last deployed version of the operation and its dependencies without the most recent changes made in the Studio project designer.
If you don't want to run the last deployed version, click Cancel to return to the previous screen. To deploy the latest version of the operation and its dependencies, as well as run the operation, use the Deploy and Run option.
Deploy and run
You can access the Deploy and Run option from the following locations:
- The project pane's Workflows tab (see Component actions menu in Project pane Workflows tab).
- The project pane's Components tab (see Component actions menu in Project pane Components tab).
- The design canvas (see Component actions menu in Design canvas).
- The operation action bar.
When you select Deploy and Run, the operation and its dependencies are immediately deployed. The deploy must succeed for the operation to run, as described earlier on this page under Deploy.
If the deploy succeeds, the operation and any downstream (child) operations chained with operation actions are also kicked off based on the configured conditions.
Operation status
If an operation has been successfully submitted to the operation queue, the real-time operation status is reported in the lower left of an operation:
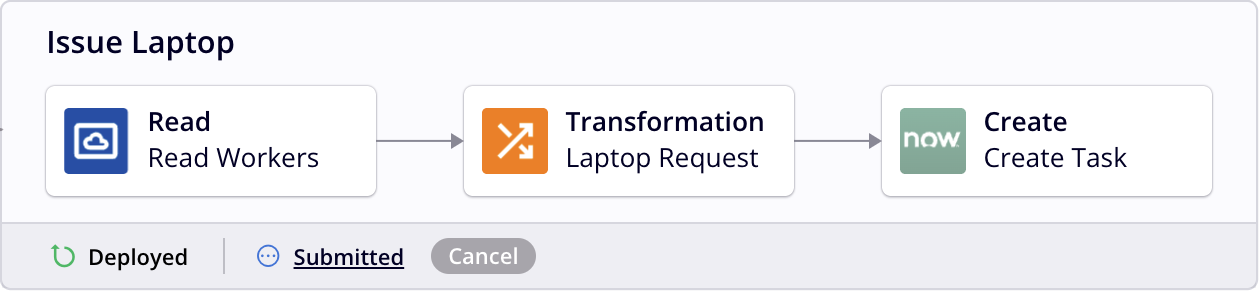
The operation status is displayed for the first 6 operations that run within an operation chain. You can view the status for any remaining operations in the operation logs.
The reported status corresponds with the statuses described on the Operation logs page under Operation statuses. Click the operation status to view detailed log information. The operation log screen automatically opens in a separate tab so that you can continue working while operations are running (see Operation logs).
After you manually run the operation, the operation status is displayed in an open project for 24 hours and is not affected by additional deploys or by running the operation in another way. Only by manually re-running the operation will the operation status refresh for operations and their child operations. The operation status clears when you close the project.
For operations that are in Submitted, Received, Pending, or Running status, a Cancel button is displayed next to the status. Clicking Cancel sends a request to the agent to stop the operation and a Cancel Requested status is displayed next to the real-time operation status:

Note
Operations that have a Cancel Requested status may still run.
Hover over the runtime status to view the last time the status was refreshed (reported in local browser time).
The color of the icon to the left of the reported status indicates the category of operation status corresponding with that displayed in the operation logs. When operations are in the collapsed view, only the colored icons indicating the category of operation status are displayed.
Use a script
To run an operation from a script, call the RunOperation function in a script, as described in the function documentation.
To call another operation in the same project, drag it into the script. The complete function is automatically created:
RunOperation("<TAG>operation:Operation 2</TAG>");
To call an operation in another project, obtain the GUID of the operation by running a simple script in that operation (using script testing) that uses the operation reference path to output the operation's GUID:
<trans>"<TAG>operation:Example Operation</TAG>";</trans>
After you have the GUID of an operation, you can remove the script. The result from the script testing is similar to op.52c3eaa8-bc45-491f-b77f-cfeff994cf31.
You can then use it with the RunOperation function in the form op.<guid> where <guid> is the GUID of the other project's operation:
RunOperation("op.52c3eaa8-bc45-491f-b77f-cfeff994cf31");
To call a Design Studio operation from Studio, pass the operationId parameter to the function in the form op.<guid> where <guid> is the GUID of the Design Studio operation. You can obtain this from within Design Studio as shown in Call an operation from a command line:
RunOperation("op.52c3eaa8-bc45-491f-b77f-cfeff994cf31");
To call a Studio operation from Design Studio, you need the names of the project and operation. After you deploy Studio operations, Design Studio projects can call them by project and operation name. See the Design Studio RunOperationFromProject function:
RunOperationFromProject("<TAG>Projects/MyCloudStudioProject/Operations/MyCloudStudioOperation</TAG>");
Use a command line from an agent
You can also call operations from a command line on an agent in the environment where you deployed the project. For details, see Call an operation from a command line.
Use an API trigger
To call the operation from an external application, use API Manager to configure a custom API and assign the operation to trigger on request. For more information, see the API Manager documentation.
Operations called from APIs display an API icon:
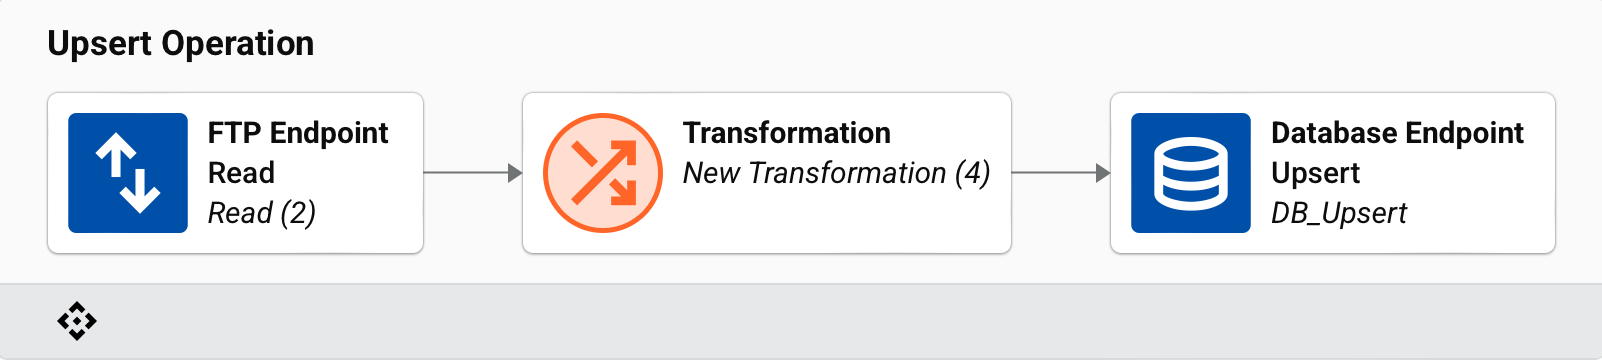
When you hover over this icon, the API service overview appears:
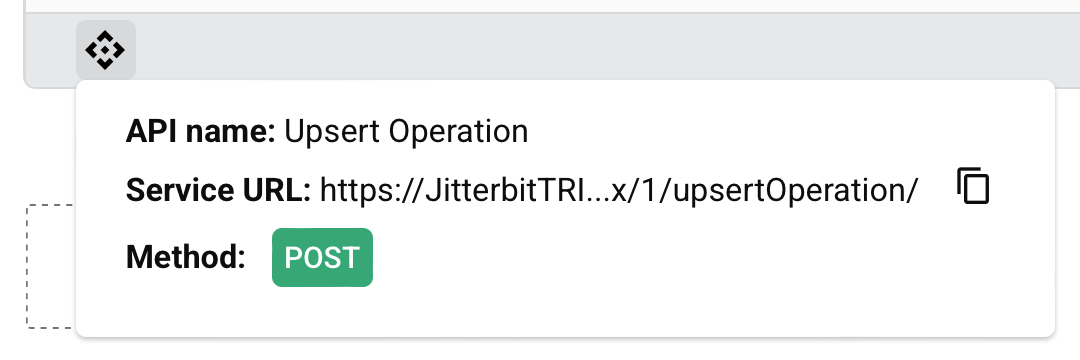
From this overview, you can click Copy service URL to add the API's service URL to your clipboard.
Use a listener
Event listeners allow operations to run automatically when triggered by specific events. You can control whether an operation responds to these triggers by enabling or disabling its event listening capability.
When you deploy an operation containing a listener activity, event listening is disabled by default and a disabled listener icon is displayed on the operation.
To enable event listening for the operation, click the disabled listener icon and use the toggle:
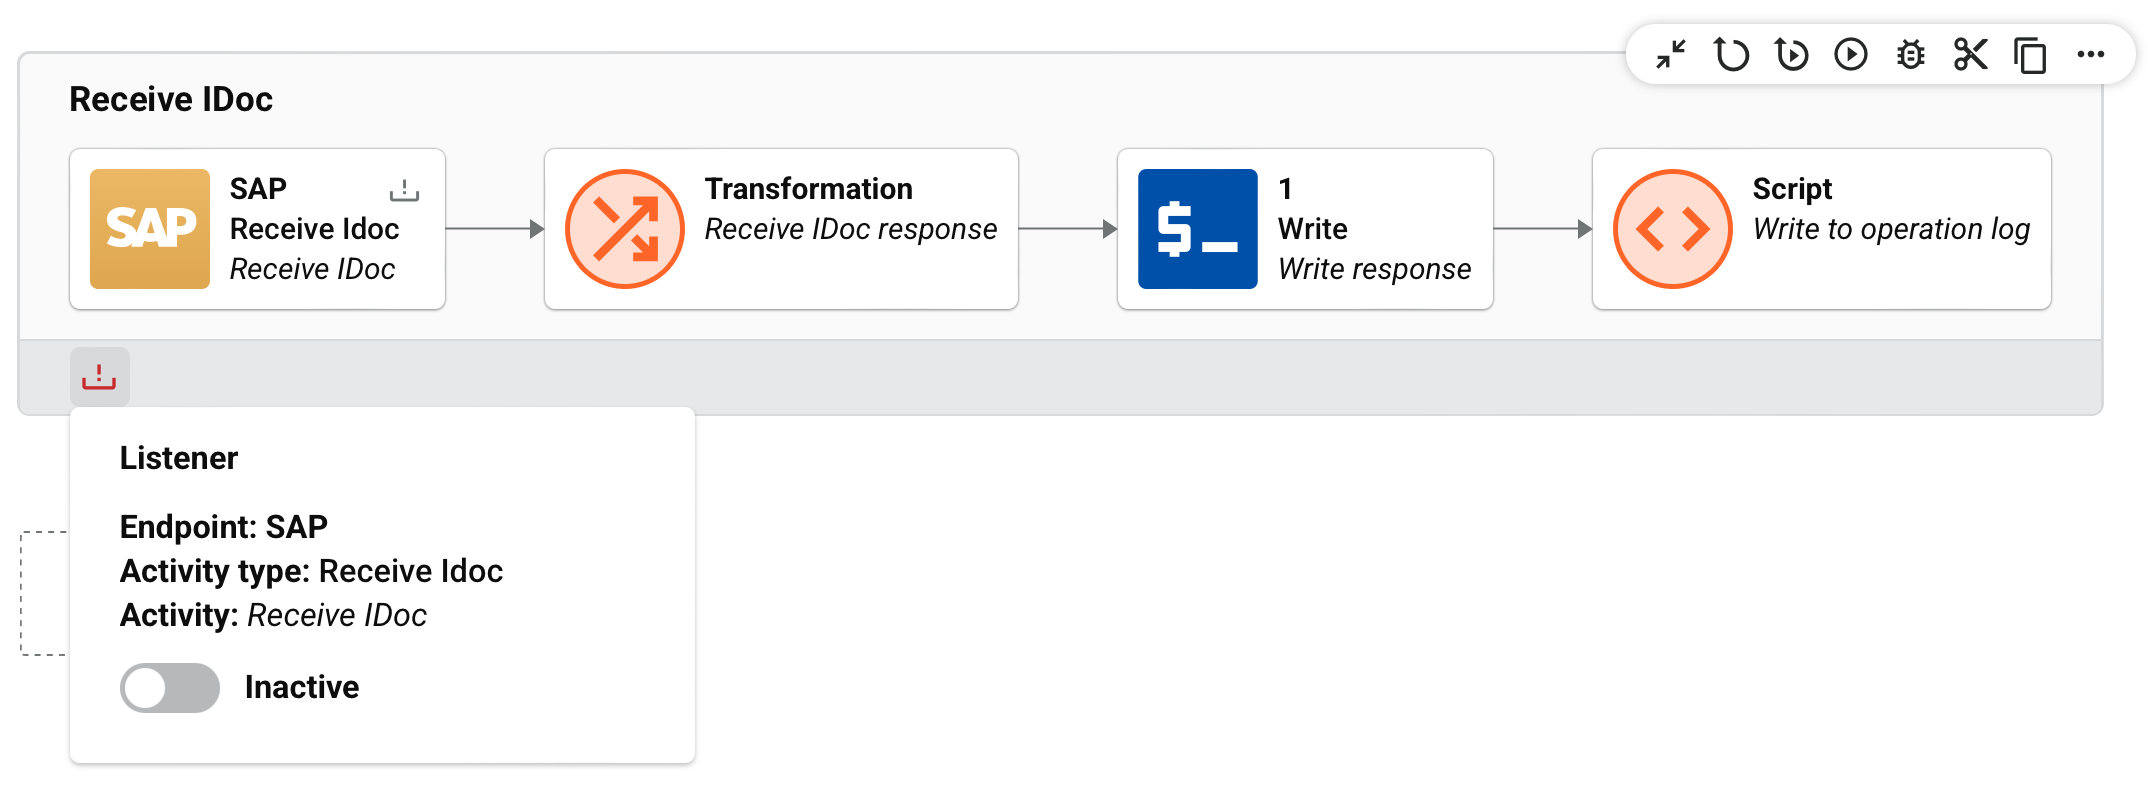
Operations triggered by events display an active listener icon:
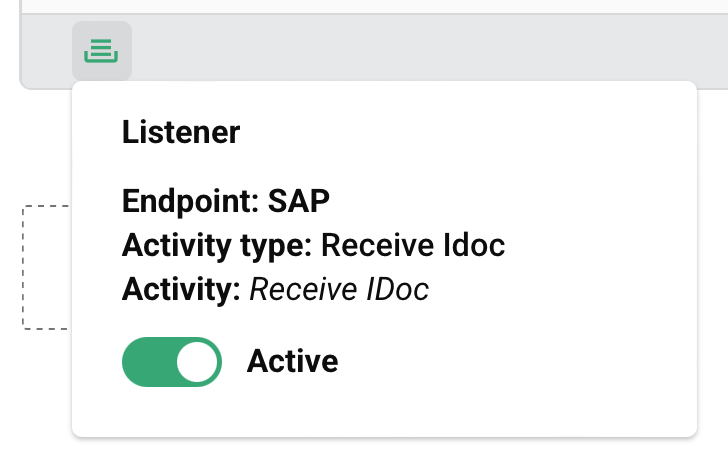
For more information, see View or enable / disable listeners in the Management Console Projects page.
Use a schedule
To run the operation automatically on a schedule, you must first configure a schedule and then apply it to an operation. You can create and apply schedules directly in Studio as described below. You can also create and apply schedules from the Projects page in the Management Console.
Note
After you apply a schedule to an operation, you can disable or re-enable it from the Projects page in the Management Console.
You add schedules from the Schedules tab of the operation settings. You can access the Settings option from the following locations:
- The project pane's Workflows tab (see Component actions menu in Project pane Workflows tab).
- The project pane's Components tab (see Component actions menu in Project pane Components tab).
- The design canvas (see Component actions menu in Design canvas).
For detailed configuration information, see Operation schedules.
Operations with enabled schedules display a Schedule operation settings icon:
When you hover over this icon, a schedule overview appears:
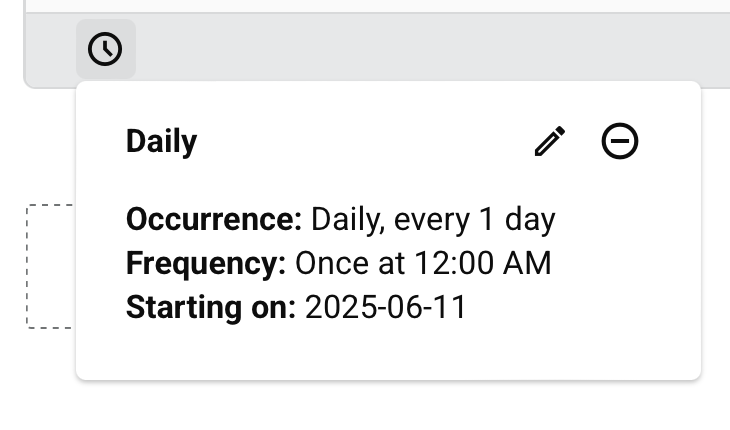
From this overview, you can click Edit schedule to modify settings or Remove schedule to remove the schedule from the operation.
Deployment requirements
You can configure deployment requirements for each project during project creation and configuration.
If project-level deployment settings require a tag or comment, a dialog appears when you initiate a deploy or deploy and run so you can enter the required information. The configurable deploy screen also provides these fields.
Dialog text
Deploy Requirements
Your organization requires a comment and a tag when deploying.
-
Tag
-
Comment
- Tag: Enter a tag to label the deploy event. The tag appears as a label on the deploy event and is recorded in the deploy details accessible from the project history.
- Comment: Enter a comment to describe the deploy event. The comment is recorded in the deploy details accessible from the project history.
- Add Comment and Tag: Click to add the tag, comment, or both, and continue with the operation deploy.
- Cancel: Click to close the dialog and return to the previous screen without deploying.
Cancel an executed operation
If you need to stop an executed operation that is in Submitted, Received, Pending, or Running status, you can do so from the following locations:
- The operation. For more information, see runtime status in Design canvas.
- The operation log table.
- The Runtime page of the Management Console.