Export and import a project in Jitterbit Studio
Introduction
Studio allows you to import project components between organizations and environments. You can export projects as JSON files or work directly with projects within the same environment.
Together, the export and import functionalities allow you to transfer projects and their components into other organizations as needed.
Studio project exports are in JSON file format. After you have a JSON project export, you can import it into any organization.
Export a project
The Export or Export Project options are accessible from these locations:
- The Projects page (see Card view or List view in Projects).
- The project toolbar (see Project actions menu in Project toolbar).
In addition, the project export screen is accessible using the Export link at the bottom of the Project Settings screen (see Edit project settings in Project creation and configuration).
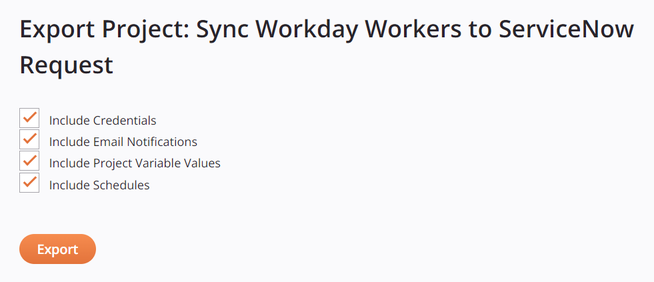
On selecting Export or Export Project, the project export screen opens, where you choose the export options and generate the project as a JSON file:
-
Include Credentials: Includes in the exported project the values specified within credentials fields of project component configuration screens.
Note
This option may be disabled depending on the Allow credentials to be exported organization policy.
The specific configuration fields that are treated as credentials fields vary by project component. They often include fields such as passwords or security tokens. Developers of custom connectors using the Connector SDK can designate such fields with either of these attributes:
-
"secret": "true": Designates only that the field is treated as a credentials field. The field's value is encrypted in the project export. -
"widgetHint": "password": Designates that the field is treated as a credentials field and also masks the value in the Studio UI by replacing each character with a black bullet. The field's value is encrypted in the project export.
The values of project variables themselves are not treated as credentials, even if the Hide Value option is selected in the UI (see Project variables). Instead, whether project variable values are included is controlled with the Include Project Variable Values selection.
If a project variable is used in a credentials field (regardless of whether Include Project Variable Values is selected), the credentials field's
"value"is the encrypted value of the square bracket syntax representation of the project variable name and any other input, if present.When Include Credentials is not selected, the credentials field's
"value"is not included in the project export, except if a project variable is used in a credentials field. In that case, the non-encrypted clear text input of the credentials field is included. This may be of concern if the credentials field uses any other input along with the project variable, though this use case is unusual. For example, a field input of[pv_password]1234suffixwould be included in the project export as[pv_password]1234suffix. -
-
Include Email Notifications: Includes email notifications in the exported project. This option applies to all email notifications in a project, regardless of whether they are configured with operation actions to run on success, failure, or SOAP fault or if they are referenced in a script.
-
Include Project Variable Values: Includes project variable default values in the exported project.
The values of project variables configured with the Hide Value option (see Project variables) are encrypted in the project export.
-
Include Schedules: Includes operation schedules in the exported project.
-
Export: Generates and downloads the project as a JSON file. By default, the JSON file name uses the name of the project.
Note
An exported project does not retain the project history.
Import
You can import projects and components using either of these two options:
-
Import a project: This option (accessible from the Projects page) allows you to import an entire project from a JSON file into your organization.
-
Selective import: This option (accessible from the project actions menu in a project) allows you to import specified components from another project in the same environment or from a project JSON file into an existing project.
Import a project
You can import a project by clicking Import on the Projects page:

Tip
To import only specified components into an existing project, use the Import option described in Selective import below. For components within the same environment, you can import directly from existing projects without needing to export and upload JSON files.
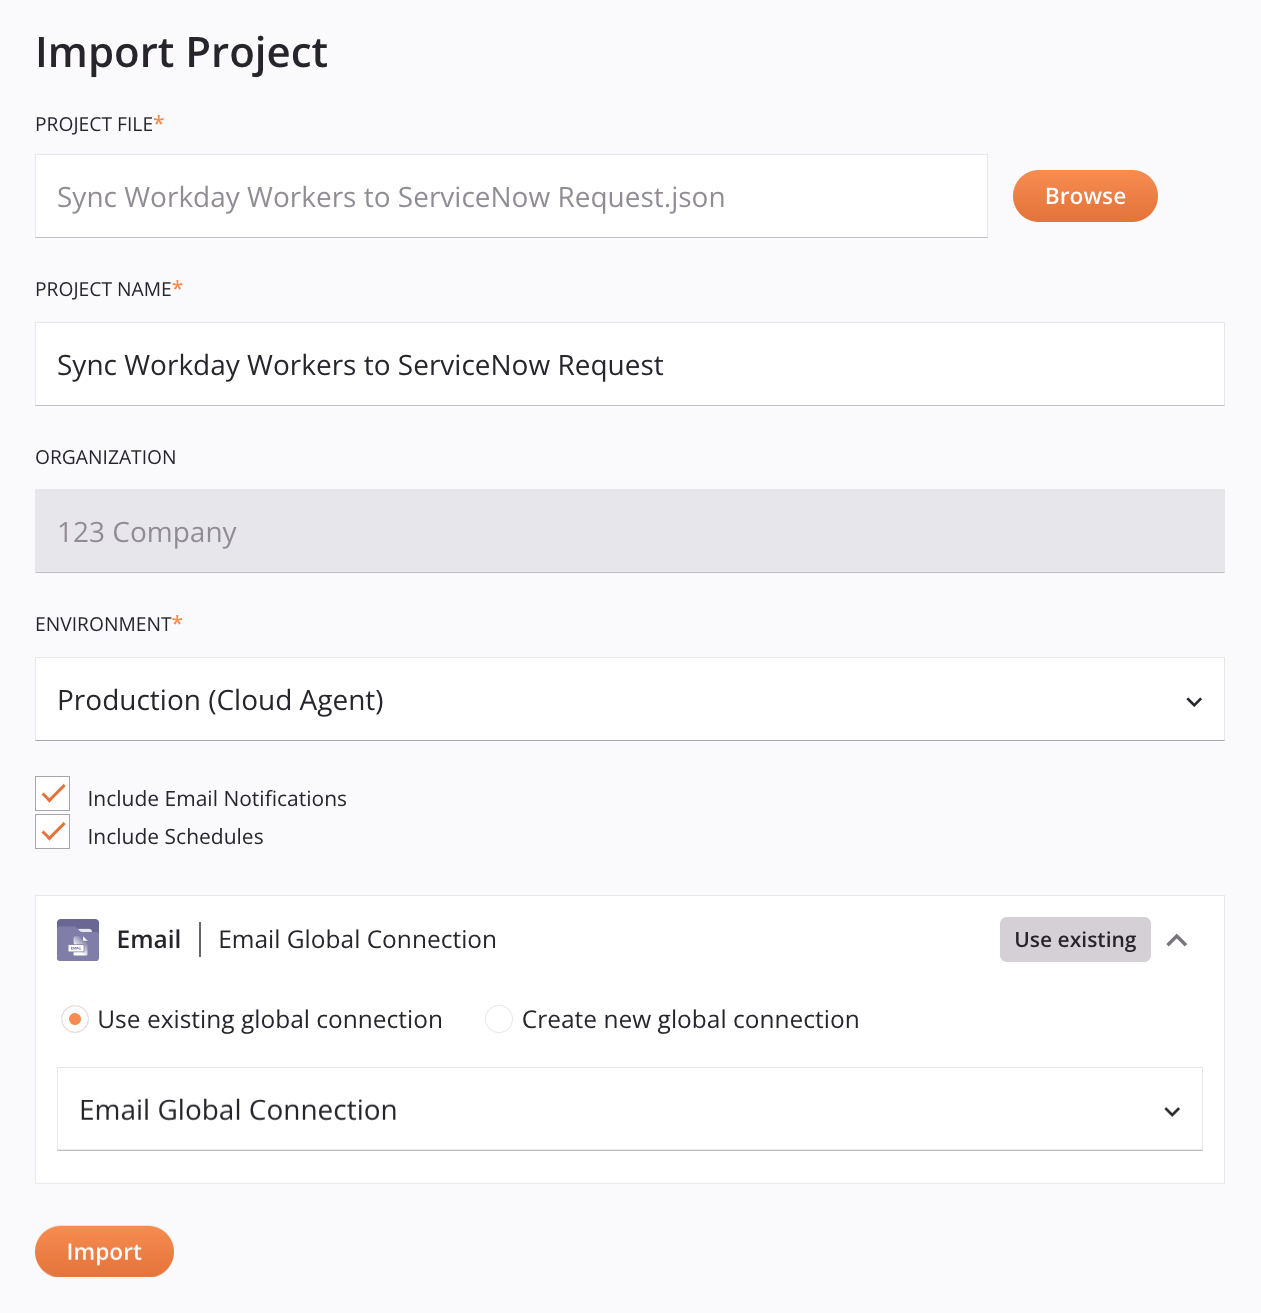
On the next screen, you import the project:
-
Project file: Use the Browse button to browse to a project JSON file that has been exported from Studio.
Tip
If the project uses any custom connectors, they must exist in the organization prior to importing the project. To export a Connector Builder connector and import it in another organization, see Connector Builder exports and imports. To install a Connector SDK connector in another organization, see Implementing a Harmony Connector.
On selecting a file, these fields become available:
-
Project name: The project name is prepopulated from the JSON file. To use a different name, you can edit it here. The project name must meet these criteria:
-
Be unique for each environment.
-
Cannot already be in use as a Design Studio project name in the same environment.
Note
If a project with the same name already exists in the Harmony cloud, go to the Management Console > Projects page to manage the deployed project.
-
-
Organization: Use the dropdown to select the organization that you want to import the project to. If you have only one organization, it is selected by default.
-
Environment: Use the dropdown to select the environment you want to import the project into.
Caution
If the source project uses connectors that are available only on private agents, you can't import it to an environment associated with a cloud agent group. These environments still appear in the Environment dropdown, but cannot be selected.
-
Include Email Notifications: By default, if email notifications were included as part of the project when it was exported, they are included when the project is imported. This option applies to all email notifications in a project, regardless of whether they are configured with operation actions to run on success, failure, or SOAP fault or if they are referenced in a script. To exclude email notifications from being imported, clear the checkbox.
Caution
References to an email notification component in a script are not removed even if email notifications are excluded, so you may need to correct any broken references after excluding emails.
-
Include Schedules: By default, if operation schedules were included as part of the project when it was exported, they are included when the project is imported. To exclude schedules from being imported, clear the checkbox.
-
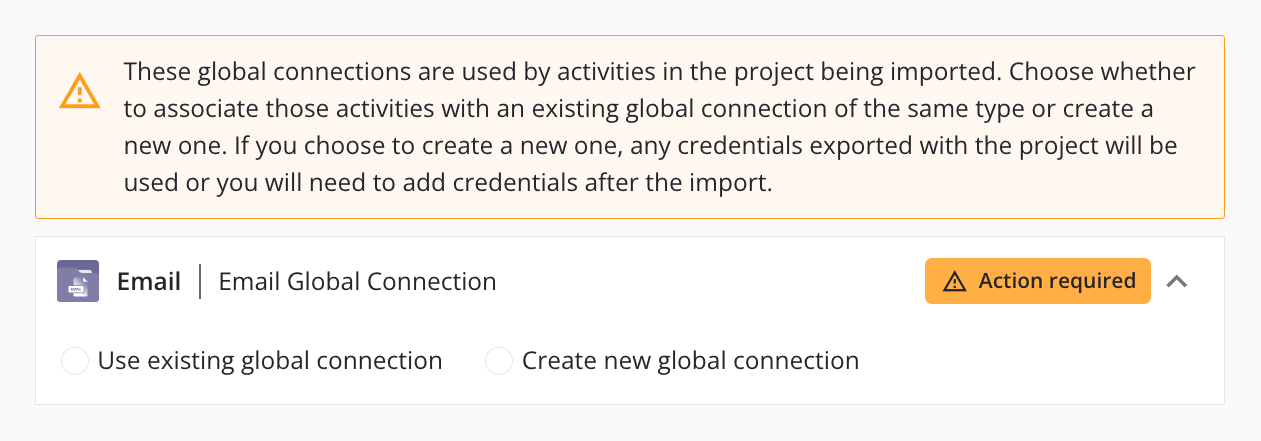
Global endpoints: Any global endpoints used by the project being imported are listed and must be added to the selected environment using either of these options:
-
Use existing global endpoint: Visible only when the global endpoint already exists in the organization. Select to add an environment endpoint to an existing global endpoint for the selected environment. Use the menu to select the existing global endpoint:
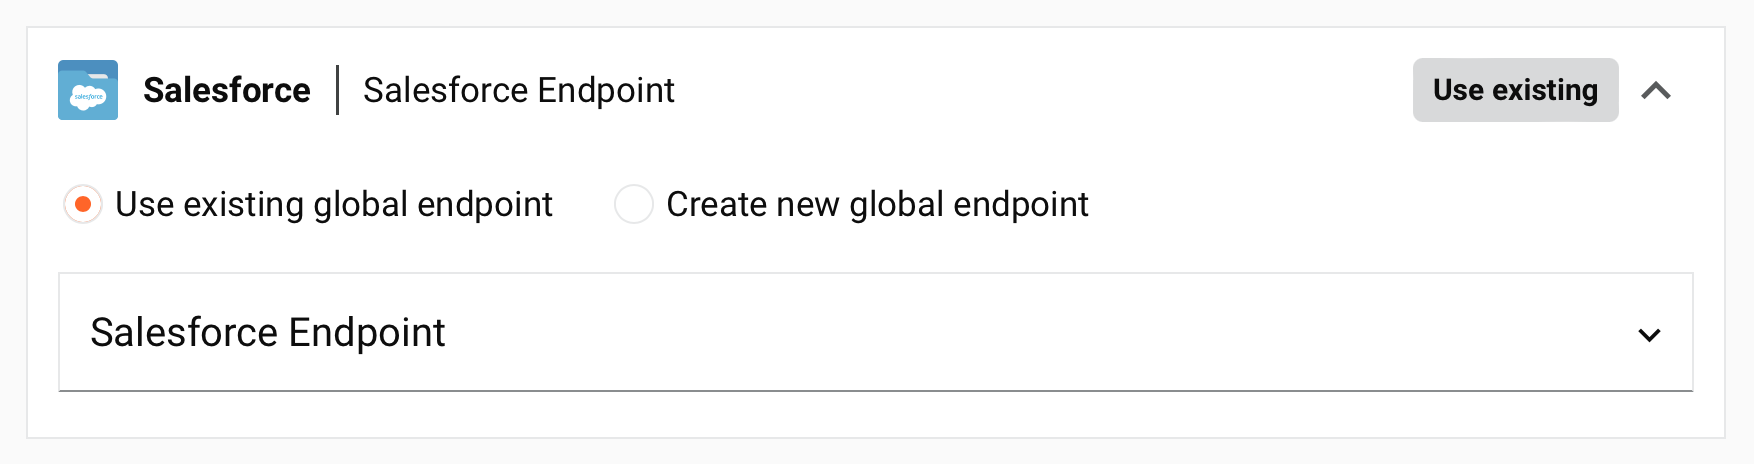
If the existing global endpoint already has an environment endpoint for the selected environment, the existing environment endpoint is used for the imported project. If the existing global endpoint does not have an environment endpoint for the selected environment, the credentials provided in the imported project are used (if applicable). Otherwise, the environment endpoint will need to be configured after the import.
-
Create new global endpoint: Select to create a new global endpoint for the organization:

When the project is imported, the global endpoint will be added to the selected environment and will need to be configured after the import.
-
-
-
Import: Click to import the project. If the project was successfully imported, the imported project opens on the design canvas. In addition, the new project is available from the Projects page.
After the project is imported, it is not yet deployed. When you are ready to deploy, see Project deployment.
Selective import
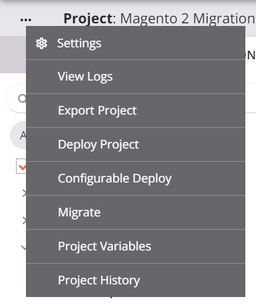
To import only specified components into an existing project, use the project actions menu and click Import From Project. You can import components either from a project JSON file or from another project in the same environment.
Note
To import an entire project JSON file as a new project, use the Import From Project option described in Import a project above.
Step 1: Import options
Select or upload a project:
-
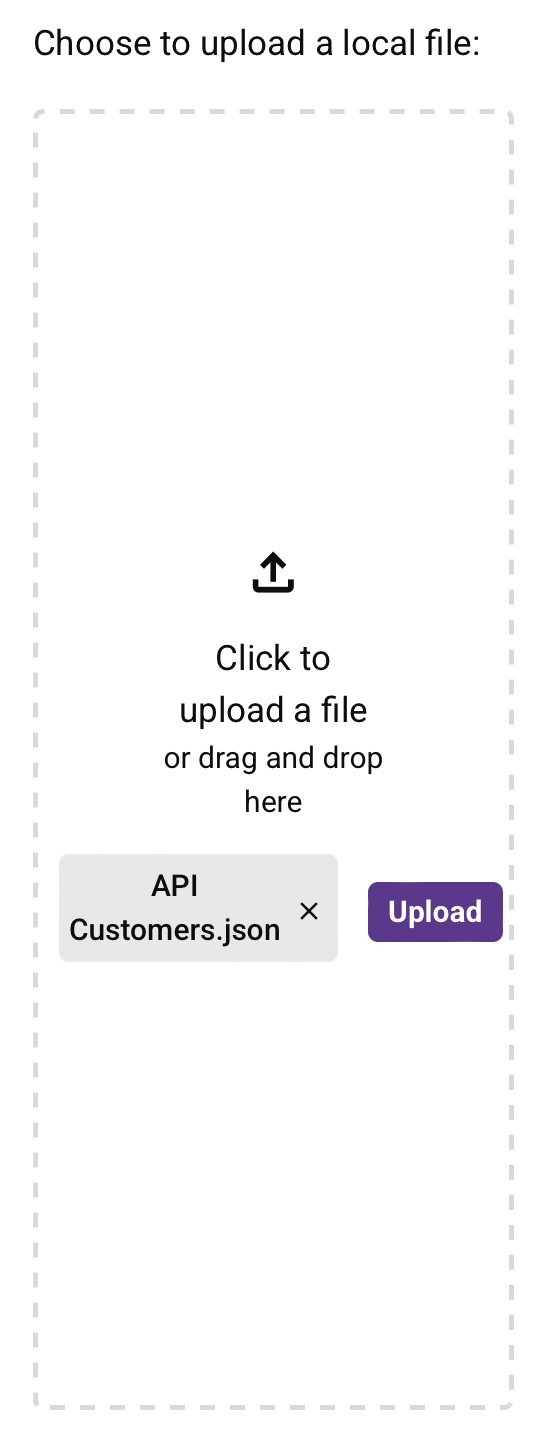
Choose to upload a local file: You can provide a project JSON file from the upload zone. You can drag and drop a project JSON file to the upload zone or manually select a file.
When clicked, a file selection dialog opens. Select the file and then click Upload:
-
Or select an existing project from your environment: Select an existing project from the currently accessed project's environment.
-
Next: Click to continue to the next step.
-
Cancel: Click to cancel the import process and return to the project.
Step 2: Choose components
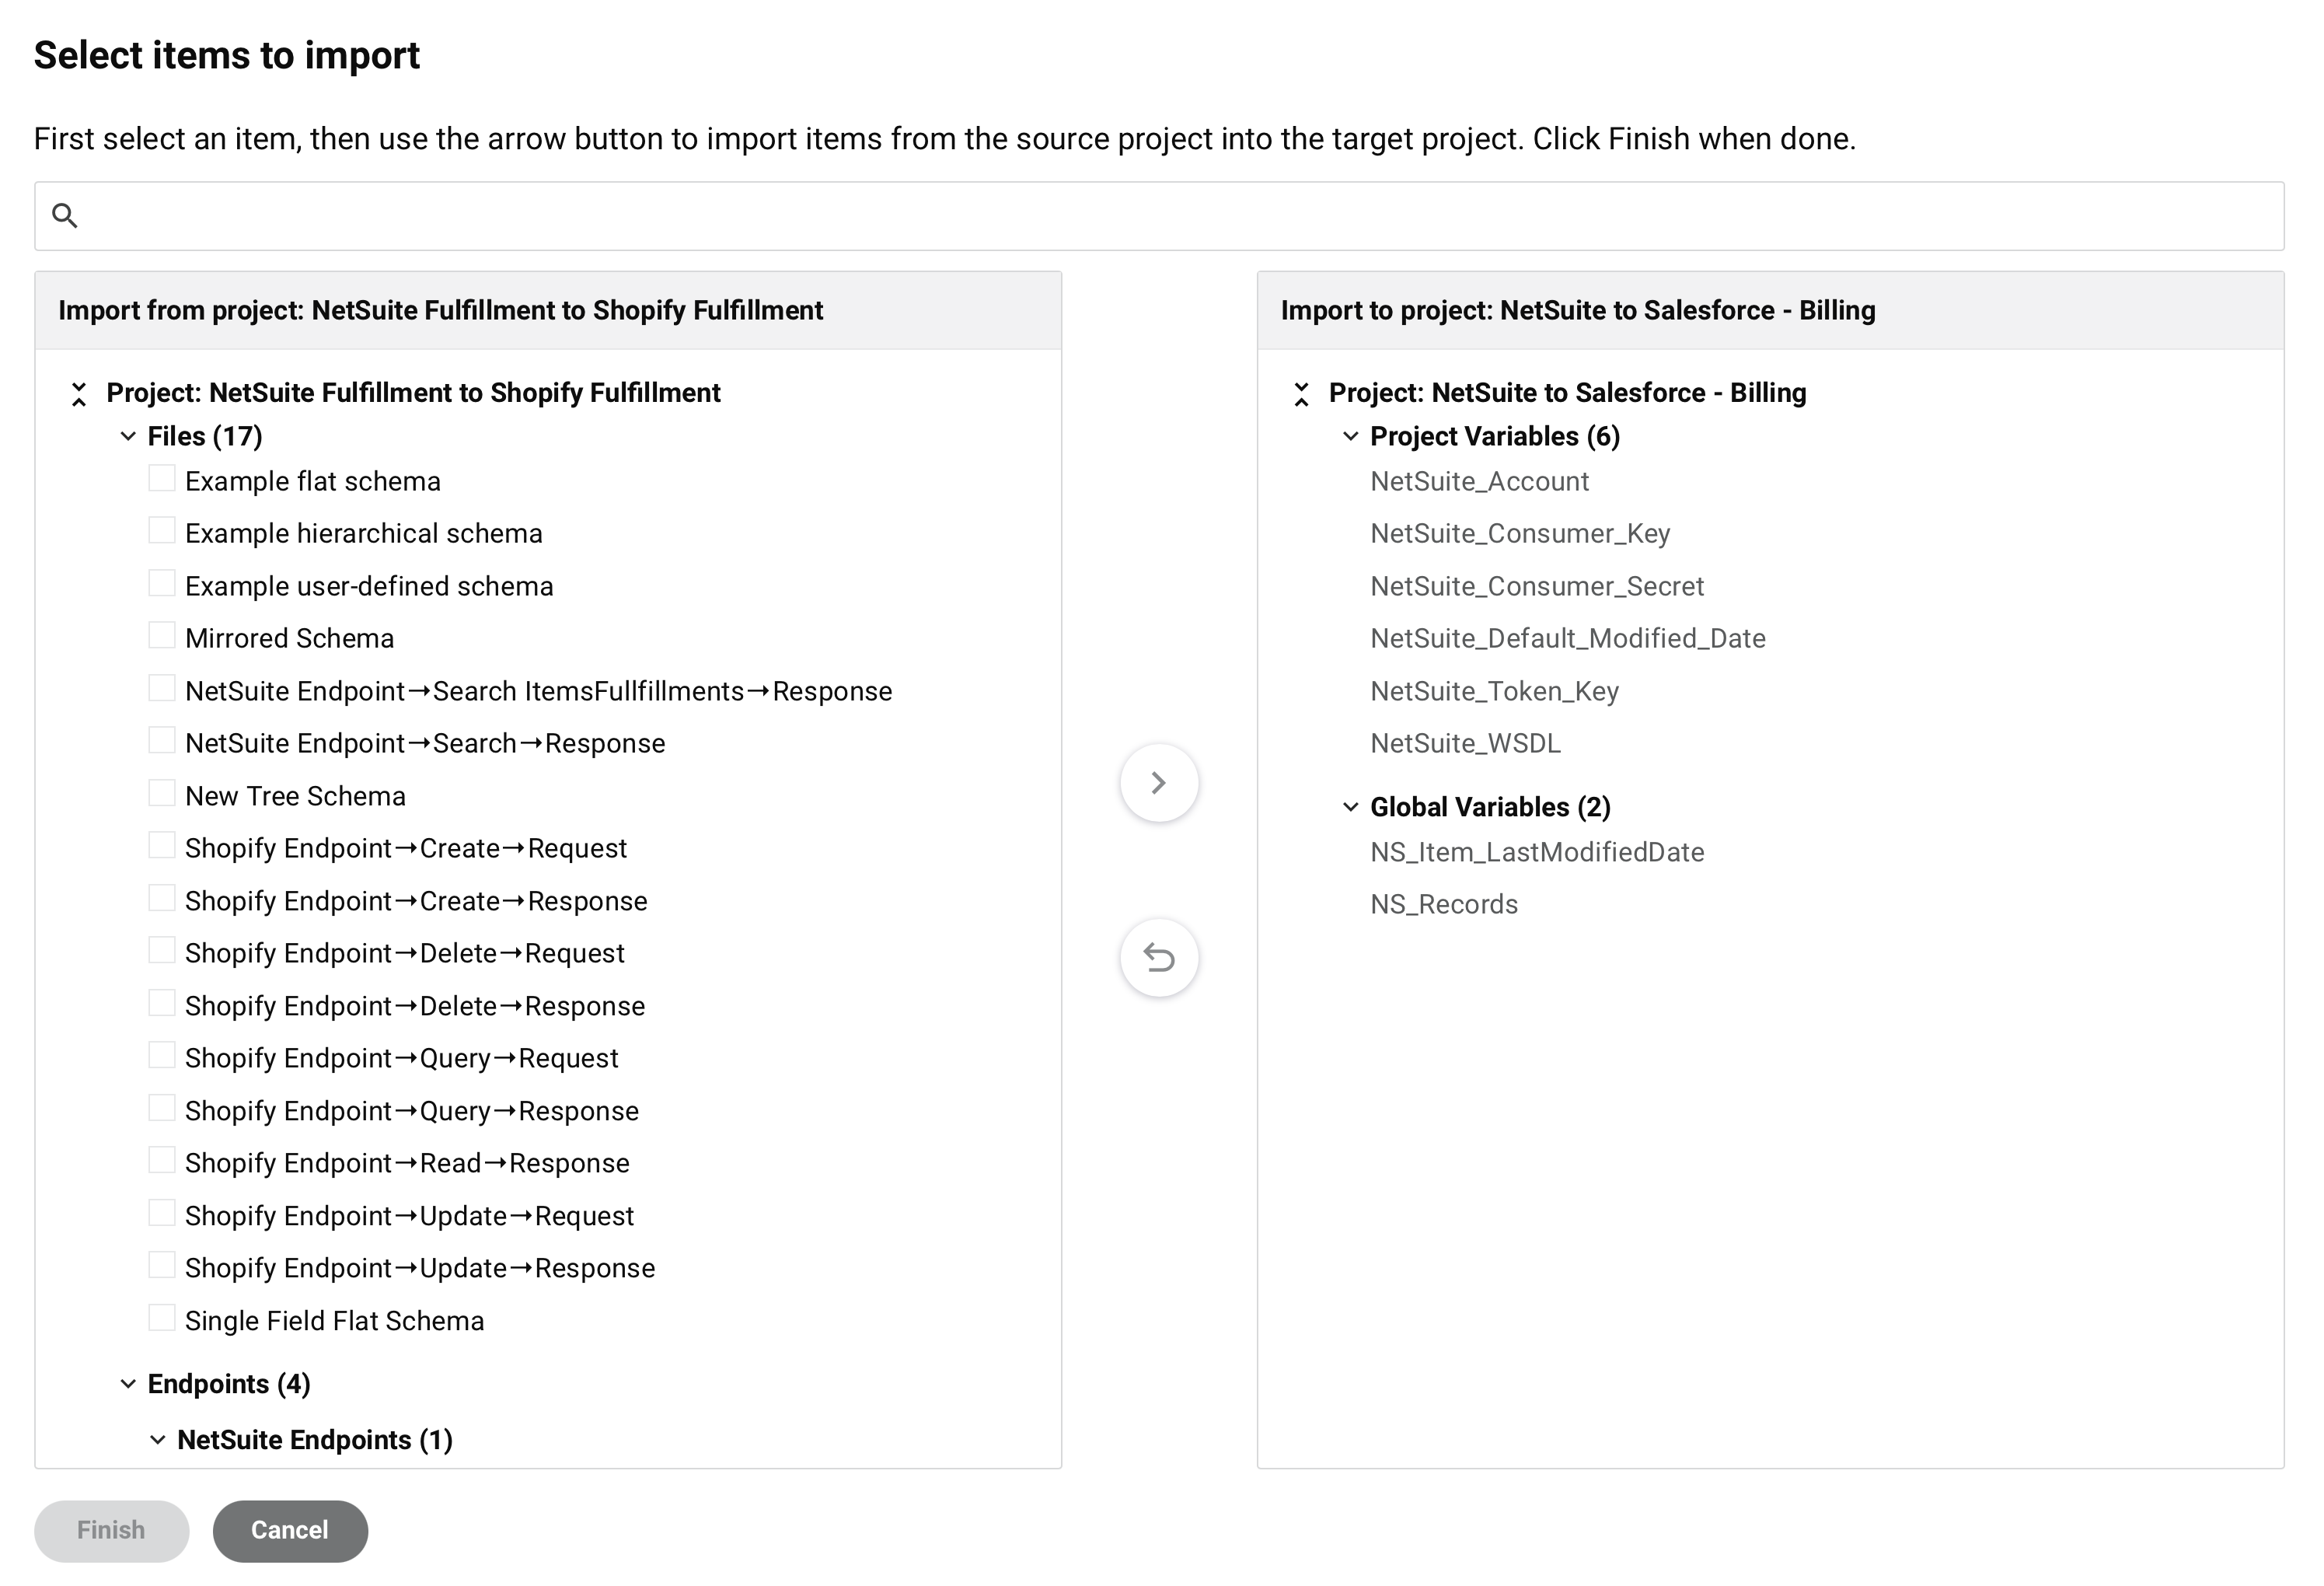
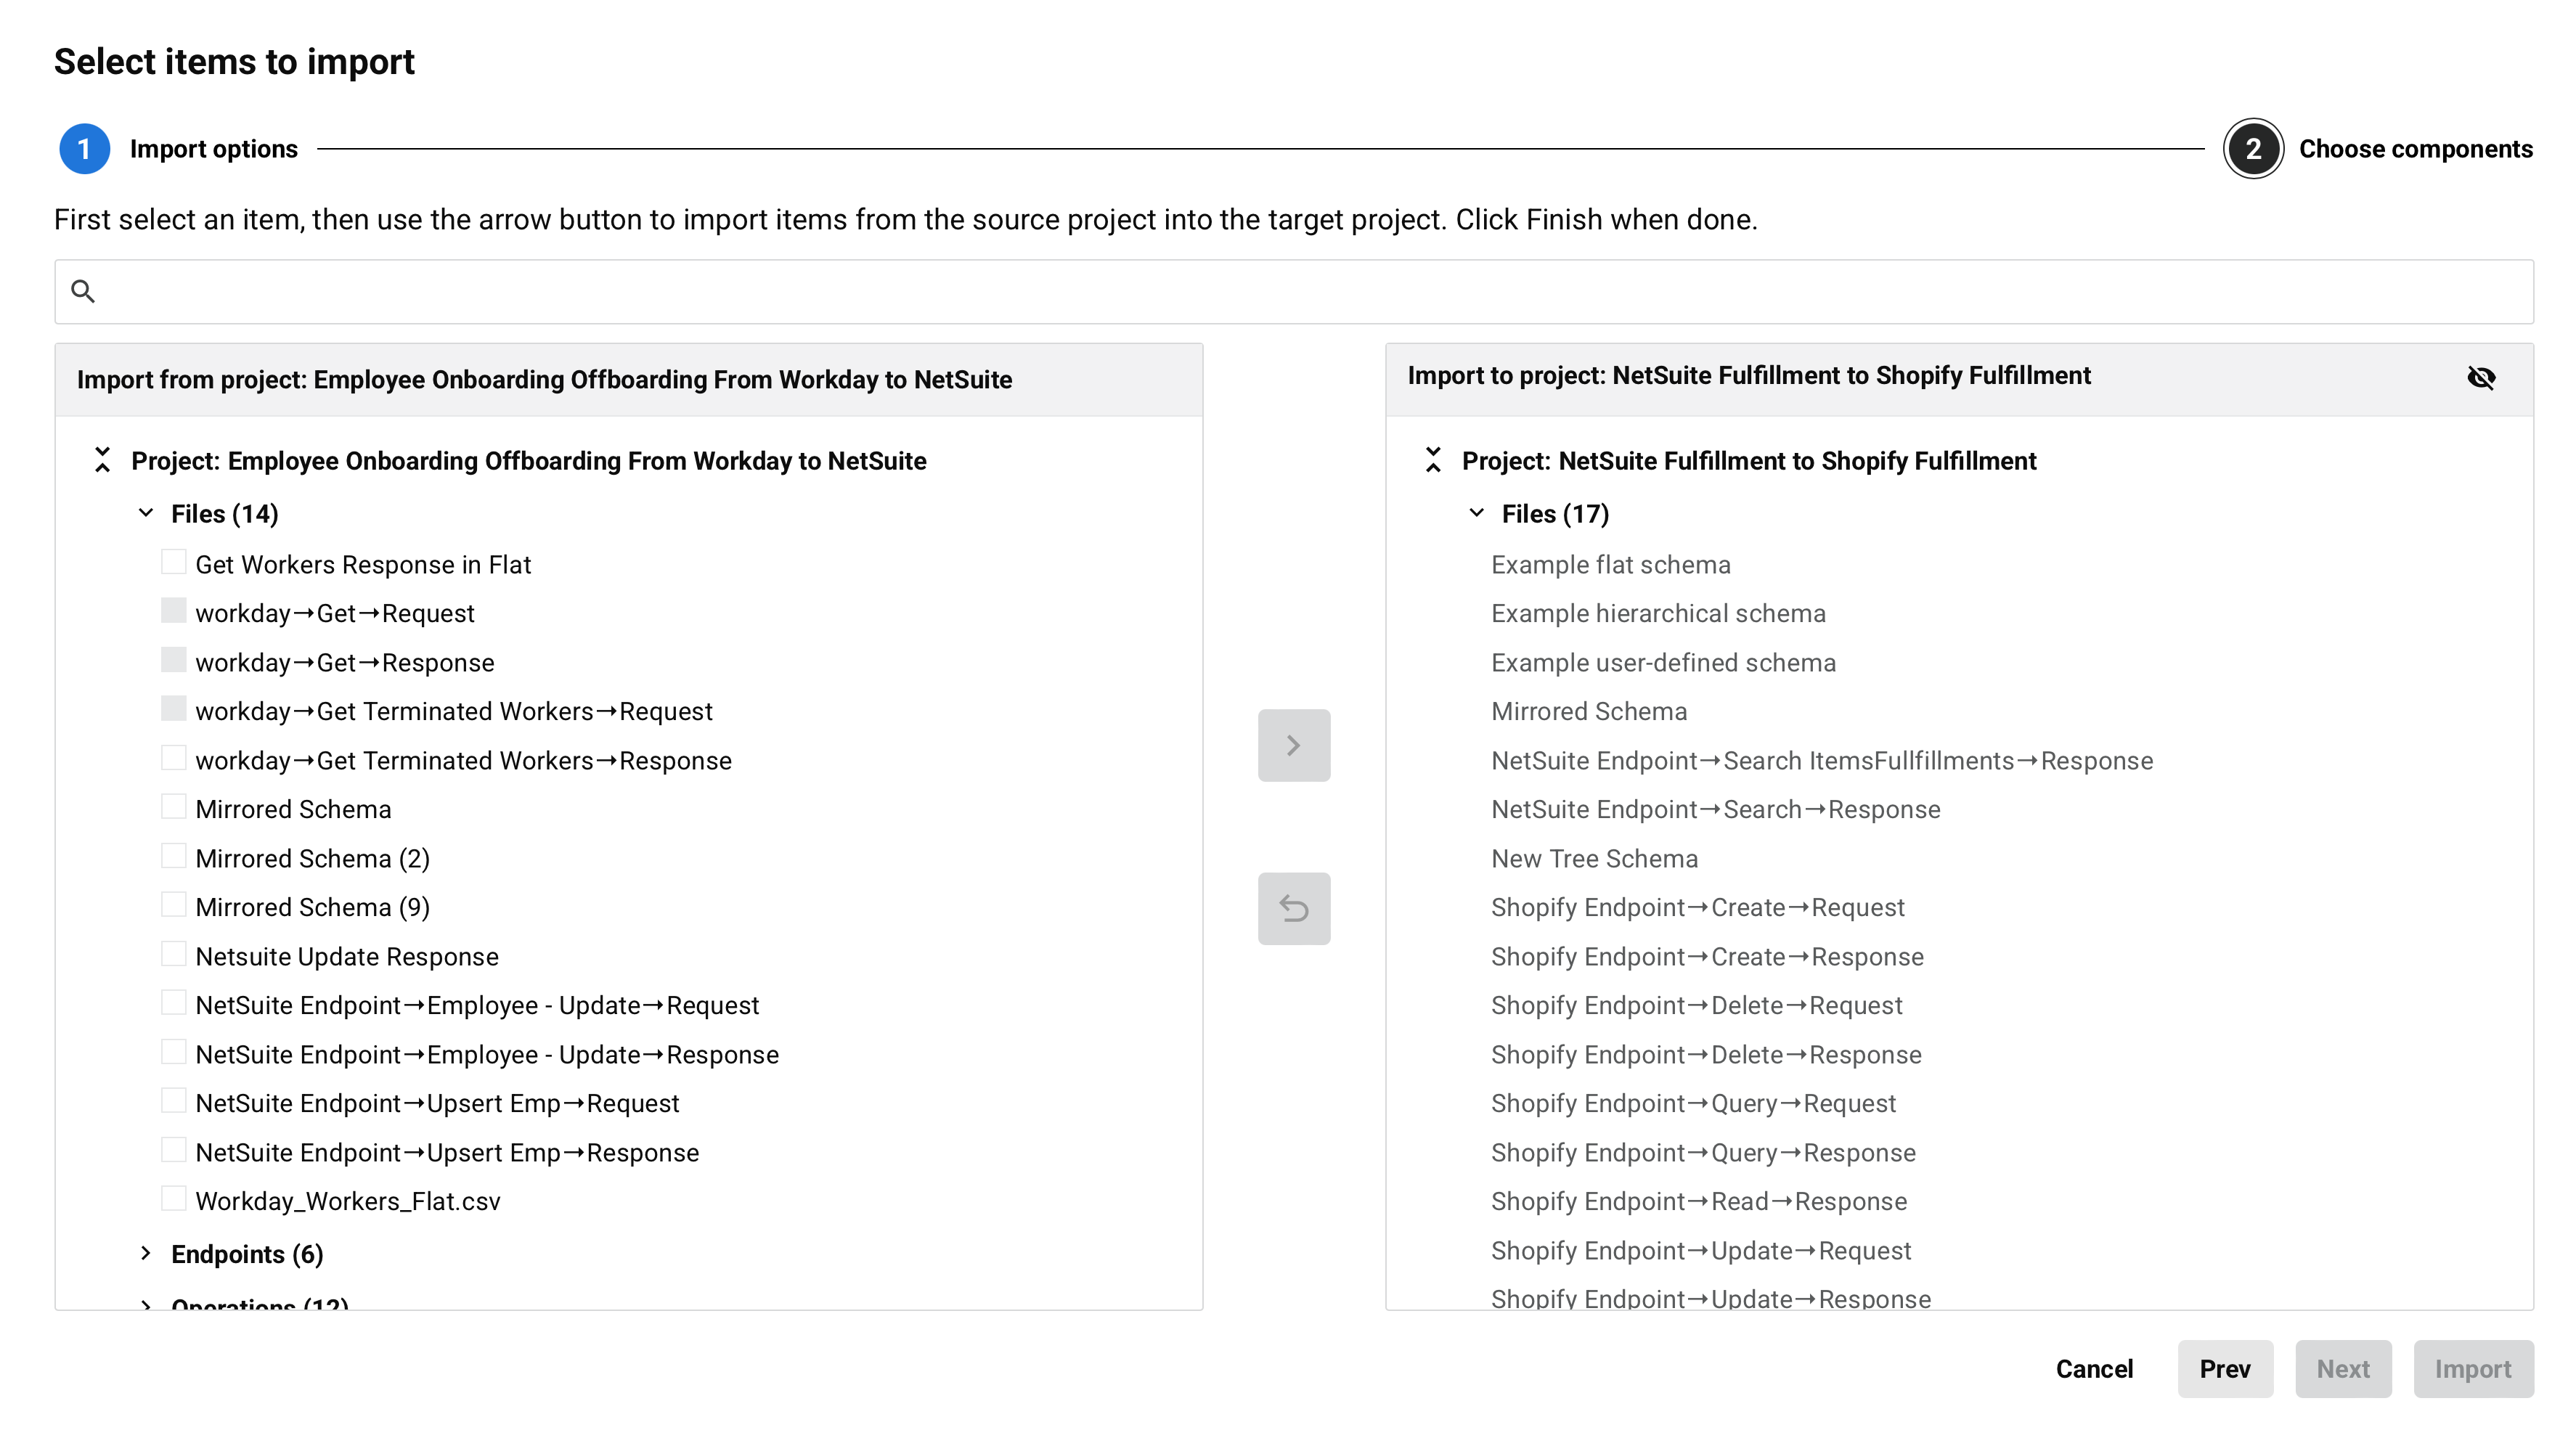
Select the components to import:
-
Import from project: This panel displays the name of the source project and the components available to be imported.
-
Import to project: This panel displays the name of the project being accessed and any components in the project.
- Show / Hide unaffected items: Shows (default) or hides components unaffected by the import.
-
Project components: Each project component category available in a project is displayed next to a number in parentheses indicating how many components are in the category. Components in a component category are listed alphabetically. From the Import from project panel, use the checkboxes to select the components to be imported into the project currently being accessed.
-
Autoselect dependencies: Toggle this option to control how component dependencies are handled during import. When enabled (default), selecting a component automatically selects all of its required dependencies, which cannot be deselected individually. When disabled, you can select individual components without automatically including their dependencies.
-
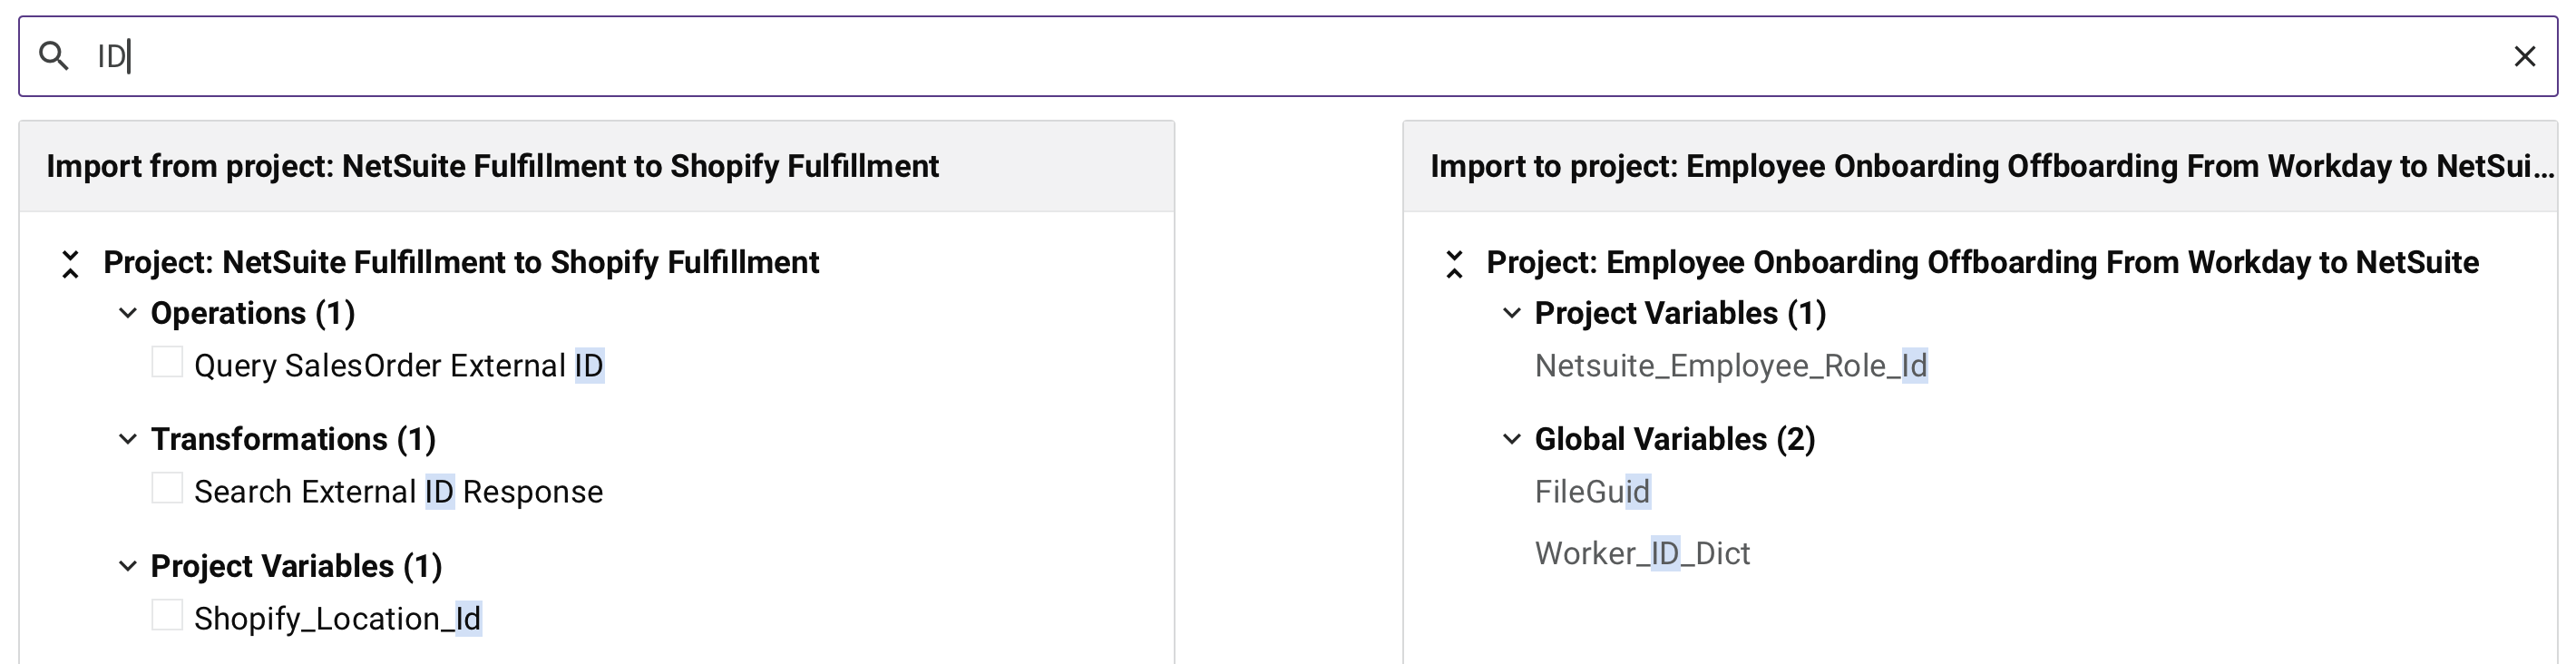
Search: Use the search box to enter a single keyword or keyword string. The keyword string becomes highlighted in blue within the name of the component:
-
Expand / Collapse all categories: Expands or collapses all the project component categories.
-
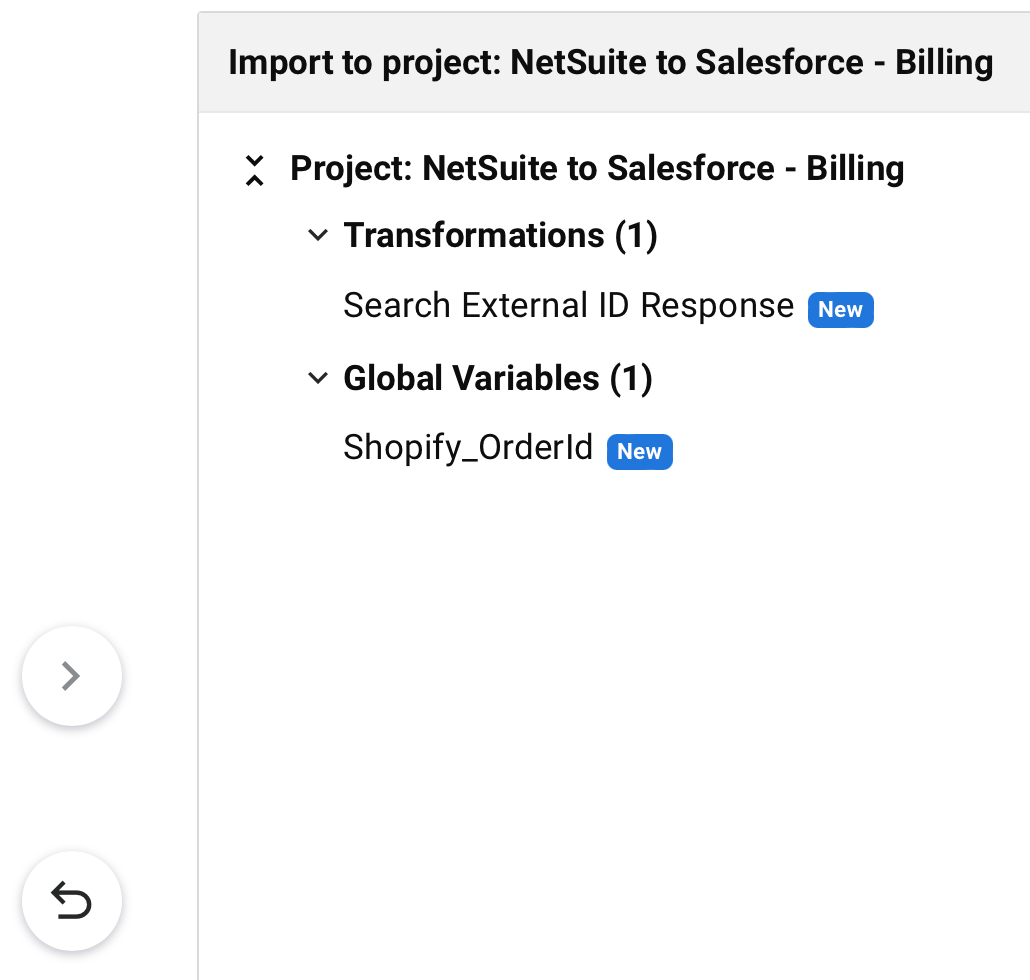
Move to project: Enabled when a component is selected in the Import from project panel. Once clicked, the selected components and their dependencies are added to the Import to project panel. Components added to the project are indicated with a blue New icon:
-
Add imported components to a new workflow: Select this option to import any operations into a new workflow. The workflow is named Imported and includes the date and time of the import in
YYYY-MM-DD HH:MM:SSformat (for example,Imported 2025-10-15 08:30:00). This option is unavailable until you select at least one operation for import. -
Conflicts: When an imported component shares the same name as a component in same component category, a conflict occurs:
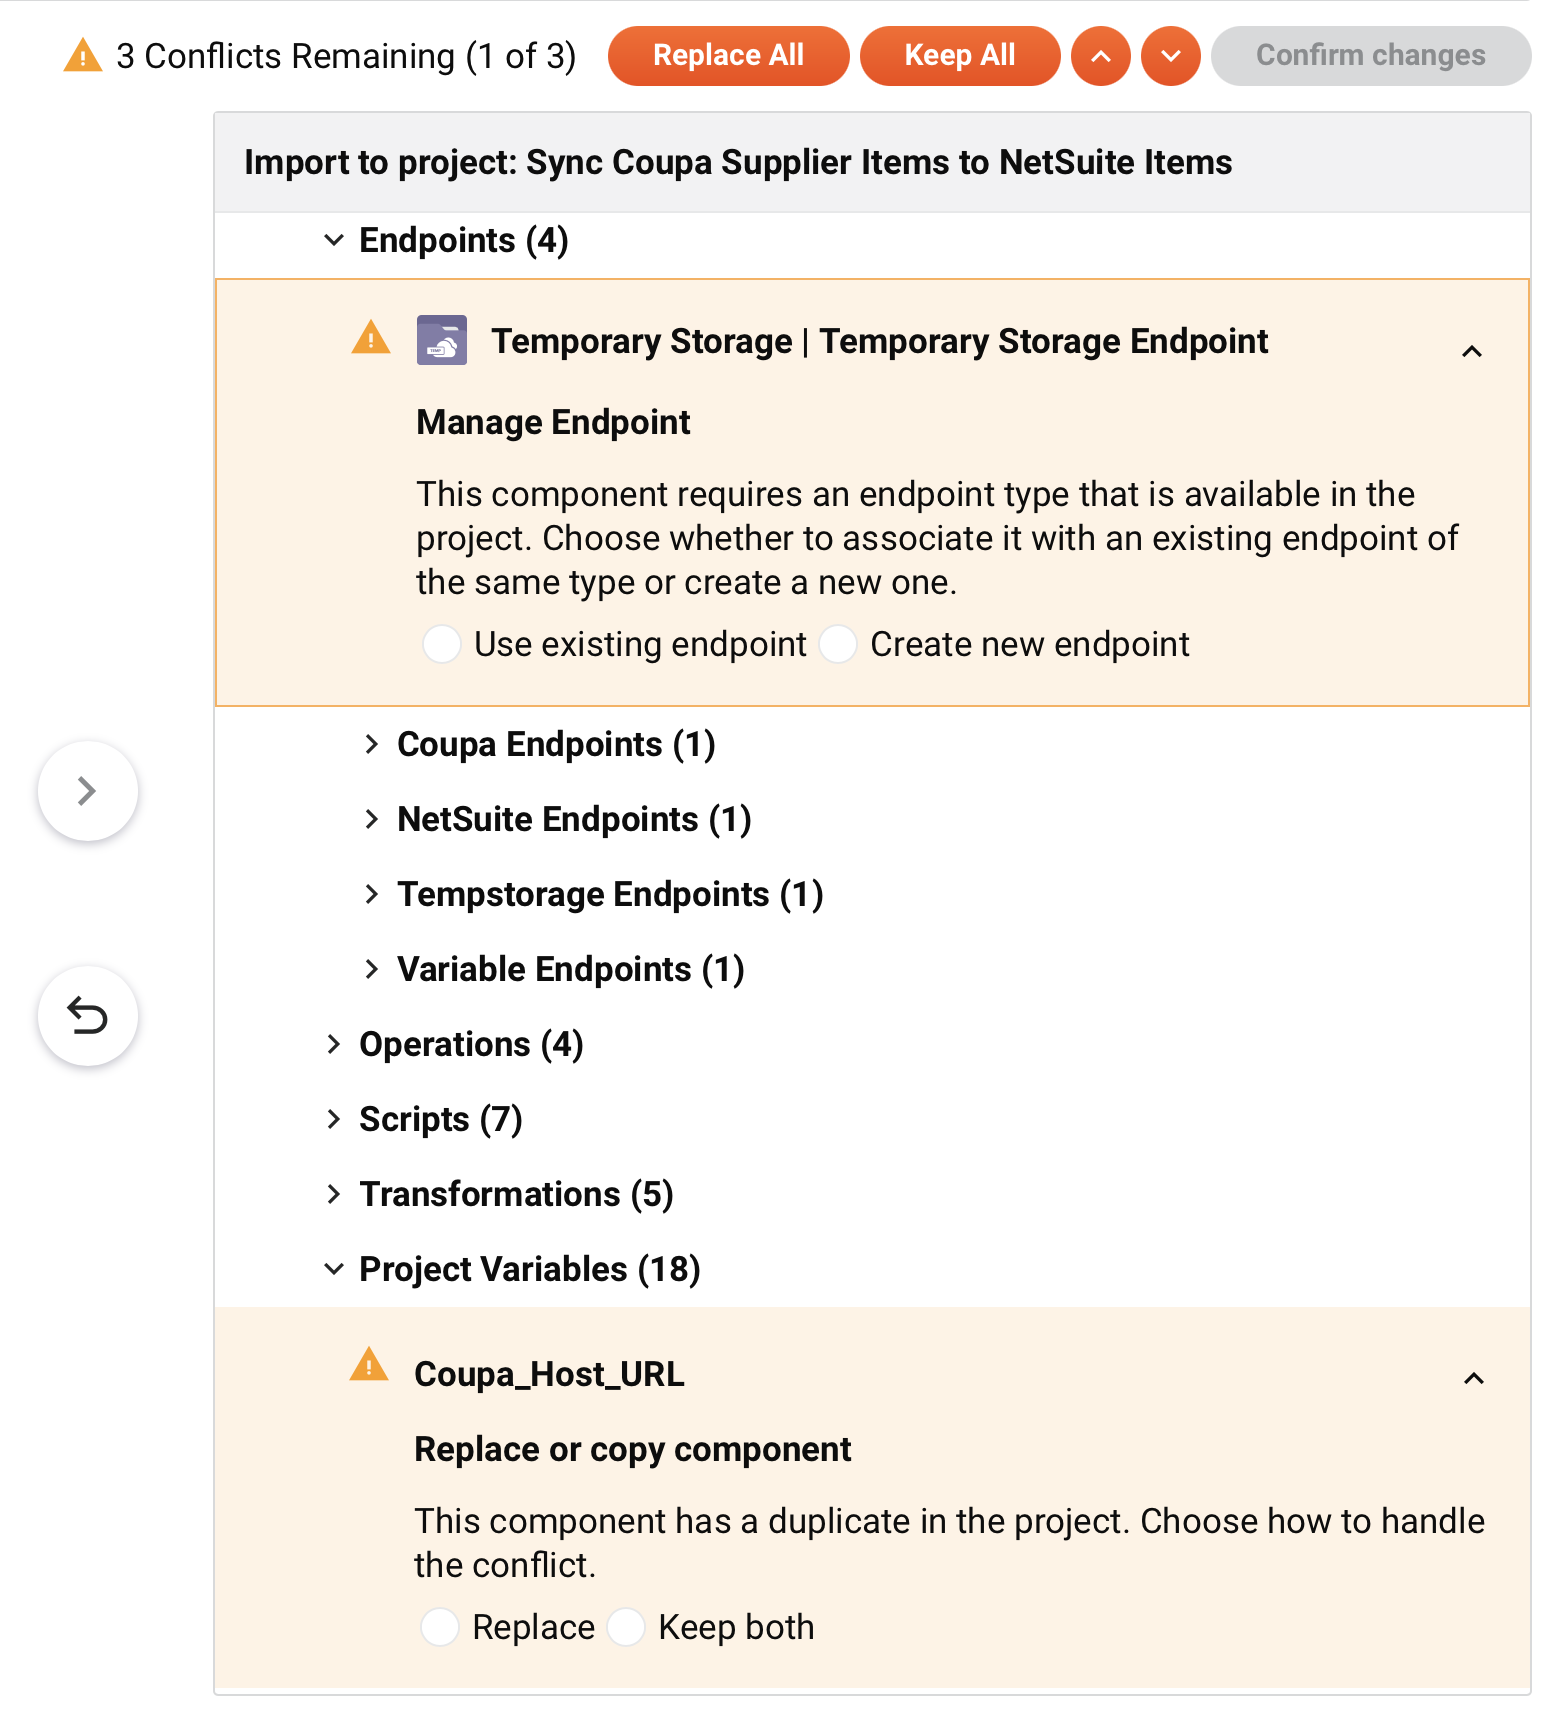
When present, conflicts must be resolved to complete the import. Use the up and down arrows to navigate to each conflict.
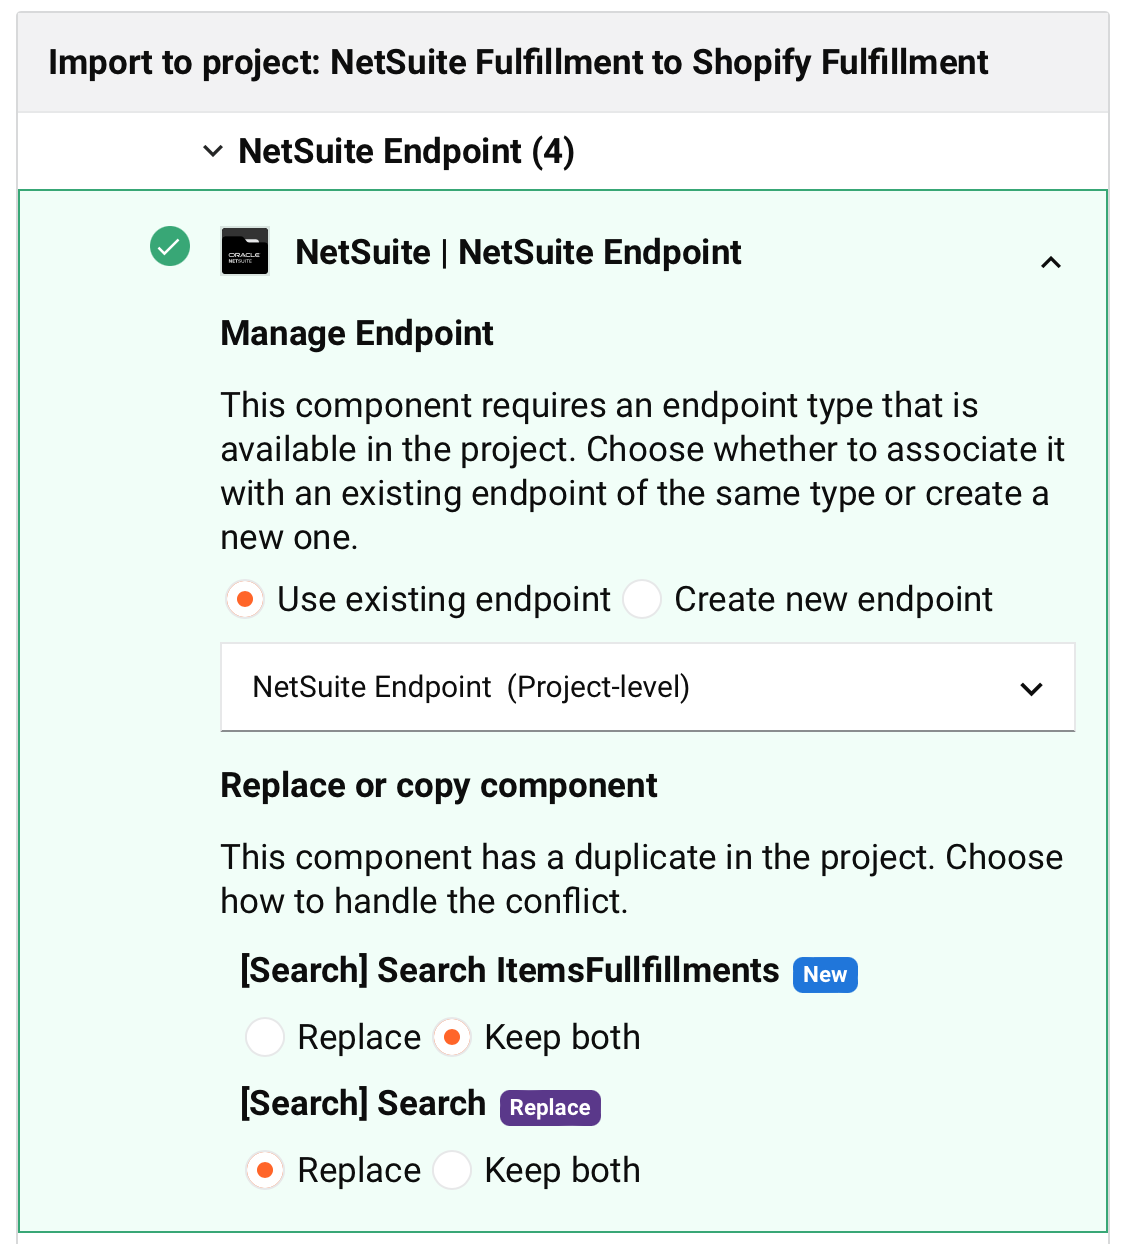
Endpoints with conflicts have these actions:
-
Use existing endpoint: Select to use an endpoint that is configured in the project currently being accessed. Use the menu to select the existing endpoint.
-
Replace or copy component: If the project's existing endpoint and the imported endpoint both have the same activity type with matching names, these options become available:
-
Replace: Select to replace the existing activity type with the activity type being imported.
-
Keep both: Select to keep both endpoint activity types as independent components. The name of the component being imported is appended with an incremented number in parentheses.
-
-
-
Create new endpoint: Select to create a new endpoint in the project currently being accessed. Use the menu to select Global (see Global Endpoints) or Project-level.
All components with conflicts (except endpoints) have these actions:
-
Replace: Replaces the existing component with the component being imported. Imported components being used as a replacement are indicated with a purple Replace icon:

-
Keep both: Keeps both components. The name of the component being imported is appended with an incremented number in parentheses. These components are visually indicated with a blue New icon:

For conflicting components that include content or configuration differences, a View changes button appears next to the conflict. Click View changes to open a diff view that shows the component's content or configuration in the project currently being accessed compared to the incoming component. The diff view remains accessible before and after confirming conflict resolutions, and is available again if you click Edit changes. The button appears only when differences exist.
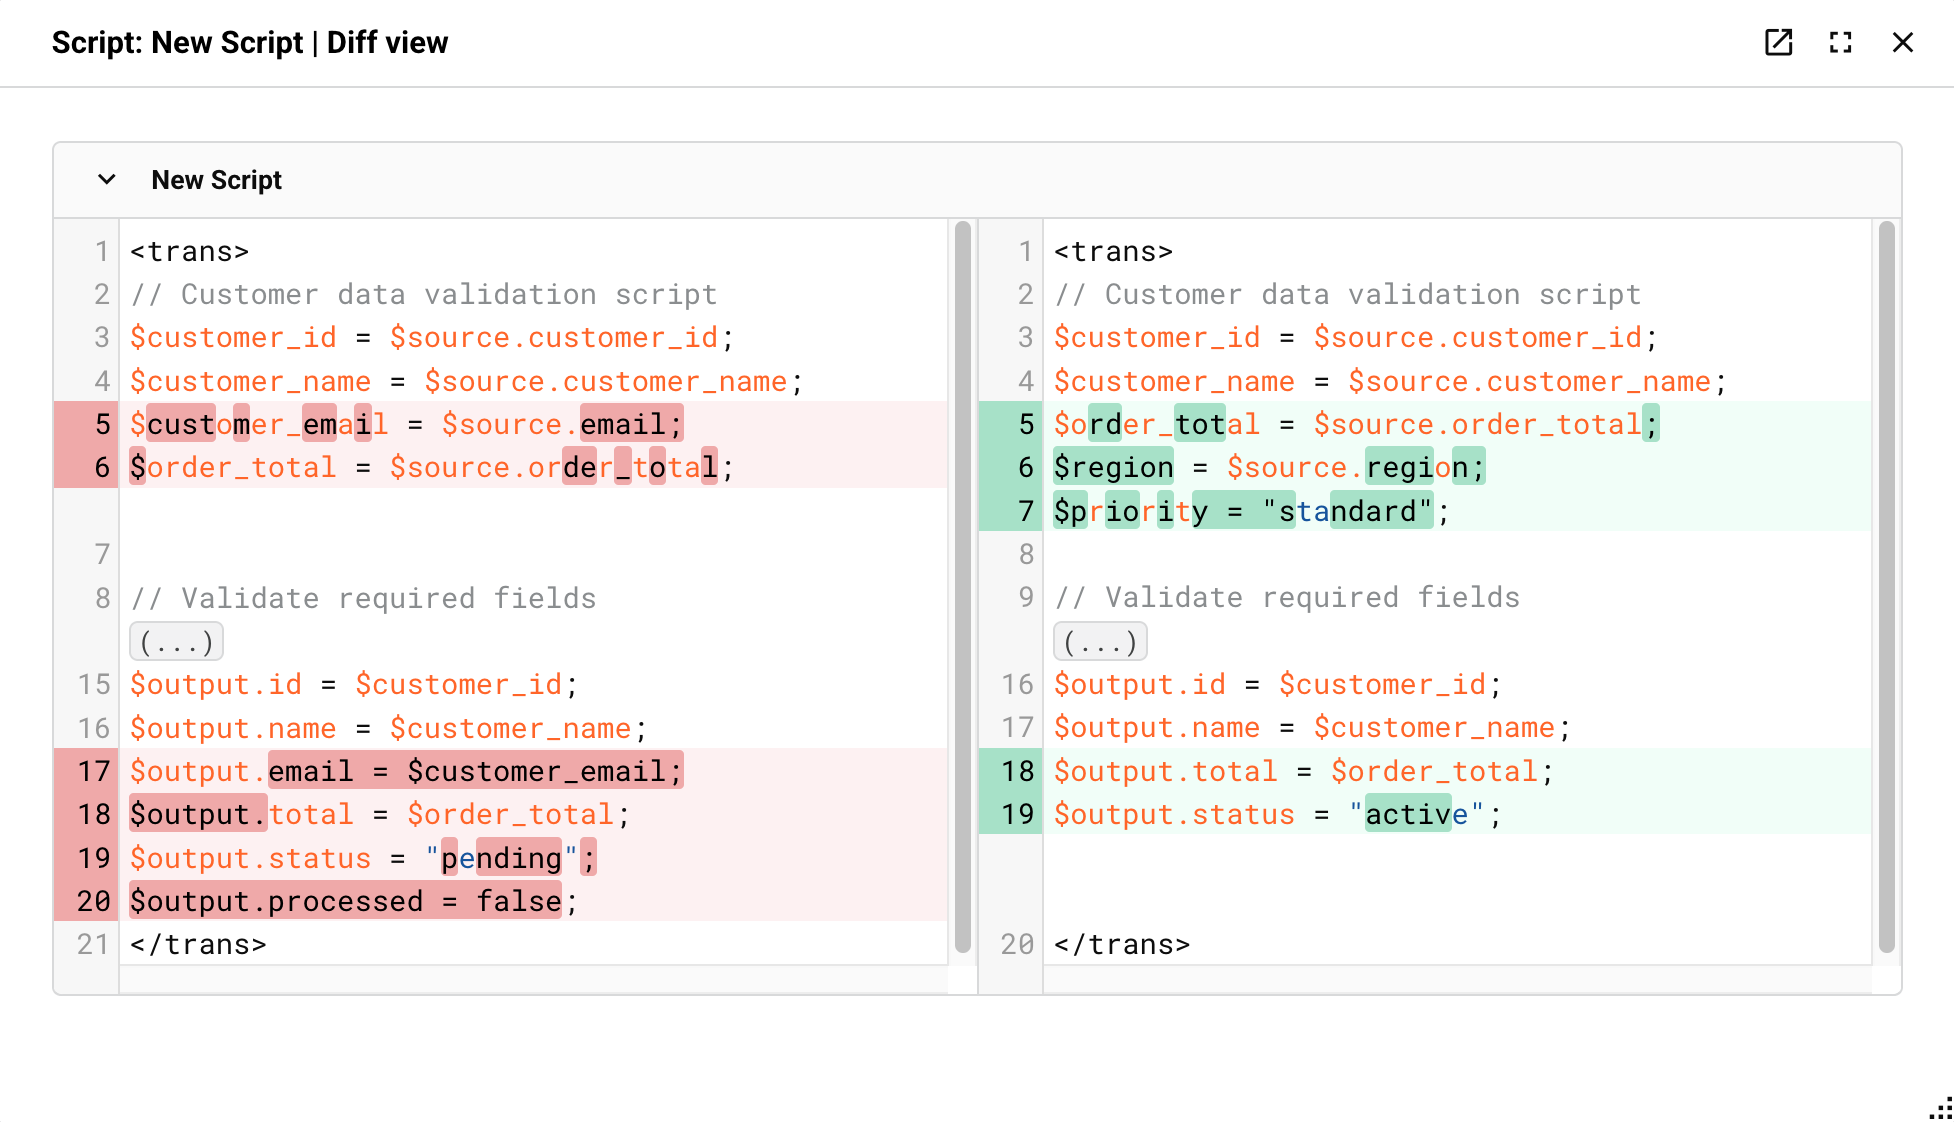
The diff view title bar displays the component type and name (for example, "Decision: Decision" or "Operation: Bulk Insert"). The following controls are available in the title bar:
- Pop-out: Opens the diff view in a new popup window. Click again to return it to the inline position.
- Maximize / Restore: Expands the diff view to fill the available screen space or returns it to its default size.
- Close: Closes the diff view.
You can drag the diff view by its title bar to reposition it anywhere on the screen, and resize it by dragging its edges or corners. A vertical scrollbar is available when the diff contains many changes.
The diff view uses one of the following formats, depending on the component type:
-
Code diff view: Used for scripts and transformations. Shows two panels side by side:
-
Left panel: Shows the content of the component in the project currently being accessed. Removed lines are highlighted in red.
-
Right panel: Shows the content of the incoming component. Added lines are highlighted in green.
For transformations, each changed mapping rule appears as a collapsible section labeled with the field path (for example, "Mapping rule json/isActive"). Click the caret to expand or collapse individual sections.
-
-
Field comparison diff view: Used for tools, email notifications, operations (including their schedules, actions, and options), project variables, connector endpoints, and connector activities. Shows a table with Name, Before, and After columns listing each changed field:
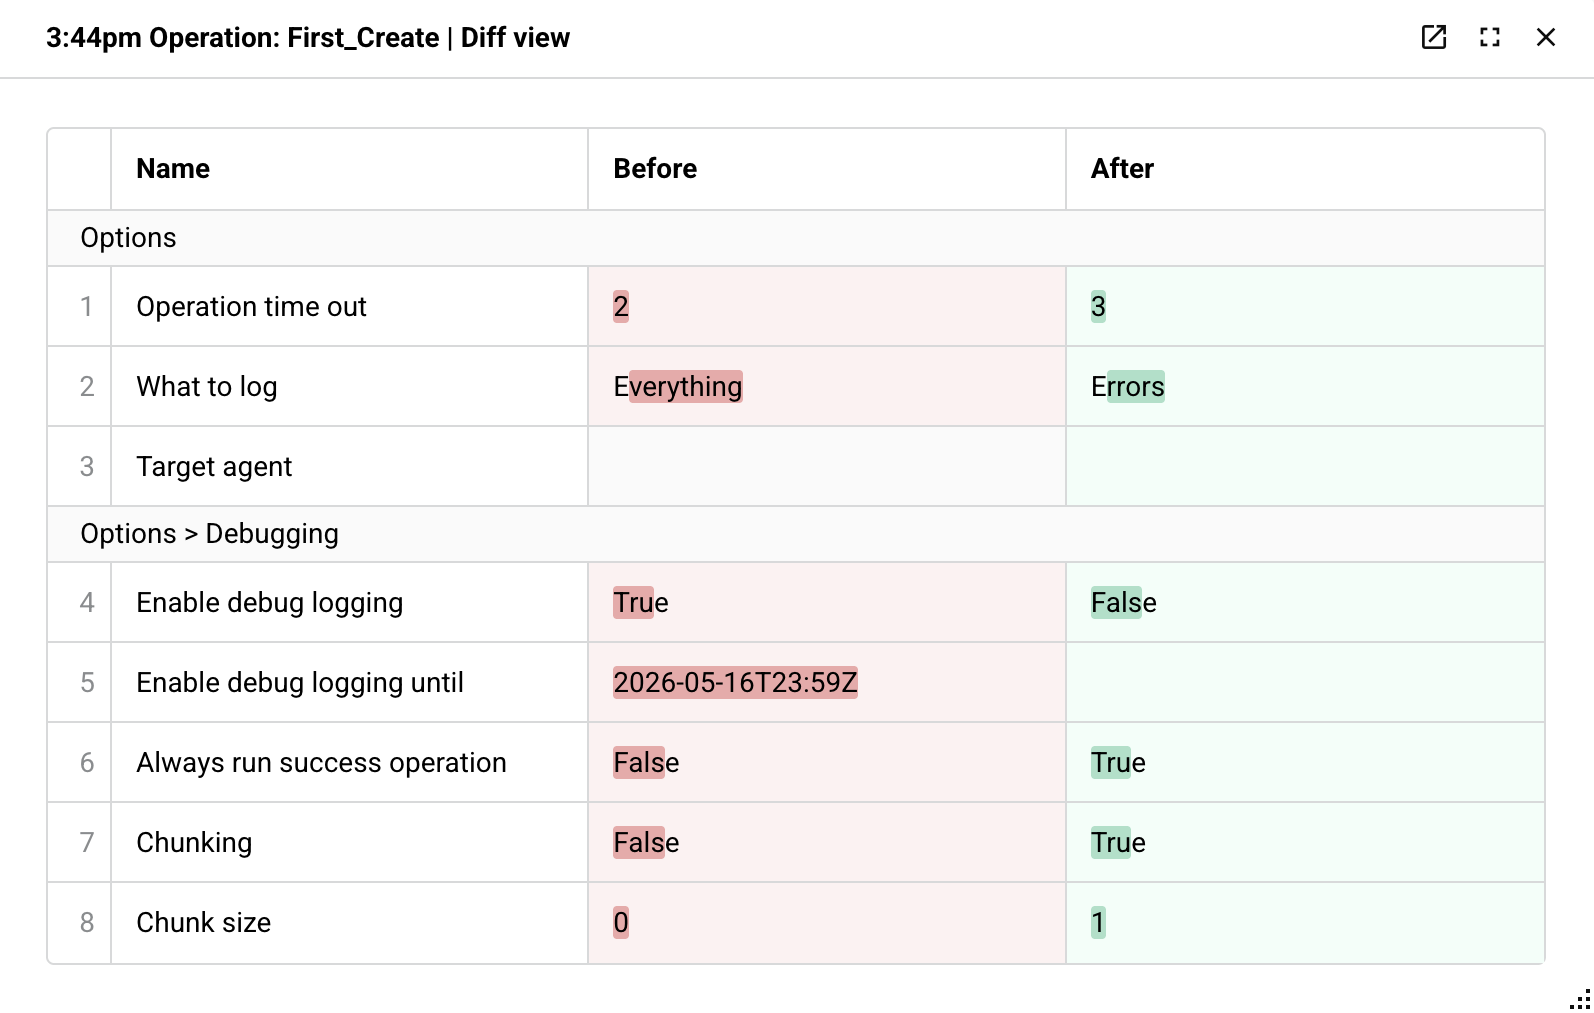
A changed row is tinted red in the Before column and green in the After column, and the specific characters or words that changed within a value are highlighted more strongly. Related fields are grouped under section headers, such as the individual conditions of a Decision tool, the nested option groups of a connector endpoint, or the steps of an operation. A field whose value references a project variable or global variable displays as a linked reference showing the variable name rather than its literal value. A credential field, such as a password or security token, is masked in the Before and After columns.
A field whose name or value is too long to display in the table, or whose value is an object or array (shown as a JSON string), includes an expand icon. Click the icon to open an inline diff of that field's content, shown as a code diff with removed lines highlighted in red and added lines highlighted in green.
For a connector activity that queries or retrieves data, a Response field can show the response schema as an expandable tree. Fields added to the schema are highlighted in green.
For a connector endpoint conflict, this same field comparison diff view is available from the View changes button next to the activity listed under Replace or copy component (described above).
A Steps row lists the activities used by an operation, and an Operation row lists the operation referenced by a Decision or Invoke Operation tool. When a referenced activity or operation shares a name with a component already in the project currently being accessed, "(source project)" is appended to its name in the After column, to distinguish the incoming component from the existing one of the same name.
Note
The Operation row for an incoming Decision or Invoke Operation tool only appears in the diff view if you also import the operation it references from the source project.
If a referenced activity or operation is itself a conflict and you resolve it to reuse the existing component in the project, the After column updates to show the name the incoming component will actually have once imported.
Important
If you change a conflict resolution after already viewing its diff, close and reopen the diff view to see the updated comparison.
Note
The rows shown for a connector activity reflect its underlying configuration properties, which do not always align one-to-one with the activity's step-based configuration screens. For example, the Salesforce Query activity presents several configuration steps that all update a single underlying query property, so editing fields across multiple steps in the activity can appear as a single changed row in the diff.
These actions are enabled only when changes are made to conflicts:
-
Replace All: Click to bulk-select Replace (described above) for all component conflicts.
-
Keep All: Click to bulk-select Keep both (described above) for all component conflicts.
-
Confirm changes: Enabled only when an action is selected for all conflicts. Click to save selected conflict actions. Once clicked, the Finish button is enabled.
-
Edit changes: (Visible after clicking Confirm changes.) Click to edit the conflict resolutions.
-
-
Reset all: Resets the project to its original state, removing any new or replaced components from the Import to project panel.
-
Cancel: Click to cancel the import process and return to the project.
-
Prev / Next:
-
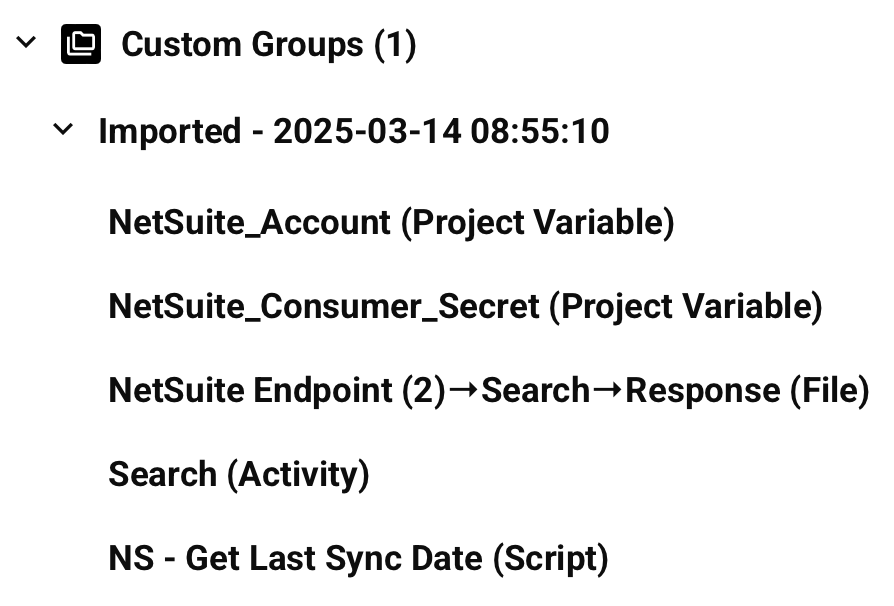
Import: Click to import the components and return to the project. Imported components are categorized into a custom group named Imported appended with the date and time of the import (in
YYYY-MM-DD HH:MM:SSformat):