Create and configure a project in Jitterbit Studio
Introduction
A project is a collection of one or more workflows that comprise and execute an integration use case. Projects are the "container" for operations that are organized into workflows, as well as other project components that may be part of an operation or exist elsewhere in the project.
This page describes how to create and configure a new project from within Studio, how to open an existing project, how to edit the configuration settings of existing projects, and how to delete existing projects.
New Studio projects can also be created by using Studio integration recipes or Studio process templates provided through Jitterbit Marketplace. For information on creating a new Studio project from Marketplace, see Start a recipe or template project.
Create a new project
New projects are created from the Projects page. This page contains a repository of accessible Studio projects. If no projects are accessible in the selected organization, none are listed.
To create a new Studio project, click New Project:

On clicking New Project, the project configuration screen opens. Five tabs are available: General tab, User roles tab, Designer tab, Deploy tab, and Advanced tab.
Note that a project is not automatically deployed after creation (see Project deployment).
For information on making changes to the project's configuration after it is created, see Edit project settings later on this page.
Note
Settings in the Deploy and Advanced tabs (described below) can be set only by users with a combination of the organization role Admin permission and environment Write access (see Harmony permissions and access). For users without the appropriate role permission, this message is displayed: "There is no requirement provided by your organization."
General tab
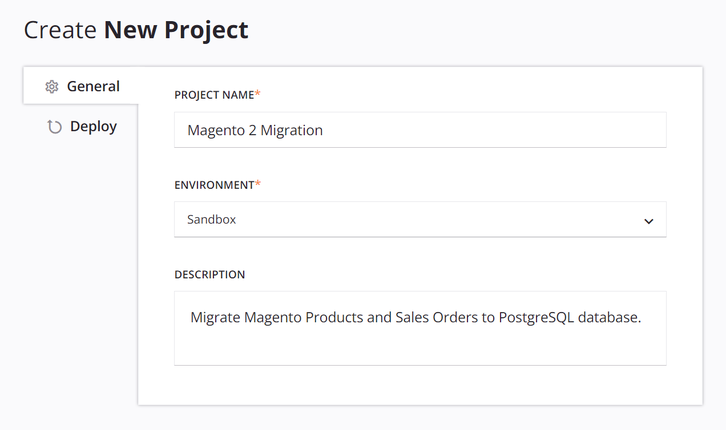
This tab has the following settings:
-
Project name: Enter a name to use to identify the project. The project name must be unique for each environment, and cannot already be in use as a Design Studio project name in the same environment. If a project with the same name already exists in the Harmony cloud, go to the Management Console > Projects page to manage the deployed project.
Tip
When renaming a project that has previously been deployed, the new project name is automatically reflected in the Harmony cloud without requiring a redeploy.
-
Environment: Use the dropdown to select an existing environment where you want to create the project. Organization administrators can set up new environments through the Management Console > Environments page.
Tip
If you do not see a newly created environment available to select, refresh the Projects page to force a reloading of environments.
When editing a project's settings, note that the environment cannot be changed. However, the project can be transferred to another environment.
-
Description: Enter an optional description for the project. This description will appear in the Projects page and may be useful to help project collaborators understand the project.
When editing a project's settings, this information is available in the General tab:
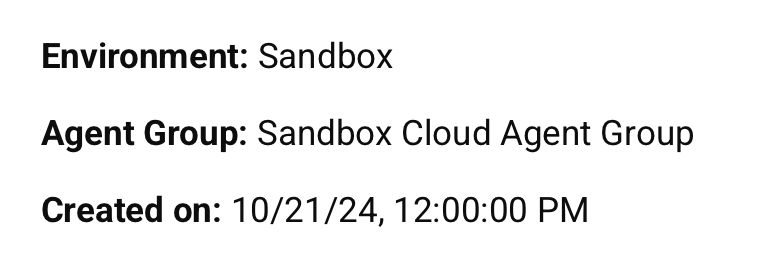
-
Environment: The environment that the project resides within (specified during project creation or transfer).
-
Agent Group: The agent group associated with the environment that the project resides within (specified in the Management Console).
-
Created on: The date and time that the project was created.
User roles tab
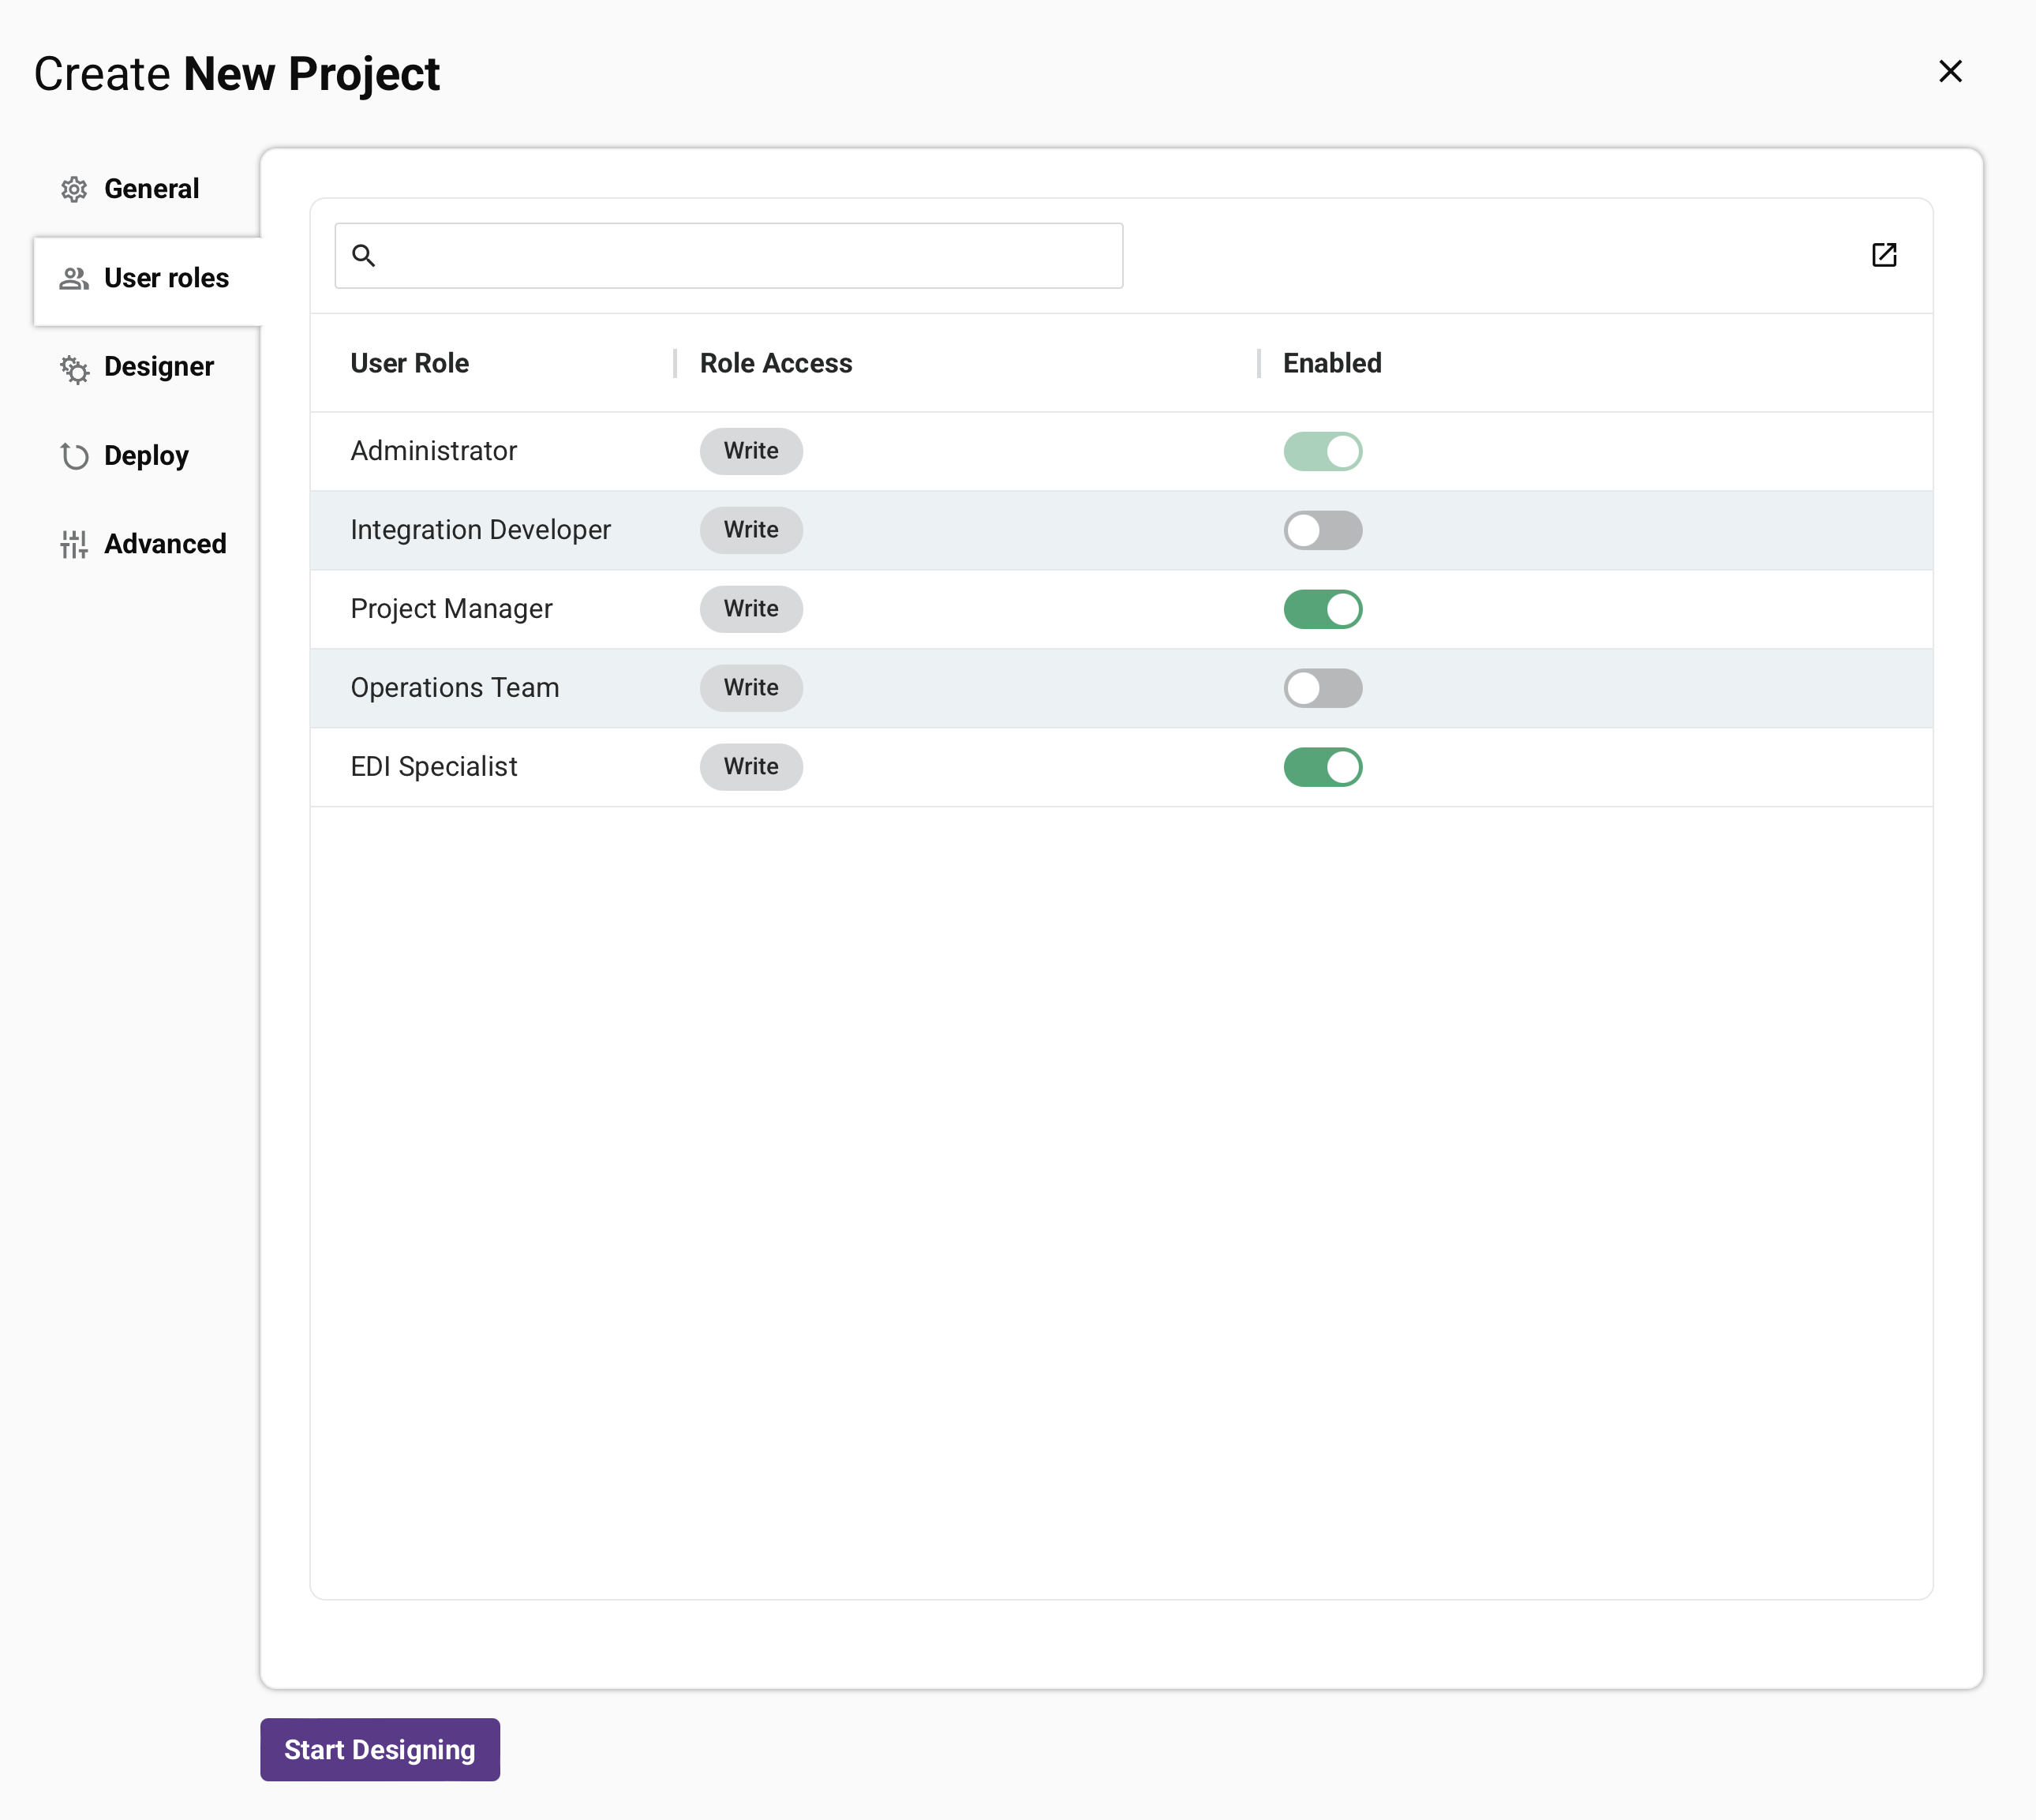
The User roles tab controls which roles can see the project in the Projects page in Studio and the Projects page in the Management Console. The tab contains a search box and a table with the following columns:
-
User Role: Lists roles in the organization. The roles that appear depend on your role membership, as described below.
-
Role Access: The highest access level that the role has in the environment. Possible values are View Logs, Read, Execute, and Write.
-
Enabled: A toggle that controls whether the project is visible in the Projects page in Studio and the Management Console Projects page for members of that role.
When a new project is created, all roles that the creating user is a member of are enabled by default, along with the Administrator role, which is always enabled.
The roles that appear in the table and whether their Enabled setting can be toggled depend on your role membership. To modify Enabled toggles, users must have environment access of Write. Users with View Logs, Read, or Execute environment access can view the tab but cannot edit it.
-
If you are a member of a role with Admin permission, the table lists all roles in the organization that have at least View Logs access to the environment, with the Administrator role always listed first. All toggles can be toggled, except for the Administrator role and the last role you are a member of.
-
If you are not a member of a role with Admin permission, only the roles you belong to appear in the table. If you belong to exactly one role, its toggle is enabled and cannot be changed. If you belong to more than one role, their toggles can be toggled individually, but at least one must always remain enabled.
The Administrator role is always shown with its toggle permanently enabled.
Changes to role visibility settings take effect immediately and do not require a project deployment.
Note
When a project is transferred to another environment, all roles that the transferring user is a member of that have access to the target environment are enabled by default. When transferring into an existing project, those roles are enabled in addition to any roles already enabled in the target project.
Designer tab
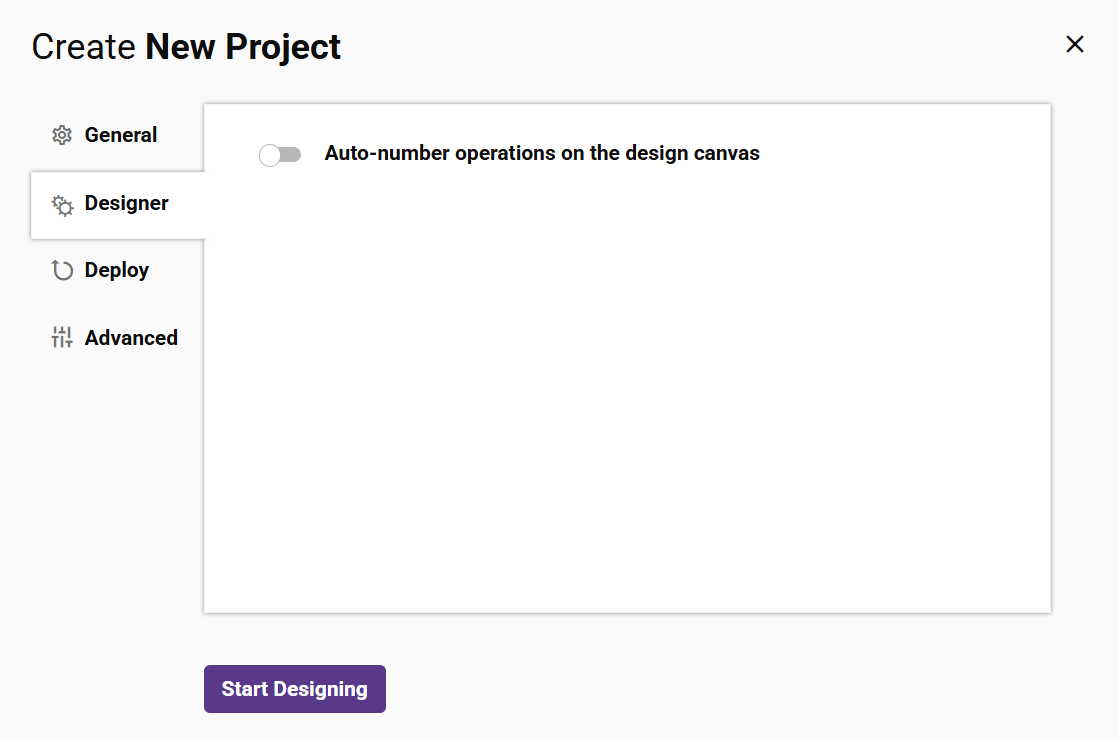
This tab has the following settings:
- Auto-number operations on the design canvas: Select to show a sequential number preceding each operation name on the design canvas. Operation numbers correspond with the workflow each operation is in. For example, in workflow 2.0, operations are auto-numbered 2.0, 2.1, 2.2, and so forth. Auto-numbering is displayed only at design time; the numbers do not appear as part of the operation name in operation logs.
Deploy tab
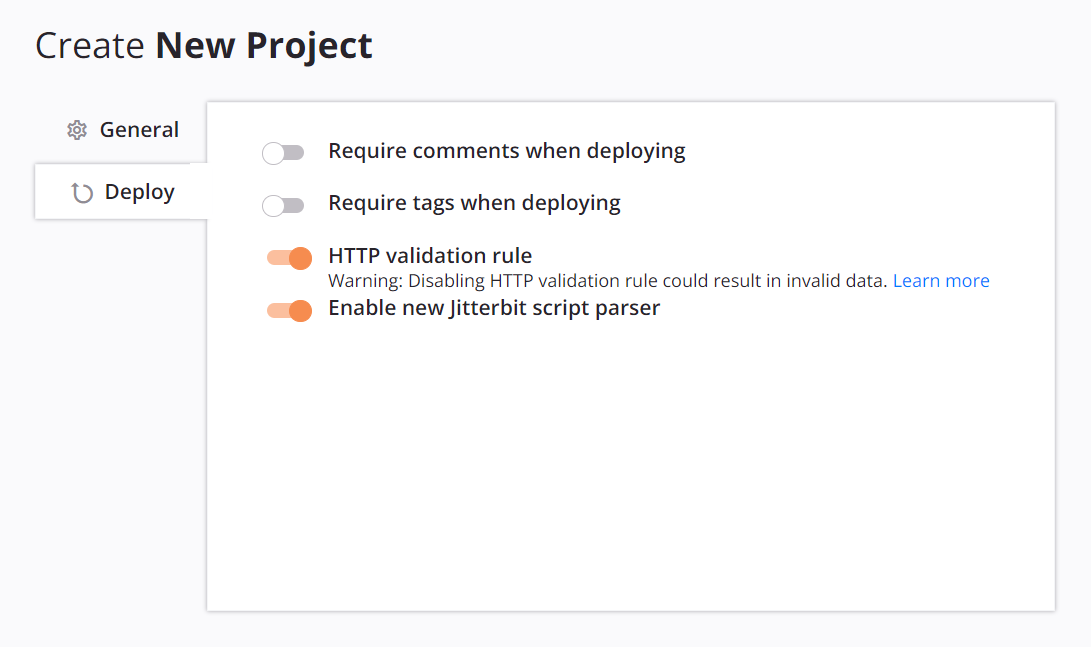
This tab has the following settings:
- Require comments when deploying: Select to require that each time this project is deployed, a dialog is presented that requires a comment to be added.
- Require tags when deploying: Select to require that each time this project is deployed, a dialog is presented that requires a tag to be added.
- HTTP validation rule: Enabled by default. Disabling this setting is not normally required. For more information see HTTP validation rule errors in Operation design troubleshooting.
Advanced tab
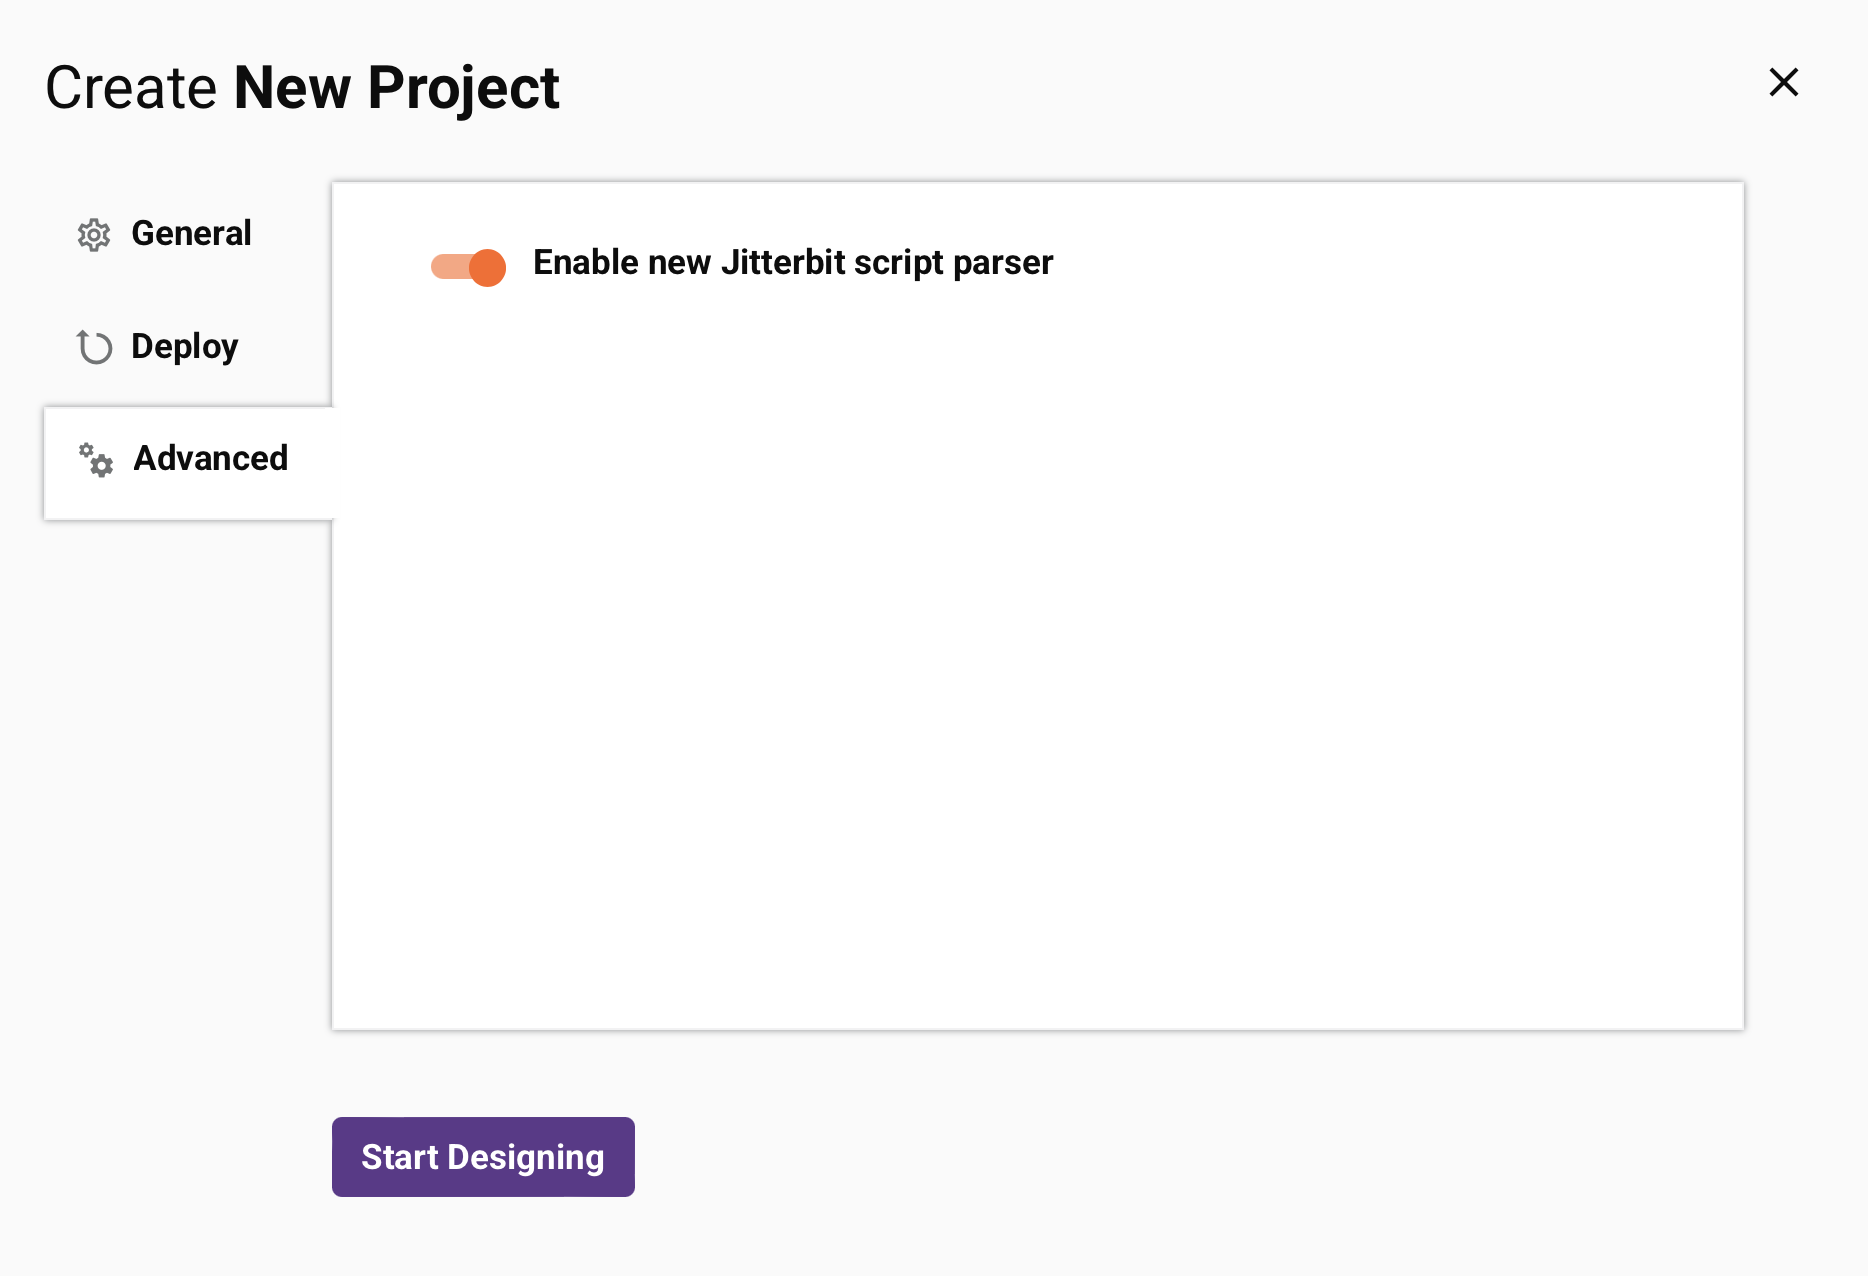
This tab has the following settings:
-
Enable new Jitterbit script parser: Enabled by default as of the 10.68 / 11.6 release. Disabling this setting is not normally required and is advised only if you experience unexpected script output.
-
Enable full line code completion suggestion in Jitterbit script editor: Enable AI-generated line suggestions when editing Jitterbit scripts. This setting is disabled by default. If the corresponding organization policy is disabled, this setting is also disabled and cannot be enabled.
-
Preserve JSON names: Determines which schema processing method is used during project design and runtime, either Preserve JSON names processing (enabled), or legacy JSON processing (disabled). The version used by default depends on when the project was created and the agent version in use:
-
Preserve JSON names processing: The default for projects created after the 11.48 Harmony release and running on agent version 11.48 or later.
-
Legacy JSON processing: The default for projects created prior to the 11.48 Harmony release or those running on agent version 11.47 or earlier. The setting Preserve JSON names can be enabled in such projects once the agent version is upgraded to 11.48 or later.
-
Important
When enabling this setting, note that the Preserve JSON names processing is used only for operations and schemas configured after the enablement. When enabling this feature, it is recommended that all operations and schemas are reconfigured, as using both schema processing methods within a single project may cause inconsistencies within the project.
Open an existing project
Existing projects are displayed in the Projects page filtered by environment. Only projects that your role has visibility enabled for are shown (see User roles tab). Use the environment dropdown to select a different environment for your selected organization.
Tip
The available environments are for your selected organization. The selected organization can be changed in the top navigation bar (see Changing the selected organization in Harmony portal).
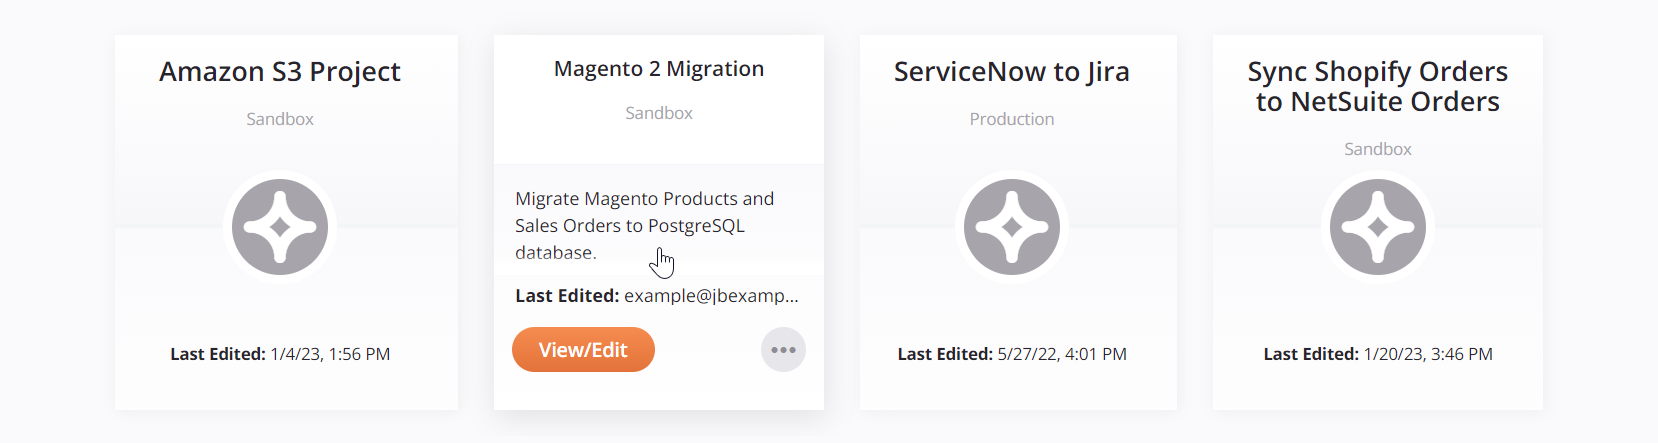
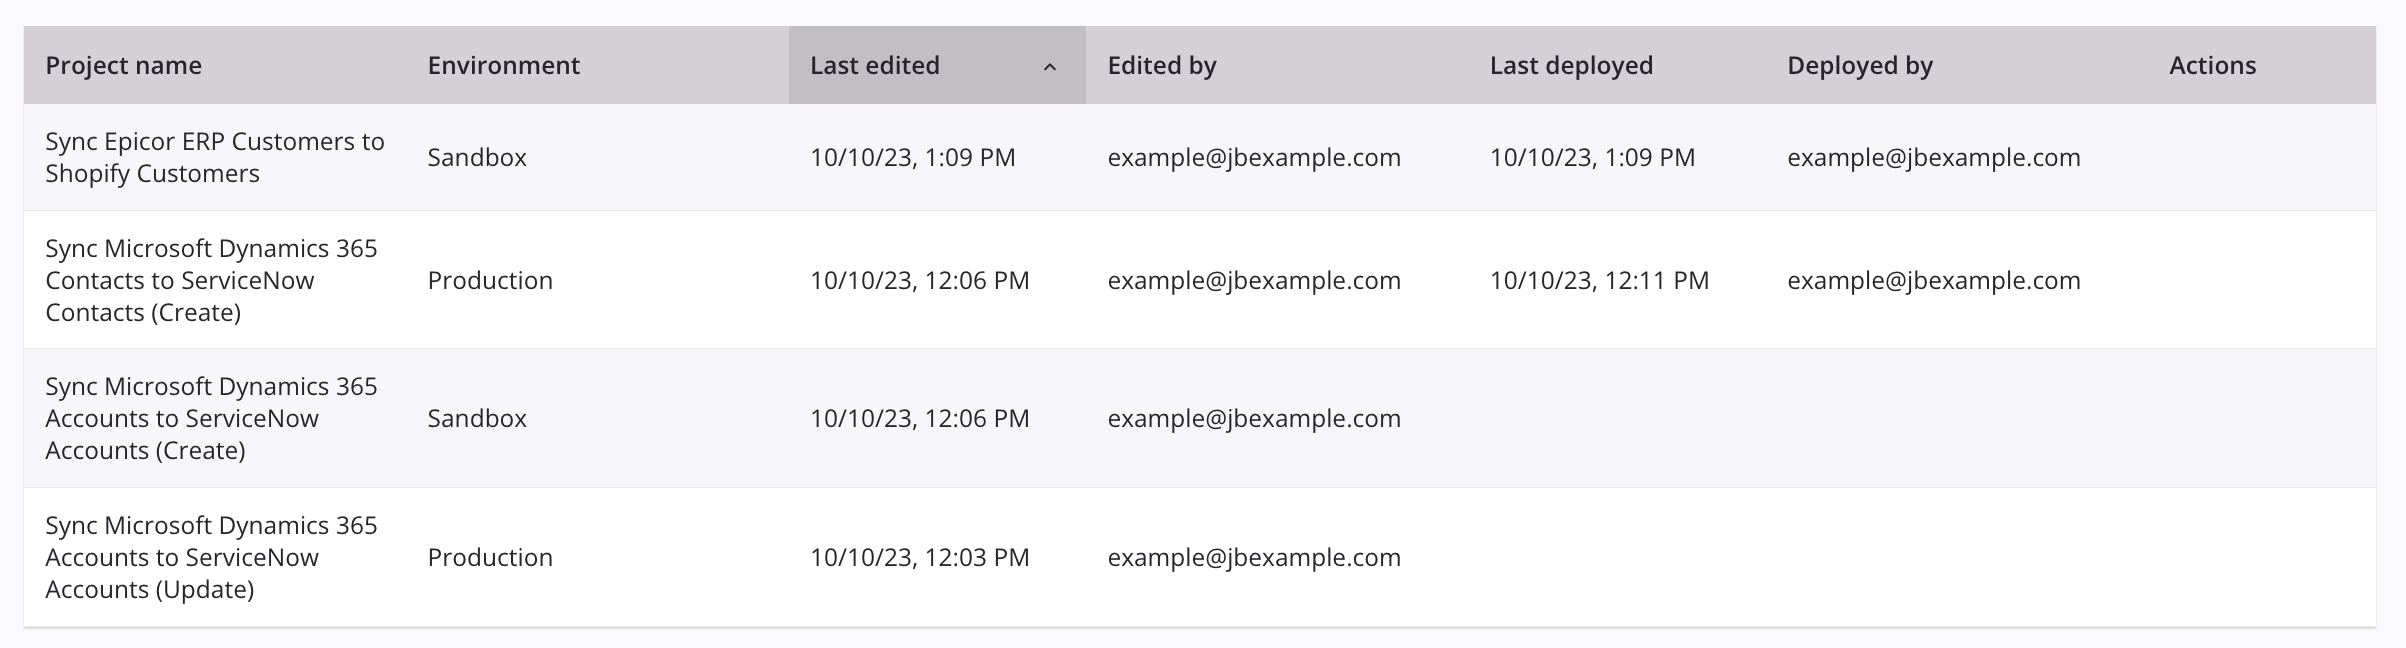
Existing projects can be opened from either project card view or project list view. For details on all available options available in each of these views, see Projects.
-
Project card view: Click the card view icon to enter card view. Then hover over a project card and select View/Edit to open the project in the project designer:
-
Project list view: Click the list view icon to enter list view. Then hover over the empty cell in the Actions column and click the edit icon to open the project in the project designer:
Edit project settings
A project is first configured during project creation, covered earlier on this page. After a project is created, you can edit the project settings to make changes to the project name, description, or role visibility, or to export or delete the project.
The Project settings option is accessible from the Projects page and the project toolbar.
This opens the project configuration screen. Five tabs are available, as described above, and these additional options:

-
Save: Saves and closes the project configuration. This button will be enabled only after you have made changes to existing settings.
-
Cancel: Closes the project configuration without saving.
-
Export: Generates and initiates a download of a JSON file of the Studio project. A project export can be used, for example, as a project backup or to share a copy of the project. For details, see Project exports and imports.
-
Move to trash: Removes the project from the environment in Studio and the Harmony cloud. Projects can be restored up to 90 days after being moved to trash. After 90 days, the project is permanently deleted and cannot be restored (see Delete and restore a project later on this page).
Delete and restore a project
You can delete, restore, or permanently delete a project from the Projects page.
The Move to trash option is accessible from these locations:
- The project settings (see Edit project settings earlier on this page).
- The Projects page (see Card view or List view in Projects).
On clicking Move to trash, a confirmation message asks you to confirm that you want to move the project to the trash:
Dialog text
Example project will be moved to trash.
This project will be permanently deleted after 90 days. The project history cannot be restored.
The Restore and Delete Permanently options are accessible from the Projects page (see Card view or List view in Projects).
On clicking Delete Permanently, a confirmation message asks you to confirm that you want to permanently delete the project:
Dialog text
Example project will be deleted permanently and will not be recoverable.
Please type "DELETE" to confirm:
You must type the word DELETE to enable the Delete button.
Troubleshooting
Common reasons you may not be able to delete a project are that the project has dependent projects or that the project has operations with an incomplete status.
Transferred projects
If the project you are attempting to delete has been transferred, it cannot be deleted until you first delete all projects farther down the transfer chain (see Transfer chains in Transfer a project). After clicking Delete in the Delete Forever dialog, a second dialog indicates that the project cannot be deleted and includes the names and environments of the transferred projects preventing deletion:
Dialog text
This project cannot be deleted because it has been mirgrated to one or more other environments. In order to delete this project, you must delete these related projects:
-
Environment: Example env 1
- Project: Example project 1
-
Environment: Example env 2
- Project: Example project 2
To resolve, first delete all projects farther down that transfer chain (listed in the dialog), and then try to delete the original project again.
Operations with an incomplete status
Projects with submitted operations that are in an incomplete status cannot be moved to the trash. If the project you are attempting to move to the trash has any operations in an incomplete status, including Submitted, Received, Pending, Running, Cancel Requested, or Delayed Status, an error message will be returned.
To resolve, you can cancel incomplete operations from these locations:
- The operation (see operation status in Design canvas).
- The operation log table.
- The Runtime page of the Management Console.