Menu supports data object in Jitterbit App Builder
Menus support the ability to be driven by a data object. This feature supports the following:
- Dynamic labels, allowing things like "Welcome {{Username}}"
- Dynamic links, including binding criteria in those links
- Dynamic images like user profiles
- Conditional themes
- Visibility rules that could control visibility of menu items
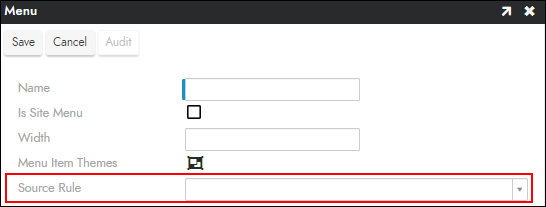
How to configure existing menu with a data object
- Select App Workbench > UI Layer - Menu.
- In the Menus panel, click the icon for the existing menu.
- In the Menu panel, click Edit.
- In the Source Rule field, select the data object to use.
- Click Save.
How to configure new menu with a data object
- Select App Workbench > UI Layer - Menu.
- Click + Menu on the Menus panel.
- Assign a Name for the menu. For example:
North Sales Menu. - Click the Menu Item Themes icon to configure any theme information for the menu.
- Select the appropriate data object from the Source Rule dropdown.
- Click Save.
After configuring the above information, if you are using a new menu instead of the default Application Menu, you also need to select it in the app settings:
- Go to the App Workbench.
- In the App Settings panel, click More > Edge Case.
- Click the Regions - Controls tab.
- Under Application Menu, Mobile Menu, or System Menu, select the new menu. The change applies immediately.
See Menu visibility for what each of these menus controls.
Apply a conditional theme to a menu item
A conditional theme sets the state or style of a menu item when a condition on a column in the menu's source rule is met. For example, you can hide a menu item when a Boolean column in the source rule is true. The menu must already have a Source Rule (see the previous sections).
To apply a conditional theme to a menu item, follow these steps:
-
Select App Workbench > UI Layer - Menu.
-
In the Menus panel, find the menu that has the source rule, then open the menu item you want to format, as described in Add menu items. If the item is new, save it first, because the Conditional Theme field appears only after the item is saved.
-
Click the Source Features tab.
-
Next to Conditional Theme, click the icon. The Styles dialog opens, listing any existing styles and conditional formats for the item.
-
Click + Conditional Formatting. The Apply a Style dialog opens.
-
Under Condition, configure when the theme applies:
-
Source Column: Select a column from the menu's source rule.
-
Operator: Select how to compare the column to the expression. For example:
=. The Expression field appears after you select an operator. -
Expression: Enter the value to compare against, or select another column from the source rule. For example:
true. -
Unconditional: Select to apply the settings regardless of any condition. This hides the other condition fields.
-
-
Under Settings, configure what happens when the condition is met:
-
State: Select Disabled, Enabled, or Hidden.
-
Style: Click Choose Style to select a style to apply. See How to use conditional formatting to change font color for an example of choosing a style.
-
-
Click Save. The conditional format appears in the Styles dialog. Close the dialog, then return to the application and refresh the browser to confirm the menu item behaves as expected.
How to insert an image in menu
There may be use cases where you want to display an image inside of a Menu. With this new feature you're able to display an image within the Menu region, and that image can be based on information stored in the data object you connect the Menu to. This example assumes you already have a data object with a Column that captures the image UUID information.
Note
Images can be stored in the data object as UUID, base64 string or binary column type with the image itself in there.

To locate a local stored image UUID
- Click Look & Feel in the top bar.
- Click the Images tab.
- Use the Collection dropdown to select the collection where you uploaded the image to be stored locally.
- In the Images panel, open the image you want to get the UUID value for.
- Select the part of the Relative URL value that appears following
/image/. For example:50e85d87-e283-4953-983f-0bc3e18b3a7e. - Copy the value to your clipboard.
- The UUID value is what you want to store in a column in the data object or rule that gets referenced from the menu.
To add an image to a menu from a data object
-
Select App Workbench > UI Layer - Menu.
-
In the Menus panel, select the menu to add the image to. The menu's Source Rule must be the data object or rule that contains the image column.
-
In the Menu Items panel, click + Menu Item.
-
On the Settings tab, confirm that Menu Control Types is set to Menu Item and enter a Name.
-
Click the Source Features tab.
-
Use the Source Column dropdown to select the column that contains the image. For example:
Avatar. -
Set Control Type to Image.
-
Click Save.
-
(Optional) In the Alignment column of the Menu Items panel, set the item's alignment. For example: Right.
-
Navigate back to the application UI layer, refresh your web browser, and check the results.
Additional information
If you're looking to add a custom logo image to an App, please see How to add a logo to an app