List control bindings in Jitterbit App Builder
You can use bindings to extend the behavior of List controls. Ordinarily, a List control on a panel only captures the key of the record a user selects from its dropdown, but through the use of bindings, you can configure it to also narrow down the dropdown's available records based on another field (a List filter), or pull additional column values from the selected record into the panel (a List retrieve).
List filter
A List filter narrows down the records available in a List control's dropdown based on the value of another field on the same panel. For example, on an Order panel, you could limit a Product list to only show products from the Supplier already selected elsewhere on the panel. To configure this, you bind the List control to a field that exists both in the panel's business object and in the List object itself.
How to configure a List filter
-
Open the desired page and select Action Drawer > Live Designer. Alternatively, open the desired page's edit screen by going to App Workbench > Pages.
-
If you're using the Live Designer, select the panel containing the List control and go to the All Controls tab. If you're in the App Workbench, select the panel containing the List control and click its Controls button.
-
Locate the List control. If you're in the Live Designer, click its Open record icon. If you're in the App Workbench, click its Open record icon. A dialog opens.
-
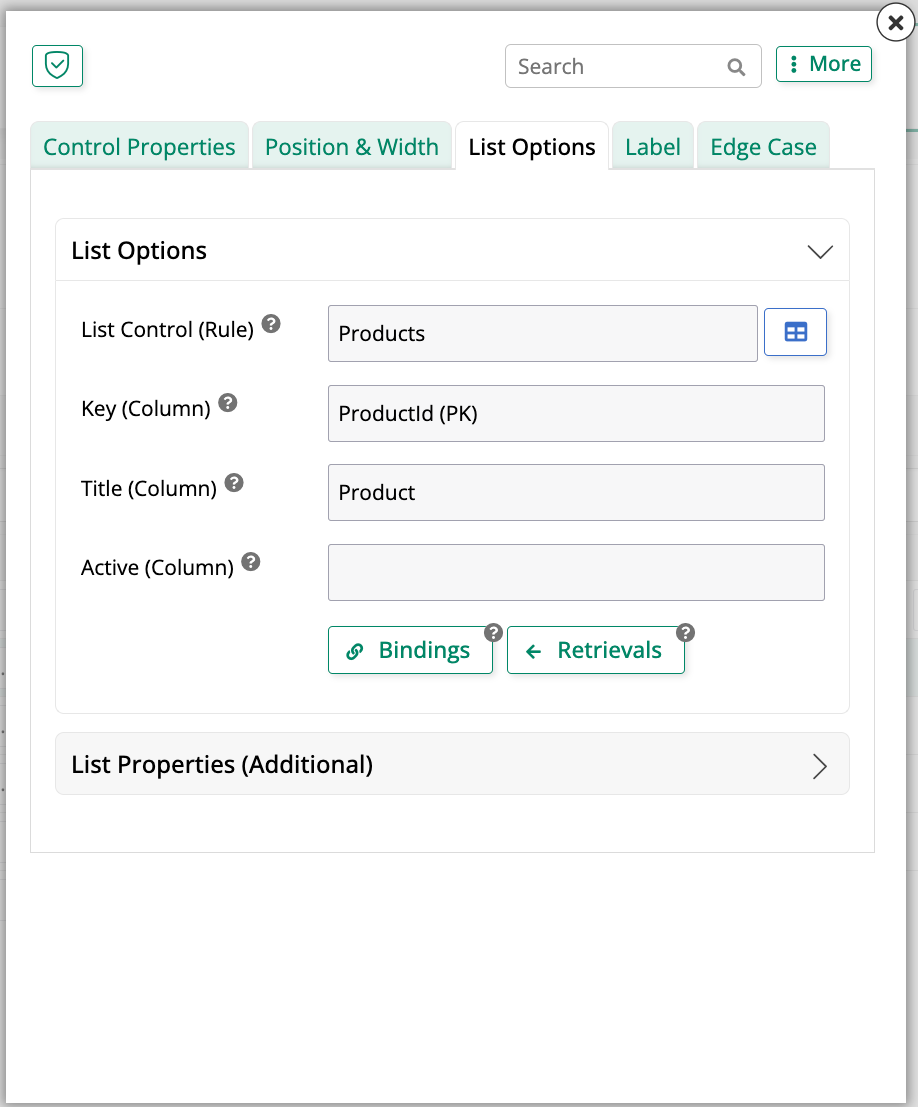
In the dialog, open the List Options tab (shown in screenshot).
-
In the List Options tab, click the Bindings button. A dialog opens.
Note
In App Builder 4.62 and earlier, this button appeared next to a Panel and List Interactions label and was called Filters.
-
In the Bindings dialog, click + Binding.
-
Select a Panel Column and a corresponding Control Column.
-
Click the save icon to save your changes.
-
Exit the dialog, refresh the application page, and test your filters.
List retrieve
A List retrieve pulls additional column values from the selected record into the current panel. For example, selecting a Product from a list could automatically retrieve its Unit Price into an Order record, saving users from having to look it up separately. To configure this, you add the extra columns to the List control's source rule, then map them to fields on the panel.
How to configure a List retrieve
-
Open the desired page and select Action Drawer > Live Designer. Alternatively, open the desired page's edit screen by going to App Workbench > Pages.
-
If you're using the Live Designer, select the panel containing the List control and go to the All Controls tab. If you're in the App Workbench, select the panel containing the List control and click its Controls button.
-
Locate the List control. If you're in the Live Designer, click its Open record icon. If you're in the App Workbench, click its Open record icon. A dialog opens:
-
In the dialog, open the List Options tab (shown in screenshot).
-
In the List Options tab, click the Retrievals button. A dialog opens.
Note
In App Builder 4.62 and earlier, this button appeared next to a Panel and List Interactions label.
-
In the Retrievals dialog, click + Retrieval.
Tip
This dialog also presents an Automap Columns button, which lets you automatically add a List retrieve entry for any List and Panel columns with the same name.
-
Select a Panel Column and a corresponding (List Source) Column.
-
Click the save icon to save your changes.
-
Exit the dialog, refresh the application page, and test it.
Once configured, selecting an item from the list will automatically populate the corresponding retrieved values on your panel.