Reach in Jitterbit App Builder
Reach is a rule purpose that implements Row-Level Security (RLS) in App Builder, restricting which rows of data are available to each user. It could keep a sales rep from seeing accounts outside their assigned territory, keep an employee from seeing data outside their region or division, or stop one customer in a multi-tenant application from ever seeing another's records.
Many Relational Database Management Systems (RDBMS) offer native support for row-level security, but Reach isn't built as a wrapper around that support. It's implemented directly by the App Builder business engine instead, so it behaves the same way no matter which database sits underneath.
This page defines how the feature works, including steps to create and register a Reach rule. Then, there are best practices, some worked examples, and a list of the feature's current limitations.
A complete walkthrough that builds a Reach rule with demo data and registers it on a business object is available in the Reach section of Introduction to App Builder - Appendix D: Security.
Definition
To use the Reach feature, three steps are necessary: creating a Reach rule, setting which token it will return, and registering that rule against a data object.
-
Create a Reach rule: A Reach rule is a business rule created with the Reach purpose. Just like other rule types, such as Default or Validation, Reach rules are fundamentally mvSQL queries under the hood. The job of a Reach rule is to determine which segments of data a given user can access, usually by calling the
who()orsession()mvSQL functions to tie that access back to whoever is currently signed in. See how to Create a Reach rule below. -
Set the Reach rule's token: Every Reach rule selects exactly one column to act as its Reach Token. This is set through that column's Column Usage Type field. Each row returned by the rule is one segment of data the current user can reach. If no rows are returned, that means the user has no access at all. See how to Set the Reach rule's token below.
Tokens usually identify a broad group (for instance, a geographic region), instead of a single record, because checking access segment-by-segment is far cheaper than row-by-row. A sales manager's token might be their region's ID, letting them pull reports for every customer in that territory rather than just one. Multi-tenant applications are a common exception: there, the token can point to the user's own customer row, since the customer itself is the segment being restricted.
The token doesn't need to live on the Reach rule's own target table. It can be pulled in from further up a relationship chain, through a join, as long as it still identifies a segment the restricted data object can be tied back to.
-
Register a Reach rule against a data object: A Reach rule has no effect until it's registered to a data object. A data object can carry more than one registration, in which case a user only sees rows that satisfy all of them at once. See Register a Reach rule below for instructions.
Create a Reach rule
To build a new Reach rule from scratch:
-
In App Workbench > Rules, click + Rule. The Rule Builder opens.
-
Following App Builder's naming conventions, name the rule using the pattern
TableName (Reach) Descriptor. -
In the Purpose field, scroll down to Reach under Edge Case and select it.
-
In the Target field, select the table the rule should query.
-
Click Create.
Set the Reach rule's token
Once you've created a Reach rule, you need to set its token. The token identifies the segments of data a user is shown.
-
Access the Reach rule's Rule Builder.
-
In the Where tab, add a clause that ties the current user to the data they can access, typically with the
who()function. If the table doesn't already have a column linking a row to an App Builder user, add one, along with a control so it can be set from the UI. -
In the Columns tab, add the column that identifies the accessible segment, then double-click it and set its Column Usage Type to Reach Token.
-
Click Results in the Rule panel to confirm the rule returns the segments you expect.
Register a Reach rule
Once the rule exists, attach it to whichever data object you want it to restrict:
-
Navigate to the Rule panel of the business object you want to restrict.
Note
A Reach rule can only be registered to a business object built on the same physical table or view it targets, not directly to a table. See Best practices and recommendations below for a pattern that applies a Reach rule to an entire table.
-
Click More > Edge Case. The Edge Case Settings dialog opens.
-
Click Reach. The Reach Registration dialog opens.
-
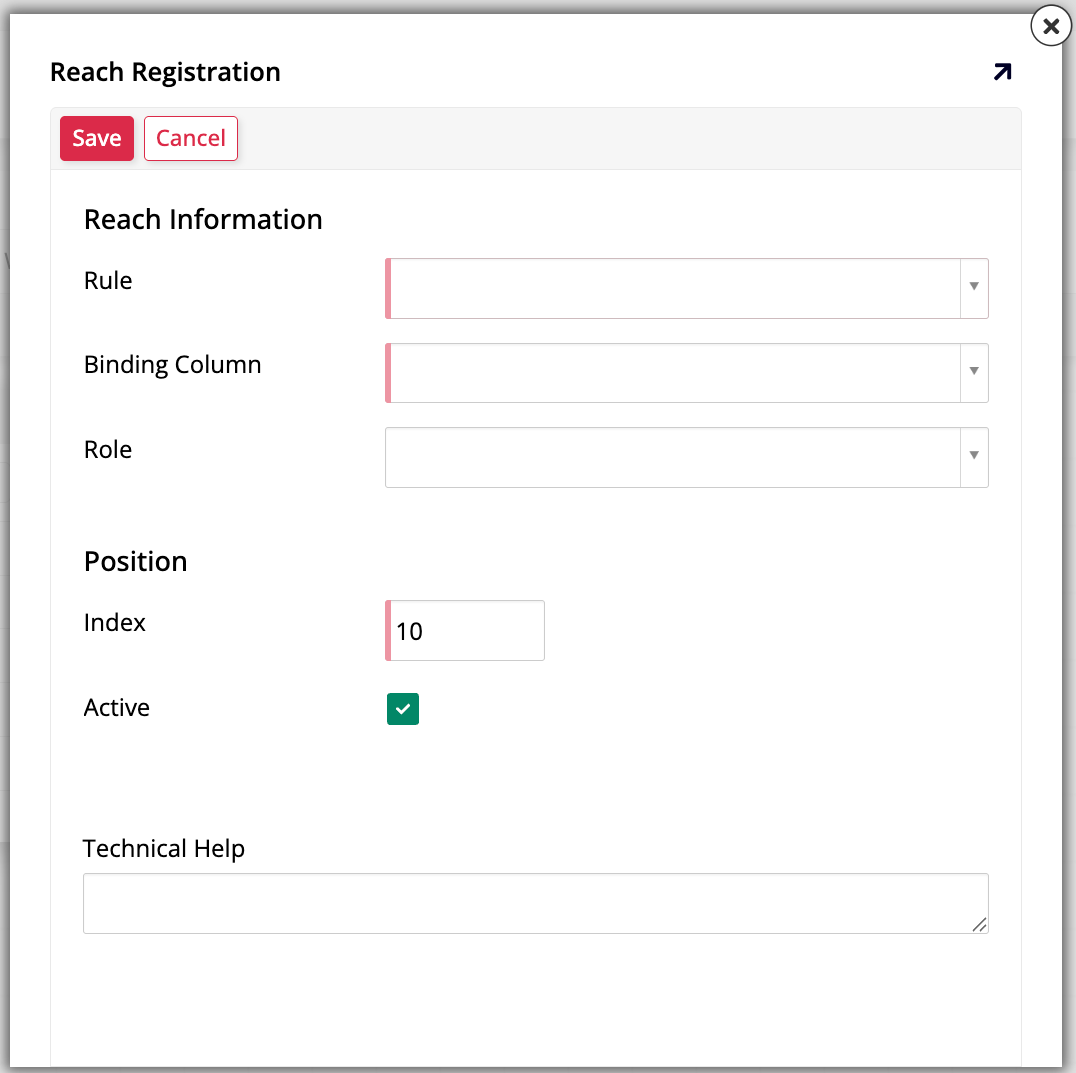
Click Create. The dialog now shows a form with the following fields:
-
Under Reach Information:
-
Rule: Select the Reach rule you created.
-
Binding Column: Select the column that corresponds to the Reach Token.
-
Role: (Optional) Select the role the restriction should apply to, or leave it blank to apply the restriction to everyone while you confirm the rule behaves as expected. See Best practices and recommendations below.
-
-
Under Position:
-
Index: (Optional) Enter a number to set this rule's order relative to any other Reach rules registered on the same object.
-
Active: Leave this checked to enforce the rule, or clear it to switch the restriction off without deleting the registration.
-
Technical Help: (Optional) Enter descriptive information to assist other developers.
-
-
-
Click Save.
Refresh the page to see the restriction take effect.
Note
Reach is enforced by the Filter event itself, not by the UI, so the restriction holds even for a user who navigates straight to a restricted record's URL instead of finding it through a list or search.
Once a business object has at least one Reach rule registered, a Reach button also appears directly on its Rule panel, next to Events and Roles, with a badge showing how many Reach rules are registered. Click it to view, edit, or add further registrations without going through More > Edge Case again.
Best practices and recommendations
The following best practices can help save time when building out Reach rules:
-
When you're registering a new Reach rule, leave the Role field blank until you've confirmed that it works. Once verified, tie it to the role it's meant to restrict, so administrative roles, such as Superuser, keep full access.
-
Register the rule on every business object that exposes the data you're restricting. A registration only affects the specific object it's attached to, not every other rule built on the same underlying table, so restricting
Customer (Source)has no effect on a separateCustomer (List)object built on the sameCustomertable unless you register the rule there too. -
Favor a token that identifies a segment of rows, such as a region or account type, over one that identifies individual rows. A rule scoped that broadly has far fewer rows to check on every
Filterevent. -
To see which rules in an app already have Reach applied, go to App Workbench > Rules and check the Reach column, or click the With Reach tab to filter the grid down to only those rules.
-
To see which pages are restricted by Reach for a given role, go to App Workbench > Roles and select that role. Its page diagram marks every restricted page with a hand icon.
-
Since a Reach rule can't be registered directly on a table, create a business object that selects every column from the table, following the naming pattern
TableName (With Reach), and register the Reach rule on that instead. Then, wherever another rule would otherwise reference the underlying table, referenceTableName (With Reach)instead: because Reach is inherited from the objects a query references, this applies the restriction everywhere that business object is used, without registering it over and over.
Examples
Region-based access
Imagine an app with the following table schema:
| Table | Primary Key | Relationships |
|---|---|---|
Region |
RegionId |
|
Customer |
CustomerId |
RegionId, foreign key to Region table. |
Employee |
EmployeeId |
RegionId, foreign key to Region table.UserId, reference to App Builder user. |
In this model, employees and customers both belong to a region, and each employee is tied to an App Builder user.
The following rule restricts users so they only see customers in their own region:
SELECT RegionId
FROM Employee
WHERE UserId = who('userid')
Since this rule targets the Customer table, it can be registered to the Customer (Source) data object, and from there it applies to every panel built on that data object.
However, Reach rules usually shouldn't apply to everyone. Instead, use them in conjunction with role-based security. For instance, suppose the data source defines an Administrator role that can see every customer, and a Sales role that should only see customers in its own region. Registering the rule against the Sales role keeps administrators unaffected, while Sales users only ever see their own region's customers.
Combining multiple attributes with a bridge table
A Reach Token doesn't have to come from a single, direct relationship. When access depends on a combination of attributes, for example, an employee who's only allowed to see customers in specific regions and specific customer tiers, a bridge table can resolve that combination down to the individual records a user can see.
Add a bridge table, such as EmployeeAccess, with an EmployeeID, a RegionID, and a CustomerTierID column, storing one row for every region and tier combination an employee is allowed to access. The following rule joins through that table to return every CustomerID the current user can see:
SELECT c.CustomerID
FROM EmployeeAccess ea
JOIN Employee e ON e.EmployeeID = ea.EmployeeID
JOIN Customer c ON c.RegionID = ea.RegionID AND c.CustomerTierID = ea.CustomerTierID
WHERE e.UserID = who('userid')
Here, CustomerID is the Reach Token: instead of identifying one broad segment, the rule resolves the intersection of every region and tier the user has access to down to the specific customer records that match. This pattern handles many-to-many relationships, such as employees assigned to more than one region or tier, and per-user exceptions that a simpler, single-column token can't express.
Implementation
Every App Builder rule hooks into a shared set of intrinsic events, and Reach specifically ties into the Filter event, the one responsible for retrieving rows. Because of that, Reach only takes effect wherever a Filter event actually runs:
- Panels: Grid and Form panels, Chart and Calendar panels, and similar.
- Controls: List and Radio controls.
- CRUD: Business CRUD rules only, not database-direct CRUD rules, since those skip the business engine entirely.
Limitations
The following constraints apply when implementing Reach:
- Reach only works with RDBMS data sources.
- Reach doesn't support cross-platform operations: the rule and the data object it's registered to must belong to the same data source.
- Reach has no effect on database-direct CRUD operations, since those bypass the business engine that enforces it.
- A Reach rule can only have one Reach Token column, so a data object binds to it through a single column, unlike other rule types that allow binding on multiple columns.
- Reach isn't currently supported alongside the App Builder Connector.
- Copying a data object doesn't carry over its Reach registrations, the same as Default, Validation and Action rules.