EDI IDs in Jitterbit EDI
Trading partners in Jitterbit EDI identify each other using an EDI ID (also referred to as ISA ID in the user interface) whose format depends on the EDI standard in use:
| EDI Standard | Format | Total length |
|---|---|---|
| X12 | Two characters (0–9 or A–Z) + hyphen + 5–18 characters (0–9 or A–Z) | 8–21 characters |
| EDIFACT | Two characters (0–9 or A–Z) + hyphen + 5–38 characters (0–9 or A–Z) | 8–41 characters |
| TRADACOMS | 5–14 alphanumeric characters | 5–14 characters |
For X12 and EDIFACT, the two-character prefix is the EDI qualifier code. The EDI standard for a partner is determined by the first EDIXml workflow associated with that partner. Format validation is skipped if the partner has no EDIXml workflows.
Note
When creating a new trading partner, only the uniqueness of the ID is validated. Format validation applies only when adding IDs to an existing partner that has at least one EDIXml workflow.
Important notes when choosing your EDI ID
-
Don't use your authentic EDI ID on test or QA environments. Use it only when setting up your production EDI environment.
-
Each ID must be unique across all environments where Jitterbit EDI is enabled. Attempting to add an ID that is already assigned to another trading partner will fail. Work with your trading partner to ensure your ID is unique and that proper communication can be established.
Set up an EDI ID
The first time you add a trading partner to an environment, the ISA ID Generation dialog opens for you to set up an EDI ID for your company:
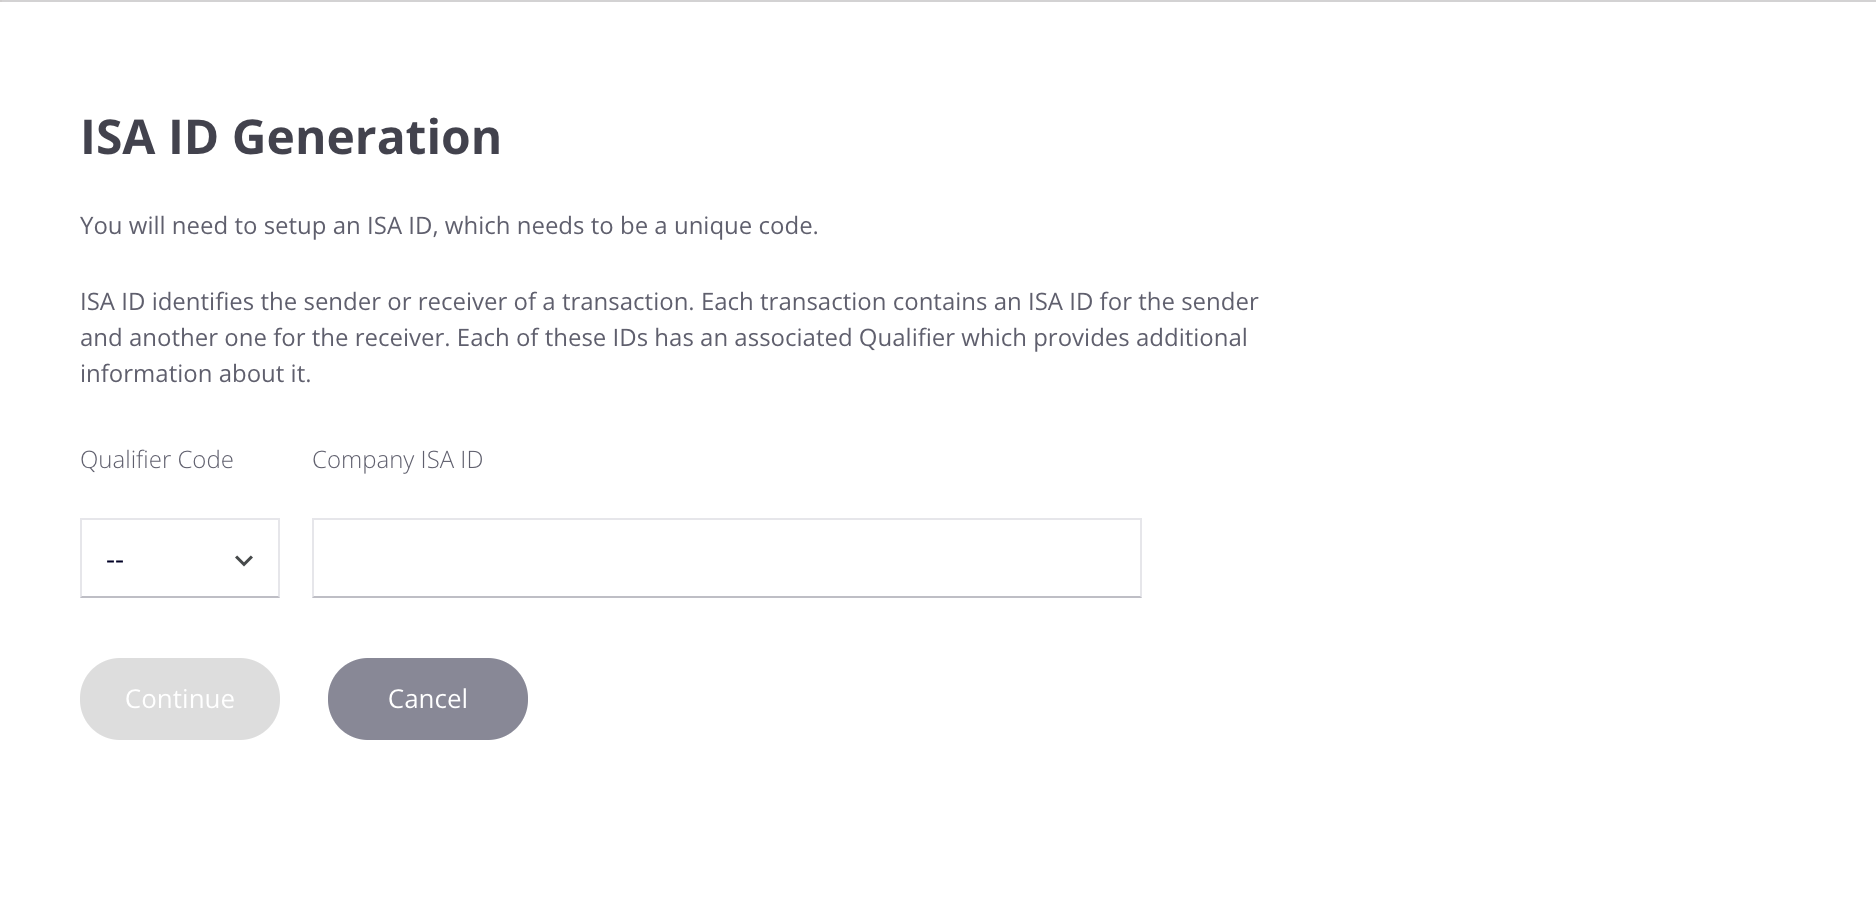
Read the contents of the dialog carefully, then choose or enter values for the following fields:
-
Qualifier Code: Select a qualifier code from the menu.
-
Company ISA ID: Enter your company's EDI (ISA) identifier.
Click Continue to save the values and continue to add your first partner.
Tip
If you need to use a different EDI ID, use the Preferred ID tab to add additional IDs, assign any as the new ID, and remove previous ones. This is useful if there are errors with the initial ID entry or if an alternative ID is required.
Preferred IDs
Preferred IDs are your default IDs used to route EDI transactions to and from your trading partners.
There are two sets of preferred IDs:
-
Partner ID: The ID that trading partners use with all their vendors.
-
Company ID: Your internal ID that your trading partner uses to identify you on their network.
Find preferred IDs
To find the preferred IDs for a partner, follow these steps:
-
Select EDI > Trading Partners.
-
In the Trading partners panel, select a partner.
-
In the configuration drawer, select the EDI settings tab.
-
Expand the Preferred IDs section:

Assign preferred IDs
Once you add a trading partner and create your first workflow, the default IDs (partner and company) are automatically assigned. You can re-assign either of the IDs by clicking the Assign icon for any other assigned ID.
The system uses the assigned IDs in outbound EDI transactions when processing them, unless you override them.
Delete or replace an ID
During account setup, a company ID is created. While it's best practice to avoid using your production EDI ID in test or QA environments (thereby reserving it for production), this might not always be possible.
If you need a different company ID, there are two options:
-
If you want a different ID (like a test ID), create and assign the new company ID, delete the original, and then reuse the original ID in another environment.
-
Use a new environment within your current organization, create a new company ID, then delete the original environment.
Use preferred IDs in transactions
Inbound transactions
All preferred IDs in your list are valid and can be used for inbound transactions whether they are assigned or not. This is important for testing, and for when trading partners or your internal systems have different subsidiaries or companies that you want to route data to.
Outbound transactions
When sending outbound transactions to your trading partners, the assigned preferred IDs are used within the transformation as the default values in your outbound EDI transactions. However, you have the option to override the assigned preferred IDs with any other preferred ID. This may be necessary if the trading partner or your internal IDs need to be changed to align with a subsidiary or another entity within your or your trading partner's business.
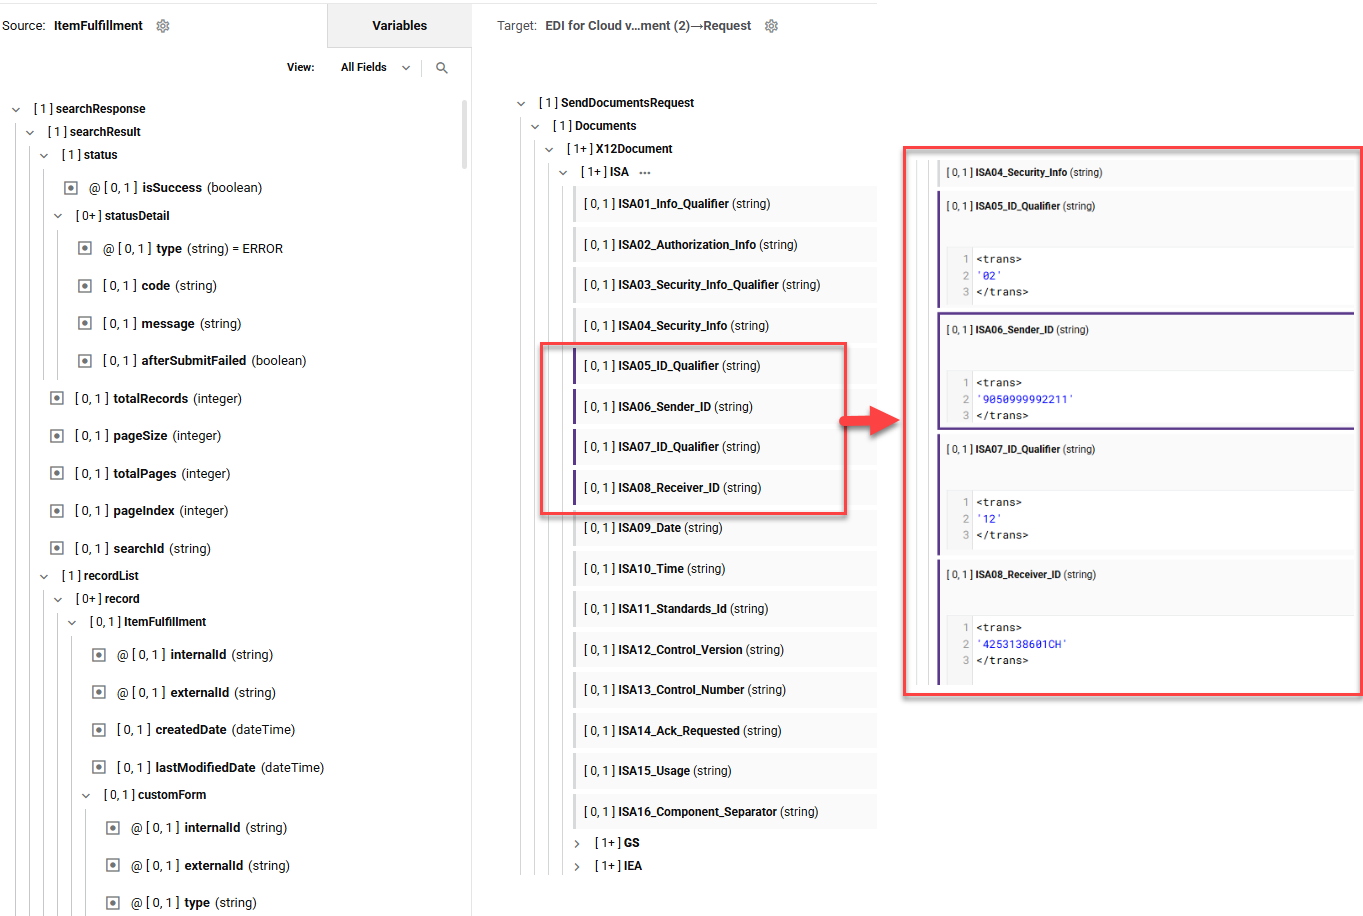
Override a preferred ID in outbound transactions
To override the IDs, you must set the following values within the request transformation used as input for an EDI for Cloud v2 Send Document activity in Studio:
| ID | Qualifier | ISA ID |
|---|---|---|
| Company ID | ISA05_ID_Qualifier |
ISA06_Sender_ID |
| Partner ID | ISA07_ID_Qualifier |
ISA08_Receiver_ID |
Tip
For outbound transactions, the sender and receiver IDs are reversed compared to inbound transactions.
Example
The two images below show a transformation, and the contents of the transformation showing the overridden IDs:

Important
Values set in a transformation are used for all outbound transactions within the workflow.