Notifications in Jitterbit App Builder
Overview
Notifications are messages that App Builder sends to your application's users when an event occurs, such as a button click or a scheduled check. A notification can be delivered as an email, a text message, an in-app alert, or a push notification, and can optionally let the recipient respond by navigating to a page or triggering an event.
This page describes the three steps necessary to set up notifications in your applications:
-
Set up a notification server
Configure the server used to deliver notifications. -
Create a notification
Define the message content and the object used to send it. -
Add response options
Optionally, let the recipients respond by navigating to a page or triggering an event.
This page also includes full walkthroughs of the entire process, with two examples: an in-app notification and an SMS message.
For messages sent by administrators to multiple users at once, rather than triggered by an application event, see System notifications.
Step 1: Set up a notification server
Before you can send a notification, you must configure at least one notification server for the delivery method you plan to use. App Builder supports the following delivery methods:
-
Email, sent through an SMTP server.
-
SMS (text message), sent through Twilio.
-
In-app (App Builder alert), a popup shown to the recipient while they're logged in to the app.
-
Push, sent through Jitterbit Blabber, for apps using the Jitterbit Wrapper or a branded wrapper, or through OneSignal, for native mobile apps using your own OneSignal account.
To view and manage notification servers, select IDE > Notification Servers:
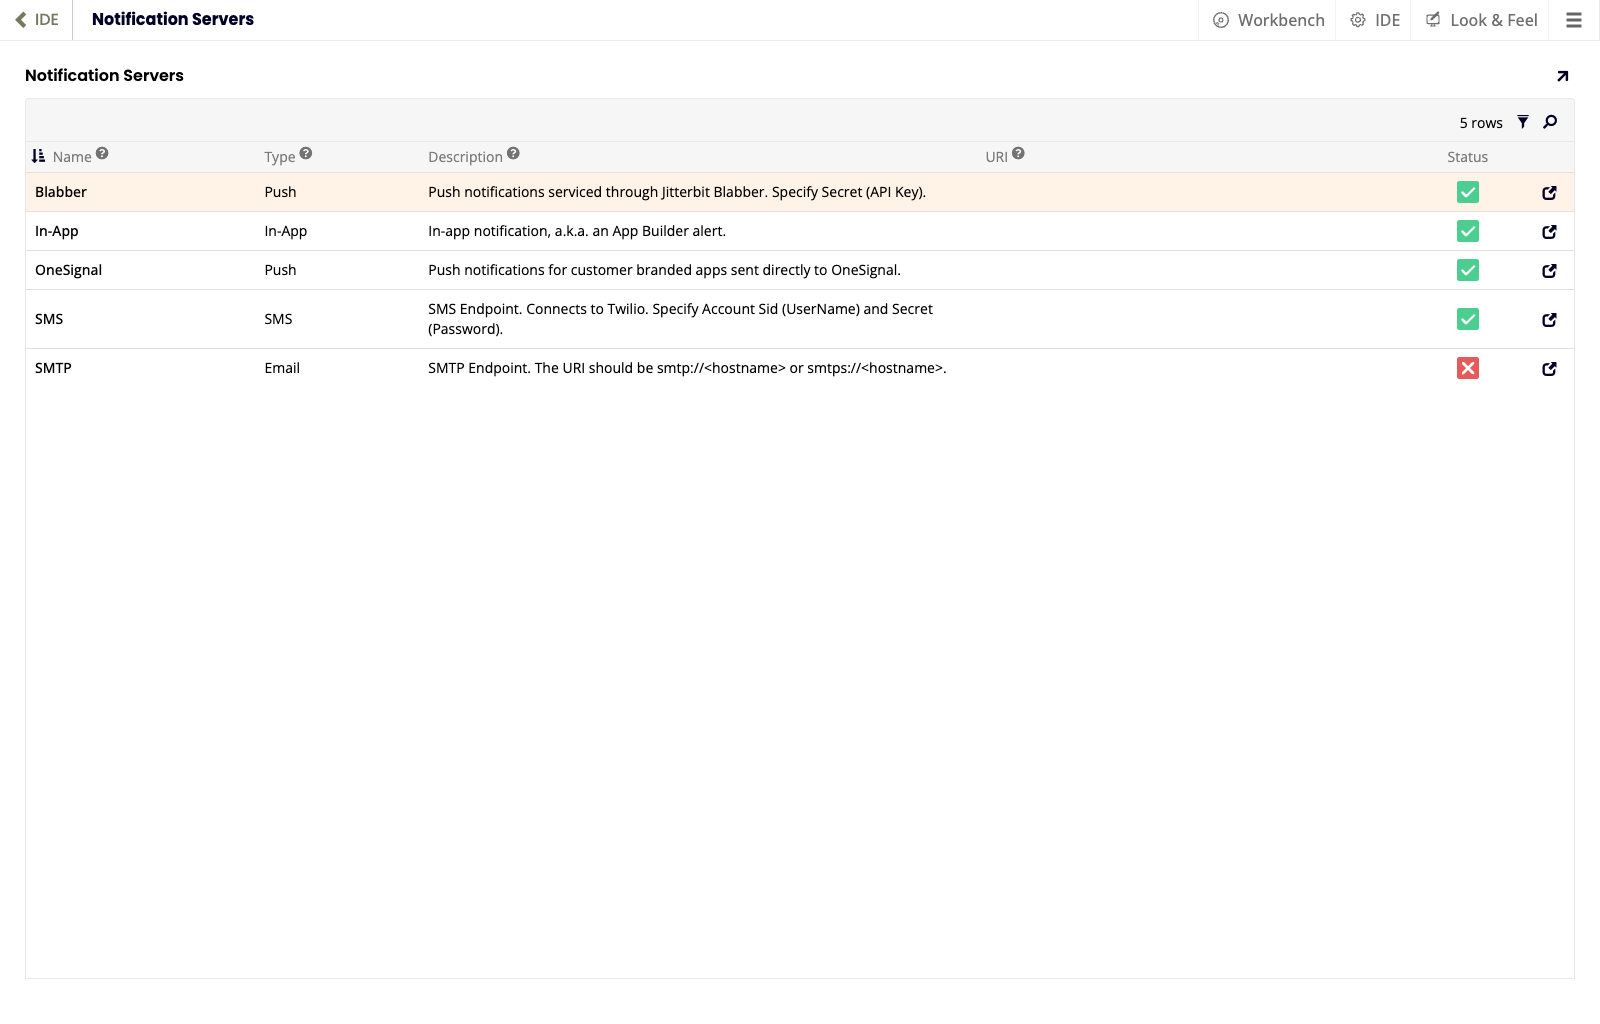
The list of servers is made of the following columns:
-
Name: The server's name.
-
Type: The type of notification that can be set up with that server.
-
Description: A brief description.
-
URI: The URI (if applicable).
-
Status: The server's current status.
Double click any row or click the icon at the end to see and edit details of a given server. Every server except In-app requires setup before use:
- SMTP (Email) requires the from address, URI, and Security sections to be populated.
- Blabber, OneSignal, and SMS require the Security section to be populated.
Note
Notification servers were previously known as notification endpoints.
Step 2: Create a notification
Creating a notification means creating a business rule with its Purpose set to Notification, from the App Workbench's Notifications tab. The rule defines the notification's message content and selects the public data object (Delivery Method) used to send it, such as Email, Text Message, App Builder Alert, or Push Notification.
To create a notification:
- Navigate to App Workbench > Notifications.
- Click + Notification.
- Assign it a Name.
- Confirm Purpose is Notification.
- Select the Delivery Method you want to use. Each delivery method sends a notification through a specific public data object, which determines the notification's details. If the data object you need isn't available, you may need to create a data source connection to App Builder (Sealed) for the app you're working in.
- Click Create.
Clicking Create opens the Rule Builder in edit mode, where you define the columns the notification uses, the same way you would when editing any other business rule. For the columns available to each delivery method, see Public data objects by delivery method below.
Note
The File table from an Amazon S3 data source cannot be used as a notification's data source.
Public data objects by delivery method
Each delivery method sends a notification through a specific public data object — a predefined set of columns that determines details like the recipient, sender, and delivery behavior. The Delivery Method you select when you create a notification determines which public data object your notification's columns must map to, in the Rule Builder's mvSQL definition.
The following sections describe the columns available for each public data object, plus the columns common to all of them.
Common columns
These columns are common to every public data object described below:
| Name | Mandatory | Multi-Target | Example | Description |
|---|---|---|---|---|
Binding() |
No | Yes | CustomerID |
If provided, this will identify the record matched to the option for this notification. Multiple bindings can be defined. |
The columns for the Email public data object are as follows:
Notifications sent by email can include file attachments of many file types, such as .pdf, .docx, .txt, or .xlsx, using the Attachment() and FileDataSourceId columns described below. App Builder attaches files from the data/pdf directory by default, or from the directory specified by FileDataSourceId.
If the notification contains options, the AppBuilderUrl column specifies the URL used when generating links to those options. If AppBuilderUrl is not provided, App Builder falls back to the server site's default URL, configured from IDE > Security Providers > More (from the Configuration panel) > Sites. For more information, see Sites and aliases.
Note
If you are using more than one email address in the To() or Cc() columns, separate values with a comma.
| Name | Mandatory | Multi-Target | Example | Description |
|---|---|---|---|---|
AppBuilderUrl |
Depends | No | 'https://example.com/MyAppBuilder' |
AppBuilderUrl is mandatory if the notification contains options. This URL is used when generating links to the various notification options. This is the URL to reach App Builder from the point of view of the message receiver. Does not require a trailing slash. |
Attachment() |
No | No | 'somepath/files/*' |
If provided, will attach file(s) to the email. If the Attachment() string ends with an asterisk (*), the string is assumed to represent a directory path, and all file attachments in the directory will be attached to the email. |
Cc() |
No | Yes | 'user1@zudy.com,user2@zudy.com' |
Comma-delimited list of email addresses to cc. Similar to To(), multiple targets can be specified for automatic concatenation. |
FileDataSourceId |
No | No | UUID |
Unique identifier that refers to the data source that should be referenced to locate the file attachment(s). |
From |
No | No | 'noreply@zudy.com' |
Defines the from address for the email. If From is not provided, the from address defined in the Be_NotificationEndpoint record will be used. |
Language |
No | No | 'es' |
If provided, translations will be attempted for both the Template and Subject fields of the associated notification. Likewise, the notification options' names will be translated. |
To() |
Yes | Yes | 'user1@zudy.com,user2@zudy.com' |
Comma-delimited list of email addresses to send to. Multiple To() fields can be targeted to send to multiple recipients (in addition to using comma-delimited values). An exception is thrown if this field is not provided or null. |
Text Message
The Text Message public data object is used for sending SMS messages. The columns for the Text Message public data object are as follows:
| Name | Mandatory | Multi-Target | Example | Description |
|---|---|---|---|---|
Language |
No | No | 'es' |
If provided, translations will be attempted for the Template field of the associated notification. Likewise, the notification options' names will be translated in a future release. |
To() |
Yes | Yes | '+15559990000' |
A single phone number in the format expected by Twilio. Multiple To() fields can be targeted to send to multiple recipients. An exception is thrown if this field is not provided or null. |
App Builder Alert
The columns of the App Builder Alert public data object are as follows. This object is similar, but not identical, to the Notification_Create public data object.
| Name | Mandatory | Multi-Target | Example | Description |
|---|---|---|---|---|
From |
No | No | who('userid') |
This column represents the user this message is from. If not provided, the user running the action will be assumed. |
Persistent |
No | No | 1 |
Boolean value that indicates whether the alert should be considered persistent. This attribute is only applicable when sending an alert to a UserId. All alerts have a Dismiss button that removes the alert from the user's notification panel. The user can ignore the alert or close their window or log out of App Builder. If persistent is true (1), the alert will be displayed repeatedly, each time the user logs in to App Builder, until the user actively dismisses the alert. Use this technique to ensure that an alert is read by the user. |
SendToPushNotificationEnabledUser |
No | No | 0 |
If provided, the App Builder Alert can be configured to only send to users who do not have a device with push notifications enabled. This allows a developer to send both an App Builder Alert and a Push Notification in the same event, and prevents a user from receiving both a desktop notification and a push notification. |
Timeout |
No | No | 15 |
If provided, Timeout represents the amount of time (in seconds) to wait before automatically closing the alert popup. |
To() |
Yes | No | all |
This column represents the user the notification is sent to. An exception is thrown if this field is not provided or null. You can use the following special expressions:
|
Push Notification
The Push Notification public data object sends a push notification to a user. The columns of the Push Notification public data object are as follows:
| Name | Mandatory | Multi-Target | Example | Description |
|---|---|---|---|---|
Badge |
No | No | 1 |
If provided, this will set the badge number on the application icon. |
From |
Yes | No | who('userid') |
From represents the user this message is from. |
To |
Yes | No | 85cc99ff-b4a6-4a32-bfeb-537d346ee52c |
To is the user (UserId) the push notification is sent to. If the user does not have a device with push notifications enabled, the notification rule will still succeed but no message will be sent. An exception is thrown if this field is not provided or null. |
ToAppUserId |
No | No | 100 |
If the user is denoted by an application user ID, this value should be provided in addition to the To field. |
Write the notification message
To write the notification's message, click the Notifications tab again and select your notification from the Notification Rules panel. Enter the message in the Body field of the Message panel; this field is mandatory, and the notification event fails with an error if it's left empty.
The message supports substitutions using the syntax {{fieldname}}, which App Builder replaces with the corresponding column value when the notification is sent. For example, the body may contain:
Hello {{CustomerName}},
In this example, CustomerName must be contained in the notification rule's columns along with the other required fields. Substitutions may add an optional url flag to indicate the value is a URL and requires url-encoding, e.g. {{fieldname|url}}. An optional HTML flag treats HTML markup in the value as plain text, e.g. {{fieldname|HTML}} substitutes a value of <b>Jitterbit</b> as Jitterbit.
For most messages, editing the plain-text Body field is enough. If you need custom formatting beyond plain text, click More > Edit HTML to edit the message's underlying HTML directly.
For emails, a Subject must also be specified, which also supports substitutions; like the Body field, leaving it empty causes the notification event to fail with an error.
Translations
If your application supports multiple languages, you can also translate a notification. Three fields support this: the notification's Body, its Subject (for emails), and the Name of each response option. Instead of entering literal text in these fields, enter a translation key; App Builder looks up the value for the recipient's language in the app's translation bundle when the notification is sent.
You must manually add these translation keys to the app's translation bundle; App Builder does not import them automatically.
If you edit the message using More > Edit HTML, add the translation key as a plain string rather than as HTML, or the lookup will fail.
For more information on setting up languages and translation bundles, see Translations.
Step 3: Add response options
A notification can optionally include one or more response options that let the recipient reply. A notification with no options is purely informational: App Builder doesn't track a response, and no links are added to the message.
When a notification has one or more options, App Builder tracks the recipient's response automatically. For emails and App Builder alerts, each option is a clickable link back into App Builder. For SMS, the recipient replies with the option's Name to select it.
Notification links expire after 7 days and cannot be configured to last longer.
To add a response option to a notification:
- In the notification's Options panel, click the + Option button.
- Set Index to determine the option's order relative to other options.
- Set Name to identify the option. For an SMS Reply option, this is also the text the recipient must reply with.
- Set Option Type to Link or SMS Reply.
- For a Link option, select the page to link to in Link To Page. The page must be marked as Public in its Edge Case settings.
- Click Save.
Navigating to the page selected in Link To Page completes the response for a Link option. If that page also has a business-logic event bound to it, the event runs before the page renders, and completing the response then also depends on that event running successfully. See Data object event binding below for the restrictions that apply to that event.
Data object event binding
When the page linked in a response option's Link To Page field also has a business-logic event bound to it, that event must belong to either the page's first panel (the panel with the lowest index, in the top-left position) or the page's own public data object, if one is defined. Events that belong to any other panel on the page cannot be bound to a response option.
For example, consider a stacked page with two side-by-side groups: the first, at index 10, contains the Customer and CustomerAddress panels, and the second, at index 20, contains the Employee and EmployeeAddress panels:
(side by side)"] --> B["Index 20: Employee, EmployeeAddress
(side by side)"]
Customer is the page's first panel, so its events are eligible. CustomerAddress, Employee, and EmployeeAddress are not eligible, since none of them is the page's first panel.
App Builder also only allows binding to custom events, not to system events. For example, you cannot bind to the Save, Insert, Update, or Delete events.
When the bound event completes, App Builder redirects the recipient to the page, but any post message or validation result from the event is lost by then, since App Builder doesn't display those to the recipient for page-level events. You can work around this by displaying data in the page's panels that changes based on whether the event ran successfully. For the same reason, a validation warning simply prevents the event from running, because there are no mechanisms for the recipient to accept or reject it.
At this point, you have everything you need to build a notification: a server to deliver it, a rule that defines its message and data, and, optionally, one or more response options.
Full walkthroughs
The following examples walk through the entire process of creating a notification, from setting up a delivery method to adding a response option. The first example uses App Builder Alert as the delivery method; the second uses Text Message (SMS).
Example notification setup
This example adds a customer approval notification to the Customers page of a hypothetical application called Northwinds, using App Builder Alert as the delivery method.
-
Create the notification and set its delivery method:
- Navigate to App Workbench.
- Click Notifications.
- Click + Notification.
- Assign it a Name. For example:
CustomersRequestApprovalAlert. - Confirm Purpose is Notification.
-
Select App Builder Alert as the Delivery Method.
Note
If you don't see this data object available, create a data source connection to App Builder (Sealed) for the app you're working in.
-
Click Create.
-
Define the notification's mvSQL, mapping the
Customerstable to the columns the App Builder Alert object needs:- Click the +Tables button.
- Add your Select From table, which in this case is
Customers. -
Add the following columns and click on the Columns tab to define:
Column Alias Target 'all' To To "C".CustomerId CustomerId Binding() "C".CustomerName CustomerName Note
CustomerNameis added here so it can be used later as a substitution parameter in the notification message.
-
Write the notification's message:
- Navigate to App Workbench.
- Click Notifications.
- Select the notification you created in step 1, which in our example is
CustomerRequestApprovalAlert. -
Enter the message in the Body field, for example:
Please review the following customer:
Customer:{{CustomerName}} -
Click the icon and enter any Technical Help to help explain the notification to other developers.
-
(Optional) Add a response option that links to a page:
- From the App Workbench > Notifications page, select the notification.
- Click the + Option button.
- Create a new option:
- Set Index to
10. - Set Name to Review.
- Select the Link To Page value. In this example, link to the Customers page. If the page you want to link to doesn't show up, ensure that it's been marked as Public in its Edge Case settings.
- Click Save.
- Set Index to
-
This example assumes the Customers page is already marked Public, with an event named
Request Approvaldefined on its first panel. Bind that event to the option's link, so it runs when the recipient follows it:- Navigate to the event for the data object.
- Click the Business Logic icon.
- Click the Events button.
- Select the event. For example:
Request Approval. - Click on Register Existing from the Actions panel.
- Select Notification as the Action Type.
- Select the notification we created in the previous step. For example:
CustomerRequestApprovalAlert. - Click Save.
- Verify that the Explicit Bindings are correct. For example:
CustomerId - CustomerId.
-
Test the notification. Navigate to your page and click the button that runs the notification event. All logged-in App Builder users should see a popup with the notification message.
Example SMS notification setup
This example adds the same customer approval notification to the same Customers page, using Text Message (SMS) as the delivery method.
Note
You will need a Twilio account to complete setup.
-
Set up App Builder security, so App Builder can authenticate incoming SMS replies from Twilio:
- Navigate to IDE > Security Providers.
- Click + User Authentication on the User Authentication panel.
- Enter a Name (e.g.
Http Basic Auth). - Select HTTP Basic Authentication as the Type.
- Click Enabled to enable.
- Click Save.
- Enter a Name (e.g.
-
Navigate to IDE > User Management.
-
In the Users panel, locate the user you want to authenticate as when an SMS reply comes in. Double click the user's row or click the icon at the end of it. The User dialog opens.
Note
This user must have access to the App Builder application, and to the event that will be executed on the notification itself.
-
Click More > Keys. The Keys dialog opens.
- Click Create. The Generate Key dialog opens.
- Select the
Http Basic Authprovider created earlier. - Click Save.
-
Note
This provider creates a secret Key. The combination of the User Name and secret Key will be used when configuring Twilio.
-
Set up Twilio to send and receive the SMS messages:
-
Create a messaging service:
- Log into your Twilio account.
- Navigate to Communications Cloud > Programmable SMS.
- Click Messaging Services.
- Create a new Messaging Service (Notifications, 2-way) and attach a Twilio phone number to it.
- Note down the MessagingServiceSid. This will be used for configuration later on.
- Enable the Process Inbound Message option.
- Enter the following Request URL, replacing
<username>,<secret_key>, and<your_AppBuilder_Server>with your values:https://<username>:<secret_key>@<your_AppBuilder_Server>/webhook/v1/vinyl/bridge_inbound
-
Gather Twilio credentials:
- Navigate to Console Dashboard > Settings.
- Note down the following live credentials:
- Account Sid
- Auth Token
-
-
Connect App Builder to Twilio, using the credentials gathered in the previous step:
- Navigate to IDE > Notification Servers.
- Double click the SMS row.
- Add the following configuration:
- User Name: Enter your Twilio Account Sid.
- Password: Enter your Twilio Auth Token.
- MessagingServiceSid: Enter your Twilio MessagingServiceSid.
-
Set the website URL App Builder uses when generating links in the SMS message:
- Navigate to IDE > Security Providers.
- Under Configuration, click More > Sites.
- Click + Site.
- Set the URL value to your website URL. For example:
https://vinyl.jitterbit.com. - Click Save.
-
Now, create and configure the SMS notification itself, following the same overall process as the previous example, but this time, instead of App Builder Alert, select Text Message as the Delivery Method:
-
Create the notification and set its delivery method:
- Navigate to App Workbench > Notifications.
- Click + Notification.
- Assign it a Name.
- Select Notification as the Purpose.
-
Select Text Message as the Delivery Method.
Note
If you don't see this data object available, create a data source connection to App Builder (Sealed) for the app you're working in.
-
Click Create.
-
Define the notification's mvSQL, mapping the phone number and customer columns to the Text Message object:
-
Click the +Table button and add the table the rule requires. E.g.
Customers. -
Click the Columns tab and add the following columns:
Column Alias Target '+15551112222' (replace with your phone number) To() To() "C".CustomerId CustomerId Binding() "C".CustomerName CustomerName Note
CustomerNameis added here so it can be used later as a substitution parameter in the notification message.
-
-
Write the message and add two response options: one the recipient can reply to by SMS, and one that links to a page:
- Click the Notifications tab.
-
Enter the following message into the Body field:
Reply {{1}} to approve {{CustomerName}}. Review {{Review}} -
Click the + Option button from the Options panel:
- Set Index to
10. - Set Name to Review.
- Select the page to link to. In our example we'll link to the Northwinds Customer page. If the page you want to link to doesn't show up, ensure that it's been marked as Public in its Edge Case settings.
- Set the Option Type to Link.
- Click Save.
- Set Index to
-
Click the + Option button from the Options panel:
- Set Index to
20. - Set Name to 1.
- Select the page to link to. In our example we'll link to the Northwinds Customer page and run the
Approveevent. - Set the Option Type to SMS Reply.
- Click Save.
- Set Index to
-
This example assumes the Customers page is already marked Public, with an event named
Request Approvaldefined on its first panel. Bind that event to the Link option, so it runs when the recipient follows it:- Navigate to the event for the data object.
- Click the Business Logic icon.
- Click the Events button.
- Select the event. For example:
Request Approval. - Click on Register Existing from the Actions panel.
- Select Notification as the Action Type.
- Select the notification we created in the previous step. For example:
Customer_RequestApprovalSms. - Click Save.
- Verify that the Explicit Bindings are correct. For example:
CustomerId-CustomerId.
-
Test the notification. Navigate to your page and click the button that runs the notification event.
-
System notifications
Unlike the notifications described earlier on this page, which App Builder sends automatically to a specific recipient when a business event occurs, system notifications are broadcast messages that an administrator sends manually, or schedules to send later, to a group of users at once, for example, everyone with access to an application, or a specific security group or role. Administrators use system notifications for things like planned maintenance windows or application upgrades, which don't need to be tied to a specific record or triggered by an event.
System notifications are shown to active users, and remain in their Notification Center (under the hamburger menu) until dismissed or expired. System notifications are part of the Maintenance feature and only support in-app alerts. They are also environment-specific: unlike application notifications, which promote with your code between environments, a system notification must be re-created in each environment.
To set up a system notification, select IDE > Maintenance, then select the Notifications tab (available since App Builder 4.44), and follow these steps:
-
In the Scheduled Notifications panel, click the Schedule or Send Now button.
-
In the Notification dialog, enter values for the following fields:
-
To: Click the field, then select one of the following:
- All
-
A group of users based on the following:
-
Their access to an application or data source granted by their groups or roles.
-
Security groups.
-
The data source's roles.
-
-
From: Defines who sent the notification (usually the service user).
-
Schedule For: (Optional) Schedule a notification to be sent later (for example, an hour before a planned application upgrade).
-
Expires On: A date/time when the notification expires and will no longer be shown to users. At this time, users who have seen and dismissed the message have the notification removed from their notification centers.
-
Body: The content of the message shown to users.
-
-
Click the Send or Schedule button.
A background service sends scheduled notifications. By default, the service is run by the Service User account. To change which user runs the service, follow these steps:
-
Select IDE > Maintenance, then select the Settings tab.
-
Click the Background Notification User menu, then select the user to run the service.