Upgrade Jitterbit App Builder on Microsoft Windows (x64)
Introduction
To upgrade App Builder on Microsoft Windows, follow these steps:
-
Satisfy the software requirements for both the web server and database server.
-
Get and unpack the software.
-
Restore settings.
-
(Optional) Enable Crystal Reports.
Important
If you are upgrading from Vinyl 3.3 to App Builder 4, you must obtain an updated license. Without an updated license, an upgrade from Vinyl 3.3 to App Builder 4 fails. If you don't have an updated license, contact your Customer Success Manager and request one. If you already have an updated license, follow the steps above and the Test and run section will provide instructions on how to activate it.
Get and unpack the software
To get and unpack the software, follow these steps:
-
Contact your Customer Success Manager (CSM) to get a copy of the App Builder 4 software.
The software is provided as a compressed file. Windows users have the following options:
-
vinyl-X.Y.N-win.zip, for a standard deployment -
vinyl-X.Y.N-thirdparty-win.zip, which includes a collection of templates for connecting to third parties -
vinyl-X.Y.N-thirdpartysap-win.zip, which includes the same templates as well as SAP-specific drivers
For all options,
X.Yis the version number (for example,4.0) andNis the build number (for example,45678).Note
The word Vinyl, used in parts of these instructions, is the former name for App Builder.
-
-
Copy this file to a folder on the host where IIS runs.
-
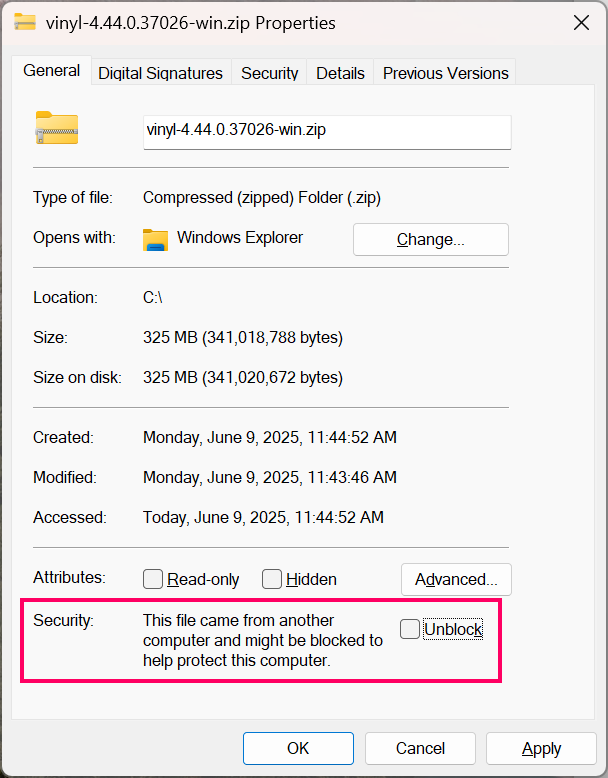
Depending on your system's security settings, you may need to unblock the file. To do this, right-click on the file, then select Properties. In the Properties dialog, select the Security tab, then select Unblock:

-
Right-click on the file containing the deployment you've picked in Step 1, and select Extract All.
-
Set the extract destination to a temporary folder, such as
C:\temp\Vinyl. -
Click the Extract button.
Caution
Do not continue until the extraction is complete. This can take many minutes.
Restore settings
To restore your settings, follow these steps:
-
Stop IIS:
-
Open Internet Information Services (IIS) Manager.
-
Select the web server.
-
Click the Stop button at the top right of the Actions pane.
-
-
Make a backup copy of your databases.
-
Move the current installation folder to a temporary location (for example, from
C:\inetpub\wwwroot\VinyltoC:\temp\OLD_Vinyl). -
Rename the new installation folder (for example, from
C:\temp\VinyltoC:\inetpub\wwwroot\Vinyl). -
Copy the following files from your old installation folder to your new one:
Copy from To C:\temp\OLD_Vinyl\Connection.xmlC:\inetpub\wwwroot\Vinyl\Connection.xmlC:\temp\OLD_Vinyl\appsettings.jsonC:\inetpub\wwwroot\Vinyl\appsettings.jsonC:\temp\OLD_Vinyl\keys\*C:\inetpub\wwwroot\Vinyl\keys\Note
Jitterbit encourages you to also copy your logs and data folders from the old directory to the new one. Although not necessary, doing so provides some advantages, such as ensuring all your logs are in one place and ensuring App Builder can display all the saved PDF files in the same directory path as before.
Configure IIS
To configure IIS after upgrading App Builder, follow these steps:
-
Open Internet Information Services (IIS) Manager.
-
Expand the Vinyl folder.
-
Right click the data folder and choose the Edit Permissions option.
-
Select the Security tab.
-
Click the Edit button to launch the Permissions for data dialog box.
-
Click the Add... button to launch the Select Users or Groups dialog box.
-
Provide the name
IIS AppPool\Vinylin the bottom field. -
Check Allow Full Control in the Permissions field, then click the OK button to close the Permissions for data dialog box.
-
Click the OK button to close the data Properties dialog box.
-
Repeat steps 3-9 for the logs and keys directories as well.
-
Restart IIS by selecting the server and clicking the Start button in the Actions pane.
(Optional) Enable Crystal Reports
App Builder supports Crystal Reports on Windows systems. Crystal Reports is hosted out-of-process in a COM server. To register the Crystal Reports COM server, open a Windows PowerShell as an administrator, then run these commands:
Set-ExecutionPolicy RemoteSigned
cd C:\inetpub\wwwroot\Vinyl\Scripts
.\RegisterCrystalReports.ps1
Test and run
To run App Builder after an upgrade, follow these steps:
-
If necessary, upload and activate a new license file:
Important
This is mandatory if you are upgrading from Vinyl 3.3 to App Builder 4, as the licenses for Vinyl 3.3 are not transferable to App Builder 4.
-
Log into the web server on which App Builder is installed.
-
Launch Windows explorer.
-
Locate the App Builder installation directory (e.g.
C:\inetpub\wwwroot\Vinyl). -
Copy the license file to the
datadirectory. -
Rename the file to vinyl.lic (if it is otherwise named).
-
-
Go to
http://localhost/Vinyl/. -
It can take several minutes to update the database. When the login screen appears, enter your administrator's credentials, then click the Sign In button.