Configure Google SAML as an SSO security provider in Jitterbit App Builder
This article steps through how to configure Google SAML as an SSO Security Provider in App Builder. The Google SSO SAML configuration needs to be set up first, followed by configuring the App Builder Security Provider information to connect to Google SAML.
Google SSO SAML
Google offers a SAML-based single sign-on (SSO) service that provides companies with control over the authorization and authentication of hosted user accounts that can access web-based entities. App Builder acts as the identify provider and, when configured along with Google SSO, can be used to authenticate and authorize Users into an App Builder app.
The Google SSO service is based on the SAML v2.0 specifications.
Google SSO configuration settings
To get started, first configure Google SAML Single Sign-On for use with your App Builder app:
- Log into your Google Admin console
- Go to Menu > Apps > Web and mobile apps
- Click Add App > Add custom SAML App
-
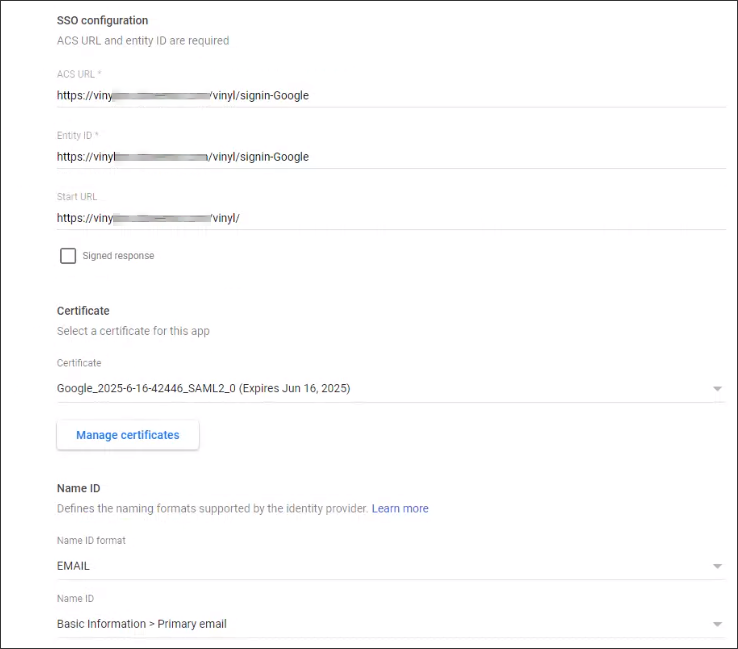
On the App Details page enter the name of the App along with the following information:

- ACS URL: Corresponds with Sign In Provider URL. Note this must start with
https://. Example:https://example.zudy.com/signin-{{ProviderName}} - Entity ID: This is the audience you want to pass from the provider. Recommend using the same value as ACS URL.
- Start URL: The URL to redirect an authenticated user to, if they initiate the Sign On from the Google Tile in browser
- Name ID Format: The value Google will pass as the unique identifier for the user. Defaults to email if none is selected.
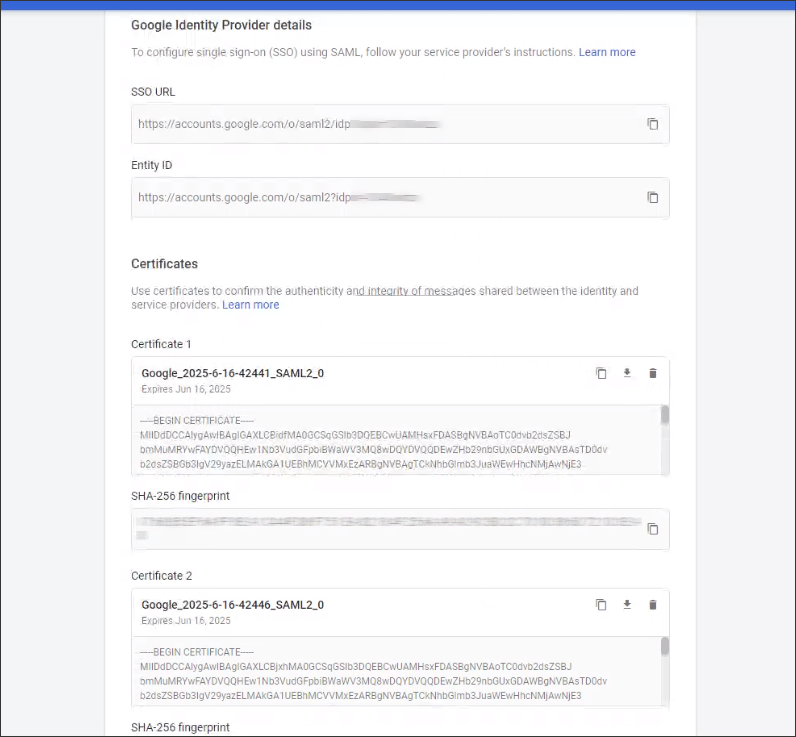
- SSO URL: The value used for the Request Redirect Endpoint Parameter in App Builder
- Entity ID: The actual Entity ID needed to populate in the App Builder configuration
- Certificate: You will need to download this and make note of the expiration date since this will need to be changed once the old certificate expires.
- ACS URL: Corresponds with Sign In Provider URL. Note this must start with
-
On the Google Identity Provider details page get the information required for the App Builder service provider:
- Copy the SSO URL and Entity ID and download the Certificate

App Builder security provider
After the Google SSO Configuration is complete, you will configure Google in App Builder as a SAML Security Provider.

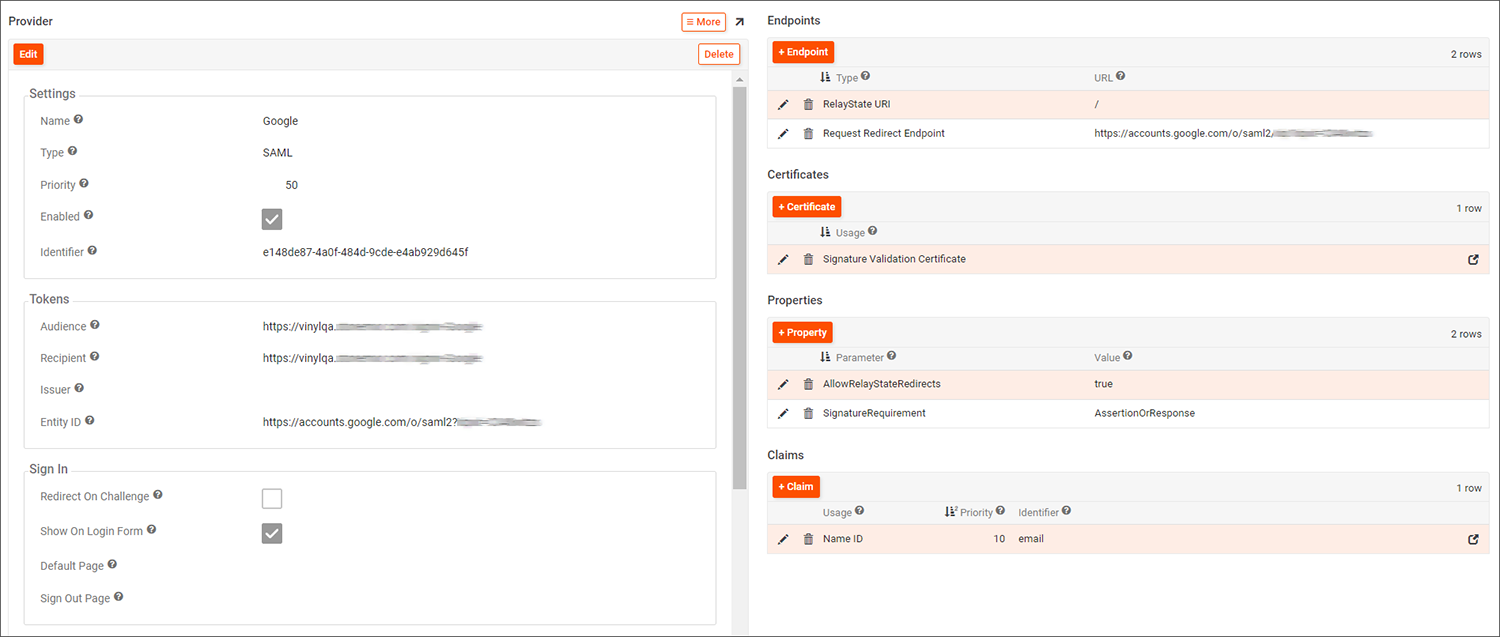
Google SAML Provider configuration example
App Builder configuration specific to google SSO
Follow the basic configuration for App Builder as a SAML security provider. In addition, review and confirm the following settings which are specific to integration with Google SSO:
Settings
- Name: Google
- Type: SAML
- Enabled: True
Tokens
- Audience and Recipient: values must match the Entity ID value provided from Google. Example:
https://vinyl.example.com/signin-Google - Entity ID: must match the second generated Google Entity ID value
Endpoints
- RelayState URI: is a configured Endpoint with the value of "
/". This allows the Google Tile to initiate the authentication flow.
Properties
- AllowRelayStateRedirects: is a configured Property with the value of True. This allows the Google Tile to initiate the authentication flow.
- SignatureRequirement: is a configured Property with the value of AssertionOrResponse. This is optional but recommended.
Claims
- Configure a Claims record to instruct how to handle the identity creation and group mapping, if required. Example: Names ID is a Usage type, with email as the Identifier value.
Lastly you will need to upload the Certificate information downloaded from Google.
- Click + Certificate from the Certificates area on Provider settings
- Select Signature Validation Certificate for Usage
- Select X.509 Certificate for Format
- Enter the Google Certificate information. Be sure to remove the start and end notation from the certificate.