How to build a release package in Jitterbit App Builder
Introduction
This page shows you how to build a release package, which is a selected collection of applications, data sources, and other components, packaged together for deployment. This process is used when moving an application from one environment to another, for example when moving an application from development to QA environments, and from there, to production environments.
The following diagram shows what a release contains.
Legend
-
Colors show which layer each object type resides in:
Color Layer Blue Data Red Business Green UI Orange Other -
Shapes indicate object type:
graph SOLN_OBJ(Solution object) NON_SOLN_OBJ((Non-solution
object)) classDef default fill:white,stroke:black,stroke-width:1px,rx:15px,ry:15px
translation)) end subgraph ASSEMBLIES[**Assembly**] PLUGINS((Plugin)) end end subgraph UI[ ] subgraph APPLICATIONS[**Application**] direction LR MENUS((Menu)) PAGES(Page) SCHEDULES((Schedule)) end subgraph COLLECTIONS[**Collections**] direction LR THEMES((Theme)) IMAGES((Image)) TEMPLATES((Template)) FORMATS((Format)) WIDGETS(Widget) end end subgraph DATA_SOURCES[**Data Source**] direction LR DATA(Data) RULES(Rule) LOGICAL_PHYSICAL_DATA_MODEL(Logical/physical
data model) ROLES(Role) SQL_OBJECTS(SQL object) end end %% General styling classDef defaultSg fill:white,stroke-width:5px,rx:15px,ry:15px class DATA_SOURCES,APPLICATIONS,COLLECTIONS,OTHER,ASSEMBLIES,BUNDLES defaultSg classDef clearSg fill:transparent,stroke-width:0px class UI,OTHER clearSg classDef boundary fill:white,stroke-width:0px,rx:15px,ry:15px class BOUNDARY boundary %% Identifying styling: Subgraphs classDef dataSg stroke:#3b6fc9 class DATA_SOURCES dataSg classDef uiSg stroke:#098565 class APPLICATIONS,COLLECTIONS uiSg classDef otSg stroke:orange class ASSEMBLIES,BUNDLES otSg %% Identifying styling: Nodes classDef dataNode fill:#3b6fc9, color:white class DATA,LOGICAL_PHYSICAL_DATA_MODEL,SQL_OBJECTS dataNode classDef businessNode fill:#db2b48, color:white class RULES,ROLES businessNode classDef uiNode fill:#098565, color:white class THEMES,IMAGES,TEMPLATES,FORMATS,WIDGETS,MENUS,PAGES uiNode classDef otherNode fill:orange class SCHEDULES,PLUGINS,LANGUAGE_TRANSLATIONS,USER_DEFINED_FUNCTIONS,LOGICAL_DATA_TYPE otherNode
Build a release
Building a release into a package and then installing a package in a new environment all takes place in the Deploy area, accessed from the App Builder IDE. During this process you will move from the left side of the Release Template Builder screen to the right side, as you step through all of the steps described here:
-
Select Action Drawer > IDE.
-
Select Deploy > Create Release.
-
To start a build, you can either select an existing template (if you're updating an existing app upgrade) or click + Release to create a new template.
-
If using an existing template, click on the Template button for the existing template record.
-
Update the Name, Version and Developer fields on the Release Details screen to reflect the build you're creating:
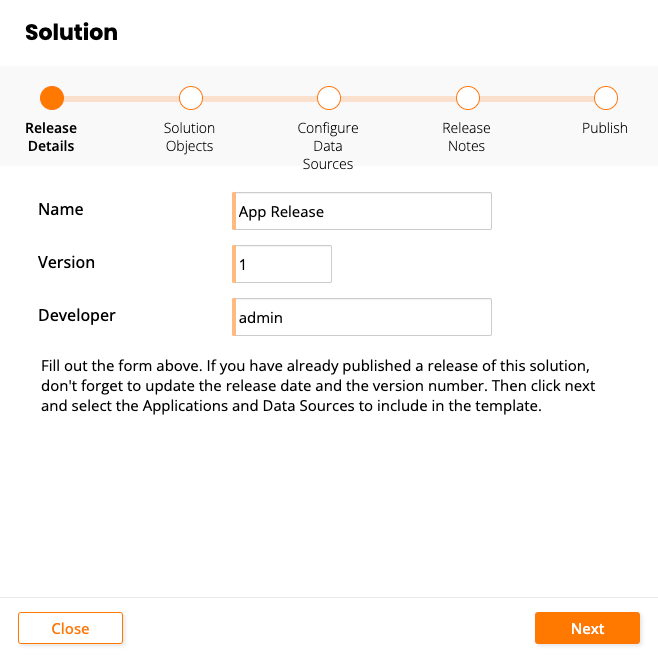
-
Click the Next button.
-
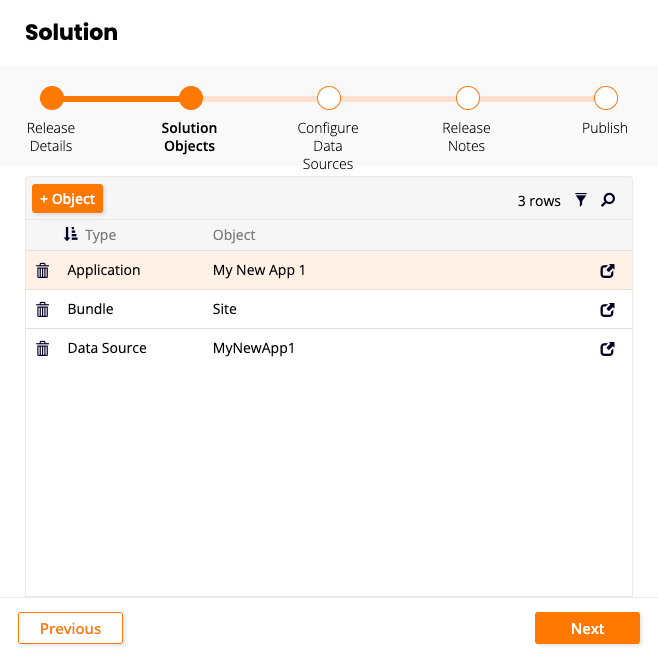
On the Solution Objects screen, you choose what goes in the release package. The options are as follows:
- Application
- Assembly
- Bundle
- Collection
- Data Source
- Function
- Logical Data Type
- Page
- Role
- Rule
- SQL Object
- Widget
To add any of these, click the + Object button, select the type from the menu, then click the Save button:
Notes
The following points apply to release packages:
-
When you add an application object, the application's bundle and data source are automatically added to the release package.
-
The release package does not include instance groups, instance security providers, or server credentials.
-
Newly supported objects (such as functions and logical data types) are not automatically added to pre-existing templates. You must add them yourself.
-
Click the Next button.
-
The Configure Data Sources screen lists all data sources relevant to the release build. (If there are no data sources, this step is skipped.) For each data source listed, check the Include column and make sure it is set as you want it for the build. Depending on the data source type, any of the following options are available:
-
Logical Model Only: Use when you want to package only the data that was created and exists in App Builder itself. Examples: data and business objects, subqueries, CRUDs, workflow, bridges. This option is generally used for data sources you do not own and/or are not maintained via App Builder (external data sources, API data sources, etc.).
-
Physical Model Only: Use when you want to package only the data source tables and columns structures, without the data.
-
Logical Model and Physical Tables: Use when you want to bring along all data existing in App Builder itself as well as the underlying data source tables and columns structures. Here, physical refers to App Builder maintaining or making updates to the actual database layer. If you move a Physical model, that means any changes made in dev to the database will also be made in the QA/Prod database upon moving the LP. This option is generally used for data sources you manage.
-
Do Not Include: Use if you do not wish to include this data source in this release.
Important
If you have database changes that need to be committed you should move Logical and Physical for that database. The Release Management process does support importing Tables. If you import Tables into a data source, those imported Tables will be created in the target system if they are a part of the first Physical change set.
-
-
Click the Next button.
-
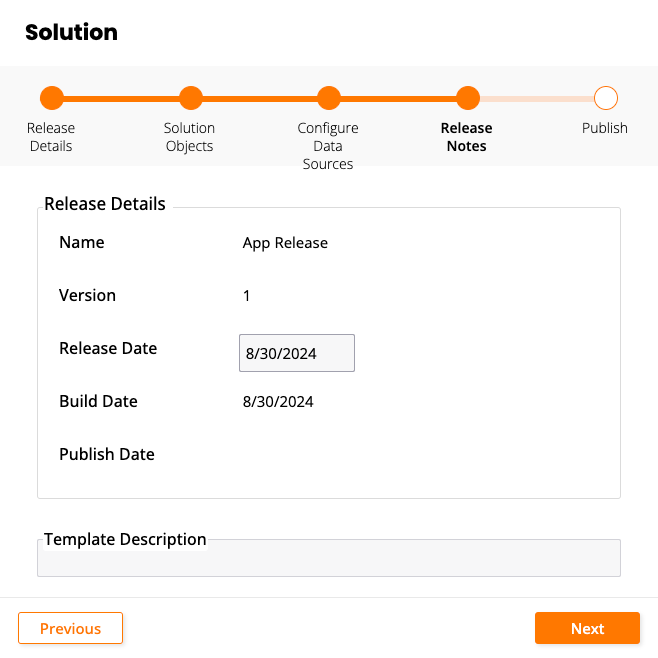
If you have translations in your app, the Solution Bundles screen appears. If not, the Release Notes screen appears with overview information about the release package:
-
Name: The name of your application.
-
Version: The version number of package being created.
-
Release Date: The date you want the release to appear as (this is a soft date and can be different from the actual release date).
-
Build Date: The date you committed the package.
-
Publish Date: The date you released the package.
-
Template Description: A text description of what your app or suite does.
-
-
Click the Next button.
-
Review the information on the Publish screen, then click the Finish button.
You should now be back at the Release Template Builder screen with the Ready column containing a green checkmark.
-
Click on the Database Changes button, and you'll know you have unconfirmed changes to review and commit if you see a red checkmark appear in the DB column on the Release Template Builder screen. The Change Management Requests screen lists out all of the data source related changes that will be part of the package. If you see any changes listed with a red checkmark in the Status column, that requires you to manually click into it to review and approve.
Clicking into review brings you to the Change Management Request screen. Here, the Patch Number field auto populates with a value and indicates what iteration this package update reflects. Be sure to review all entries listed in the Changes panel to ensure this information is what you expect will move with the package. On this screen you need to enter:
-
Reference Number: This can mirror the Patch Number value, be a JIRA or AHA ticket reference, or use a client numbering value.
-
Short Description: Provide a text description about the package. If desired, enter additional information in the Comments field.
-
-
Click the Save button, and if ready to proceed click the Close this Request button.
-
Close out remaining screens so you're looking at the Release Template Builder screen. You'll now see a green check appear in the DB column.
-
The Data Config is optional and only used if you're moving Logical and Physical Data with the package. From the Data Configuration screen you'll line items of all the datasource, tables for the data source, along with what Owner Type has been assigned along with the corresponding action that happens when the table is moved to that environment. The different Owner Types are as follows:
-
User Data: Will not transfer any of the data. The users in each environment are responsible for populating that table. For example: Customers or Orders, which are transactional tables.
-
Share Data: Inserts the new records only into the next environment. For example: Email Templates, which is a table you want the user to customize changes to.
-
Developer Data: Truncates the table in QA and inserts all the records from the package. This is typically used any time you have lookup tables, or tables that are part of a configuration. For example: CustomerType, EmployeeType.
-
-
Information can be manually overridden for Owner Types, and set for the specific package, or you can simply click Confirm Config. This marks this process as complete and returns to the Release Template Builder screen. Note that Jitterbit methodology Best practice is to always set the Install Option value at the Table level, which maps to Owner Type in the Release Template Builder screen. Install Options are User Data, Share Data, and Developer Data. If the values are set at the table level, these settings will transfer over to the release package. Setting this information at the table level is helpful for projects with multiple team members.
-
The SQL Config area allows you to pick the database and see if there are any objects (views or stored procedures) stored on the database at the native SQL layer. This will allow you to move views or stored procedures. This information will not automatically populate on the resultant Code screen, and you will need to manually click on the Create button and add them in. This step is typically only used in advanced situations, and is not a required step.
-
The Build step will show the version for this release, allow you to add notes specific to this release, and let you select an option to take a snapshot before building. When you structure your release notes, you should use a format like the following screenshot. Following a consistent process for naming your release notes over time is important, especially if your project is one that has multiple people working on them. This becomes a running log of the app release notes.
-
Click on the Build Package button, which kicks off a background job that builds the package. There is no notification that happens to let you know when the package is finished and/or fails. To check on the process status, you need to go to App Builder IDE, Manage Servers and Schedules and check the Instance Running Jobs panel.
-
The Reset button would clear out all information associated with the package template, and allow you to start from a clean slate for your package build.
-
Click the
 Packages icon which brings you to Solution Releases screen, which has the downloadable LP file created for the next environment. This is the file you'll take to install in the next environment. From this screen, download the Package file and store it locally on your computer.
 -
With the LP file available, go to your next environment where you will install it (QA or Prod). From there, go to Deploy your Application from the App Builder IDE and click on the Install Release button.
Tip
To see the contents of the package before installing, click the Manifest button.
-
Click the Create button and Browse to locate the Package file and click Save. Upon Saving you will see the Solution panel on the right display the package information about Name, Version, Developer, Release Date, Description and Release Notes.
-
Click the Install button after confirming this is the package you wish to install. This process runs in the foreground. If it succeeds you'll get a success message. If it fails go to Logs > App Server Fast Logs and you'll see specific error information as to why the install failed.
Schedules and release packages
Schedules will be included in a Release Package (or LP) unless they are manually removed when building the Package. By design, Schedules that have been deployed in a Production environment are "sealed" or prevented from making certain edits to the Schedule information. This prevents someone from accidentally making development changes in a downstream environment, which could lead to various issues when trying to deploy the app in the future. Schedules are part of an application, so they are "sealed" in these downstream environments. You can turn Schedules on or off or adjust the time, but you are not able to change the execution type of a Schedule.
There are some scenarios where you might set up a Schedule in Dev but once in Production the Dev Schedule gets turned off. For example, interacting with an API. You may only want to interact with an API from the Production environment, so once the Dev is complete you can turn off the Schedule in the Development environment.
Once a Schedule has been added to an LP, note that not all Schedule changes will get pushed in future Builds of a package. If you add or remove Events associated with a Schedule, these changes will get reflected in a new Build. Other changes to a Schedule definition will not get pushed to future Builds.
To make changes to a Production Schedule that is sealed, you can create a new Schedule that will then get included in the next LP. This process will ensure the Schedule is created correctly with any new settings reflected in the downstream environments.