SAP system configuration for Jitterbit Design Studio SAP Event Listener
Introduction
It is recommended that an SAP administrator configure the SAP system prior to installing and configuring the SAP Event Listener application. As part of this process, they will create required objects in the SAP system and set up Jitterbit as a partner. These configuration activities are detailed on this page:
- Creating an RFC destination
- Creating a transactional RFC (trfc) port
- Specifying a logical system
- Setting up a partner profile
After the SAP Event Listener is fully configured, an SAP Administrator can test the connection of the RFC destination to verify connectivity, as described at the end of this page under Verifying connectivity with the SAP event listener.
For all steps required to configure and use the SAP Event Listener, see SAP event listener get started guide.
Creating an RFC destination
The first step is to register Jitterbit at the SAP gateway system using an RFC destination. The RFC destination is a logical destination that will be bound to the transactional RFC (tRFC) port you create in the next section.
Follow these steps to create an RFC destination in the SAP system:
-
Log in to the SAP GUI.
-
In the search box, enter the SAP transaction code SM59.
-
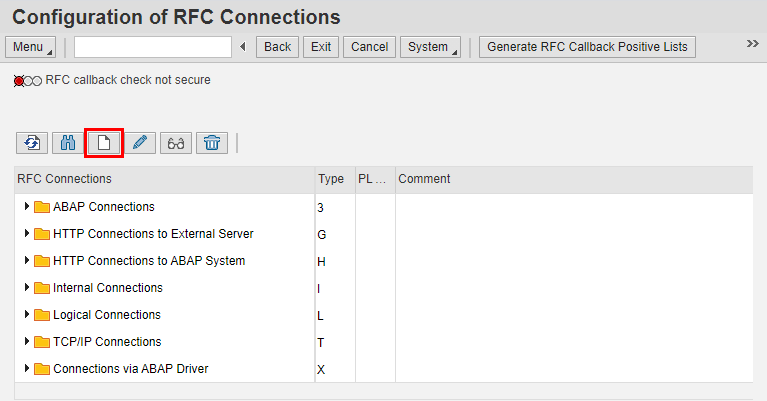
The Configuration of RFC Connections screen is displayed. Click the create button
 to create a new RFC destination:
-
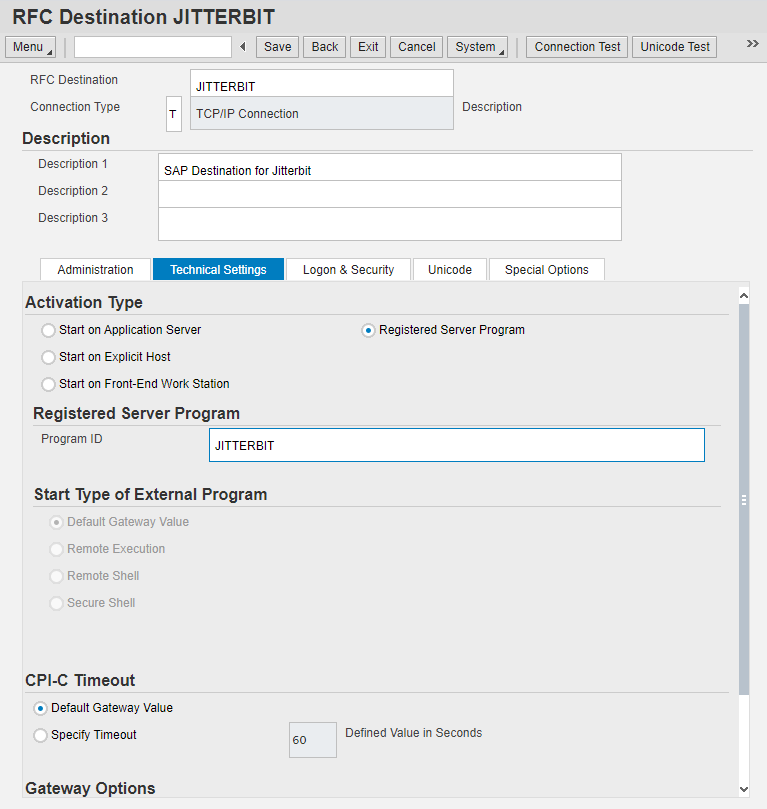
The RFC Destination configuration screen is displayed. Complete the configuration as follows:
-
In the RFC Destination field, enter a name for the RFC destination, such as JITTERBIT.
-
In the Connection Type field, select T for TCP/IP Connection.
-
In the Description, enter a description, such as SAP Destination for Jitterbit.
-
In the Technical Settings tab:
- Under Activation Type, select Registered Server Program.
- Under Registered Server Program, in the Program ID field, enter a name for the program to be used by the SAP Event Listener to connect to the SAP gateway, such as JITTERBIT.
-
Save the RFC destination.
Note
The Connection Test button should not be used at this point in the configuration. If used, an error is expected. To test the connection after all configuration is completed, see Verifying connectivity with the SAP Gateway at the end of this page.
-
Creating a transactional RFC (tRFC) port
The transactional RFC (tRFC) port is the logical port used by the RFC destination for exchanging information with the Jitterbit SAP Event Listener. In order to be able to communicate with the SAP server, a port must be created on the SAP system and linked to the RFC destination.
Note
The Jitterbit SAP Event Listener uses the tRFC port for both tRFC and qRFC function calls.
Follow these steps to create a tRFC port:
-
Log in to the SAP GUI.
-
In the search box, enter the SAP transaction code WE21.
-
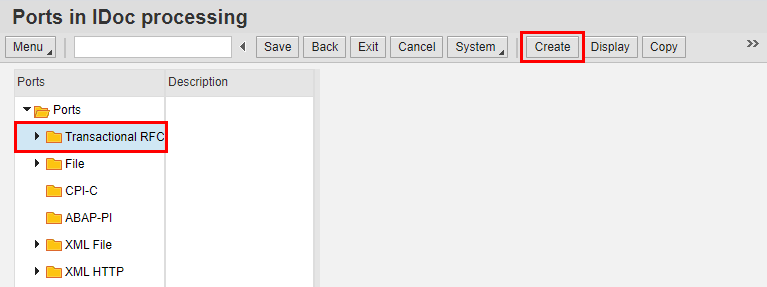
The Ports in IDoc Processing screen is displayed. Select the Transactional RFC folder and then click the Create button:
-
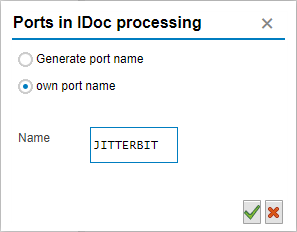
The Ports in IDoc Processing dialog is displayed. Select Own Port Name and specify the port name for the program, such as JITTERBIT:
-
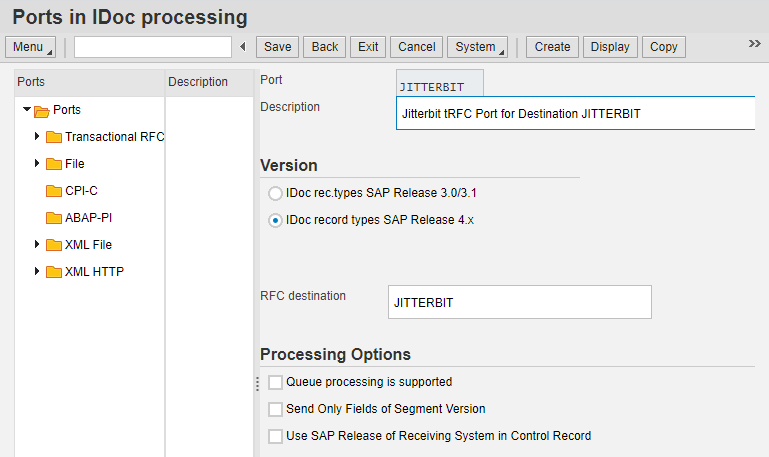
In the Ports in IDoc Processing screen for the new port, complete the configuration as follows:
-
In the Description field, enter a description, such as Jitterbit tRFC Port for Destination JITTERBIT.
-
Under Version:
-
Select the version of IDoc record types to be exchanged using this port.
-
In the RFC Destination field, enter the name of the RFC destination that you previously defined, such as JITTERBIT.
-
-
Save the port.
-
Specifying a logical system
A logical system must be specified before setting up a partner profile (as described in the next step). Follow these steps to specify a logical system:
-
Log on to the SAP GUI.
-
In the search box, enter the SAP transaction code BD54.
-
The Change View "Logical Systems": Overview screen is displayed. Click the New Entries button:

-
In the Logical Systems table, in both the Log.System and Name table columns, enter a name for the logical system, such as JITTERBIT.
-
Save the logical system.
Setting up a partner profile
A partner profile must be created on the SAP system to specify the type of information that is exchanged with Jitterbit. The partner profile specifies the IDoc types that can be sent by Jitterbit to the SAP system (inbound parameters) and the IDoc types that are sent by the SAP system to Jitterbit.
Follow these steps to create a partner profile:
-
Log on to the SAP GUI.
-
In the search box, enter the SAP transaction code WE20.
-
The Partner Profiles screen is displayed. Click the Create button.
-
In the Partner Profiles screen for the new profile, complete the configuration as follows:
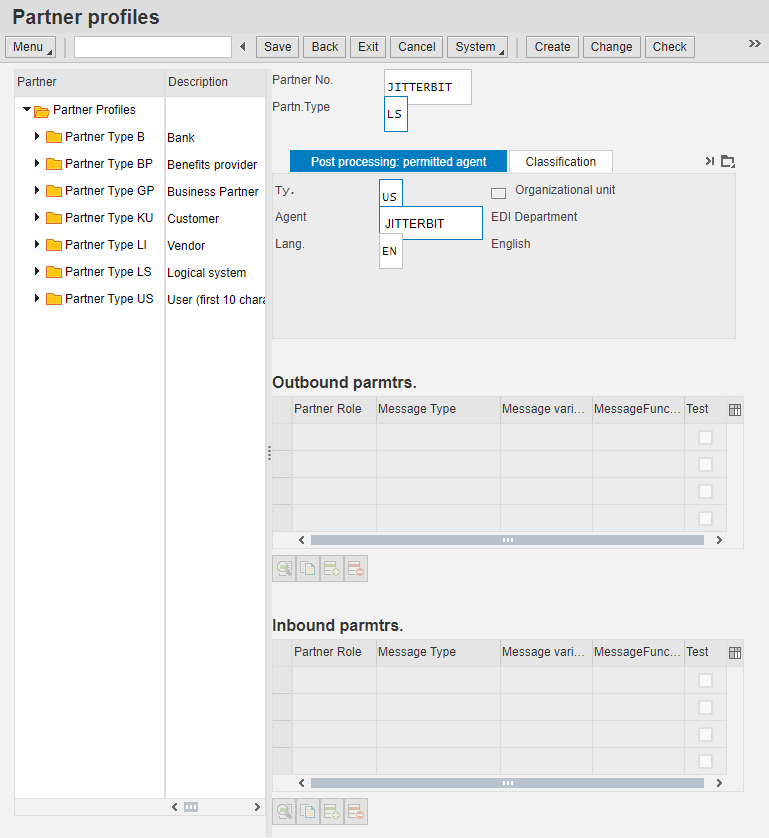
- In the Partner No. field, enter the name of the logical system, such as JITTERBIT.
- In the Partn. Type field, enter LS.
- In the Post Processing: Permitted Agent tab:
- In the Type field, enter US as the user type.
- In the Agent field, enter the ID of the permitted user, such as JITTERBIT.
- In the Language field, enter EN to use English as the notification language.
-
Under Outbound Paramtrs., click the create parameter button
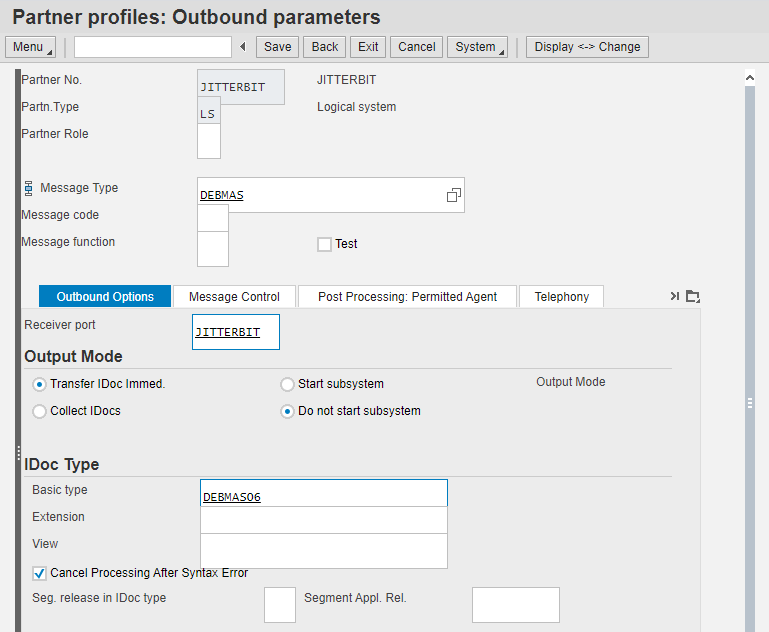
 to add as many outbound parameters as needed. The Partner Profiles: Outbound Parameters screen opens. For each outbound parameter, complete the configuration as follows:
-
In the Message Type field, enter the type of message that is to be sent.
-
In the Outbound Options tab:
- In the Receiver Port field, enter the previously defined receiver port, such as JITTERBIT.
- Under Output Mode, for most use cases, select Transfer IDoc Immed. Choose other options as appropriate for the use case.
- Under IDoc Type, enter the information for the IDoc type that is to be sent.
-
Save the outbound parameter.
-
-
Under Inbound Parmtrs., click the create parameter button
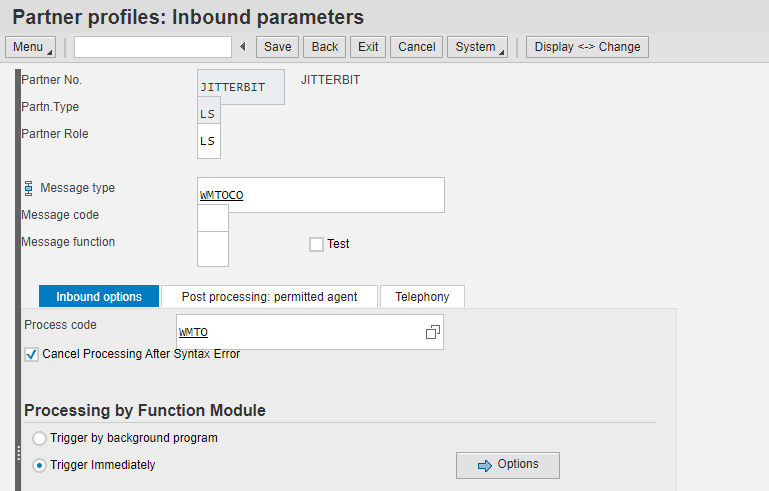
 to add as many inbound parameters as needed. The Partner Profiles: Inbound Parameters screen opens. For each inbound parameter, complete the configuration as follows:
-
In the Partner Role field, enter LS for logical system.
-
In the Message Type field, enter the type of message that is to be received.
-
In the Inbound Options tab, enter the Process Code for the functional module that is to process the received IDoc.
-
Save the inbound parameter.
-
Verifying connectivity with the SAP event listener
Connectivity with the SAP Event Listener is not expected to be established until all configuration steps are complete, as summarized in the SAP event listener get started guide. Particularly, the Event Details must have been entered in the SAP event connection properties section of the SAP event listener configuration and the SAP Event Listener restarted.
Once those configuration steps are complete, an SAP administrator can test the connection of the configured RFC destination in the SAP system to verify that connectivity has been established between the SAP gateway and the SAP Event Listener.
To test the connection of the RFC destination:
-
Log in to the SAP GUI.
-
In the search box, enter the SAP transaction code SM59.
-
In the RFC Connections column, expand TCP/IP Connections and double-click to open the RFC destination name (such as JITTERBIT) configured as part of Creating an RFC destination and described earlier on this page.
-
Click the Connection Test button to verify connectivity between the SAP gateway and the SAP Event Listener:

These are possible reasons for an unsuccessful connection test:
- Missing Profile Name: If you receive an error related to a missing profile name, check to ensure the Event Details are included in the SAP event connection properties section of the SAP event listener configuration, restart the SAP Event Listener service, and perform the test again.
- Unicode Settings: The connection test may fail if the Unicode settings on the RFC destination are not set properly. Correct the settings on the RFC destination, restart the Jitterbit SAP Event Listener service, and perform the test again.