Pivot tables with pivot panels in Jitterbit App Builder
Pivot Panels are a technique used in data processing, and represent a table of statistics that summarizes the data from a more extensive table(s). In App Builder you can create client-side Pivot Panels by selecting the Pivot Panel Type when creating a Panel, and leveraging a data object to define the data to be displayed in the table. This guide will step you through how to create a Pivot Panel as well as limitations and notes when using Pivot Panels in App Builder.
Note
Pivot Panels are deprecated. Pivot Panels will continue to work, but creating new ones is no longer supported.

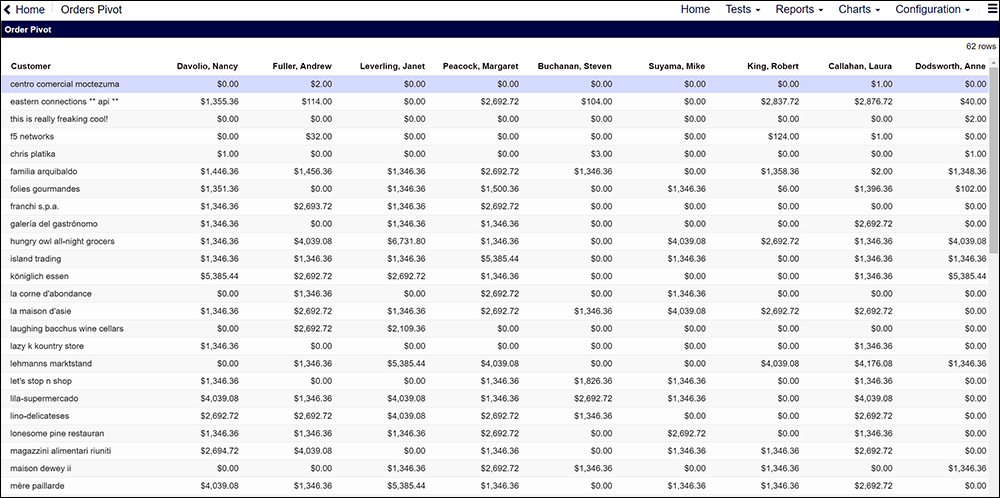
Example Pivot Panel, Row = Customer, Column = Employee, Value Control = Sum of Order Total
To create a pivot panel
Prior to creating and adding a Pivot Panel to a page in your App Builder Application, you should have a data object already created in the Business Logic layer that the Pivot Panel will be using. The data object should have values for the Row, Column, and Value Control that the Pivot table will display, and also needs to aggregate the data so that there are no duplicate values.
- Navigate to App Workbench > Add a Page
- Assign a Name for the new page, and click Save. For example: Order Pivot
- Click Create
- Select the single row Page Layout
- Click Add Panel, and select Pivot as Panel Type
- Select the data object the pivot table should use as the Source
- Review the assigned Name and edit if needed
- Click Save
- Click Create under Controls and select the Column that will represent the Row data in the Pivot table. For example: Customer
- Set the Control Type to Row
- If the data selected is an ID and you want to change it to Name, modify the List Control Properties information to select the appropriate List Business Object Set, Key, and Title.
- Click Save and click the Create+ button
- Select the Column that will represent the Column data in the Pivot Panel. For example: Employee
- Set the Control Type to Column
- If the data selected is an ID and you want to change it to Name, modify the List Control Properties information to select the appropriate List Business Object Set, Key, and Title.
- Click Save and click the Create+ button
- Select the Column that will represent the Value data in the Pivot panel. For example: Sum of OrderTotal
- Set the Control Type to Value
- Click the X button to exit out of the Control definition screen, click the Run button to preview the results in the application
Limitations and notes on pivot panels
-
Pivot Panels are limited to display 1 Row, 1 Column, and 1 Value Control.
-
Child Panels can only bind to the Pivot Panel on the Row Column.
-
It is the responsibility of the data object to provide unique values per Column header / Row header combination. The data object should SUM or COUNT or use whatever aggregate function it needs. A pivot panel will throw an exception if duplicate values are detected, which implies that you need to modify the data object to perform the appropriate aggregation.
-
Row and Column headers can be looked up using a Source table. For example, you can convert a EmployeeID to an Employee Name when the pivot table is rendered. This is setup similar to how a List Control is Configured - Source table, ID Column, Name Column.