MCP Servers (Beta) page in Jitterbit MCP
Introduction
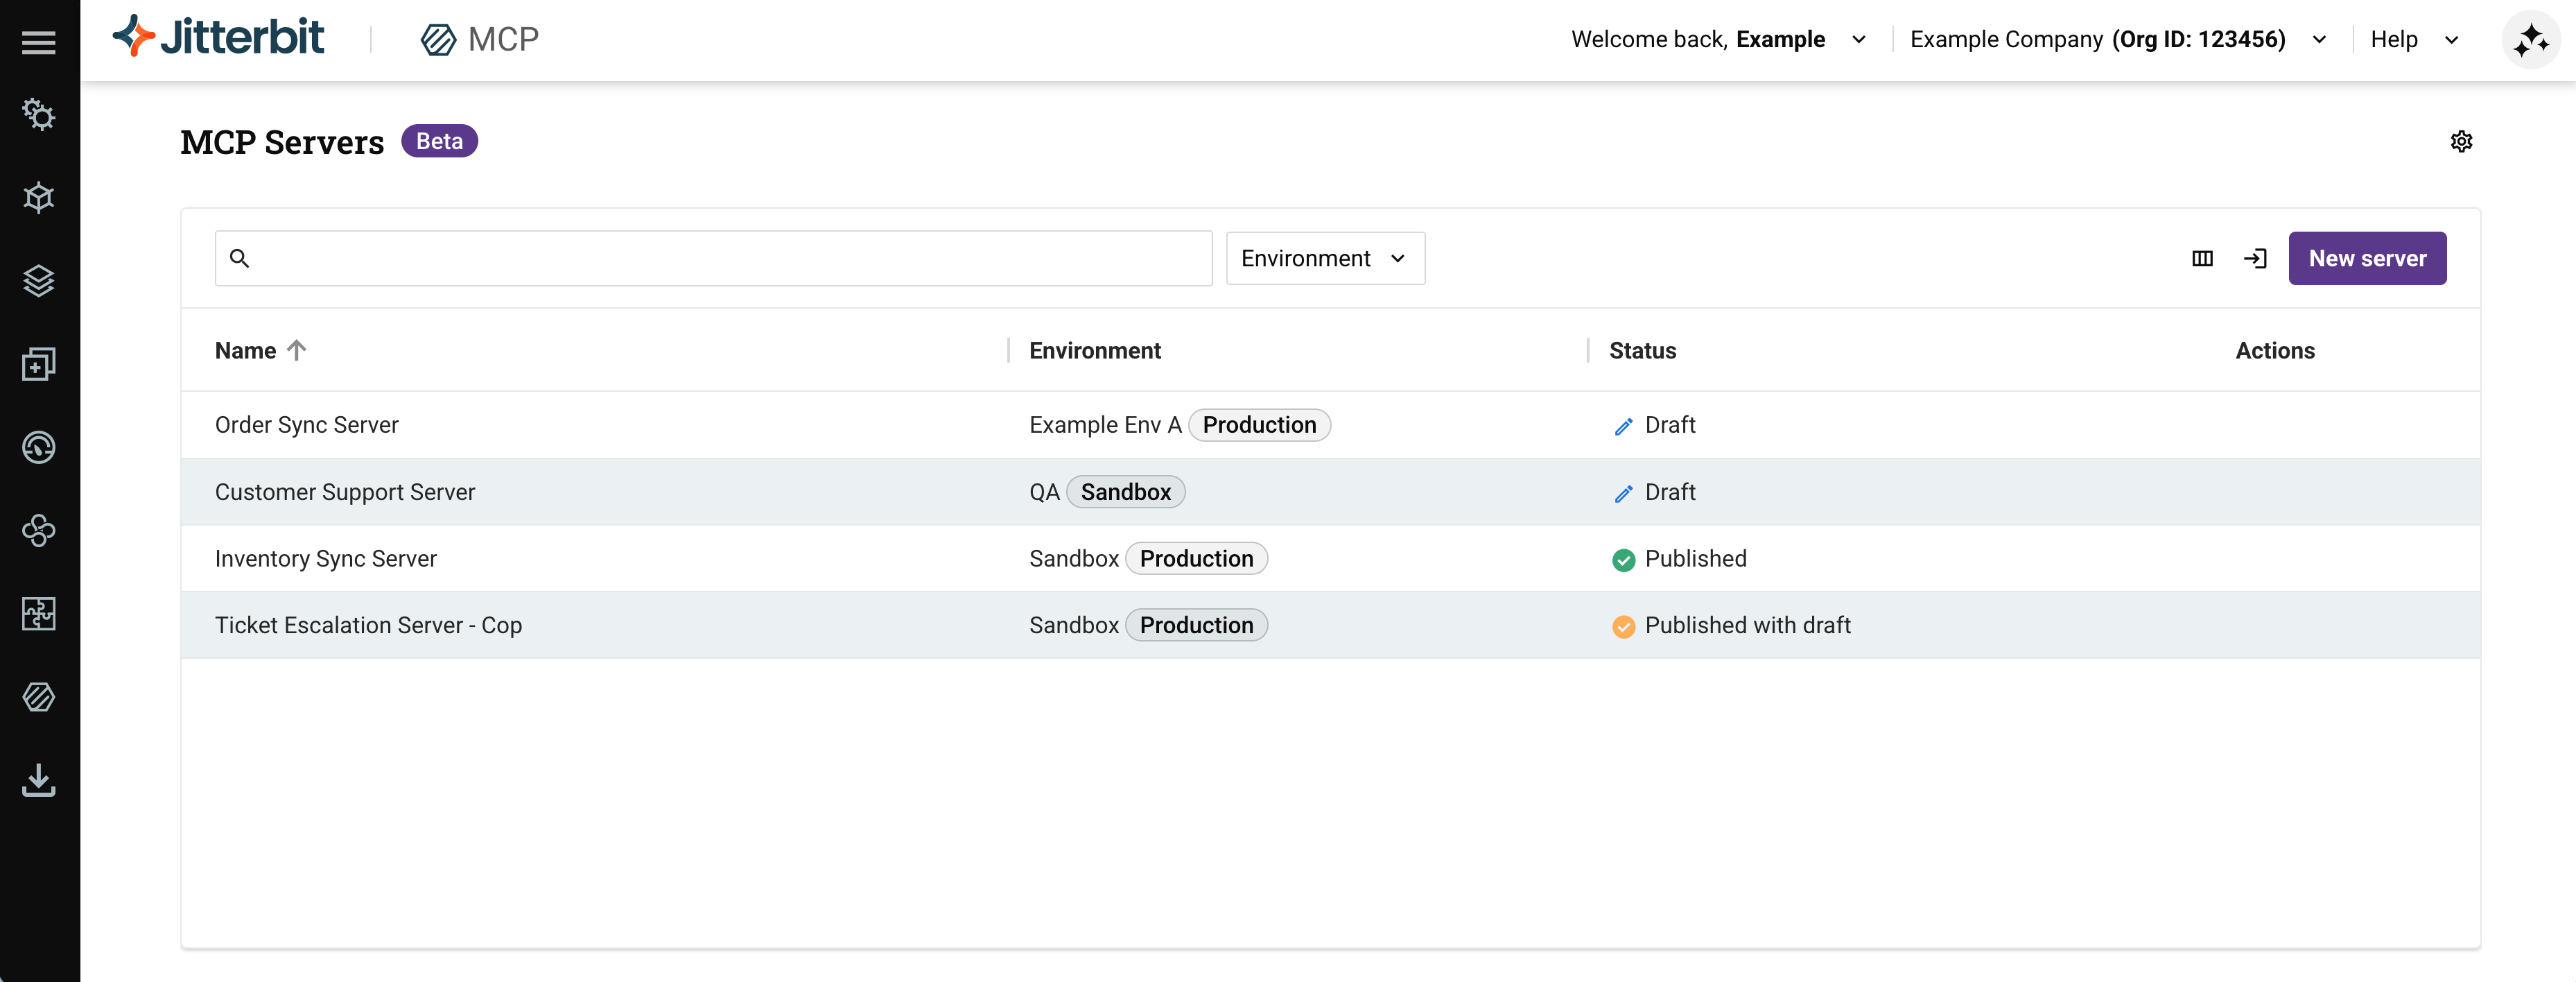
The MCP Servers page is where you create, configure, publish, and manage MCP servers and their capabilities.
To access the MCP Servers page, use the Harmony portal menu to select MCP > Servers.
Note
Users with the Admin or Read role permission can access this page. Users with only the Read permission also require Read environment access to view a server's contents.
Prerequisites
Before you create an MCP server, make sure you have:
-
Access to Jitterbit MCP, with the required role permissions and environment access.
-
An external HTTP or REST API, or a Jitterbit API created in API Manager, to expose as an MCP tool.
MCP-enabled environments
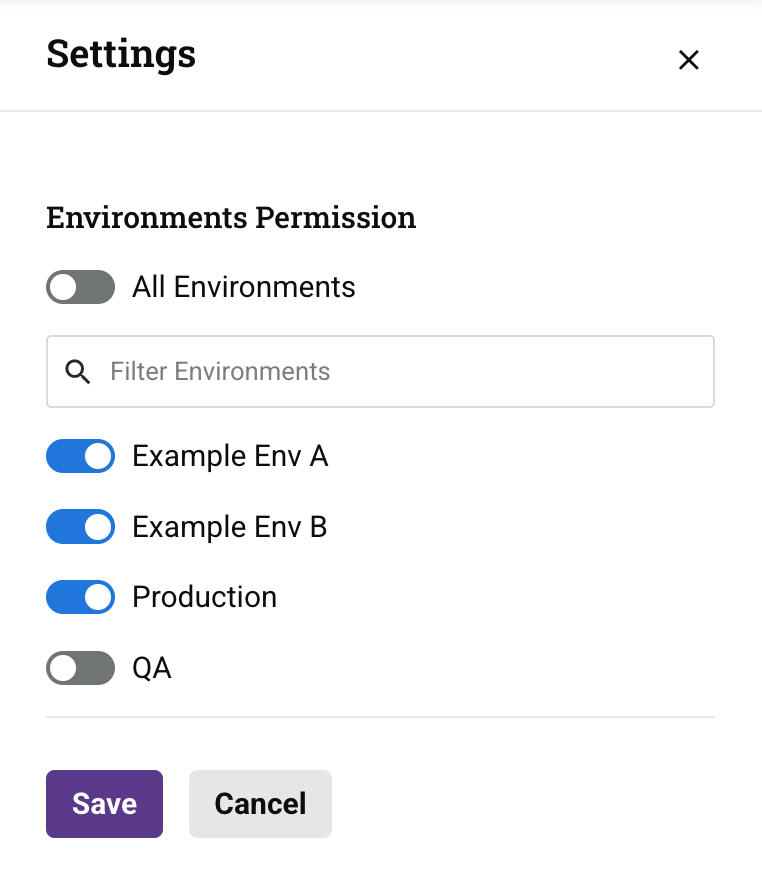
Click the settings icon in the top-right corner of the page to open the Settings panel. The Environments Permission section of this panel controls which Harmony environments are enabled for Jitterbit MCP. Only enabled environments can be used to create and manage MCP servers.
-
All Environments: Enable MCP for all environments in the organization. When this option is disabled, use the individual environment toggles to select which environments can use MCP.
-
Filter Environments: Enter any part of an environment name to filter the list.
-
Environment toggles: Enable or disable MCP for individual environments.
Click Save to apply the changes, or Cancel to close the panel without saving.
Servers page header
The header along the top of the MCP Servers page includes these controls:
-
Search: Enter any part of the server name to filter the list of servers. The search is not case-sensitive.
-
Environment: Use the dropdown to filter the list of servers by environment.
-
Columns: Click to change the visibility and arrangement of the columns in the server list.
-
Import server: Click to import an MCP server from a JSON file.
-
New server: Click to open the Server details drawer and create a new MCP server.
Server list
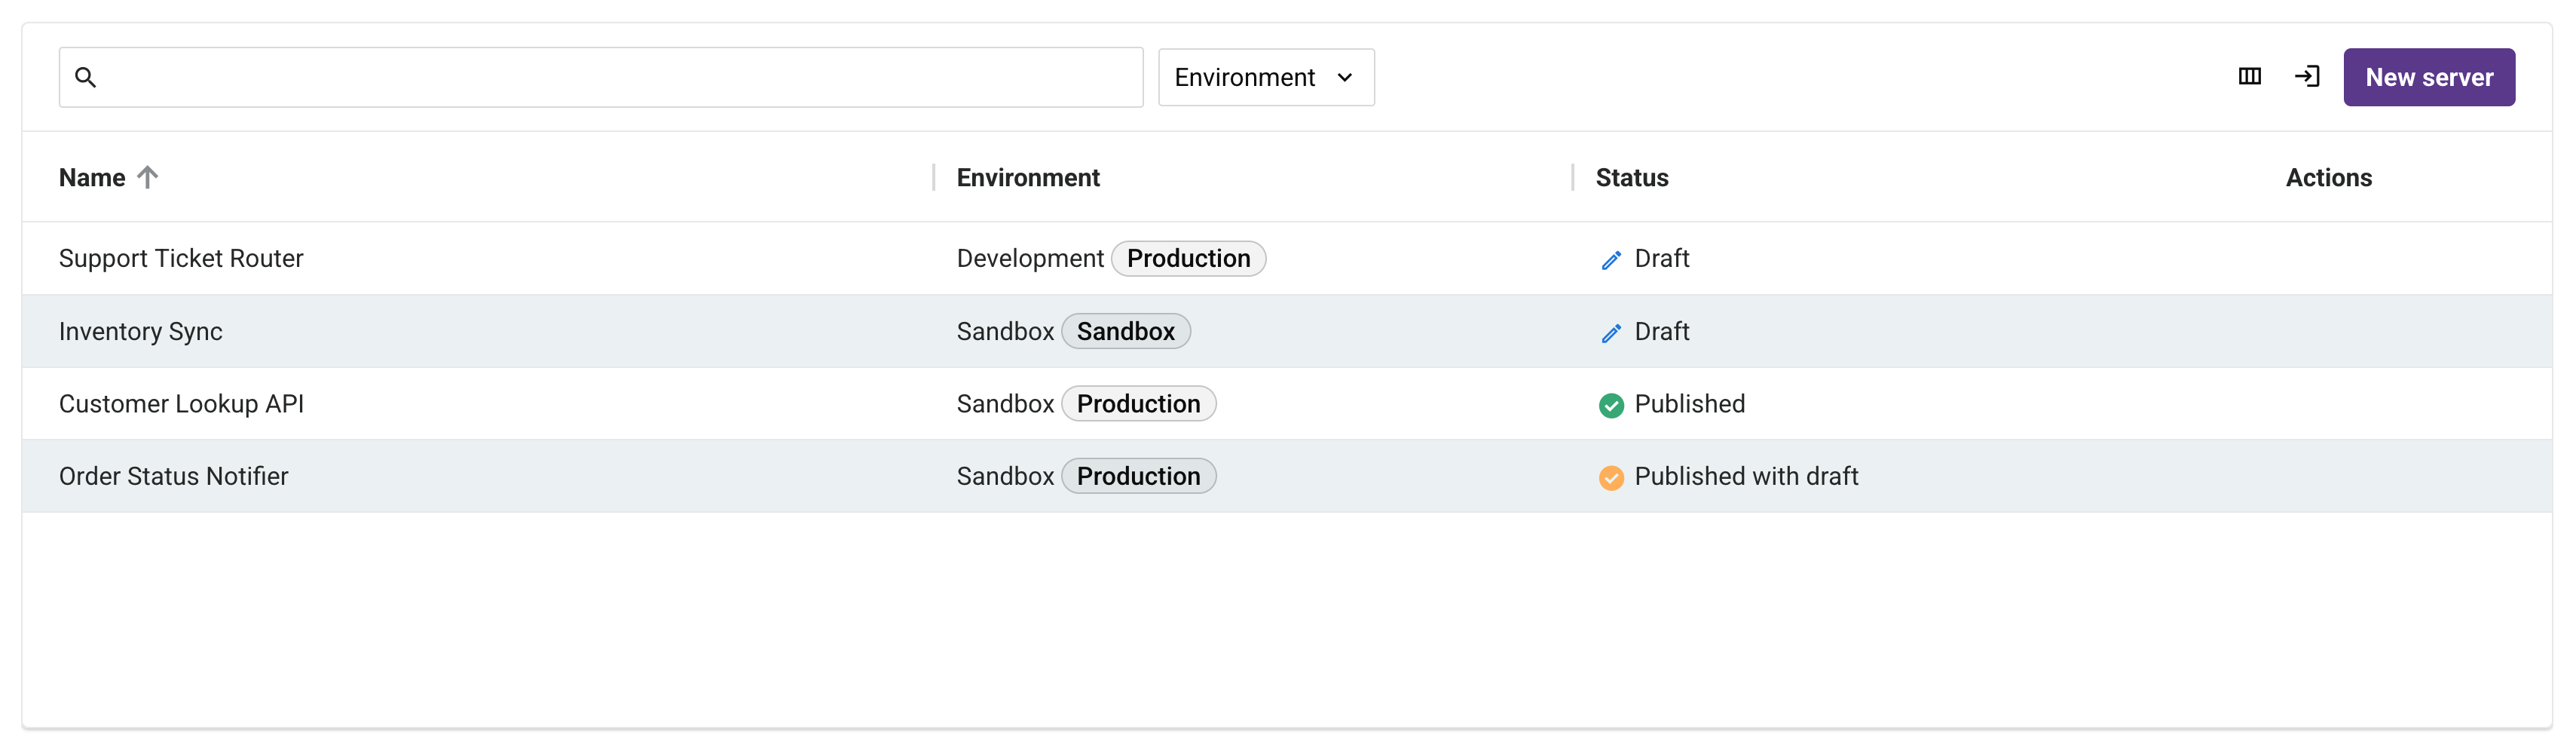
The MCP Servers page displays the MCP servers in your MCP-enabled environments in a table. When no servers have been created, the page displays an empty state. When MCP servers exist, the table displays them with the following columns:
-
Name: The name of the MCP server.
-
Environment: The environment where the server resides, followed by the environment's class (for example, Production).
-
Status: The server's status, one of:
-
Draft: The server has never been published.
-
Published: The server is published and available to MCP clients.
-
Published with draft: The published version remains available to MCP clients, and the server also has unpublished draft changes.
-
-
Actions: Hover over a server row to reveal these actions:
-
Edit: Opens the Server details drawer to edit the server.
-
Duplicate: Creates an independent draft copy of the server, with Copy appended to its name.
-
Export: Downloads the server configuration as a JSON file.
-
Delete: Permanently deletes the server. A confirmation dialog appears before the server is deleted.
-
Click a sortable column heading to sort the table in ascending order. Click it again to reverse the sort order.
Click a server row to open the Server details drawer.
Server details drawer
The Server details drawer opens at the bottom of the page when you create a server or select an existing one.
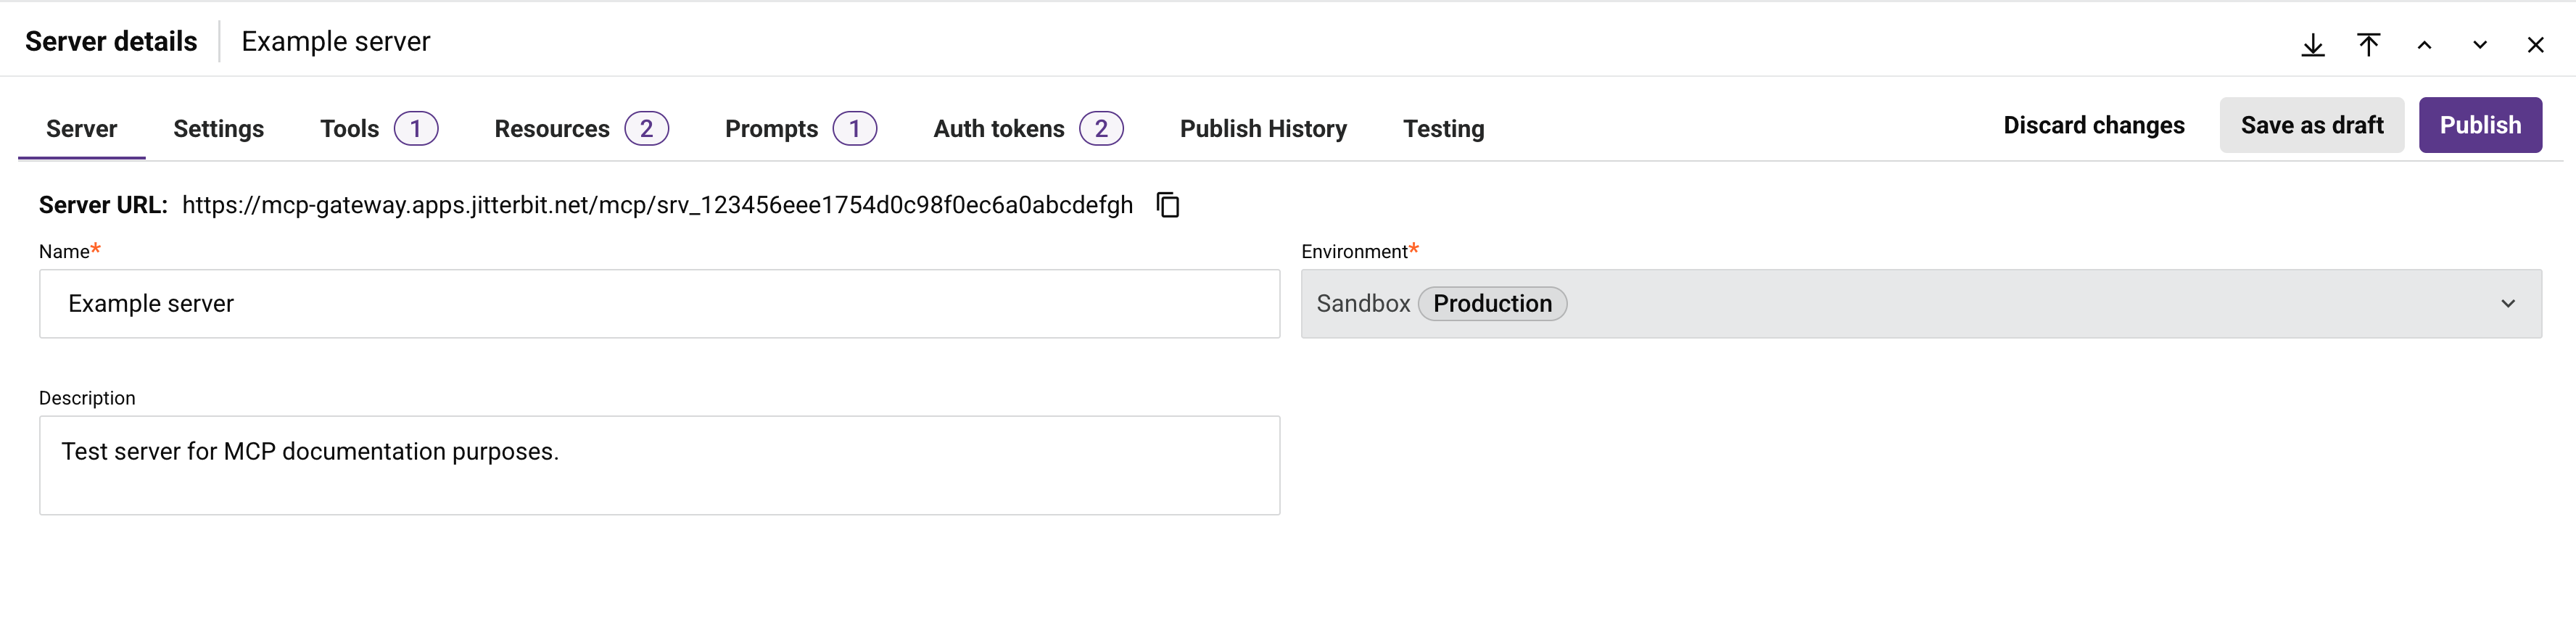
The drawer header includes these controls:
-
Download: Downloads the server configuration as a JSON file.
-
/ Expand / Collapse: Expands the drawer to full screen or returns it to the default view.
-
/ Previous / Next: Navigates to the previous or next server in the list.
-
Close: Closes the drawer.
The drawer header also includes these save controls:
-
Discard changes: Closes the drawer without saving changes.
-
Save as draft: Saves changes without publishing them:
-
A new server, or a server whose status was Draft, is saved in Draft status.
-
A server whose status was Published is saved in Published with draft status. The published version stays available to MCP clients while the draft does not.
-
-
Publish: Opens the Publish server changes dialog:
-
Version: A version identifier for this publish. This field is required.
-
Tag: An optional tag for this publish. A maximum of 75 characters is allowed.
-
Description: An optional description of the changes included in this publish.
Click Publish to save and publish the current server configuration, making it available to MCP clients, or Cancel to close the dialog without publishing. Each publish is recorded as an entry on the Publish History tab.
-
If the server has unsaved changes, navigating away from it using the Previous / Next controls, or by clicking another server row in the server list, opens an Unsaved changes dialog requiring one of the save controls above before navigation continues.
The drawer organizes the server configuration into tabs. When you create a server, use the Prev and Next controls to move through the Server, Settings, Tools, and Resources configuration steps. After you save the server, either as a draft or published, a Prompts tab becomes available. After you publish the server, an Auth Tokens tab also becomes available. The Testing tab requires the server to have no unpublished changes before you can test.
Server tab
The Server tab (shown in the previous section) contains the server's basic information:
-
Server URL: The MCP gateway endpoint that MCP clients connect to, unique to this server. A client authenticates with an MCP authentication token scoped to the server. This value is assigned when the server is published. Click the copy icon to copy the URL to your clipboard.
-
Name: The name of the server. This field is required.
-
Environment: The environment where the server resides. This field is required.
-
Description: An optional description of the server.
Important
A server's environment does not restrict which MCP clients can access it. Any MCP client with a valid MCP authentication token for the server can connect to it and invoke its tools, regardless of the client's own environment.
Settings tab
The Settings tab contains the server's rate limits and trusted IP address restrictions. These settings apply to all requests made to the server.
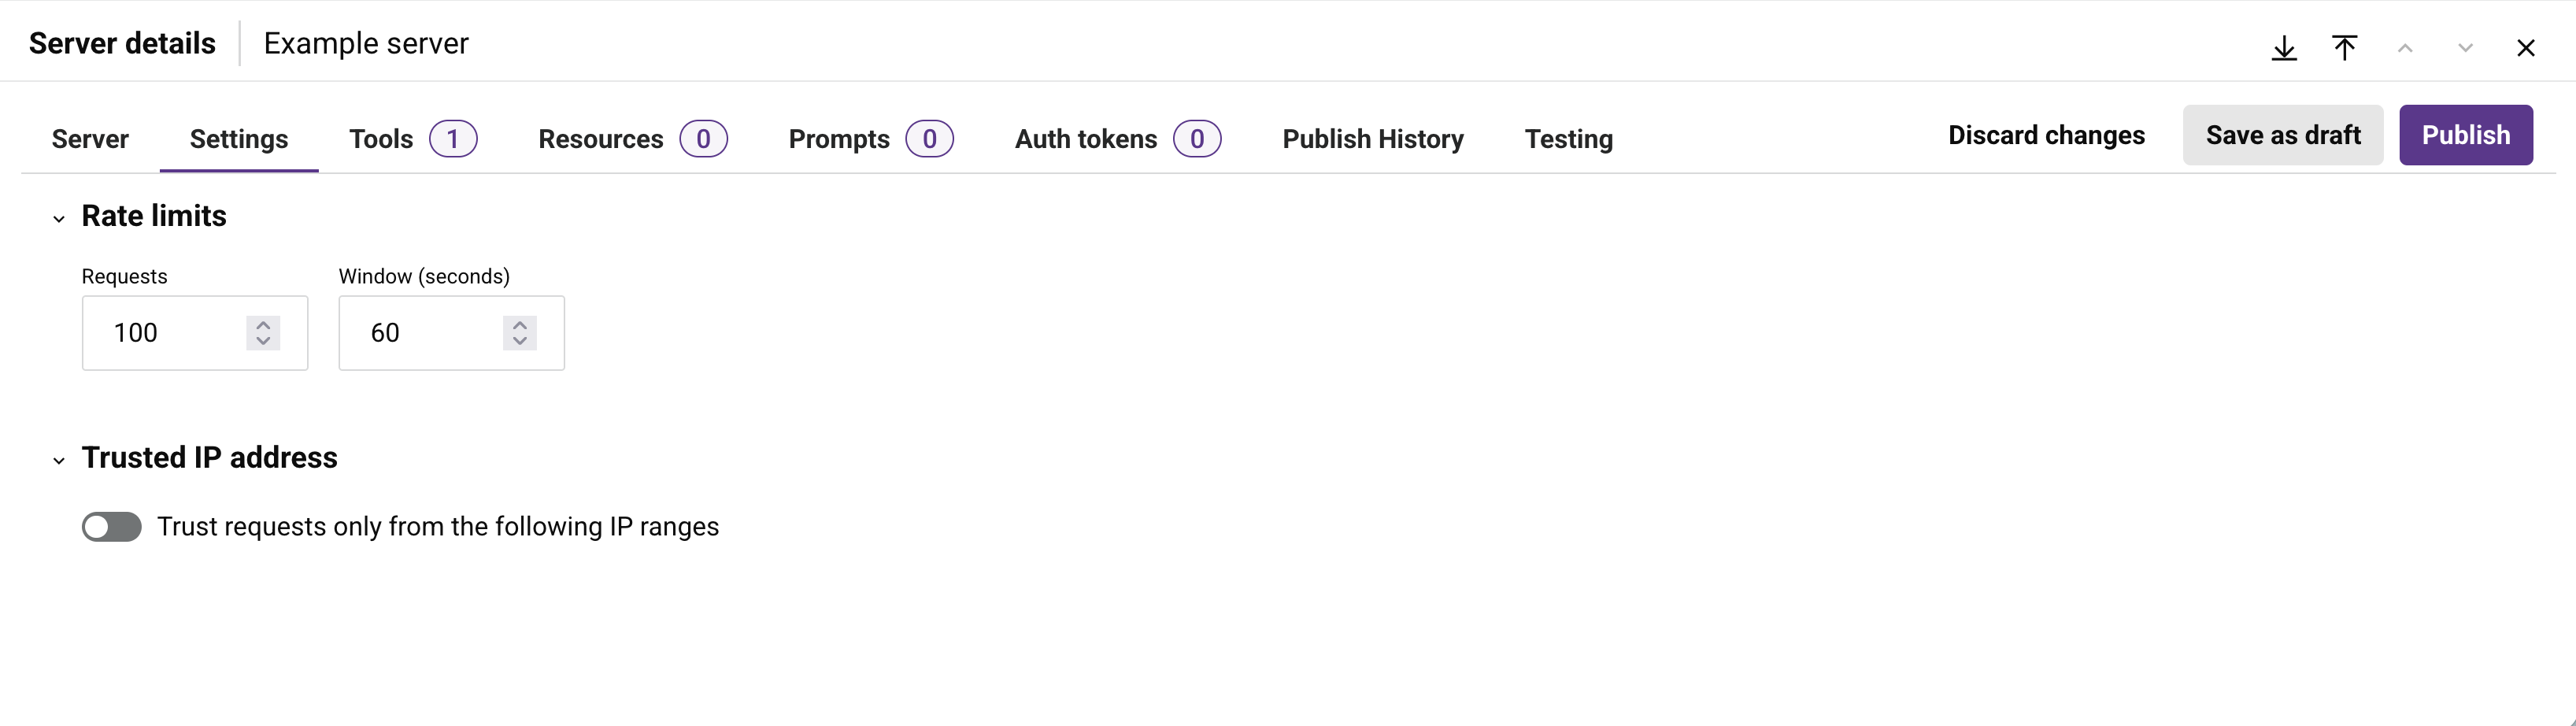
Rate limits
Under Rate limits, set the maximum number of requests the server accepts during a rolling time window:
-
Requests: The maximum number of requests allowed within the window.
-
Window (seconds): The length of the rolling time window, in seconds.
Trusted IP address
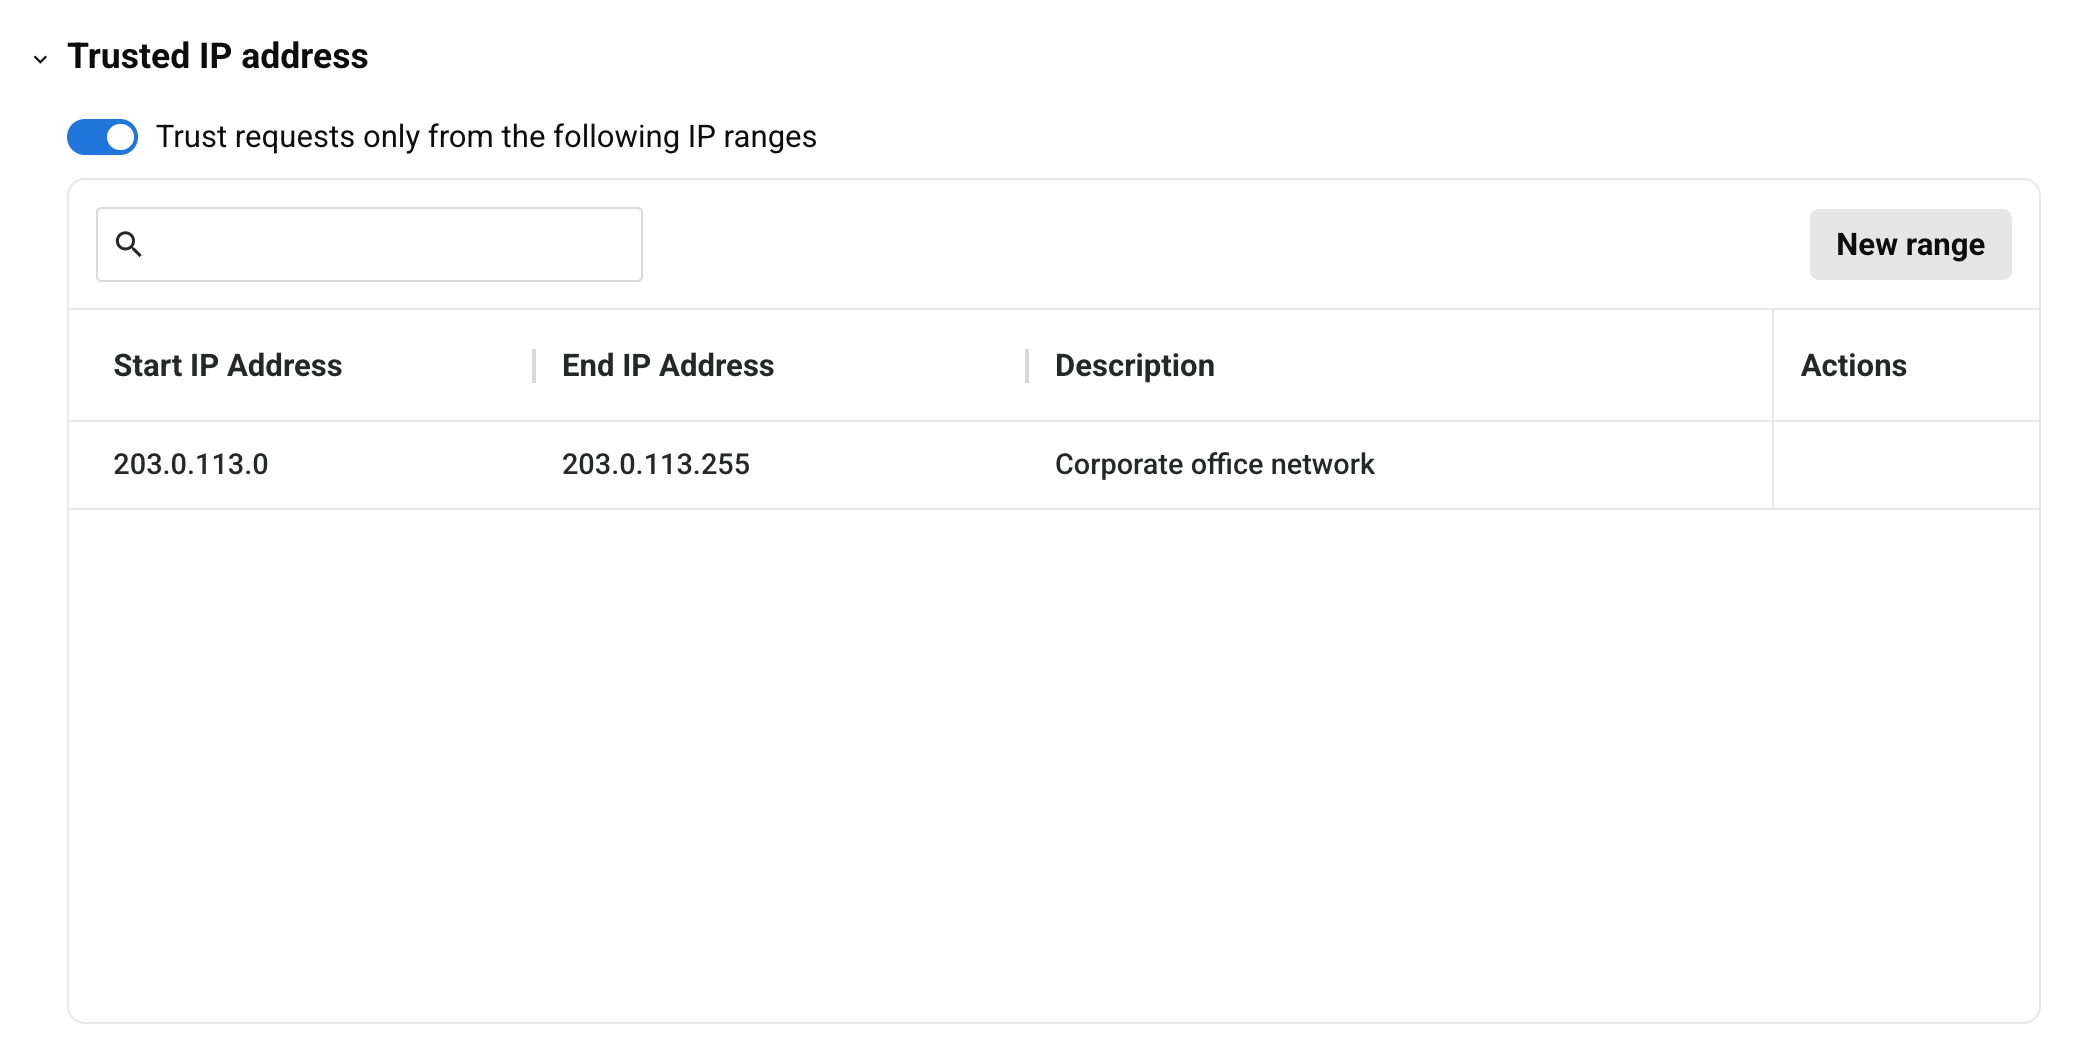
The Trusted IP address setting restricts the IP addresses from which clients can access the server. Enable Trust requests only from the following IP ranges, then define one or more permitted ranges in the table:
Note
A client's traffic must originate from a known, stable outbound IP address for a trusted IP range to work. This setting is best suited for a client running on a private agent with a static IP. A cloud agent, or a private agent without a static IP, does not have a fixed outbound IP address to add to the range, so client requests fail. Changes to a server's trusted IP ranges can take up to a few minutes to take effect.
-
New range: Adds a row to the table. Configure the range with these fields:
-
Start IP Address: The first IP address in the permitted range.
-
End IP Address: The last IP address in the permitted range.
-
Description: An optional description of the range.
-
-
Actions: Hover over a range row to reveal these actions:
-
Edit: Edits the range's fields.
-
Delete: Removes the range.
-
As with other changes made in the Server details drawer, use Save as draft or Publish to persist edits to a trusted IP range.
Tools tab
The Tools tab lists the tools the server exposes and lets you add, review, edit, duplicate, and delete them.
Tool list
Each tool added to the server appears as a row in the table, showing the values set during configuration:
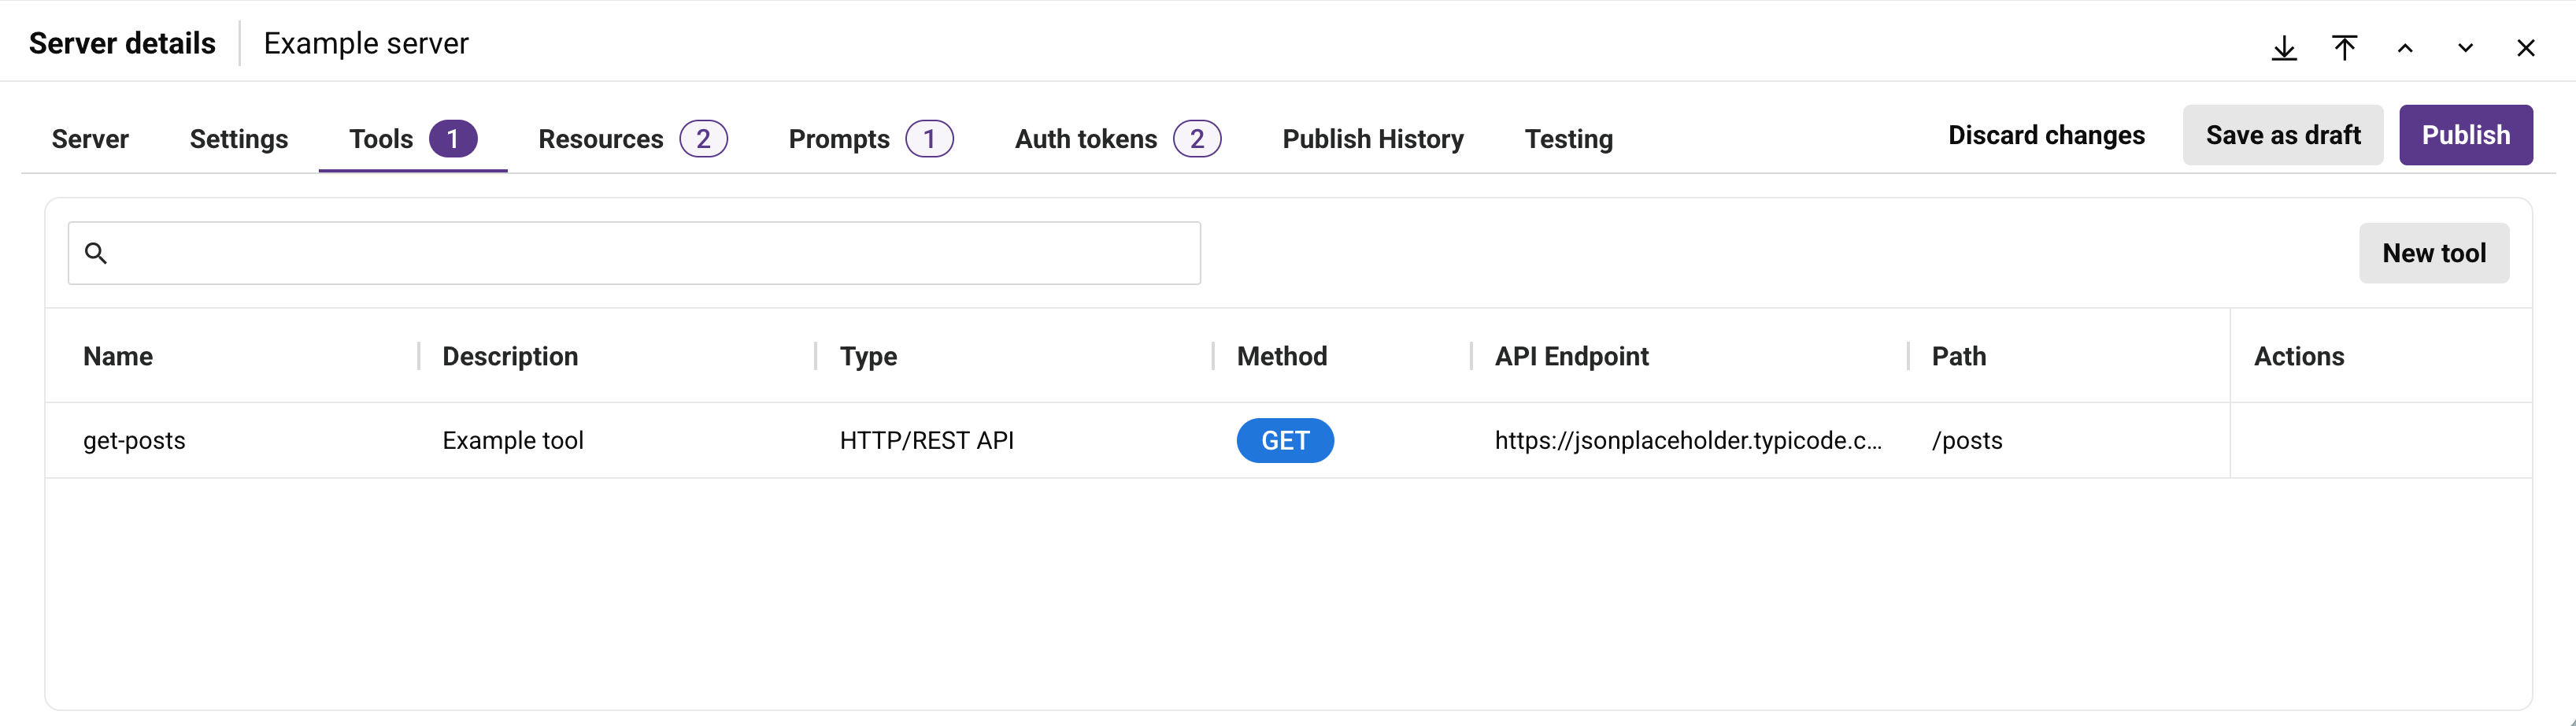
The table displays each tool's Name, Description, Type, Method, API Endpoint, and Path. The Method, API Endpoint, and Path columns show -- for a tool whose Type is Jitterbit Operation, since that tool type doesn't call an API endpoint directly. Click a tool row to see the tool's complete configuration in a read-only view. Hover over the Name column to reveal the copy icon, which copies the name without opening the row. Hover over a tool row to reveal these actions:
-
Go to API: Available only when the tool's Type is Jitterbit API. Opens the associated API's details in API Manager.
-
Edit: Opens the tool in edit mode.
-
Duplicate: Creates an independent draft copy of the tool, with Copy appended to its name.
-
Delete: Deletes the tool.
To filter the list, enter any part of a tool name in the search box.
Tool configuration
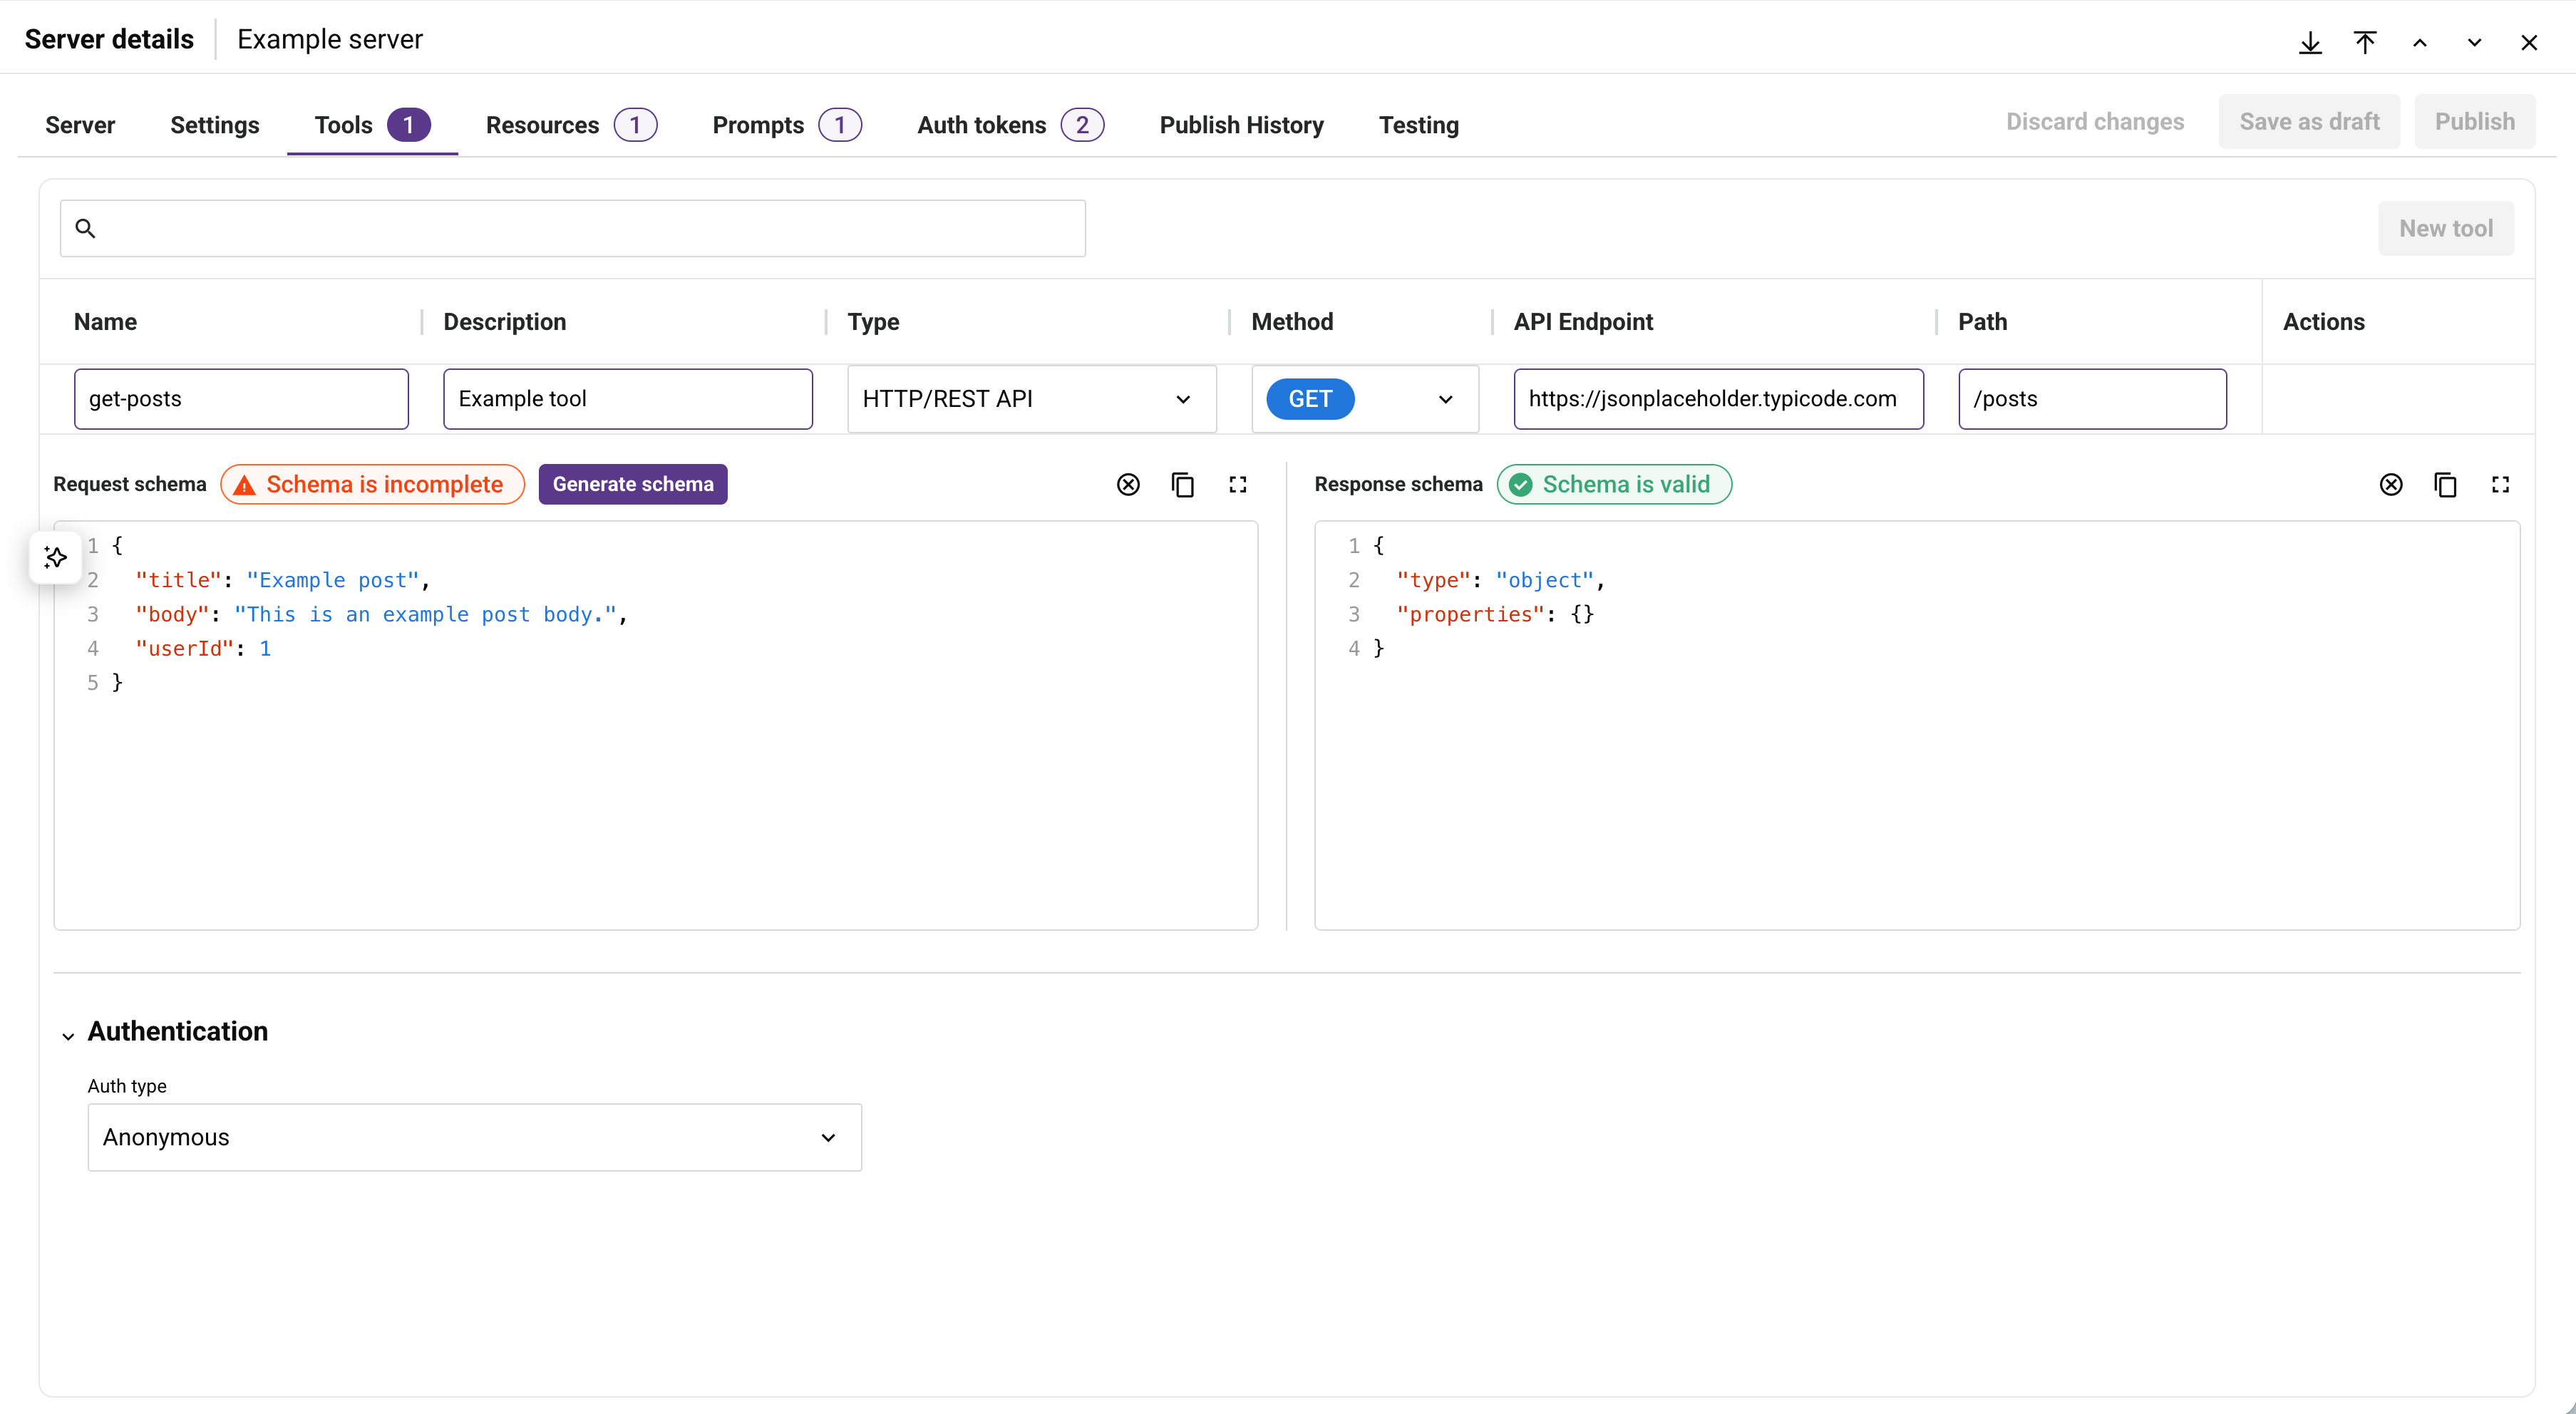
Click New tool to add a tool, or click the Edit action on an existing tool to edit it. A tool has the following configuration fields:
-
Name: The name of the tool. This field is required.
-
Description: A description of the tool. This field is required. MCP clients use this description to determine when the tool should be invoked.
-
Type: The tool type, one of HTTP/REST API, Jitterbit API, or Jitterbit Operation. The remaining fields depend on the selected type.
HTTP/REST API and Jitterbit API tools
For HTTP/REST API or Jitterbit API tool types, the following fields are available:
-
Method: The HTTP request method the tool uses, such as GET, POST, PUT, DELETE, or PATCH. Where supported, you can enter a custom method.
-
API Endpoint: The base URL of the API the tool calls. It can reference an external HTTP or REST API or a Jitterbit API.
-
Path: The path appended to the API endpoint to form the complete request URL, in the format
/path. This field is required. -
Authentication: The credentials the tool uses to invoke its endpoint, one of Anonymous, Basic, or API Key. See Authentication fields.
Jitterbit Operation tools
For the Jitterbit Operation tool type, the following fields are available:
-
Project: The Studio project that contains the operation to trigger. This field is required.
-
Operation to trigger: The operation, within the selected project, that the tool invokes. This field is required.
-
Response type: How the tool returns the operation's result. Defaults to Final Target:
-
Final Target: The tool's response is the final target of the operation. When this response type is selected, the operation must have (as the final target of the operation chain) a Studio API Response activity. If any other final target is used, the tool's response is empty.
-
System Variable: The tool's response is set in a Jitterbit variable in the operation. When this response type is selected, the operation must have (as part of an operation chain) a script that sets the Jitterbit variable
jitterbit.api.responseequal to the response that you want the tool to return. If this variable is not set, the tool's response is empty. -
No Response: The tool's response is blank. If the request to run the operation is accepted, the tool returns an immediate empty response.
-
-
Enable async mode: This toggle cannot be enabled.
-
Timeout: The maximum time to wait for the operation to complete, in milliseconds. Defaults to
120000when left blank. -
Authentication: The credentials the tool uses to invoke the operation. The authentication type is fixed to Basic, and a Username and Password are required; the tool cannot be saved without them. See Authentication fields.
Note
Enter the Harmony username and password of a user with the MCP User permission.
Common fields
Every tool, regardless of type, also has the following fields:
-
Request schema: The structure of the tool's input, defined as JSON schema. For a Jitterbit Operation tool, add the arguments an MCP client can pass to the tool as
propertiesentries in this schema, and list any required arguments in arequiredarray; these arguments then appear in the Testing tab's request payload. -
Response schema: The structure of the tool's output, defined as JSON schema.
The default request and response schema is an object with no properties:
{
  "type": "object",
  "properties": {}
}
Each schema field displays a status badge above it: Schema is valid when the field contains a valid JSON schema, or Schema is incomplete when it contains JSON that is not a schema, such as an example payload.
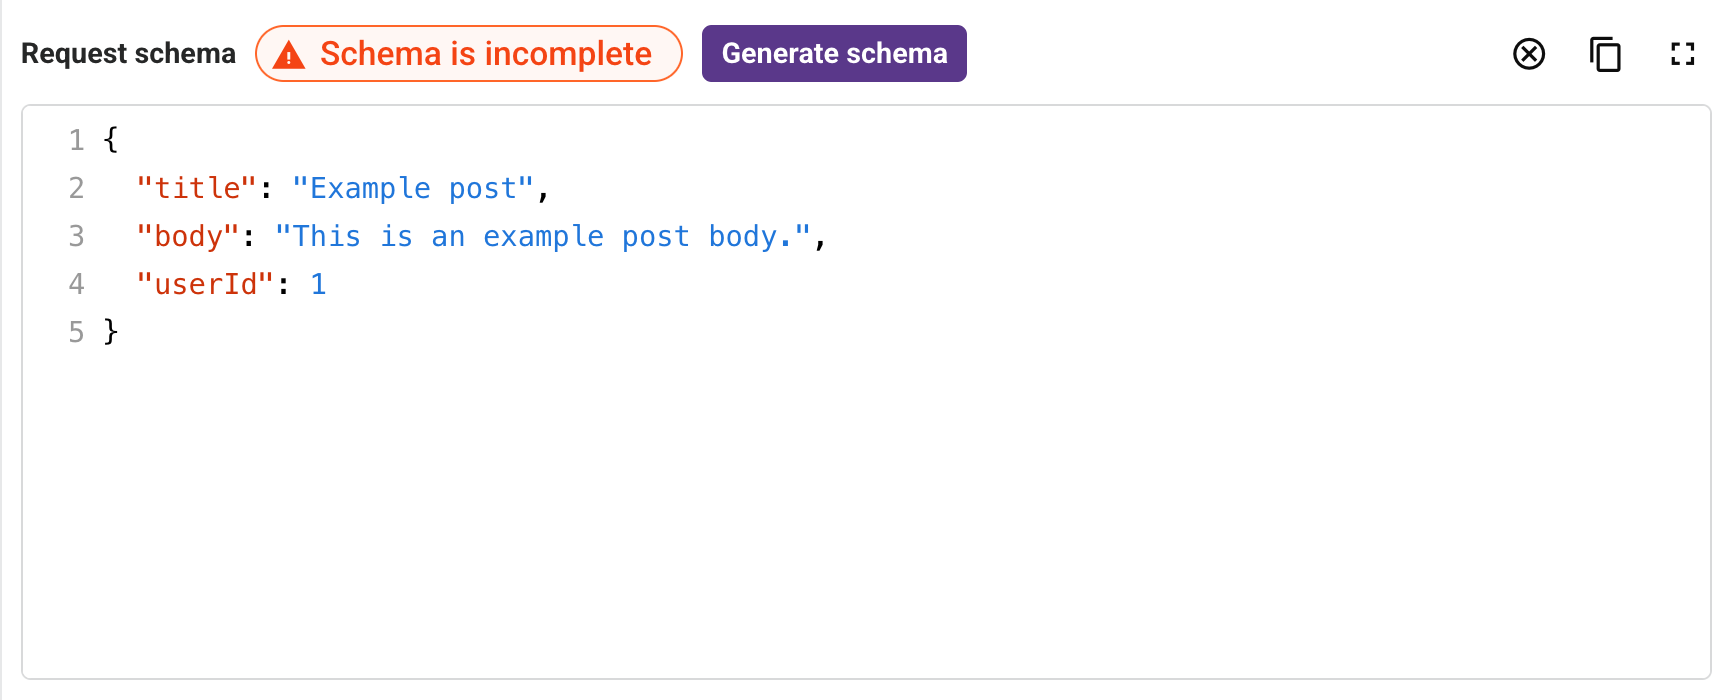
When a field shows Schema is incomplete, a Generate schema button appears next to the badge. Click it to replace the field's contents with a JSON schema generated from the pasted JSON, targeting the 2020-12 JSON schema draft and inferring property types (for example, string, integer, and array) from the example values. Generating a schema overwrites the field's current contents immediately, with no confirmation prompt.
Info
A JSON example and a JSON schema are different documents. Pasting a JSON example and generating a schema from it replaces the example with the generated schema; the example itself is not saved as the tool's schema.
Tool schemas are validated when the MCP server is published.
Authentication fields
The available authentication fields depend on the selected authentication type:
-
Anonymous: No authentication.
-
Basic: Authenticates with a Username and Password.
-
API Key: Authenticates with a Key and Value.
The credentials used to invoke the underlying API are securely managed by Jitterbit MCP and are not exposed to MCP clients.
Resources tab
The Resources tab lists the read-only content sources the server exposes and lets you add, edit, and delete them.
Resource list
Each resource added to the server appears as a row in the table, showing the values set during configuration:
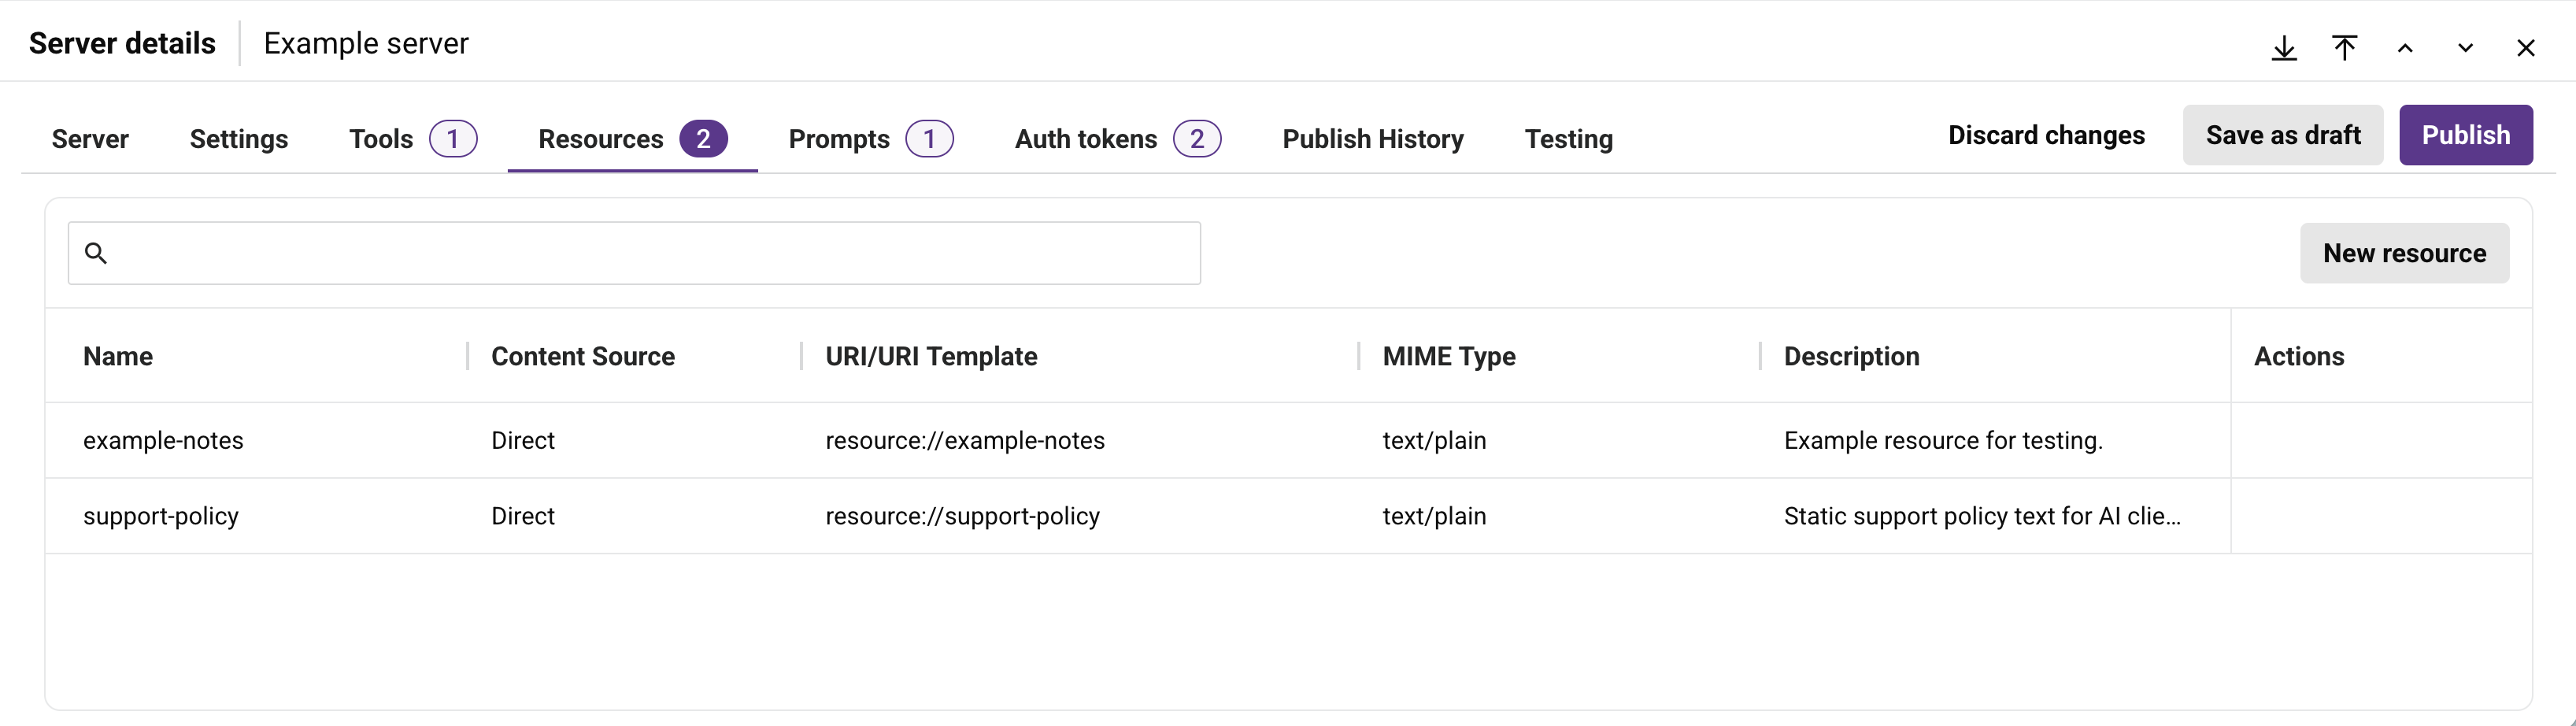
The table displays each resource's Name, Content Source, URI/URI Template, MIME Type, and Description. Hover over the Name column to reveal the copy icon, which copies the name without opening the row. Hover over a resource row to reveal these actions:
-
Go to API: Available only when the resource's Content Source is Jitterbit API. Opens the associated API's details in API Manager.
-
Edit: Opens the resource in edit mode.
-
Delete: Opens the Delete Resource dialog. Enter the word DELETE where indicated, then click Continue to permanently delete the resource, or Cancel to close the dialog without deleting it.
To filter the list, enter any part of a resource name in the search box.
Resource configuration
Click New resource to add a resource, or click the Edit action on an existing resource to edit it. A resource has the following configuration fields:
-
Content Source: The source of the resource's content. This field is required. Select one of:
-
Direct: Enter the content directly in the Content field.
-
HTTP (REST): Retrieve the content from an external HTTP or REST API.
-
Jitterbit API: Retrieve the content from a Jitterbit API created in API Manager.
-
File: Retrieve the content from an uploaded file.
-
-
Name: The name of the resource. This field is required. Only letters, numbers, underscores (
_), hyphens (-), and periods (.) are allowed. -
MIME Type: The media type of the resource content, selected from a predefined list. This field is required.
-
Description: An optional description of the resource.
The remaining fields depend on the selected Content Source:
-
For Direct:
-
URI: The unique identifier MCP clients use to access the resource. This field is required.
-
Content: The resource's content, entered directly into the field. This field is required.
-
-
For File:
- URI: The unique identifier MCP clients use to access the resource. This field is required.
-
For HTTP (REST):
-
Method: The HTTP request method used to retrieve the content, one of GET, POST, PUT, or DELETE. Where supported, you can enter a custom method. This field is required.
-
Timeout (s): The number of seconds to wait for a response before the request times out. This field is required.
-
URI Template: The unique identifier MCP clients use to access the resource, in the format
resource://{parameter}. This field is required. -
API Endpoint: The base URL of the API to call. This field is required.
-
Path: The path appended to the API endpoint to form the complete request URL, in the format
/resource/{parameter}. This field is required.
-
-
For Jitterbit API:
-
API: The Jitterbit API to call, selected from the APIs available in API Manager. This field is required.
-
Path: The API path to call, selected from the paths available on the selected API. This field is required.
-
Method: The HTTP request method the selected path uses. This field is automatically set based on the selected API and Path, and cannot be edited directly.
-
Timeout (s): The number of seconds to wait for a response before the request times out. This field is required.
-
URI Template: The unique identifier MCP clients use to access the resource, in the format
resource://{parameter}. This field is required. -
Security Profile: The security profile assigned to the selected API that supplies the resource's authentication credentials. Available options depend on the selected API.
Selecting a security profile displays a read-only Authentication section showing the Auth type and its associated fields: Username and Password for a Basic security profile, or Key and Value for an API Key security profile. The Password and Value fields are masked and do not display their values. For other security profile types, such as OAuth, the Auth type field does not populate.
-
Resources are published as part of their MCP server. As with other changes made in the Server details drawer, use Save as draft or Publish to save resource changes.
Prompts tab
The Prompts tab lists the reusable prompt templates the server exposes and lets you add, review, edit, duplicate, and delete them.
Prompt list
Each prompt added to the server appears as a row in the table, showing the values set during configuration:
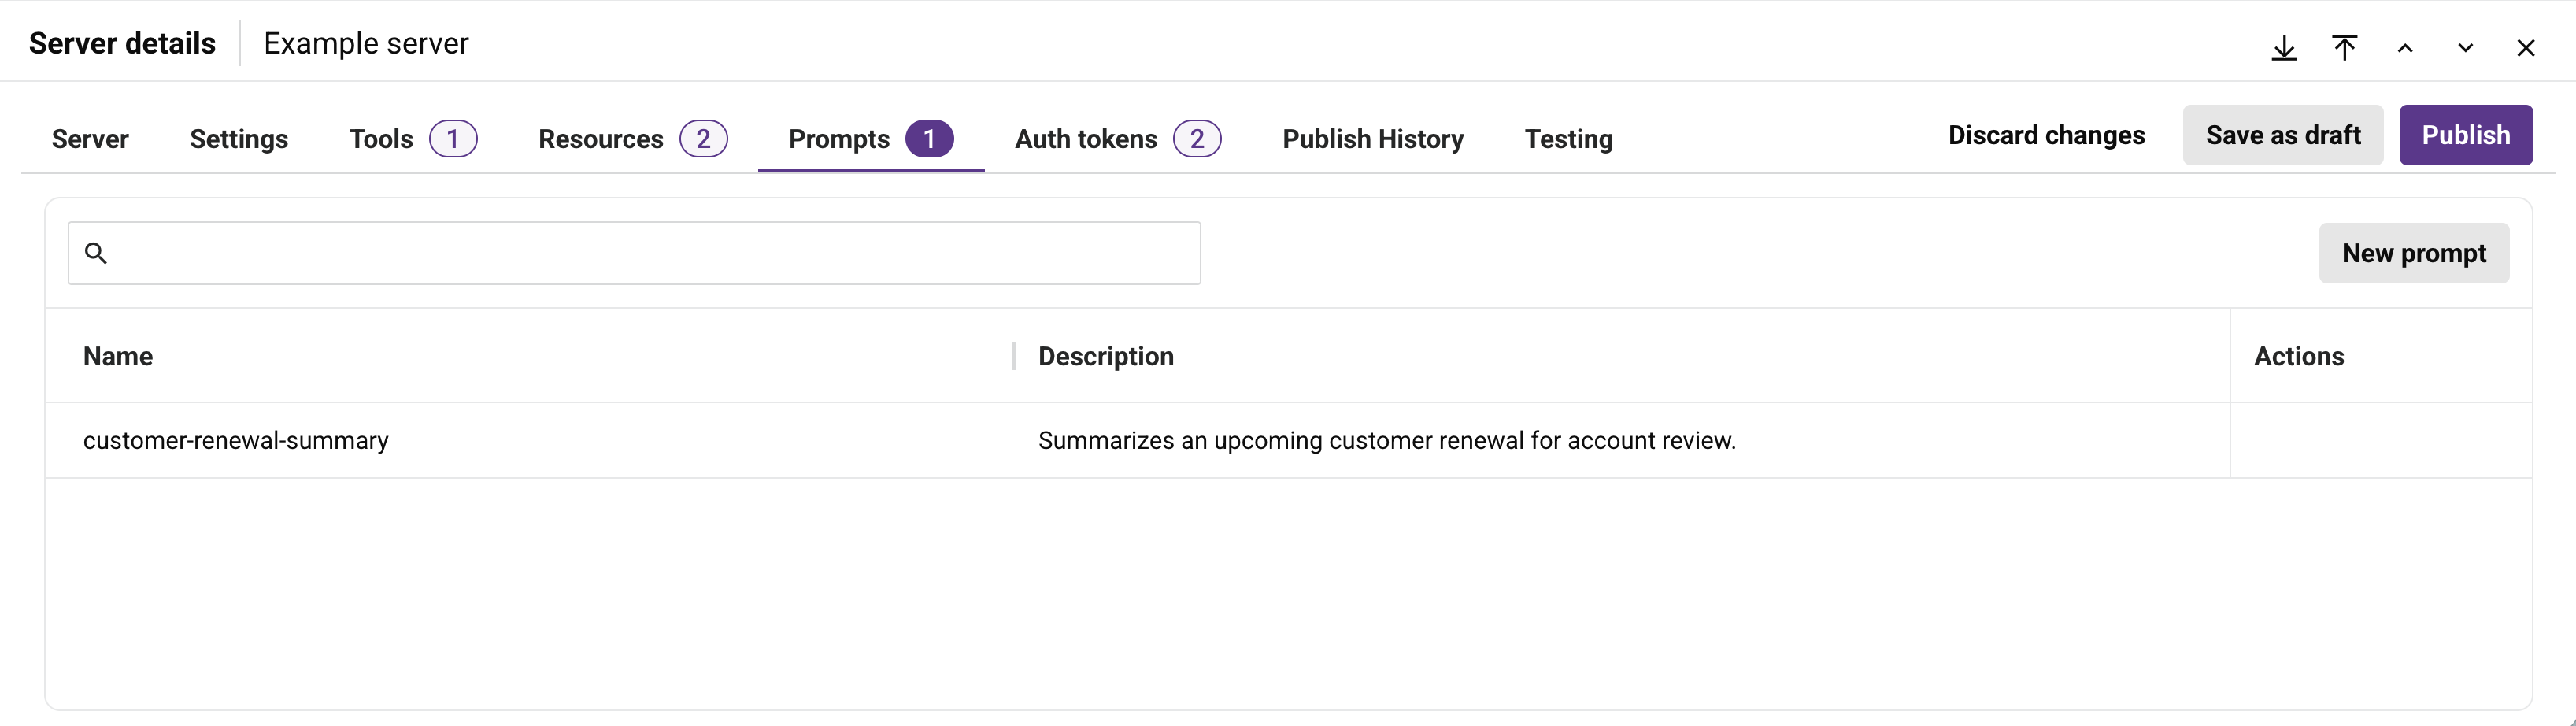
The table displays each prompt's Name and Description. Click a prompt row to see the prompt's complete configuration in a read-only view. Hover over the Name column to reveal the copy icon, which copies the name without opening the row. Hover over a prompt row to reveal these actions:
-
Edit: Opens the prompt in edit mode.
-
Duplicate: Creates an independent draft copy of the prompt, with Copy appended to its name.
-
Delete: Deletes the prompt.
To filter the list, enter any part of a prompt name in the search box.
Prompt configuration
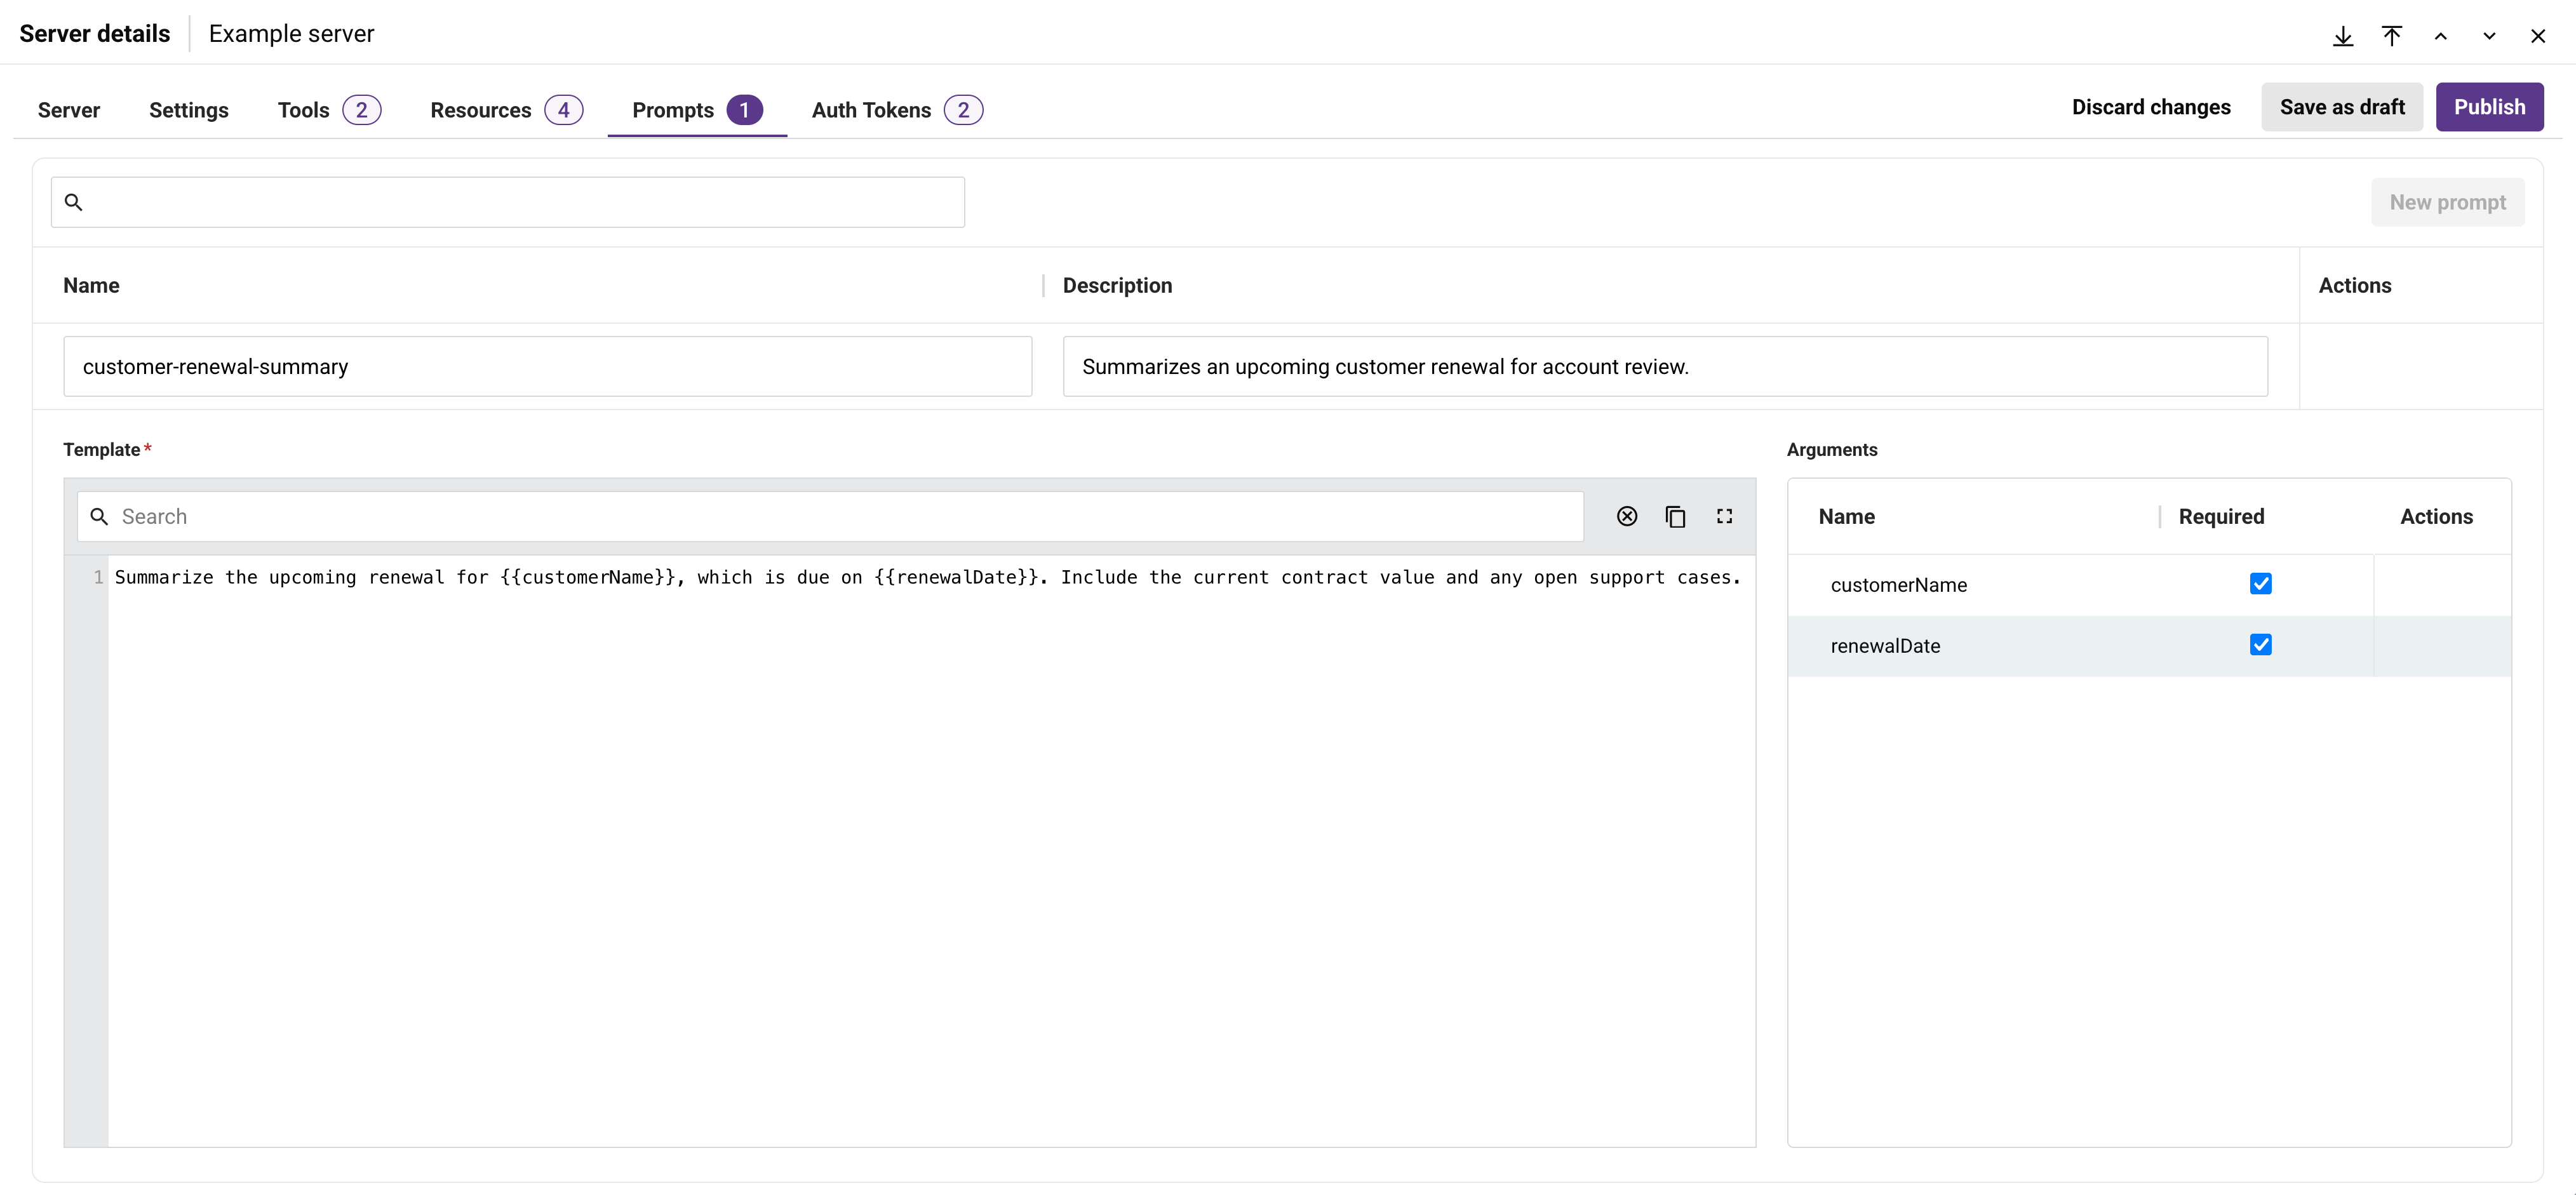
Click New prompt to add a prompt, or click the Edit action on an existing prompt to edit it. A prompt has the following configuration fields:
-
Name: The name of the prompt. Only letters, numbers, underscores (
_), hyphens (-), and periods (.) are allowed. -
Description: An optional description of the prompt.
-
Template: The reusable prompt content. This field is required. A new prompt's Template field is populated with a sample template, labeled Example, that demonstrates the
{{ argumentName }}placeholder syntax; overwrite or modify it as needed. Use the Search field above the template to search the template text and its arguments. -
Arguments: The inputs the template accepts. Add a placeholder in the format
{{ argumentName }}to the template to create an argument. Each argument appears in the Arguments table with these columns:-
Name: The argument name, taken from the placeholder added to the template.
-
Required: Whether the argument is required.
-
Actions: Hover over an argument row to reveal the Delete action, which removes the argument.
-
Prompts are published as part of their MCP server. As with other changes made in the Server details drawer, use Save as draft or Publish to save prompt changes.
Auth Tokens tab
The Auth Tokens tab becomes available after you publish the server. It lists the MCP authentication tokens that MCP clients, including AI assistants and agents, use to authenticate with the server. Each MCP authentication token is scoped to its server. For the tokens a private MCP runtime or private MCP gateway uses to authenticate with the MCP control plane, see the MCP Service Tokens page instead.
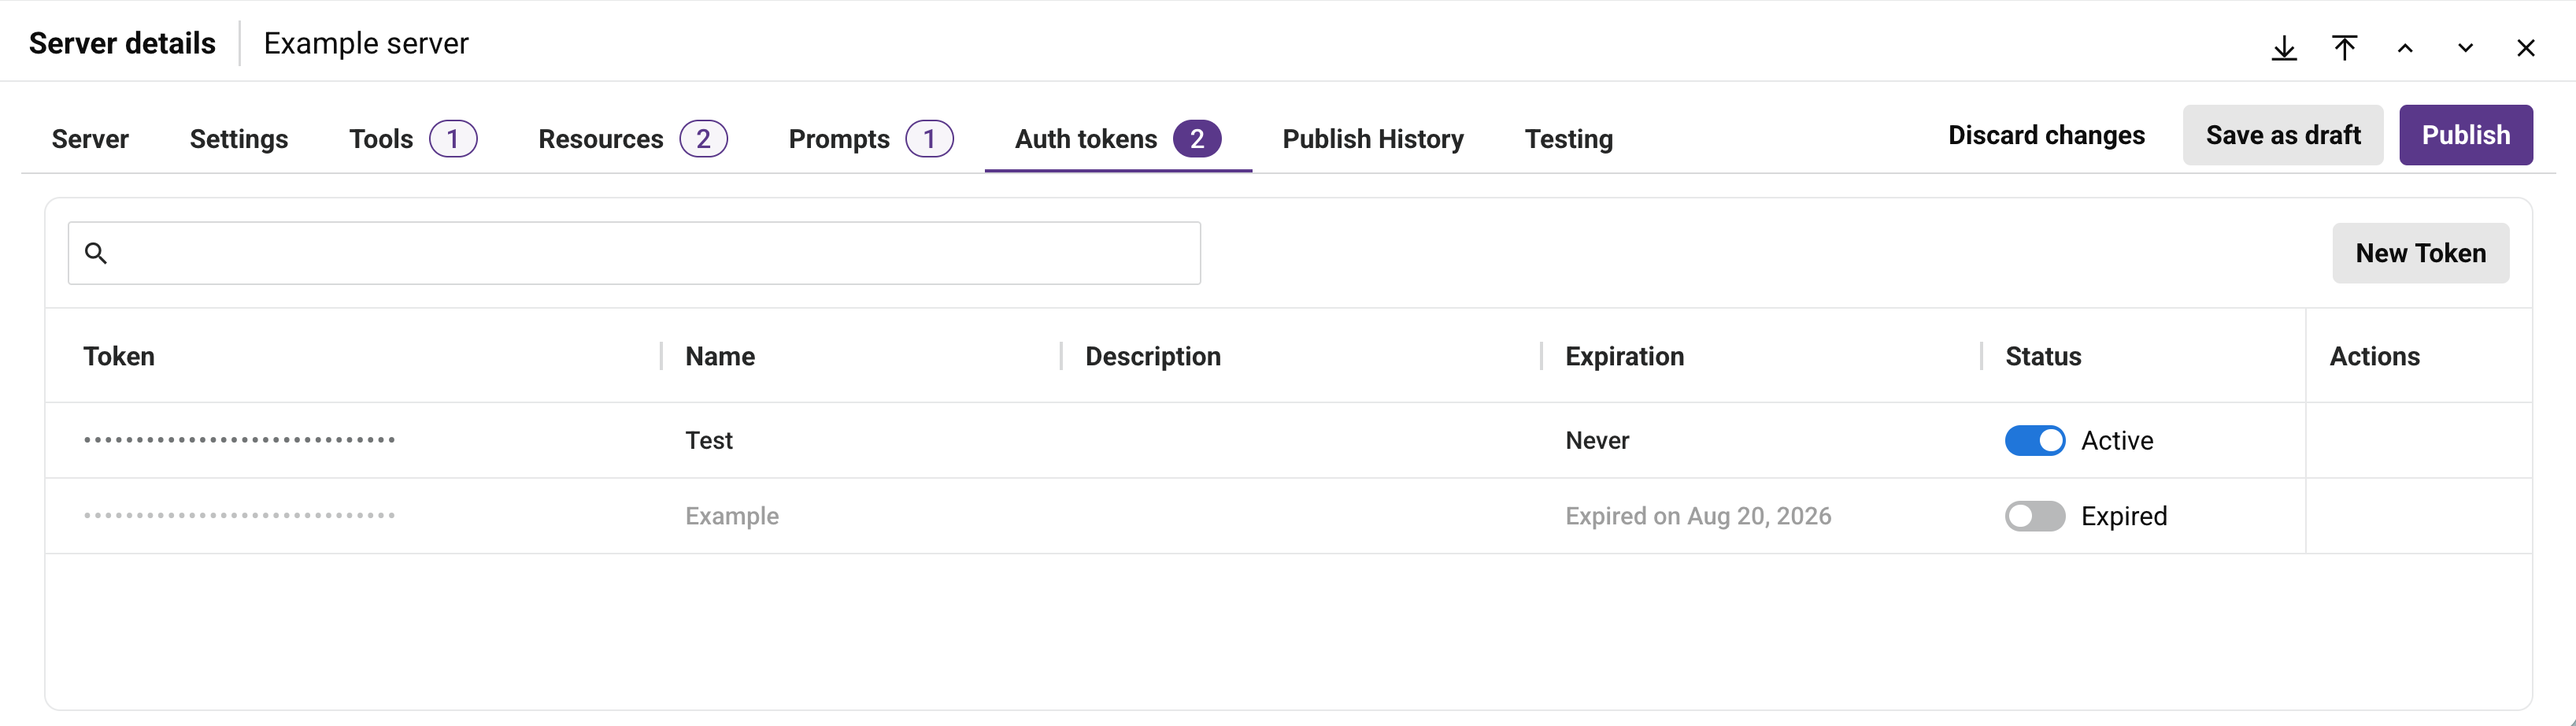
The tab includes these controls:
-
Search: Enter any part of a token name or description to filter the list.
-
New Token: Click to add a token row, then configure these fields:
-
Name: A name for the token. This field is required.
-
Description: An optional description of the token.
-
Expiration: The token's lifetime, one of 7 days, 30 days, 60 days, 90 days, or Never.
Click the confirm icon to create the token or the cancel icon to discard it.
Warning
The complete token value is displayed only once, immediately after the token is created. Copy it and store it securely. After creation, the token value cannot be viewed, revealed, or copied.
-
The token list displays these columns:
-
Name: The name of the token.
-
Token: The token value, masked after creation.
-
Description: The token's description, if one was provided.
-
Expiration: The token's lifetime and expiration date.
-
Status: Use the toggle to activate or deactivate the token. A deactivated MCP authentication token can be activated again.
-
Actions: Hover over a token row to reveal the Delete action, which permanently deletes the token.
Publish History tab
The Publish History tab lists every past publish of the server, most recent first. Enter any part of a version, tag, or description to filter the list.
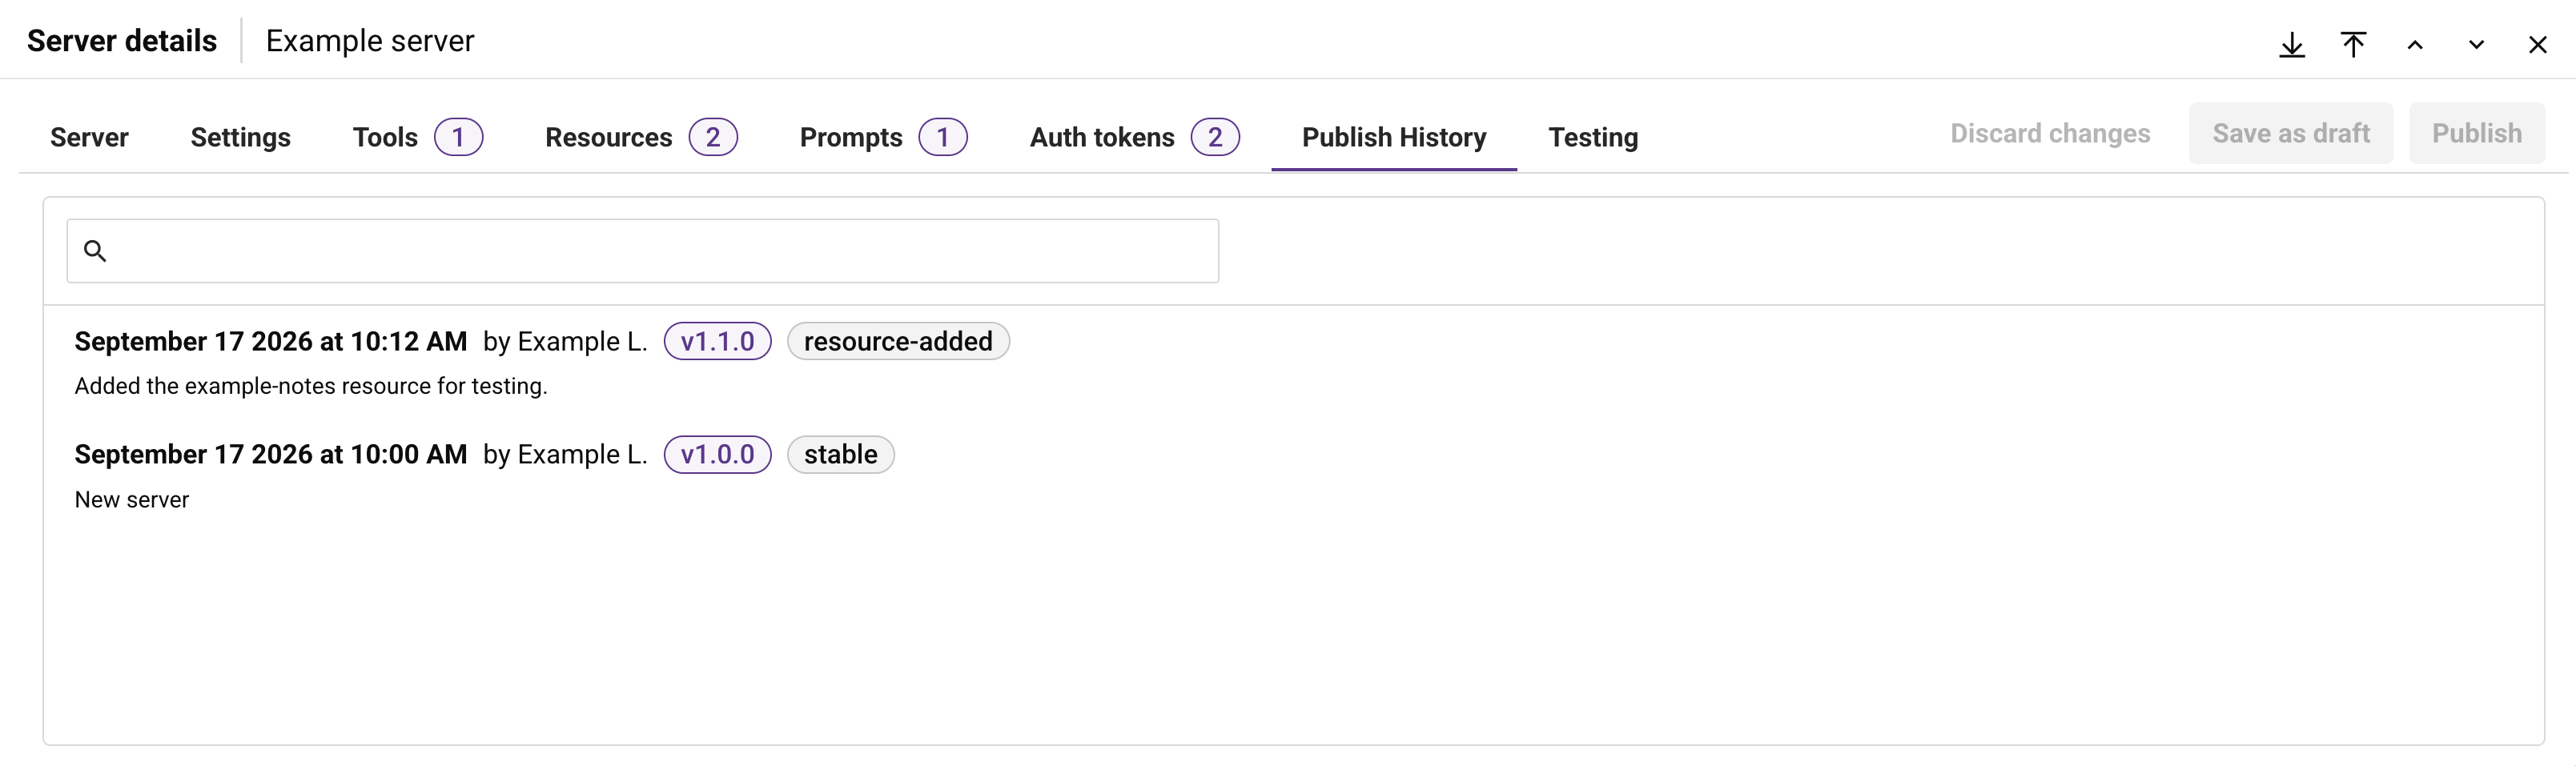
Each entry displays the date and time of the publish, the name of the user who published it, the Version and Tag (if one was set), and the Description (if one was set). Hover over an entry to reveal these actions:
-
Tag details: Opens a dialog to edit the entry's Tag and Description. Click Save to apply the changes, or Cancel to close the dialog without saving.
-
Restore this version: Restores the server's configuration to this published version.
Testing tab
The Testing tab lets you test the server's tools, resources, and prompts using a valid MCP authentication token, without changing the server's configuration. If the server has unpublished changes, the tab displays a message instead, and you must publish or discard those changes before you can test.
Your selection and test results in this tab are retained per server. If you navigate to another tab or to another server and then return to Testing, your previous testing state is restored.
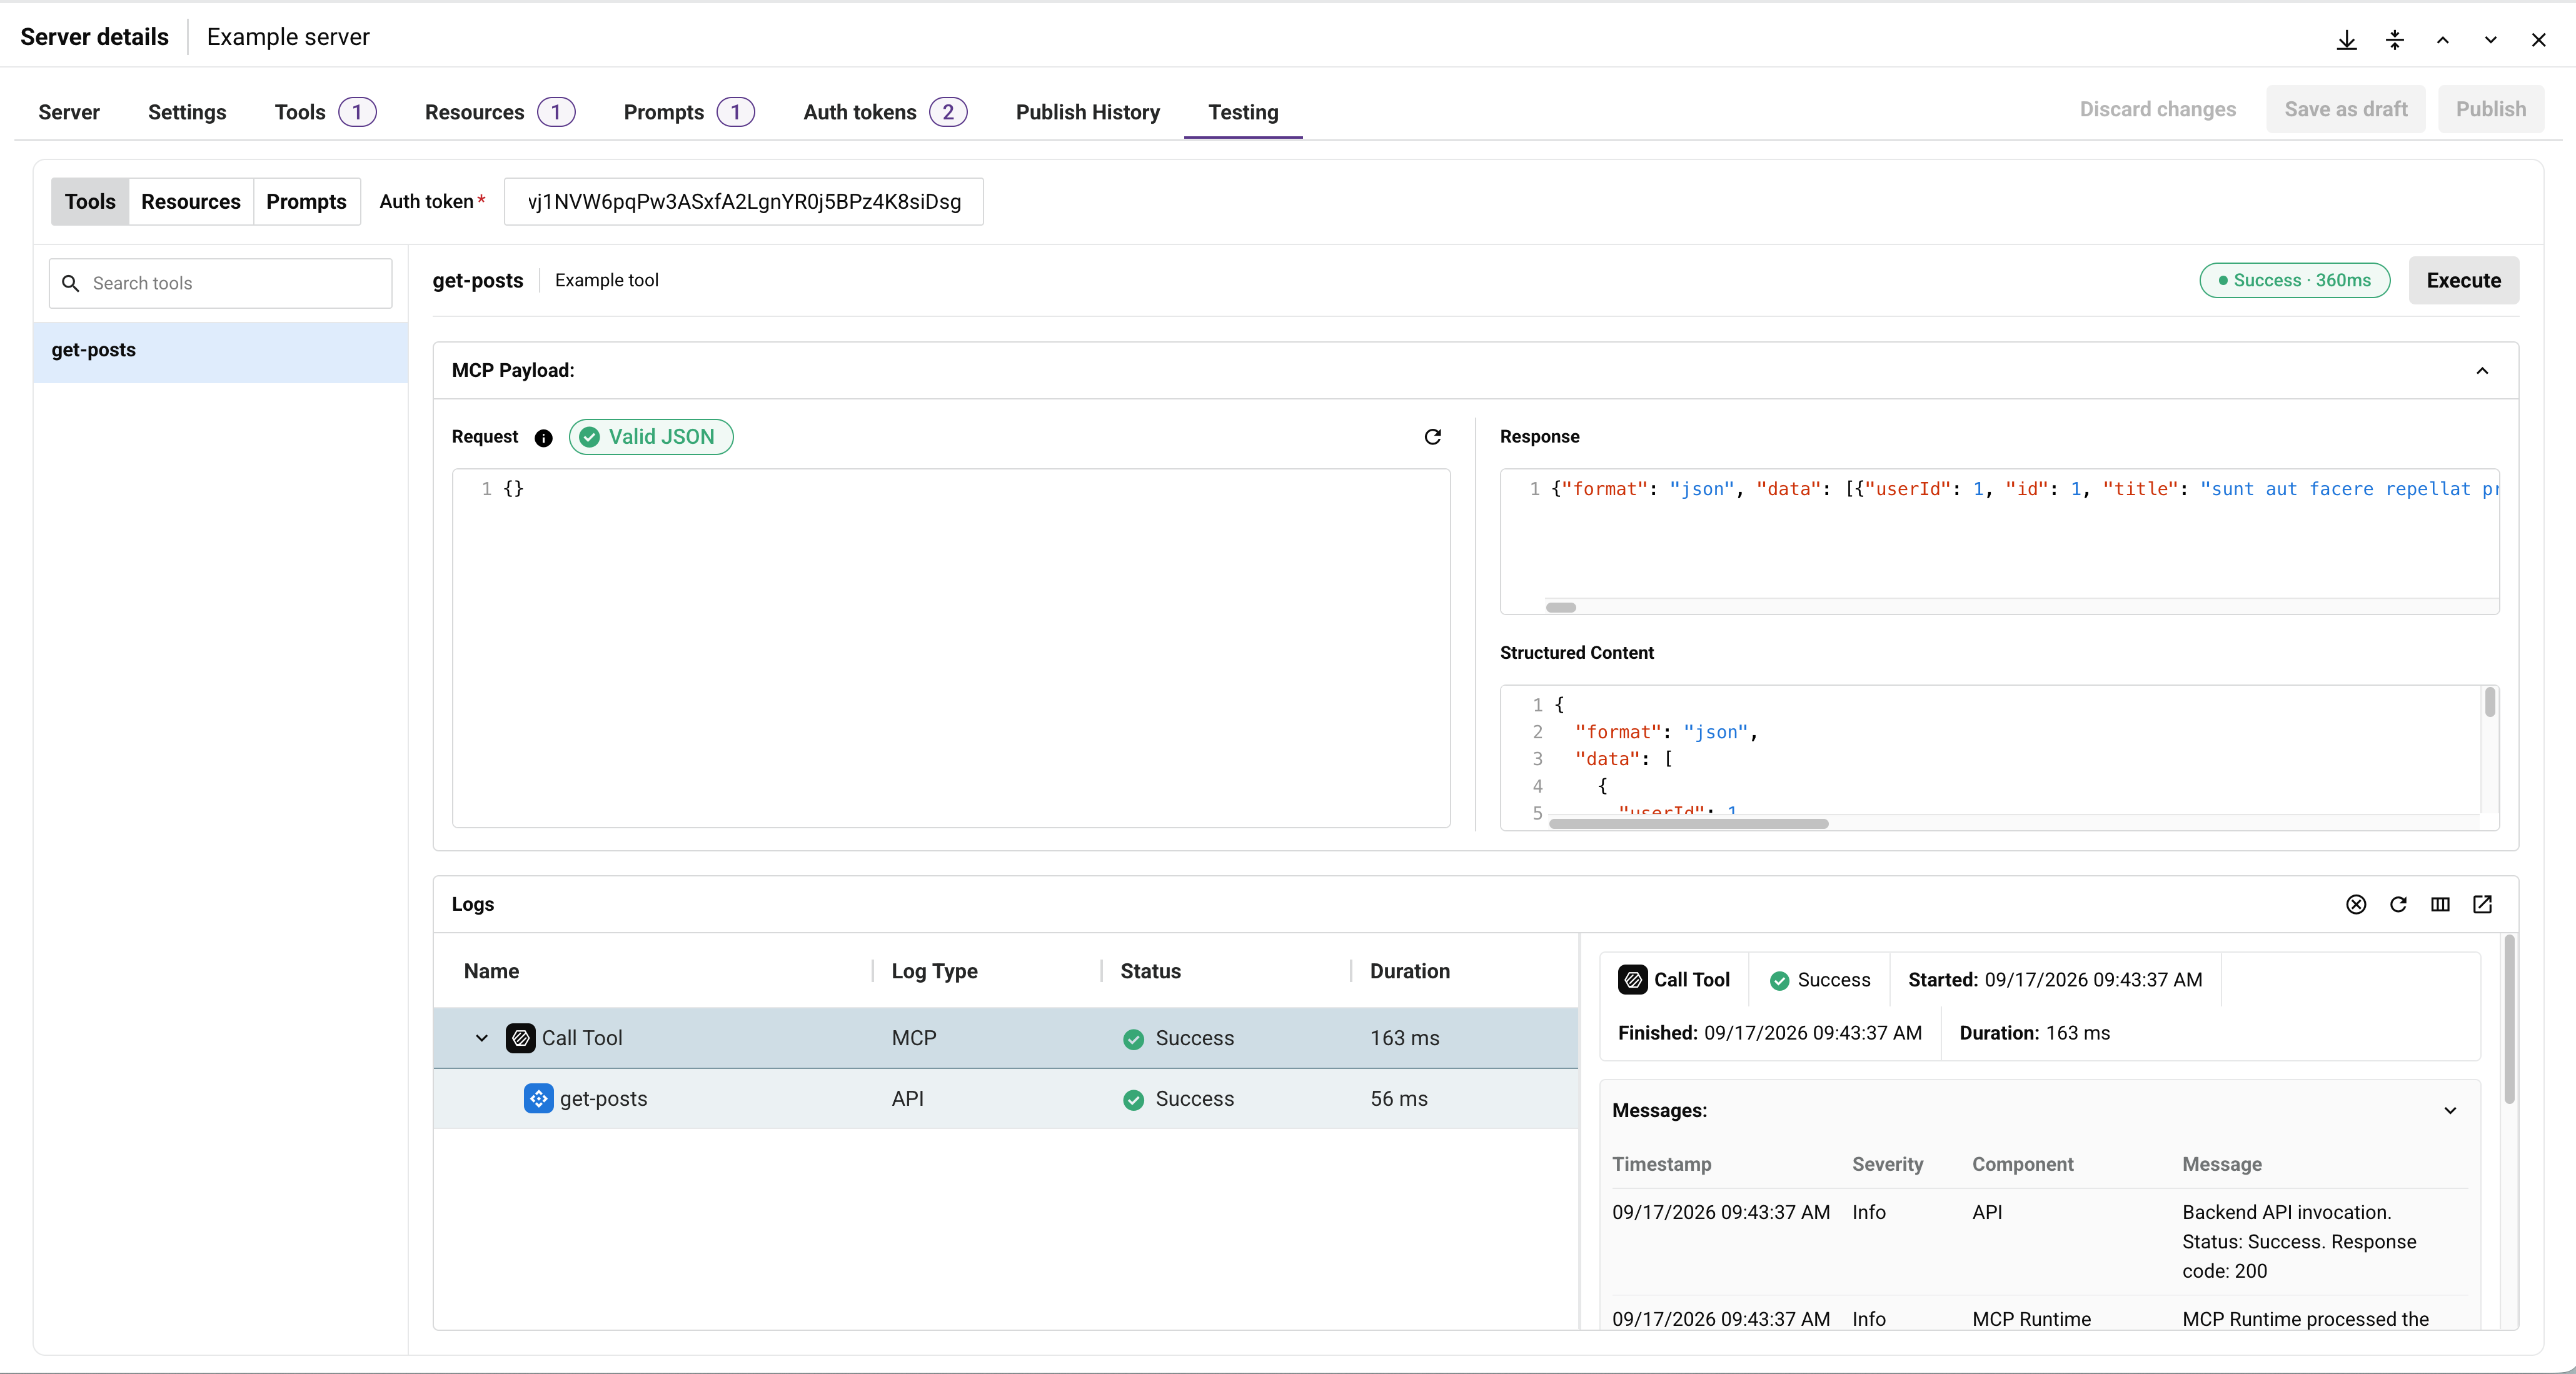
-
Tools, Resources, Prompts: Select which type of capability to test. Each type has its own searchable list of the server's configured tools, resources, or prompts.
-
Protocol: Select which MCP protocol version to test against: Legacy (
2025-11-25) or Modern (2026-07-28). Modern is selected by default. -
Auth token: Enter an MCP authentication token for the server. This field is required.
Select a tool, resource, or prompt from the list to open it. The panel displays the item's name and description, along with its current test status (for example, Not run, or Success with the execution duration after a test completes) and an Execute button.
MCP Payload
The MCP Payload section displays the Request and Response side by side.
-
Request: Populated with sample values based on the tool's request schema, the resource's URI, or the prompt's arguments. Edit or replace this JSON before clicking Execute. A Valid JSON badge confirms the field contains valid JSON, or a Invalid JSON badge appears if it doesn't. Execute remains enabled even when the request contains invalid JSON.
-
Response: Displays the response returned by executing the tool, resource, or prompt. This field is read-only and displays placeholder text until you click Execute.
Testing a tool invokes the tool's configured backend authentication and calls its underlying API or Jitterbit API directly, so testing a tool that creates, updates, or deletes data has the same real effect as invoking it from an MCP client.
Below the Request and Response fields, a Structured Content field displays the parsed response content and metadata, such as the response status code and content type.
Logs
The Logs section displays a table of the execution's processing steps, with Name, Log Type, Status, Duration, and Started columns. Click the expand icon next to a row to reveal its related child execution, such as the underlying API call made by a tool.
Click a log row to open its details in the panel to the right, which displays the same Started, Finished, Duration, and Messages information described in Log entry details on the Logs page.