Jitterbit Sales Agent
Overview
The Jitterbit Sales Agent (Sales Agent) is an AI agent provided through Jitterbit Marketplace that is intended to enable your organization's internal Sales team. This agent uses the Retrieval-Augmented Generation (RAG) technique, which combines LLM reasoning with access to external tools and data sources. It does the following:
- Connects to NetSuite and Salesforce to fetch real-time sales orders, pricing, and customer data using Jitterbit Studio.
- Integrates with an LLM to power an intelligent Sales Agent chatbot accessed via a custom API created with Jitterbit API Manager.
This document explains how to set up and operate this AI agent. It covers architecture and prerequisites, example prompts that show what the agent can do, and steps to install, configure, and operate the AI agent.
AI agent architecture
The following diagram depicts the architecture implemented in the Sales Agent:
Slack bot) GENERIC_UI_APP(
Generic UI app) JB_APIM_A((
Jitterbit API Manager
custom API)) JB_APIM_B((
Jitterbit API Manager
custom API)) MAIN_ENTRY(Main Entry - Slack API Request Handler workflow) GENERIC_API_RH(Generic API Request Handler workflow) MAIN(Main - AI Agent Tools Logic workflow) AUTH_UTIL@{ shape: delay, label: "Authorization utility" } AUTH_WF[Utility - User Authorization and Session workflow] HISTORY_CONTEXT_UTIL@{ shape: delay, label: "History context utility" } INSERT_QUERY_QA_HIST_WF[Utility - Bot Chat History Storage workflow] TOOLS_ROUTER_OP[Tools Router operation] DECISION@{ shape: diamond, label: "Identify which function is called based on LLM response" } CUSTOMER_LOOKUP_TOOL@{ shape: delay, label: "Customer lookup tool" } CUSTOMER_LIST_WF[Tool - Customer Lookup workflow] PRICING_TOOL@{ shape: delay, label: "Pricing tool" } PRICING_DETAILS_WF[Tool - Pricing Sheets workflow] ORDER_FORM_TOOL@{ shape: delay, label: "Order form tool" } ORDER_FORM_DETAILS_WF[Tool - Customer Order Details workflow] FUNCTION_RESPONSE_TO_OPENAI[Function response to Azure Open AI] FUNCTION_RESPONSE[Function response] subgraph BOUNDARY[**Sales agent architecture**] LLM_NAT_LANG_REPLY[LLM-crafted natural-language reply] AZURE_OPENAI[ Azure Open AI] subgraph CHATBOT_UI_APPS[Chatbot UI apps] SLACK_BOT GENERIC_UI_APP end subgraph JB_AI[ **Jitterbit Studio project**] JB_APIM_A JB_APIM_B MAIN_ENTRY GENERIC_API_RH MAIN DECISION TOOLS_ROUTER_OP subgraph GROUP2[ ] HISTORY_CONTEXT_UTIL AUTH_UTIL ORDER_FORM_TOOL PRICING_TOOL CUSTOMER_LOOKUP_TOOL end subgraph GROUP3[ ] CUSTOMER_LIST_WF PRICING_DETAILS_WF ORDER_FORM_DETAILS_WF AUTH_WF end subgraph GROUP4[ ] FUNCTION_RESPONSE --> FUNCTION_RESPONSE_TO_OPENAI FUNCTION_RESPONSE_TO_OPENAI -->|Store Q and A| INSERT_QUERY_QA_HIST_WF end end end SLACK_BOT --User question--> JB_APIM_A GENERIC_UI_APP -->|User question| JB_APIM_B JB_APIM_A --> MAIN_ENTRY --> MAIN JB_APIM_B --> GENERIC_API_RH --> MAIN MAIN --> HISTORY_CONTEXT_UTIL MAIN ----> AUTH_UTIL --> AUTH_WF MAIN --> DECISION --> TOOLS_ROUTER_OP HISTORY_CONTEXT_UTIL --> INSERT_QUERY_QA_HIST_WF TOOLS_ROUTER_OP --> ORDER_FORM_TOOL ORDER_FORM_TOOL --> ORDER_FORM_DETAILS_WF ORDER_FORM_DETAILS_WF --> FUNCTION_RESPONSE TOOLS_ROUTER_OP --> PRICING_TOOL PRICING_TOOL --> PRICING_DETAILS_WF PRICING_DETAILS_WF --> FUNCTION_RESPONSE TOOLS_ROUTER_OP --> CUSTOMER_LOOKUP_TOOL CUSTOMER_LOOKUP_TOOL --> CUSTOMER_LIST_WF CUSTOMER_LIST_WF --> FUNCTION_RESPONSE FUNCTION_RESPONSE_TO_OPENAI ---->|REST call| AZURE_OPENAI AZURE_OPENAI -->|Response| FUNCTION_RESPONSE_TO_OPENAI CHATBOT_UI_APPS --- LLM_NAT_LANG_REPLY LLM_NAT_LANG_REPLY --- FUNCTION_RESPONSE_TO_OPENAI classDef Clear fill:white, stroke:white, stroke-width:0px classDef Plain fill:white, stroke:black, stroke-width:3px, rx:15px, ry:15px classDef BoundaryStyle fill:white, stroke-width:0px, rx:15px, ry:15px class CHATBOT_UI_APPS,JB_AI Plain class GROUP2,GROUP3,GROUP4 Clear class BOUNDARY BoundaryStyle
Prerequisites
To use the Sales Agent, the following components are required or assumed in the design of the agent.
Harmony components
You must have a Jitterbit Harmony license with access to the following components:
- Jitterbit Studio
- Jitterbit API Manager
- Jitterbit Sales Agent purchased as a license add-on
- Jitterbit Cloud Datastore (optional)
Supported endpoints
The following endpoints are incorporated into the agent's design, but other systems can be accommodated by modifying the project's endpoint configurations and workflows.
Large language model (LLM)
The AI agent uses Azure OpenAI as the LLM provider. To use Azure OpenAI, you must have a Microsoft Azure subscription with permissions to create and manage Azure OpenAI with a deployed gpt-4o model.
Tip
To select pricing tiers based on your specific requirements and anticipated usage, see Azure OpenAI pricing.
Chat interface
The agent's design incorporates Slack as the chat interface for interacting with the AI agent.
NetSuite
The agent connects to NetSuite as the primary source for customer order forms. The integration allows the agent to retrieve, update, or validate order data in real-time during user interactions.
Salesforce
The agent uses Salesforce to manage customer accounts and product pricing. This integration provides the agent with the current data required to generate accurate quotes and account details.
Example prompts
Here are example prompts the Sales Agent can handle with access to the appropriate data:
Customer Lookup Questions
- "Show me all customers in California."
- "Which customers are based in Sydney?"
Order Form / Licensing Details Questions
- "What products has Acme Corp purchased?"
- "How many 'Product X' is ByteTech GmbH licensed for?"
- "Can you give me the order details for AcmeCloud Ltd?"
- "What is the subscription duration for Zento Systems?"
Product Pricing or Plan Inquiry
- "What's the price of 'Product X' in USD?"
- "How much does the Professional subscription cost?"
- "Which subscription plan allows 10 environments?"
- "Can you calculate the cost for 15 'Product X' and 4 'Product Y'?"
Account Owner Queries
- "Who manages Acme Corp?"
- "Which customers are owned by jsmith@abc.com?"
- "Show customers handled by David Brown in Texas."
- "List accounts managed by Grace in the UK."
Installation, configuration, and operation
Follow these steps to install, configure, and operate this AI agent:
- Download customizations and install the Studio project.
- Create Microsoft Azure resources.
- Create the Slack app.
- Prepare Jitterbit Cloud Datastore.
- Configure project variables.
- Test connections.
- Deploy the project.
- Create the Jitterbit custom API.
- Review project workflows.
- Trigger the project workflows.
Download customizations and install the project
Follow these steps to download customization files and install the Studio project:
-
Log in to the Harmony portal at https://login.jitterbit.com and open Marketplace.
-
Locate the AI agent named Jitterbit Sales Agent. To locate the agent, you can use the search bar or, in the Filters pane under Type, select AI Agent to limit the display to the available AI agents.
-
Click the AI agent's Documentation link to open its documentation in a separate tab. Keep the tab open to refer back to after starting the project.
-
Click Start Project to open a two-step configuration dialog to download customizations and import the AI agent as a Studio project.
Note
If you have not yet purchased the AI agent, Get this agent will be displayed instead. Click it to open an informational dialog, then click Submit to have a representative contact you about purchasing the AI agent.
-
In configuration step 1, Download Customizations, the following files are provided to facilitate setup of the index and indexer in Azure AI Search and to create the Slack app. Select the files and click Download Files:
-
Azure AI Search index and indexer JSON definition files
Azure_AI_Search_Datasource_Definition.jsonAzure_AI_Search_Index_Definition.jsonAzure_AI_Search_Indexer_Definition.json
-
Slack app manifest file
slack_app_manifest.json
Tip
The configuration dialog includes a warning not to import the template before applying endpoint customizations. That warning does not apply to this AI agent and can be ignored. Follow the recommended order of steps in this documentation.
Click Next.
-
-
In configuration step 2, Create a New Project, select an environment where you want to create the Studio project, then click Create Project.
-
A progress dialog is displayed. After it indicates that the project is created, use the dialog link Go to Studio or open the project directly from the Studio Projects page.
Create Microsoft Azure resources
Create the following Microsoft Azure resources and retain the following information for configuring the AI agent. To create and manage these resources, you must have a Microsoft Azure subscription with the appropriate permissions.
Azure Blob container
You must create an Azure Blob container to store customer details. Data from the Blob container will be indexed in Azure AI Search using an index and indexer.
You'll need the container's SAS URL for use in determining the values of the Azure Blob Storage project variables. To generate the SAS URL:
- In the Azure portal, browse to Storage accounts and open the specific storage account.
- From the resource menu under Data storage, select Containers and open the specific container.
- From the resource menu under Settings, select Shared access tokens.
-
Use the Permissions menu to verify that the shared access signature (SAS) URL for this container has a minimum of Read and Write permissions:
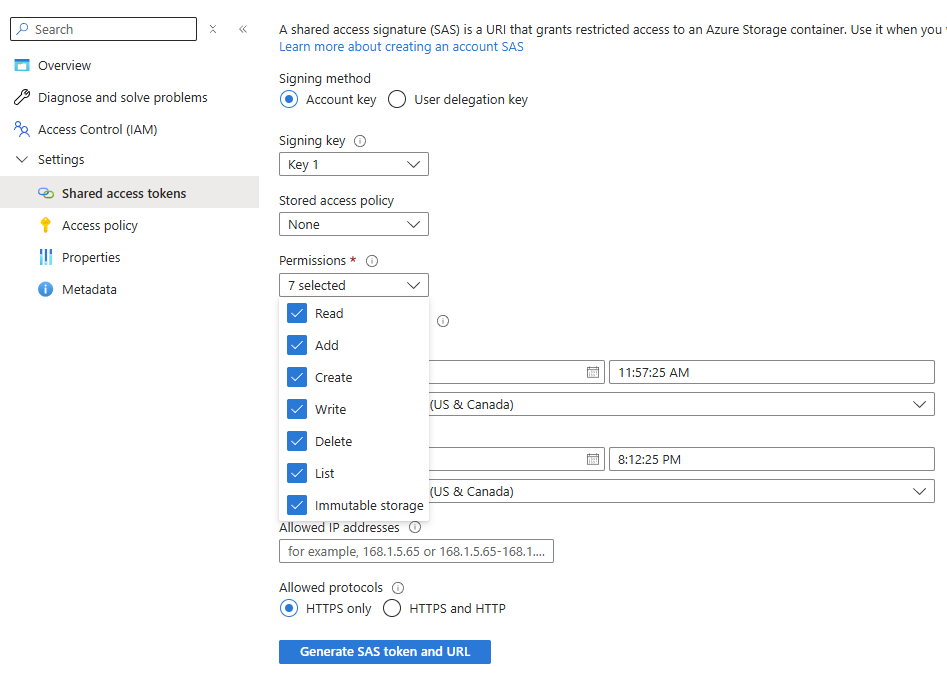
-
Click Generate SAS token and URL.
- Copy the Blob SAS URL displayed at the bottom.
- Determine the values of the Azure Blob Storage project variables from the SAS URL. The SAS URL is in the format of
{{ azure_blob_base_url }}/{{ Azure_Customer_Details_Container }}?{{ azure_customer_detail_blob_sig }}.
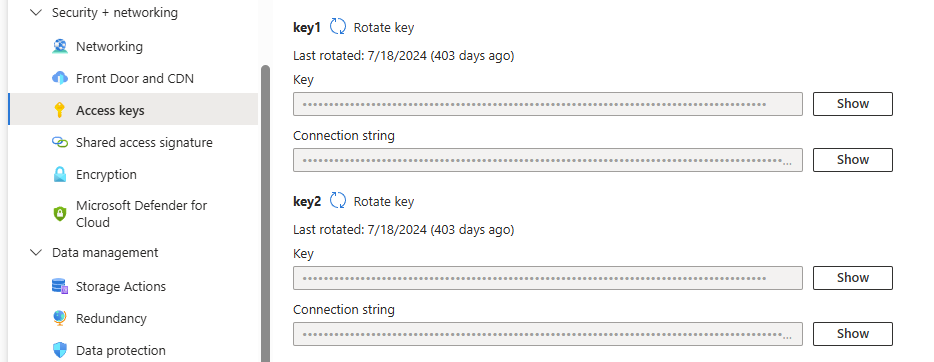
If using the JSON definition files included in the AI agent's customization files to generate the index and indexer, you'll also need the Azure Blob Storage account key. To view account access keys:
- In the Azure portal, browse to Storage accounts and open the specific storage account.
- From the resource menu under Security + networking, select Access keys.
-
Click Show keys to reveal the access key to use during configuration of Azure AI Search.
Azure AI Search service
You must create an Azure AI Search service and configure its index and indexer to process the data from the Blob container.
You'll need the Azure AI Search service's URL and API key to determine the values of the Azure AI Search project variables:
- URL: To obtain the value to use for
azure_ai_search_url, refer to the Azure documentation Get service information. - API key: To obtain the value to use for
azure_ai_search_api_keyrefer to the Azure documentation Configure role-based access.
You can use the JSON definition files included in the AI agent's customization files to generate the index and indexer, or you can create them yourself.
If using the provided definition files, you must replace the following placeholders with your own configuration values:
Azure_AI_Search_Indexer_Definition.json
| Placeholder | Description |
|---|---|
{{Your Azure AI Search Service Name}} |
The name of the Azure AI search service. |
Azure_AI_Search_Datasource_Definition.json
| Placeholder | Description |
|---|---|
{{Your Azure AI Search Service Name}} |
The name of the Azure AI search service. |
{{Your Azure Blob Account Name}} |
The name of the Azure Blob account. |
{{Your Azure Blob Account Key}} |
The access key for the Azure Blob Storage account, obtained as described in Azure Blob container above. |
{{your_azure_blob_container_name}} |
The name of the Azure Blob container. |
Azure OpenAI resource
You must create an Azure OpenAI resource and deploy a gpt-4o or gpt-4.1 model via the Azure AI Foundry portal.
You'll need the deployment name, Azure OpenAI endpoint URL, and API key to determine the values of the Azure OpenAI project variables. To find these values:
- In the Azure AI Foundry portal, open the specific OpenAI resource.
-
The values to use for the endpoint URL (
azure_openai_base_url) and API key (azure_openai_api_key) are displayed on the landing page for the resource: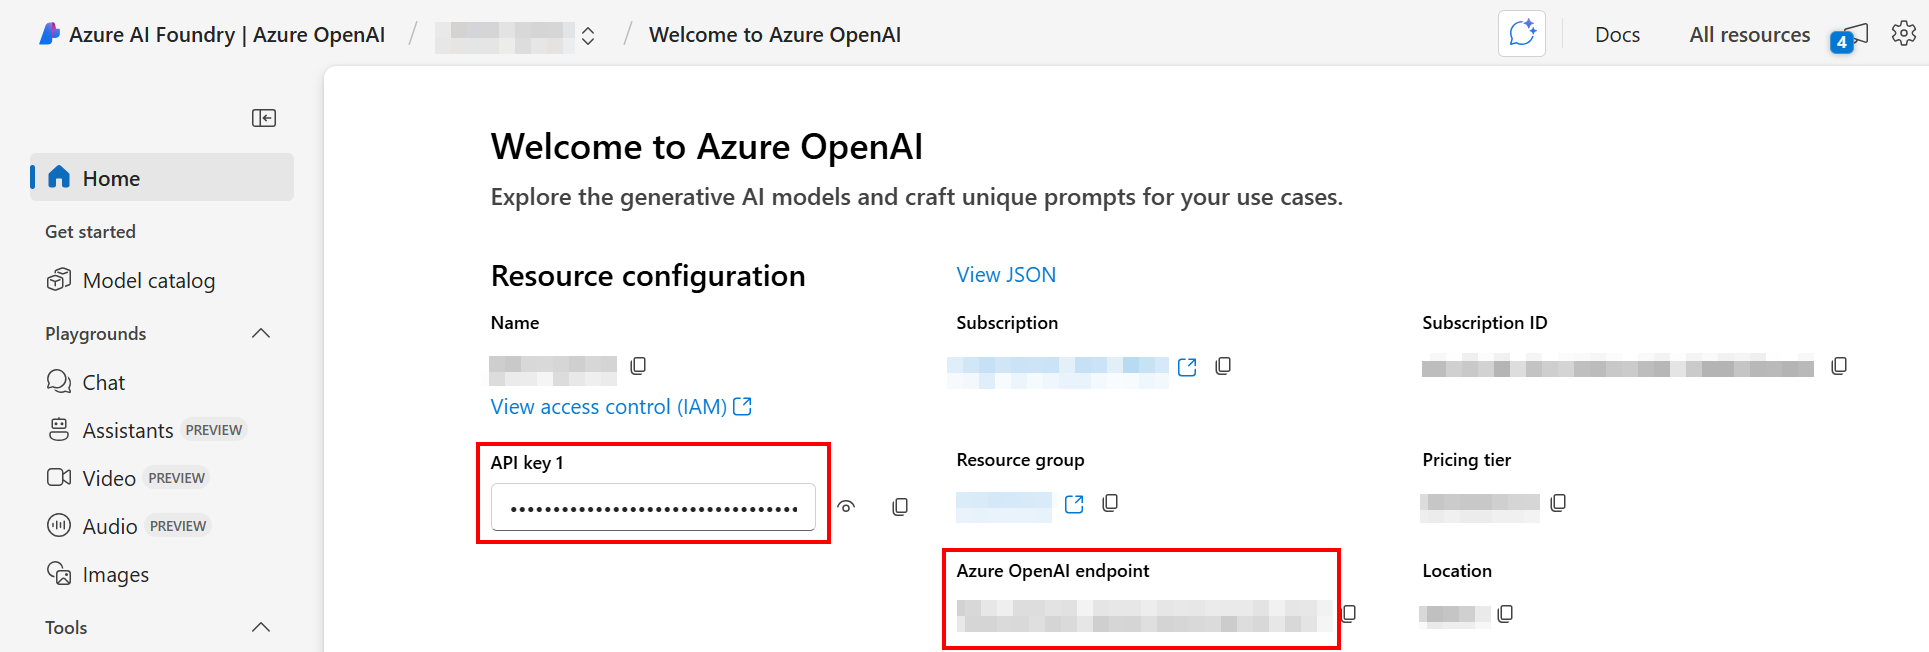
-
In the navigation menu under Shared resources, select Deployments. The deployment name (
Azure_OpenAI_Deployment_Name) is displayed.
Create the Slack app
To create the Sales Agent chat interface in Slack, follow these steps:
-
Create a Slack app using the Slack app manifest file (
slack_app_manifest.json) provided with this AI agent's customization files. Alternatively, create the app from scratch. -
If you use the provided manifest file, replace the following placeholders with your own configuration values:
Placeholder Description {{Replace with Slack bot name}}The name you want your Slack bot to have, as displayed to users. Replace this value in two places in the manifest. {{Replace with Jitterbit API URL}}The service URL of the Jitterbit custom API you created in Create the Jitterbit custom API. -
Install the app to your Slack workspace.
-
Obtain the bot token (for the Slack connection's Bot User OAuth Token field) and enter its value for the
slack_bot_oauth_user_tokenproject variable. -
Configure the
slack_channel_nameproject variable with the channel where notifications should be sent. -
Enter the bot token value for the
slack_bot_oauth_user_tokenproject variable and the channel name for theslack_channel_nameproject variable. You will configure these in the next step.
Prepare Jitterbit Cloud Datastore
Create two key storages in Jitterbit Cloud Datastore, Bot_Authorized_Users and askjb_sales_q_and_a, whose fields have the names and types listed in the tables below.
As you add custom fields, use the tables below to determine whether each should be toggled to Required in the Cloud Datastore user interface. The AlternativeKey and Value fields are default fields that cannot be removed or toggled.
After adding custom fields, add a key storage register for each user that will be authorized to use the AI agent bot. You must manually define the values marked in the tables below. You can leave blank the values of fields whose values are auto-populated or not used.
Bot_Authorized_Users
This key storage contains the list of authorized users and their sessions. You must manually enter the email addresses of users who are authorized to access the AI agent bot.
| Name | Type | Required | Value definition | Description |
|---|---|---|---|---|
Key |
Text | Yes | Enter manually | The email address of the user authorized to interact with the AI agent via the Slack bot. This value is entered manually. |
AlternativeKey |
Text | No | Auto-populated | The session for the user will be auto-generated during execution. No manual entry is required. |
Value |
Text | No | Enter manually | The email address of the user authorized to interact with the AI agent via the Slack bot. This value is entered manually. Although it is not marked as a required field by default, providing a value is required for the AI agent to function. |
askjb_sales_q_and_a
This key storage retains a bot's chat history to provide memory context for the LLM. It is used by the integration to store question and answer history. All data is entered automatically during the interaction run.
| Name | Type | Required | Value definition | Description |
|---|---|---|---|---|
Key |
Text | Yes | Auto-populated | Specifies the unique identifier assigned to a message by the system. |
AlternativeKey |
Text | No | Auto-populated | Specifies the unique identifier assigned to a chat session by the system. |
Value |
Text | No | Not used | Not used. |
slackChannel |
Text | Yes | Auto-populated | The Slack channel ID from which the message is sent. |
User |
Text | Yes | Auto-populated | The Slack username of the user who sends the message. |
FirstName |
Text | No | Auto-populated | First name of the user who sends the message. |
LastName |
Text | No | Auto-populated | Last name of the user who sends the message. |
Email |
Text | Yes | Auto-populated | Email address of the user who sends the message. |
MessageTimestampText |
Text | Yes | Auto-populated | The timestamp text of the message. |
UserQuestion |
Big Text | Yes | Auto-populated | The question or message submitted by the user to the AI agent. |
AIAnswer |
Big Text | Yes | Auto-populated | The response generated by the AI agent to the user's question. |
ai_reformulate_question |
Big Text | No | Auto-populated | The user's question after being reformulated or rephrased by the AI to improve understanding. |
Configure project variables
In the Studio project installed earlier via Marketplace, you must set values for the following project variables.
To configure project variables, use the project's actions menu to select Project Variables. This opens a drawer along the bottom of the page where you can review and set the values.
Salesforce
| Variable name | Description |
|---|---|
SF_Login_URL |
Server Host in the Salesforce connection |
SF_Password |
Password in the Salesforce connection |
SF_Security_Token |
Security token in the Salesforce connection |
SF_User_Name |
Username in the Salesforce connection |
NetSuite
| Variable name | Description |
|---|---|
NetSuite_Account |
Account in the NetSuite connection |
NetSuite_Consumer_Key |
Consumer key in the NetSuite connection |
NetSuite_Consumer_Secret |
Consumer secret in the NetSuite connection |
NetSuite_Base_URL |
NetSuite base URL, such as https://{{NetSuite_Account}}.suitetalk.api.netsuite.com. |
NetSuite_Token_Key |
Token key in the NetSuite connection |
NetSuite_Token_Secret |
Token secret in the NetSuite connection |
Azure Blob Storage
| Variable name | Description |
|---|---|
Azure_Customer_Details_Container |
The name of the Azure Blob container to store customer information from order forms. |
azure_customer_detail_blob_sig |
SAS URL signature for Azure_Customer_Details_Container. |
azure_blob_base_url |
Azure container service base URL for Azure_Customer_Details_Container. |
Tip
These values can be derived from the SAS URL, which is in the format of {{azure_blob_base_url}}/{{Azure_Customer_Details_Container}}?{{azure_customer_detail_blob_sig}}.
Azure AI Search
| Variable name | Description |
|---|---|
customer_search_index_name |
The name of the Azure index that stores customer information from order forms. |
Azure_SalesOrders_Customer_Indexer |
The name of the Azure indexer that indexes data from Azure_Customer_Details_Container to customer_search_index_name index. |
azure_ai_search_url |
Azure AI search service base URL. |
azure_ai_search_api_key |
API key for Azure AI Search service. |
Azure OpenAI
| Variable name | Description |
|---|---|
Max_Output_Tokens |
The maximum number of tokens the LLM can generate in a response. GPT-4.1 supports up to 32768 tokens, while GPT-4o supports up to 16384. |
Azure_OpenAI_Deployment_Name |
The name of deployment for LLM in Azure OpenAI. |
azure_openai_base_url |
Azure OpenAI service base URL. |
azure_openai_api_key |
API key for Azure OpenAI service. |
Slack
| Variable name | Description |
|---|---|
salesorder_slack_bot_token |
The Slack bot token that is obtained after creating the Slack app, used for the Bot user OAuth access token in the Slack connection. |
Note
The Slack app is created in a later step. For now, you can leave this variable blank.
Common
| Variable name | Description |
|---|---|
Authorized_User_Admin |
Contact name/email shown in the response sent to the user when an error occurs. |
Customer_LastOrder_DefaultDate |
The default date (mm/dd/yyyy) from which orders are pulled from NetSuite during the first run or a historical run when incrementalRun is set to false. For example: 06/01/2004. |
Default_Last_Sync_Date |
Default last sync date to be used if cache value is not available. |
incrementalRun |
When true, only incremental (new or updated) orders are pulled from NetSuite. When false or blank, a complete order history is retrieved from the default date. |
Only_Unexpired_Orders |
When true, only the orders with nextbilldate greater than today's date will be pulled from NetSuite. |
Test connections
Test the endpoint configurations to verify connectivity using the defined project variable values.
To test connections, go to the design component palette's Project endpoints and connectors tab, hover over each endpoint, and click Test.
Deploy the project
Deploy the Studio project.
To deploy the project, use the project's actions menu to select Deploy.
Create the Jitterbit custom API
Create a custom API using API Manager for one of the following:
- Slack bot API request handler: Required if using the Slack notification included in the design of this AI agent.
- Generic API request handler: Optional. Use for handling API requests from any application.
Create the Slack bot API request handler
This custom Jitterbit API will trigger the Slack Bot API Request Handler operation. Configure and publish the custom API with the following settings:
- API Service:
Slack Bot API Request Handler - Path:
/ - Project: Select the Studio project created from the
Jitterbit Sales Agentin Marketplace - Operation to Trigger:
Slack Bot API Request Handler - Method:
POST - Response Type:
System Variable
Retain the service URL of the published API for use in creating the Slack app. The service URL can be found in the API details drawer on the Services tab by hovering on the service's Actions column and clicking Copy API service URL.
Generic API request handler
This custom Jitterbit API will trigger the Generic API request Handler operation. It is not required. Create this API if you are using other applications to process HTTP API requests. Configure and publish the custom API with the following settings:
- Service name:
Generic API request Handler - Project: Select the Studio project created from the
Jitterbit Sales Agentin Marketplace - Operation:
Generic API request Handler - Method:
POST - Response type:
System Variable
Tip
You can also add a security profile for authentication.
{
    "username": "abc@abc.com",
    "sessionId": "123608",
    "prompt": "Order Forms details for xyz"
}
{
   "message": "Based on order forms, here are the complete order details: ...",
   "status_code": 200
}
Review project workflows
In the open Studio project, review the workflows along with the descriptions below to understand what they do. The descriptions below note where you could replace the system by modifying the project's endpoint configurations and workflows.
-
Utility-Upload Customer Order Forms to Azure
This workflow automates order form processing by extracting details from NetSuite, uploading documents to Azure Blob Storage, and indexing them in the Azure AI Search index.
This workflow must be run first to load all active customer data, making customer details available to the AI agent. Running the workflow is described in Trigger the project workflows later on this page.
If your organization's customer order form data is in a system other than NetSuite, you must modify the workflow's operations to replace NetSuite-specific components with those for your endpoint.
-
Main Entry - Slack API Request Handler
This workflow manages incoming Slack bot requests and verifies user authorization. It is triggered via a Jitterbit custom API each time your Sales team interacts with the Slack bot chat UI (that is, sends a Slack message to it). Configuration of the Jitterbit custom API is described in Create the Jitterbit custom API later on this page.
If you aren't using Slack, this workflow can be ignored and won't be triggered. To use a different chat UI for your Sales team to interact with, use the
Generic API Request Handlerworkflow, also triggered via a Jitterbit custom API. -
Main - AI Agent Tools Logic
After receiving user authorization from either the
Main Entry - Slack API Request HandlerorGeneric API Request Handlerworkflows, this workflow manages function-calling requests to the large language model (LLM), making decisions on which tool to run based on the LLM's response. There are three main tool calls:-
Customer_Order_Function: This tool addresses user queries about customer order forms by invoking the
Main - Get Customer Order Form Detailsoperation within theTool-Customer Order Detailsworkflow. -
Pricing_Function: This tool addresses user queries about product pricing by invoking the
Main - Pricing Sheetoperation within theTool-Pricing Sheetsworkflow. -
Customer_Lookup_By_Location_Function: This tool addresses user queries to get customers by location or account owner by invoking the
Main - Customer Lookupoperation within theTool - Customer Lookupworkflow.
-
-
Tool-Customer Order Details
This workflow retrieves customer order details from NetSuite.
To use a different endpoint than NetSuite, create a new operation to retrieve order forms from the system and assign the results to the
extractedContentglobal variable. Then trigger the new operation from theMain - Get Customer Order Form Detailsoperation. -
Tool-Pricing Sheets
This workflow retrieves product pricing from Salesforce.
In the configuration of the Salesforce Query activity, the following query retrieves product pricing information by agent. If your Salesforce organization doesn't use these objects and fields, or if product pricing information is stored in different objects/fields, this workflow will not function properly. In that case, the agent will not be able to answer pricing questions. Customize the query in this workflow to align with your Salesforce organization's data model:
SELECT Product2.Description,
       Product2.Family,
       Product2.ProductCode,
       CurrencyIsoCode,
       Name,
       UnitPrice,
       Pricebook2.Name,
       Id
FROM   PricebookEntry
WHERE  IsDeleted = false
       AND IsArchived = false
       AND IsActive = true
       AND Pricebook2.IsActive = true
       AND Pricebook2.IsDeleted = false
       AND Pricebook2.IsArchived = false
       AND Product2.IsActive = true
       AND Product2.IsDeleted = false
       AND Product2.IsArchived = false
       AND CurrencyIsoCode = '{{ currencycode }}'
ORDER BY Name
To use a different endpoint than Salesforce, create a new operation to retrieve product pricing from the system and assign the results to the
pricing_sheetglobal variable. Then trigger the new operation from theMain - Pricing Sheetoperation. -
Tool - Customer Lookup
This workflow retrieves customers from Salesforce.
In the configuration of the Salesforce Query activity, the following query retrieves customer account information. If your Salesforce organization uses different fields or objects for customer details, customize this query in this workflow accordingly:
SELECT Id,
       BillingCity,
       BillingCountry,
       BillingState,
       Name
FROM   Account
WHERE  Type = 'Customer'
To use a different endpoint than Salesforce, create a new operation to retrieve customers from the system and assign the results to the
extractedContentglobal variable. Then trigger the new operation from theMain - Customer Lookupoperation. -
Utility - Get All Account Owners
This workflow retrieves account owners from Salesforce.
In the configuration of the Salesforce Query activity, the following query retrieves account owners (name and email) for all accounts of type
CustomerorPartner. If your Salesforce organization uses different account types or custom fields to classify accounts, customize this query in this workflow accordingly:SELECT OwnerId, Owner.Email, Owner.Name FROM Account WHERE Type IN ('Customer', 'Partner')To use a different endpoint than Salesforce, create a new operation to retrieve account owners from the system and assign the results to the
Account_Owner_Listvariable. Then trigger the new operation from theMain - Get Owner Listoperation. -
Utility-User Authorization And Session
This workflow manages the user authorization and session. It uses Jitterbit Cloud Datastore to maintain a list of authorized users and their active sessions.
To configure this workflow with an alternative data store or authorization mechanism for managing user access and sessions, modify the workflow's operations accordingly.
-
Utility - Bot Chat History Storage
This workflow manages the storage of bot chat history, which is essential for providing memory context to LLMs. It leverages Jitterbit Cloud Datastore for this purpose.
To integrate with other data storage solutions for storing and retrieving chat history, modify the workflow's operations accordingly.
-
Generic API Request Handler
This workflow processes HTTP API requests from any application. To integrate with your applications, create a custom Jitterbit API that triggers the
Generic API request Handleroperation. This API's URL can then be used by any application to send and receive requests.Configuration of the custom Jitterbit API is described in Create the Jitterbit custom API later on this page.
Trigger the project workflows
For the initial data load, run the operation in the first workflow, Utility-Upload Customer Order Forms to Azure. This can be done using the operation's Run option shown by hovering on the operation. You will need to run the operation again in the future if your data is updated.
Tip
You may want to put this operation on a schedule to get updated data on a regular basis. This can be done from the operation's actions menu in Settings > Schedules.
The two other main workflows are triggered by the Jitterbit custom APIs:
-
Main Entry - Slack API Request Handler: This workflow is triggered from Slack via theSlack Bot API Request Handlercustom API. Sending a direct message to the Slack app will initiate the custom API trigger. -
Generic API Request Handler: This workflow is triggered from another application via theGeneric API request Handlercustom API. Sending a request to the configured API will initiate the custom API trigger.
All other workflows are triggered by other operations and are downstream of those listed above. They are not intended to be run by themselves.
Troubleshooting
If you encounter issues, review the following logs for detailed troubleshooting information:
For additional assistance, contact Jitterbit support.