Jitterbit Knowledge Agent
Overview
The Jitterbit Knowledge Agent (Knowledge Agent) is an AI agent provided through Jitterbit Marketplace that is intended to enable your organization's internal team to get intelligent answers from your organization's internal data. This agent uses the Retrieval-Augmented Generation (RAG) technique, which combines LLM reasoning with access to external tools and data sources. It does the following:
-
Connects to and fetches information from the following sources using Jitterbit Studio:
- Atlassian Confluence pages
- Atlassian Jira issues
- Google Drive documents
- Salesforce support cases (from the
Caseobject)
-
Integrates with an LLM to power an intelligent AI chatbot using data from the above sources accessed via a custom API created with Jitterbit API Manager.
This document explains how to set up and operate this AI agent. It covers architecture and prerequisites, example prompts that show what the agent can do, and steps to install, configure, and operate the AI agent.
AI agent architecture
The following diagram depicts the architecture implemented in the Knowledge Agent:
Agent data flow
Slack app/bot) JB_CUSTOM_API(
Jitterbit API Manager
custom API) REQ_AZURE_OPENAI(Request to
Azure OpenAI) SLACK_API_REQ_H(Slack
API request handler
workflow) RES_AZURE_OPENAI(Response from Azure OpenAI) TIMEOUT(Timeout handling) subgraph LIVE_AGENT_DATA_FLOW[ ] direction RL subgraph EXTAPP[**External app**] SLACKAPP end JB_CUSTOM_API subgraph STUDIO[ **Jitterbit Studio**] REQ_AZURE_OPENAI RES_AZURE_OPENAI SLACK_API_REQ_H TIMEOUT end end SLACKAPP -->|Request| JB_CUSTOM_API JB_CUSTOM_API -->|Request| SLACK_API_REQ_H JB_CUSTOM_API -->|Response| SLACKAPP SLACK_API_REQ_H -->|Response|JB_CUSTOM_API SLACK_API_REQ_H --> REQ_AZURE_OPENAI REQ_AZURE_OPENAI --> RES_AZURE_OPENAI RES_AZURE_OPENAI --> SLACK_API_REQ_H REQ_AZURE_OPENAI --> TIMEOUT --> SLACK_API_REQ_H classDef Clear fill:white, stroke:white, stroke-width:0px, rx:15px, ry:15px classDef Plain fill:white, stroke:black, stroke-width:3px, rx:15px, ry:15px class LIVE_AGENT_DATA_FLOW Clear class EXTAPP,APIM,STUDIO Plain
Initial data load and data maintenance workflows
Prerequisites
To use the Knowledge Agent, the following components are required or assumed in the design of the agent.
Harmony components
You must have a Jitterbit Harmony license with access to the following components:
- Jitterbit Studio
- Jitterbit API Manager
- Jitterbit Knowledge Agent purchased as a license add-on
Supported endpoints
The following endpoints are incorporated into the agent's design.
Large language model (LLM)
The AI agent uses Azure OpenAI as the LLM provider. To use Azure OpenAI, you must have a Microsoft Azure subscription with permissions to create and manage the following resources:
- Azure OpenAI resource with a deployed
gpt-4oorgpt-4.1model. - Azure Storage with a Blob container to store fetched data.
- Azure AI Search with a search service that can be configured with an index and indexer.
Tip
For pricing information, see Azure AI Search pricing tiers.
Knowledge base
You can use any or all of these endpoints as the knowledge base for this AI agent:
- Atlassian Confluence: The source of Confluence pages.
- Atlassian Jira: The source of Jira issues.
- Google Drive: The source of files stored on a Google shared drive.
- Salesforce: The source of your customer support cases from the
Caseobject.
Chat interface
The agent's design incorporates Slack as the chat interface for interacting with the AI agent. If you want to use a different application as the chat interface, a separate workflow and instructions for a generic API setup are included in this AI agent.
Example prompts
Here are example prompts the Knowledge Agent can handle with access to the appropriate data. The agent may find information across any or all connected endpoints.
- "I am having an issue with the component 'ABC'. Can you help with this?"
- "How can I connect to a MySQL database using JDBC?"
- "Can you give me details about Jira ticket number 123?"
- "Are there any Jira tickets regarding the SQL connector?"
- "What is the security policy for installing software on my work computer?" (There may be a document on Google Drive or a Confluence page on this topic.)
Installation, configuration, and operation
Follow these steps to install, configure, and operate this AI agent:
- Download customizations and install the Studio project.
- Review project workflows.
- Create Microsoft Azure resources.
- Create the Slack app.
- Set up a Google service account and shared drive.
- Configure project variables.
- Test connections.
- Deploy the project.
- Create the Jitterbit custom API.
- Review project workflows.
- Trigger the project workflows.
- Troubleshooting.
Download customizations and install the project
Follow these steps to download customization files and install the Studio project:
-
Log in to the Harmony portal at https://login.jitterbit.com and open Marketplace.
-
Locate the AI agent named Jitterbit Knowledge Agent. To locate the agent, you can use the search bar or, in the Filters pane under Type, select AI Agent to limit the display to the available AI agents.
-
Click the AI agent's Documentation link to open its documentation in a separate tab. Keep the tab open to refer back to after starting the project.
-
Click Start Project to open a two-step configuration dialog to download customizations and import the AI agent as a Studio project.
Note
If you have not yet purchased the AI agent, Get this agent will be displayed instead. Click it to open an informational dialog, then click Submit to have a representative contact you about purchasing the AI agent.
-
In configuration step 1, Download Customizations, the following files are provided to facilitate setup of the index and indexer in Azure AI Search and to create the Slack app. Select the files and click Download Files:
-
Azure AI Search index and indexer JSON definition files
Azure_AI_Search_Datasource_Definition.jsonAzure_AI_Search_Index_Definition.jsonAzure_AI_Search_Indexer_Definition.json
-
Slack app manifest file
slack_app_manifest.json
Tip
The configuration dialog includes a warning not to import the template before applying endpoint customizations. That warning does not apply to this AI agent and can be ignored. Follow the recommended order of steps in this documentation.
Click Next.
-
-
In configuration step 2, Create a New Project, select an environment where you want to create the Studio project, then click Create Project.
-
A progress dialog is displayed. After it indicates that the project is created, use the dialog link Go to Studio or open the project directly from the Studio Projects page.
Create Microsoft Azure resources
Create the following Microsoft Azure resources and retain the following information for configuring the AI agent. To create and manage these resources, you must have a Microsoft Azure subscription with the appropriate permissions.
Azure Blob container
You must create an Azure Blob container to store customer details. Data from the Blob container will be indexed in Azure AI Search using an index and indexer.
You'll need the container's SAS URL for use in determining the values of the Azure Blob Storage project variables. To generate the SAS URL:
- In the Azure portal, browse to Storage accounts and open the specific storage account.
- From the resource menu under Data storage, select Containers and open the specific container.
- From the resource menu under Settings, select Shared access tokens.
-
Use the Permissions menu to verify that the shared access signature (SAS) URL for this container has a minimum of Read and Write permissions:
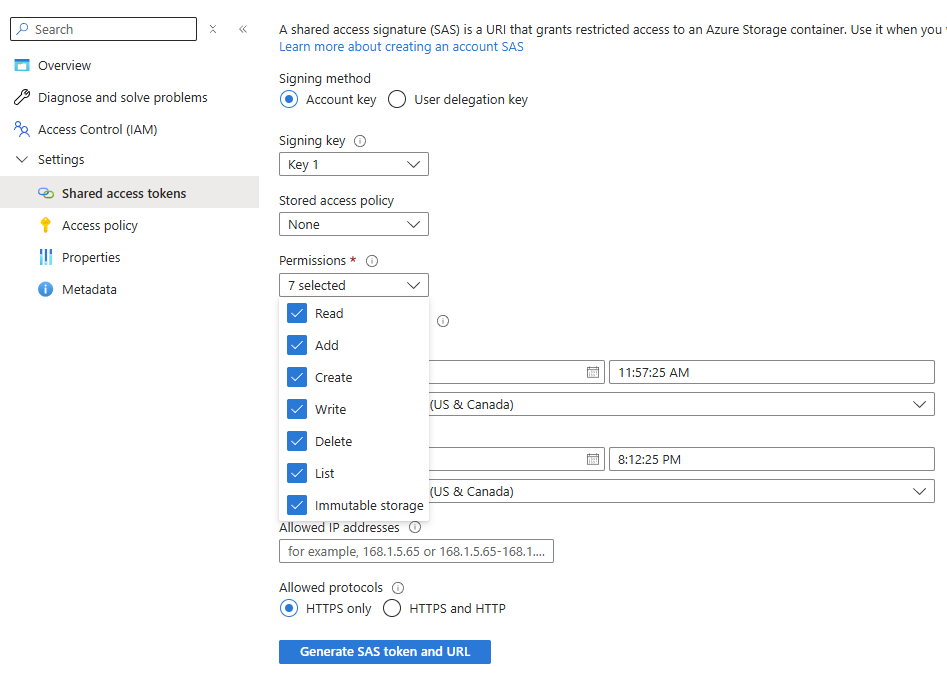
-
Click Generate SAS token and URL.
- Copy the Blob SAS URL displayed at the bottom.
- Determine the values of the Azure Blob Storage project variables from the SAS URL. The SAS URL is in the format of
{{ azure_blob_base_url }}/{{ Azure_Blob_Container_Name }}?{{ azure_blob_sas_token }}.
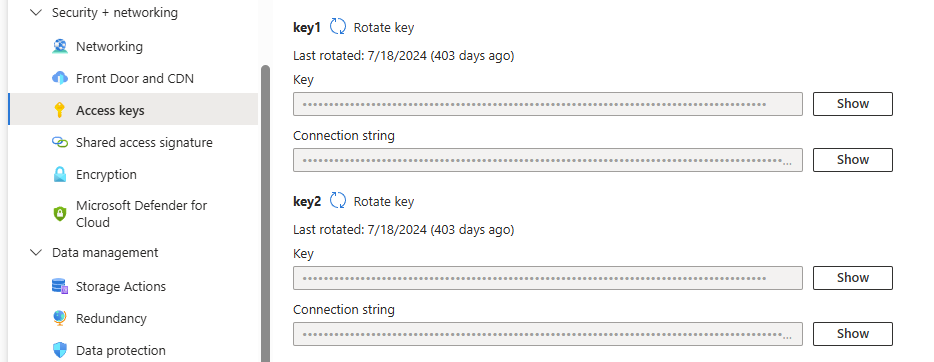
If using the JSON definition files included in the AI agent's customization files to generate the index and indexer, you'll also need the Azure Blob Storage account key. To view account access keys:
- In the Azure portal, browse to Storage accounts and open the specific storage account.
- From the resource menu under Security + networking, select Access keys.
-
Click Show keys to reveal the access key to use during configuration of Azure AI Search.
Azure AI Search service
You must create an Azure AI Search service and configure its index and indexer to process the data from the Blob container.
You'll need the Azure AI Search service's URL and API key to determine the values of the Azure AI Search project variables:
- URL: To obtain the value to use for
azure_ai_search_url, refer to the Azure documentation Get service information. - API key: To obtain the value to use for
azure_ai_search_api_keyrefer to the Azure documentation Configure role-based access.
You can use the JSON definition files included in the AI agent's customization files to generate the index and indexer, or you can create them yourself.
If using the provided definition files, you must replace the following placeholders with your own configuration values:
Azure_AI_Search_Indexer_Definition.json
| Placeholder | Description |
|---|---|
{{Your Azure AI Search Service Name}} |
The name of the Azure AI search service. |
Azure_AI_Search_Datasource_Definition.json
| Placeholder | Description |
|---|---|
{{Your Azure AI Search Service Name}} |
The name of the Azure AI search service. |
{{Your Azure Blob Account Name}} |
The name of the Azure Blob account. |
{{Your Azure Blob Account Key}} |
The access key for the Azure Blob Storage account, obtained as described in Azure Blob container above. |
{{your_azure_blob_container_name}} |
The name of the Azure Blob container. |
Azure OpenAI resource
You must create an Azure OpenAI resource and deploy a gpt-4o or gpt-4.1 model via the Azure AI Foundry portal.
You'll need the deployment name, Azure OpenAI endpoint URL, and API key to determine the values of the Azure OpenAI project variables. To find these values:
- In the Azure AI Foundry portal, open the specific OpenAI resource.
-
The values to use for the endpoint URL (
azure_openai_base_url) and API key (azure_openai_api_key) are displayed on the landing page for the resource: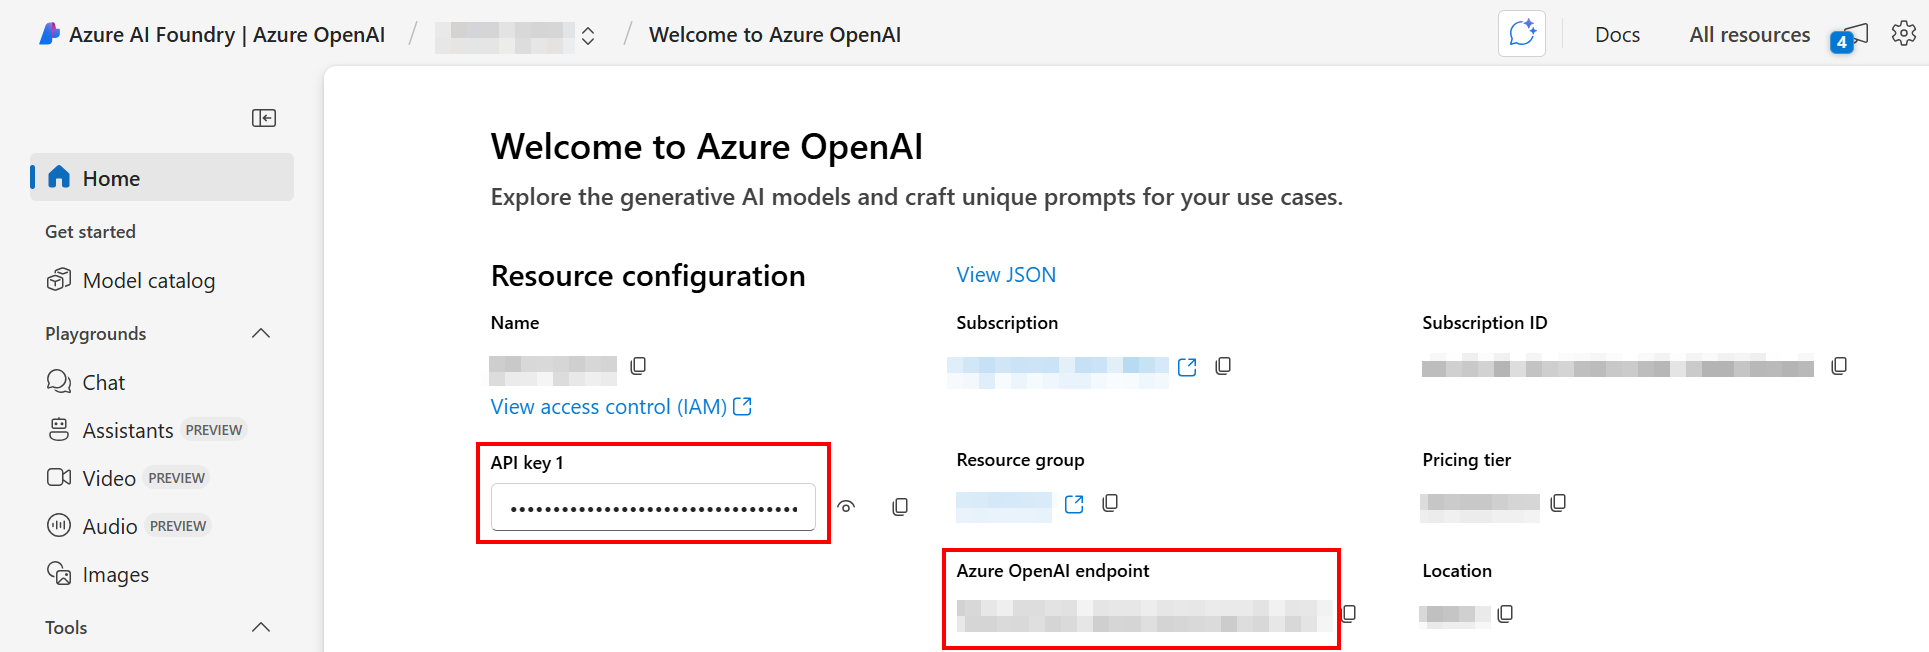
-
In the navigation menu under Shared resources, select Deployments. The deployment name (
Azure_OpenAI_Deployment_Name) is displayed.
Create the Slack app
To create the Knowledge Agent chat interface in Slack, follow these steps:
-
Create a Slack app using the Slack app manifest file (
slack_app_manifest.json) provided with this AI agent's customization files. Alternatively, create the app from scratch. -
If you use the provided manifest file, replace the following placeholders with your own configuration values:
Placeholder Description {{Replace with Slack bot name}}The name you want your Slack bot to have, as displayed to users. Replace this value in two places in the manifest. {{Replace with Jitterbit API URL}}The service URL of the Jitterbit custom API you created in Create the Jitterbit custom API. -
Install the app to your Slack workspace.
-
Obtain the bot token (for the Slack connection's Bot User OAuth Token field) and enter its value for the
slack_bot_oauth_user_tokenproject variable. -
Configure the
slack_channel_nameproject variable with the channel where notifications should be sent. -
Enter the bot token value for the
slack_bot_oauth_user_tokenproject variable and the channel name for theslack_channel_nameproject variable. You will configure these in the next step.
Set up a Google service account and shared drive
This setup is required only if you're using Data upload Utility - Google Drive to Azure Blob workflow. You must have an active Google Cloud project to proceed. If you don't have one, you can create one by following Google's instructions.
Create a Google service account
Follow the steps below to create a key for the Google service account to allow the utility to securely access your Google Drive files:
-
In the Google Cloud console, use the search bar to find and navigate to the Service Accounts page.
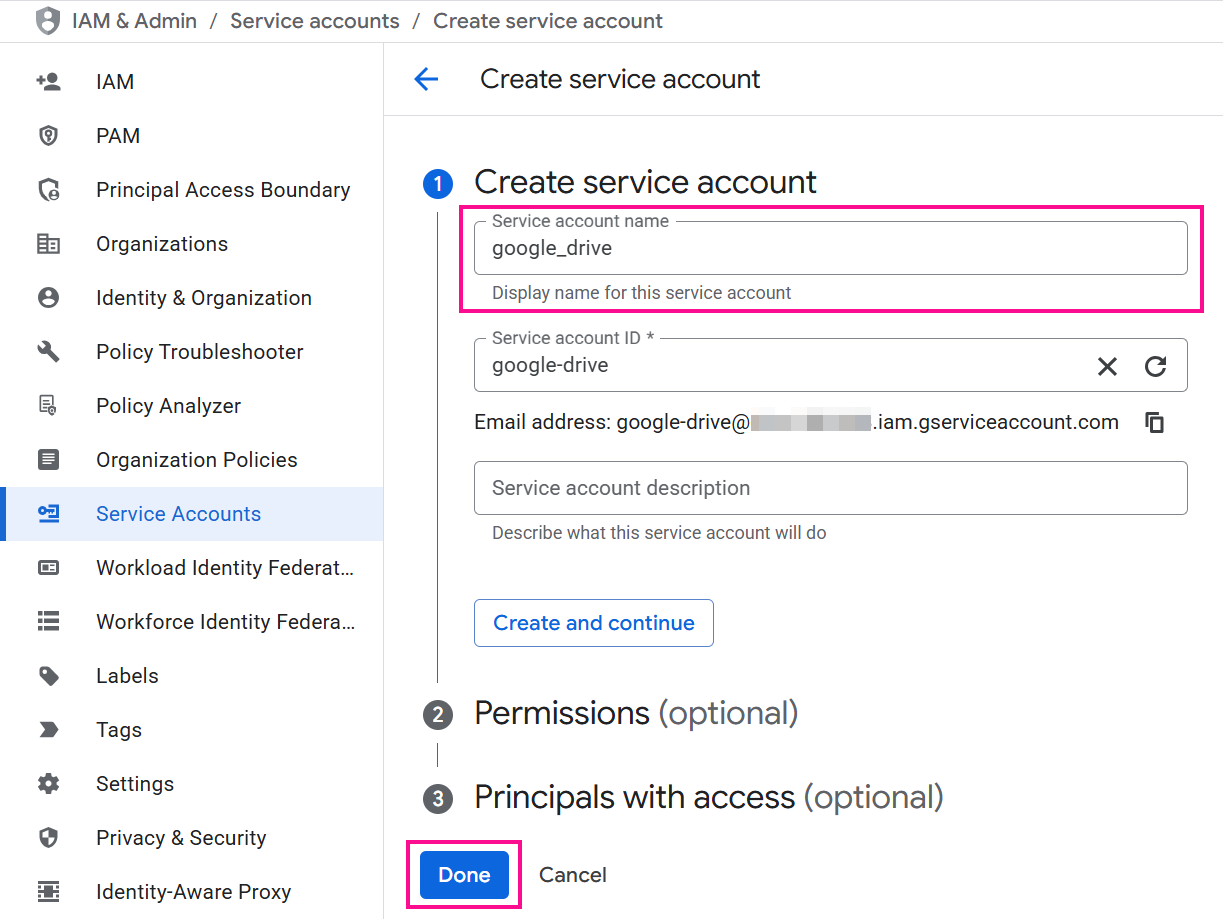
-
If you already have a service account you want to use, proceed to step 3. Otherwise, click Create service account, provide a name, and click Done. No additional permissions or access are needed.
-
Select the service account to open its Service account details:
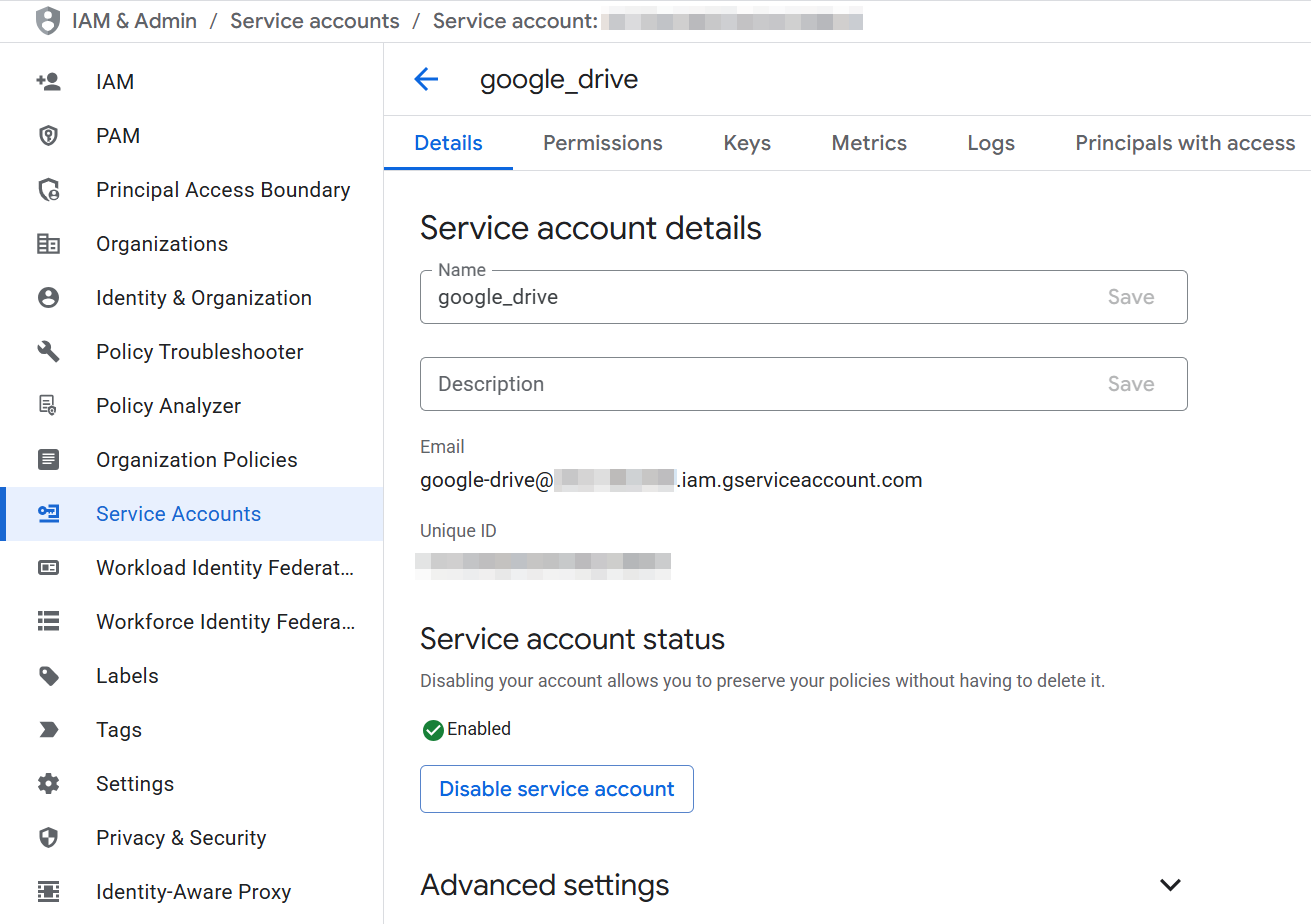
-
Navigate to the Keys tab and use the Add key menu to select Create new key.
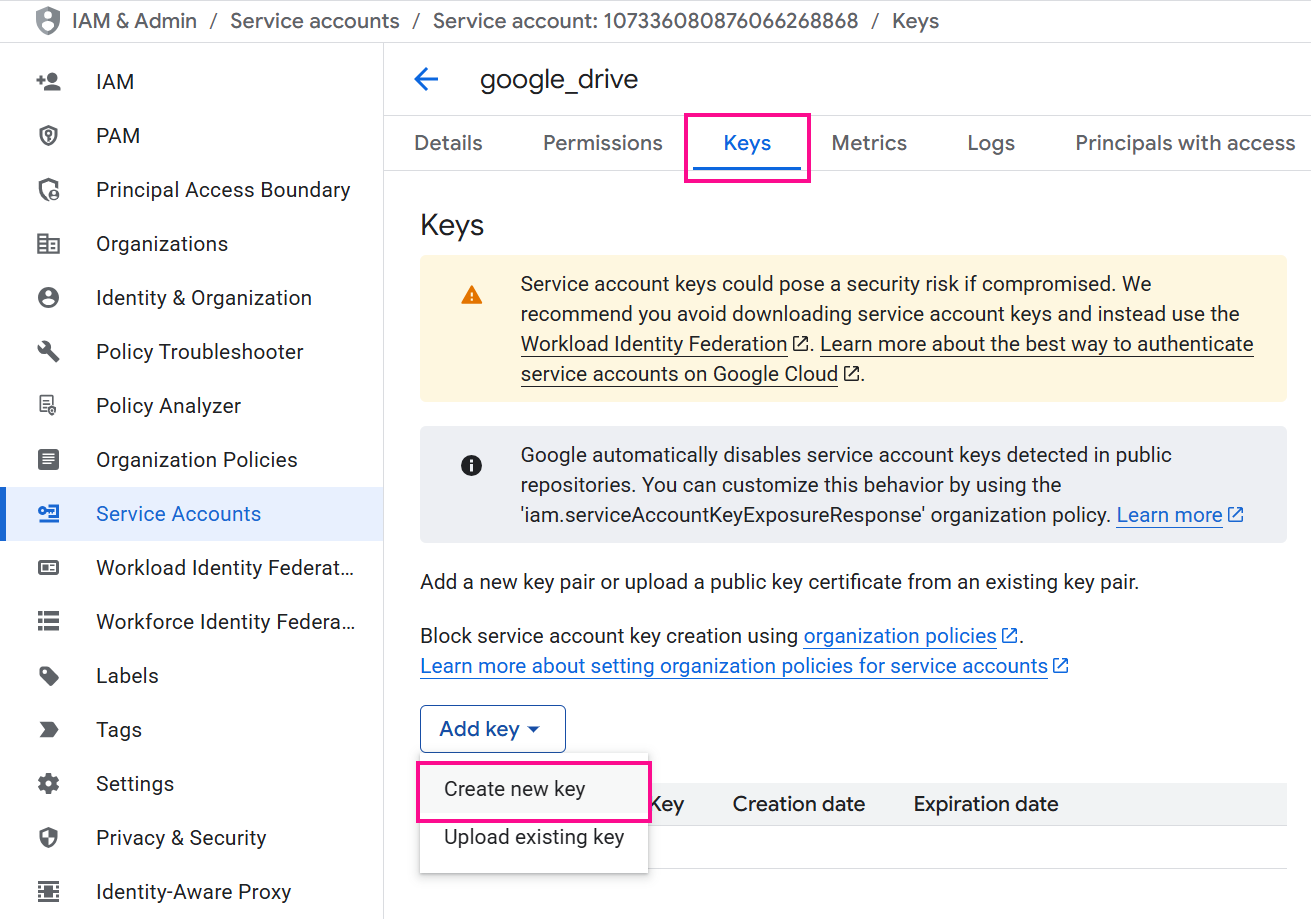
-
Choose JSON as the key type and click Create. A JSON file containing the credentials will download to your computer.
-
Open the downloaded JSON file to find the following values needed to configure the Google Drive project variables:
client_email: This is the value for theGoogle_Client_Emailproject variable and needed to configure the Google shared drive in the next section.private_key: This is the value for theGoogle_Private_Keyproject variable.
-
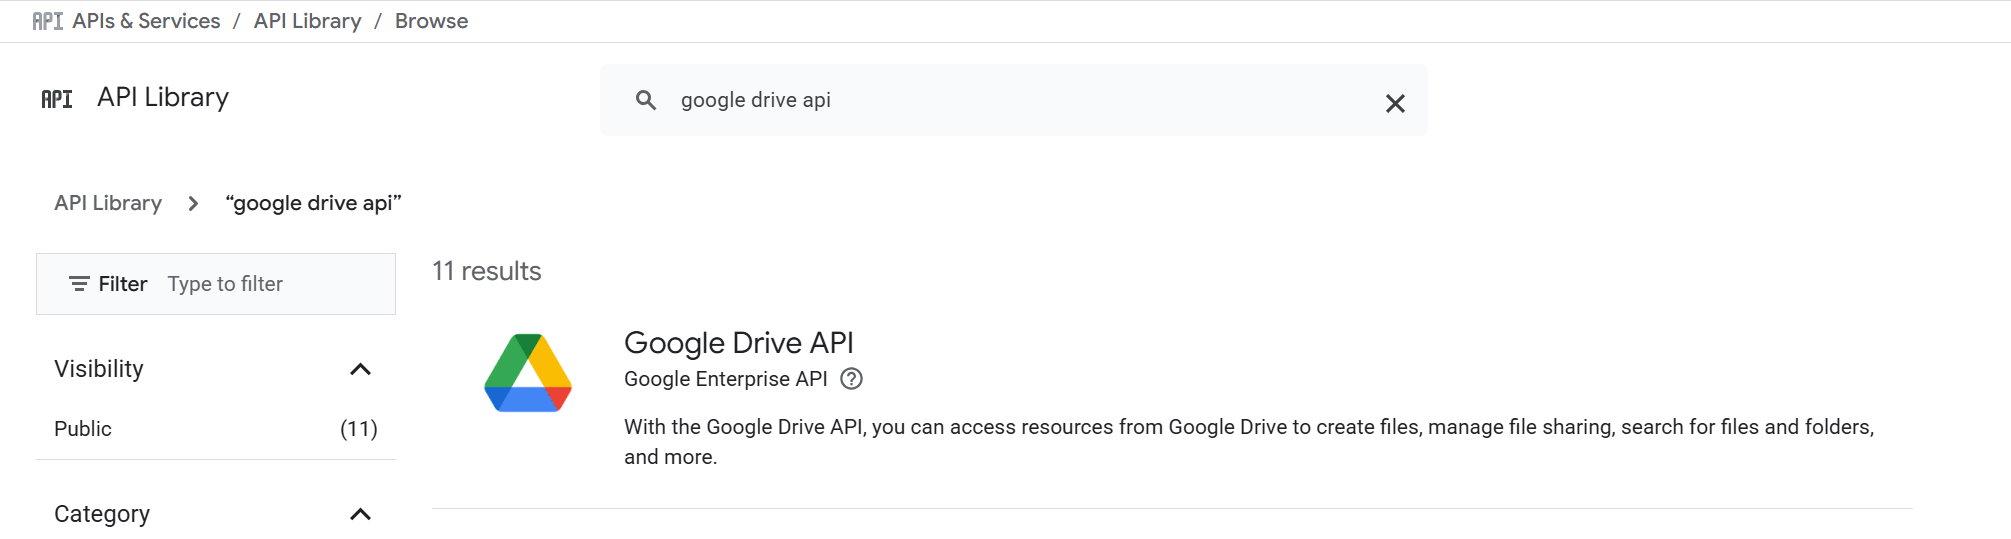
Enable the Google Drive API in your Google Cloud account:
-
In the Google Cloud console, use the search bar to find and navigate to the APIs & Services page.
-
Access the API Library and select the Google Drive API:
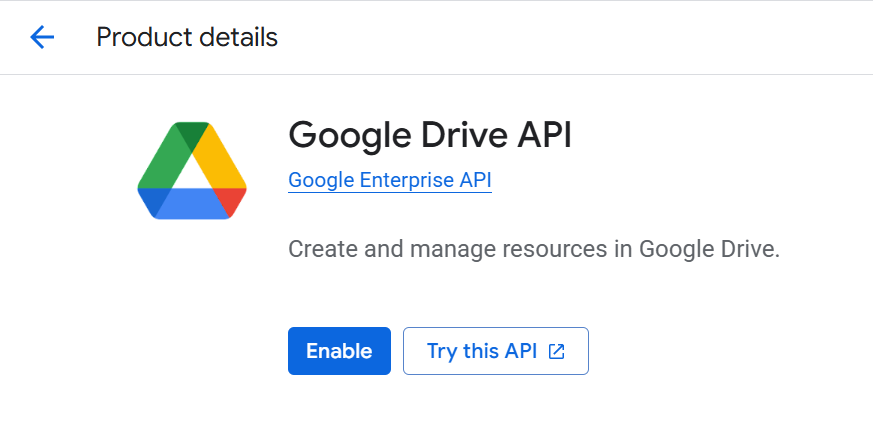
-
Click the Enable button:
-
Configure the Google shared drive
The Google shared drive should be configured as follows to allow the utility access to any files you upload to it:
-
Create a Google shared drive if you don't already have one.
-
Open the shared drive and copy its ID from the browser's URL. The ID is the long string of characters at the end. For example, if the URL is
https://drive.google.com/drive/folders/dftg-LbGrP7hdfd, the ID isdftg-LbGrP7hdfd. This ID is the value for theGoogle_Drive_IDproject variable when configuring Google Drive project variables. -
Click the name of the shared drive at the top of the page and select Manage members. A dialog appears.
-
In the Add people and groups field, paste the value of the
client_emailfrom the JSON file you downloaded earlier. -
Assign the Content manager role to the service account and confirm the action.
Configure project variables
In the Studio project installed earlier via Marketplace, you must set values for the following project variables.
This can be done using the project's actions menu to select Project Variables to open a drawer along the bottom of the page where you can review and set the values.
Salesforce
| Variable name | Description |
|---|---|
SF_Login_URL |
Server Host in the Salesforce connection |
SF_Password |
Password in the Salesforce connection |
SF_Security_Token |
Security token in the Salesforce connection |
SF_User_Name |
Username in the Salesforce connection |
SF_Cases_Incremental_Run |
Flag to control whether to fetch only new or updated Salesforce cases since the last run. When true, only incremental (new or updated) cases are fetched from Salesforce since the last run. When false, a full fetch is performed from the default date and time (SF_Cases_Default_Modified_Date). |
SF_Cases_Default_Modified_Date |
The default date and time from which Salesforce cases are fetched. Used during the first run or when SF_Cases_Incremental_Run is false. Format: yyyy-MM-dd'T'HH:mm:ss.SSS'Z'. Example: 2024-09-11T13:00:02.000Z. If this date is not set, an error will be raised. |
Jira
| Variable name | Description |
|---|---|
JIRA_Username |
The email address associated with the Jira account for authentication. |
JIRA_Token |
API token used for authenticating with the JIRA instance. For Atlassian Cloud, you can generate this token from your account settings. |
JIRA_Projects |
Jira project keys to fetch issues from, using the format keys=PROJECT1&keys=PROJECT2. Example: keys=SUPPORT&keys=ITHELP. |
JIRA_Issue_Types |
List of Jira issue types to fetch, separated by commas. Each value must be enclosed in single quotes. Example: 'Story','Bug','Task'. |
Jira_Default_Modified_Date |
The default date and time from which Jira issues are fetched. Used during the first run or when JIRA_IncrementalRun is false. Format: yyyy-MM-dd HH:mm. Example: 2025-08-07 10:00. If this date is not set, an error will be raised. |
JIRA_Incremental_Run |
Flag to control whether to fetch only new or updated Jira issues since the last run. When true, only incremental (new or updated) issues are fetched from Jira since the last run. When false, a full fetch is performed from the default date and time (Jira_Default_Modified_Date). |
JIRA_Base_URL |
The base URL of the Jira instance to connect to. Do not include a trailing slash. Example: https://yourdomain.atlassian.net. |
Confluence
| Variable name | Description |
|---|---|
Confluence_Wiki_UserName |
The Confluence wiki username. |
Confluence_Wiki_Password |
The Confluence wiki password. |
Confluence_Wiki_Base_Url |
The root URL of the Confluence wiki for API calls and content retrieval. Example: https://yourcompany.atlassian.net/wiki. |
Google Drive
| Variable name | Description |
|---|---|
Google_Client_Email |
The client email of the Google service account used for authentication when accessing Google Drive. |
Google_Drive_Default_Modified_Date |
The default date and time from which Google Drive files are read. Used during the first run or when incremental reading is disabled. Format: yyyy-MM-dd'T'HH:mm:ss. Example: 2024-05-28T11:32:47. If this date is not set, an error will be raised. |
Google_Drive_ID |
The ID of the shared Google Drive from which files will be read. For example, if the shared drive URL is https://drive.google.com/drive/folders/1KTXaKx_FG7Ud8sWHf8QgG67XHy, the drive ID is 1KTXaKx_FG7Ud8sWHf8QgG67XHy. |
Google_Drive_Incremental_Run |
Flag to control whether to fetch only new or updated Google Drive files since the last run. When true, only incremental (new or updated) files are fetched from Google Drive since the last run. When false, a full fetch is performed from the default date and time (Google_Drive_Default_Modified_Date). |
Google_Oauth_Scopes |
The OAuth scope required to grant the Google service account access to Google Drive. For this AI agent, enter: https://www.googleapis.com/auth/. |
Google_Private_Key |
The private key of the Google Cloud service account used to authenticate for fetching files from Google Drive. |
Azure Blob Storage
| Variable name | Description |
|---|---|
Azure_Blob_Container_Name |
The name of the Azure Blob Storage container where fetched data is stored or retrieved. This is the part of the SAS URL immediately following the storage account domain. Example: In https://myaccount.blob.core.windows.net/mycontainer/myblob.txt?sv=..., the container name is mycontainer. |
azure_blob_sas_token |
The SAS token used to authenticate access to Azure Blob container Azure_Blob_Container_Name. Only the part after ? in the full blob URL should be stored. Example token: sv=2025-08-01&ss=b&srt=sco&sp=rl&se=2025-08-30T12:00:00Z&st=2025-08-25T12:00:00Z&spr=https&sig=AbCdEfGhIjKlMnOpQrStUvWxYz1234567890. |
azure_blob_base_url |
The base URL of the Azure Blob Storage account used to access containers and blobs. In a SAS URL like https://myaccount.blob.core.windows.net/mycontainer/myblob.txt?sv=..., the base URL is https://myaccount.blob.core.windows.net/. |
Tip
These values can be derived from the SAS URL, which is in the format of {{azure_blob_base_url}}/{{Azure_Blob_Container_Name}}?{{azure_blob_sas_token}}.
Azure AI Search
| Variable name | Description |
|---|---|
Azure_AI_Search_Index_Name |
The name of the Azure index that stores customer information from order forms. |
azure_ai_search_indexer |
The name of the Azure AI Search indexer used to populate and update the search index Azure_AI_Search_Index_Name. |
azure_ai_search_url |
The endpoint URL of your Azure AI Search service. Do not include a trailing slash. Example: https://<your-search-service>.search.windows.net. |
azure_ai_search_api_key |
The API key used to authenticate requests to Azure AI Search. |
Azure OpenAI
| Variable name | Description |
|---|---|
Azure_OpenAI_Deployment_Name |
The name of the Azure OpenAI deployment used to access the model. |
azure_openai_base_url |
The base URL for accessing the Azure OpenAI service. Example: https://<your-resource-name>.openai.azure.com. |
azure_openai_api_key |
The API key used to authenticate requests to the Azure OpenAI service. |
Slack
| Variable name | Description |
|---|---|
Slack_Bot_Token |
The Slack bot token that is obtained after creating the Slack app, used for the Bot user OAuth access token in the Slack connection. |
Note
The Slack app is created in a later step. For now, you can leave this variable blank.
Common
| Variable name | Description |
|---|---|
html_regex |
Regex to remove HTML tags. Use the default value: <(?:"[^"]*"['"]*|'[^']*'['"]*|[^'">])+> |
AI_Prompt |
The input text or instruction provided to the AI model that guides how it should generate a response. For this agent you may use the following prompt:
|
Test connections
Test the endpoint configurations to verify connectivity using the defined project variable values.
To test connections, go to the design component palette's Project endpoints and connectors tab, hover over each endpoint, and click Test.
Deploy the project
Deploy the Studio project.
To deploy the project, use the project's actions menu to select Deploy.
Deploy the project
Deploy the Studio project. This can be done using the project's actions menu to select Deploy.
Create the Jitterbit custom API
Create a custom API using API Manager for one of the following:
- Slack bot API request handler: Required if using the Slack notification included in the design of this AI agent.
- Generic API request handler: Optional. Use for handling API requests from any application.
Create the Slack bot API request handler
This custom Jitterbit API will trigger the Slack Bot API Request Handler operation. Configure and publish the custom API with the following settings:
- API Service:
Slack Bot API Request Handler - Path:
/ - Project: Select the Studio project created from the
Jitterbit Knowledge Agentin Marketplace - Operation to Trigger:
Slack Bot API Request Handler - Method:
POST - Response Type:
System Variable
Retain the service URL of the published API for use in creating the Slack app. The service URL can be found in the API details drawer on the Services tab by hovering over the service's Actions column and clicking Copy API service URL.
Generic API request handler
This custom Jitterbit API will trigger the Generic API request Handler operation. It is not required. Create this API if you are using other applications to process HTTP API requests. Configure and publish the custom API with the following settings:
- Service name:
Generic API request Handler - Project: Select the Studio project created from the
Jitterbit Knowledge Agentin Marketplace - Operation:
Generic API request Handler - Method:
POST - Response type:
System Variable
Tip
You can also add a security profile for authentication.
{
    "username": "johnr",
    "prompt": "How to connect to mysql using a connector?"
}
{
    "message": "To connect to a MySQL database using the Database connector, follow these steps:   - Use the MySQL JDBC driver that ships with the agent for additional features like manual queries.",
    "references": [],
    "status_code": 200
}
Review project workflows
In the open Studio project, review the workflows along with the descriptions below to understand what they do.
Note
The first four workflows are Data upload Utility workflows whose purpose is to fetch data to be used as the knowledge base for the AI agent. You may use any or all of these workflows to fetch data. At least one source is required as the knowledge base for the AI agent.
These workflows should be run first to load knowledge into the agent before interacting with it. You can set up a schedule to get updated data on a regular basis per your requirements. This can be done from the first operation's actions menu in Settings > Schedules.
-
Data upload Utility - JIRA Ticket to Azure Index
This workflow fetches issues from Jira, then runs the
Utility - Azure Data Upload and Indexworkflow to upload issues to Azure Blob Storage and index them in the Azure AI Search index.The initial operation is
Main - JIRA tickets upload. The following fields are fetched:"fields": [ "summary", "status", "assignee", "description", "reporter", "created", "updated", "priority", "issuetype", "components", "comment" ]This workflow can be configured to fetch all issues, or only new and updated issues, using the Jira project variables.
-
Data upload Utility - SF Cases to Azure Index
This workflow retrieves support cases from Salesforce, then runs the
Utility - Azure Data Upload and Indexworkflow to upload cases to Azure Blob Storage and index them in the Azure AI Search index.The initial operation is
Main - SF Cases Upload.In the configuration of the Salesforce Query activity, the following query retrieves support case information by agent. If your Salesforce organization doesn't use these objects and fields, or if support case information is stored in different objects and fields, this workflow will not function properly. Customize the query in this workflow to align with your Salesforce organization's data model:
SELECT Account.Name,
       Owner.Email,
       Owner.Name,
       (SELECT CreatedBy.Email,
               CreatedBy.Name,
               Id,
               CommentBody,
               CreatedDate,
               LastModifiedDate,
               LastModifiedBy.Email,
               LastModifiedBy.Name
        FROM   CaseComments),
       Id,
       CaseNumber,
       CreatedDate,
       Description,
       LastModifiedDate,
       Origin,
       Priority,
       Reason,
       Status,
       Subject,
       Type,
       CreatedBy.Email,
       CreatedBy.Name,
       LastModifiedBy.Email,
       LastModifiedBy.Name
FROM Case
This workflow can be configured to fetch all cases, or only new and updated cases, using the Salesforce project variables.
-
Data upload Utility - Confluence Pages to Azure Index
This workflow retrieves pages from Confluence, then runs the
Utility - Azure Data Upload and Indexworkflow to upload documents to Azure Blob Storage and index them in the Azure AI Search index.The initial operation is
Main - Load Confluence Pages.This workflow fetches all Confluence pages on each execution.
-
Data upload Utility - Google Drive to Azure Blob
This workflow retrieves files from Google Drive, then runs the
Utility - Azure Data Upload and Indexworkflow to index them in the Azure AI Search index.The initial operation is
Main - Google Drive Upload.Supported file types include Google Docs, Google Spreadsheets, and those supported by Azure Storage blob indexing.
Supported maximum file sizes are listed as the maximum blob size in the Azure AI Search Indexer limits for your AI search service tier. For example, for the basic tier, the limit is 16 MB; for S1, the limit is 128 MB.
This workflow can be configured to fetch all files, or only new and updated files, using the Google Drive project variables.
-
Utility - Azure Data Upload and Index
This is a common utility workflow used by the
Data upload Utilityworkflows to upload data to Azure Blob Storage and index it in Azure AI Search. -
Main Entry - Slack API Request Handler
This workflow manages incoming Slack bot requests. It is triggered via a Jitterbit custom API each time your team interacts with the Slack bot chat UI (that is, sends a Slack message to it). Configuration of the Jitterbit custom API is described in Create the Jitterbit custom API later on this page.
If you aren't using Slack, this workflow can be ignored and won't be triggered. To use a different chat UI for your team to interact with, use the
Generic API Request Handlerworkflow, also triggered via a Jitterbit custom API. -
Generic API Request Handler
This workflow processes HTTP API requests from any application. To integrate with your applications, create a custom Jitterbit API that triggers the
Generic API request Handleroperation. This API's URL can then be used by any application to send and receive requests.Configuration of the custom Jitterbit API is described in Create the Jitterbit custom API later on this page.
Trigger the project workflows
For the initial data load, run any or all of the Data upload Utility workflows depending on your data sources. This can be done using the initial operation's Run option shown by hovering over the operation. You will need to run the operation again in the future if your data is updated.
Tip
You may want to put the initial operations in Data upload Utility workflows on a schedule to get updated data on a regular basis. This can be done from the operation's actions menu in Settings > Schedules.
The two other main workflows are triggered by the Jitterbit custom APIs:
-
Main Entry - Slack API Request Handler: This workflow is triggered from Slack via theSlack Bot API Request Handlercustom API. Sending a direct message to the Slack app will initiate the custom API trigger. -
Generic API Request Handler: This workflow is triggered from another application via theGeneric API request Handlercustom API. Sending a request to the configured API will initiate the custom API trigger.
All other workflows are triggered by other operations and are downstream of those listed above. They are not intended to be run by themselves.
Troubleshooting
If you encounter issues, review the following logs for detailed troubleshooting information:
For additional assistance, contact Jitterbit support.