Work with hierarchical data in Jitterbit Studio
Introduction
Hierarchical data structures contain one or more parent-child or nested relationships between fields and records. Common examples include customers with multiple addresses, orders with line items, or companies with multiple locations.
In Studio, hierarchical structures are also called relational, multilevel, complex data, or tree structures.
For information about node and field notation, see Nodes and fields in Key concepts.
Identify hierarchical structures
Hierarchical data appears as a tree structure in transformations:
<customer>
    <id>10123</id>
    <name>ABC Co.</name>
    <addresses>
        <address>
            <street>1 Main St.</street>
            <city>Anytown</city>
            <state>NY</state>
            <zip>12345</zip>
        </address>
        <address>
            <street>1 Time Square</street>
            <city>New York City</city>
            <state>NY</state>
            <zip>54321</zip>
        </address>
    </addresses>
</customer>
Map hierarchical data
When you map hierarchical structures, you must map within the same level. For example:
- Parent fields map to parent fields.
- Child fields map to corresponding child fields.
- Loop nodes are automatically generated for repeating elements.
If automatic mapping doesn't work for your structure, see Control data loops.
Handle structure mismatches
When source and target structures differ, you can handle them using one of these methods:
-
Map multiple instances to single instance: When you map arrays to single objects, you see this dialog:
Quote
A multiple instance source cannot be mapped to single instance target. Do you want to change the mapping to use the first instance for each source?
Clicking Yes maps only the first record by adding
#1to the path. -
Flatten hierarchical to flat structures: To create one output record per child element, follow these steps:
- Map fields from the deepest repeating node.
- Parent data automatically repeats for each child.
- The iterator line moves to the child level.
Data normalization
Data normalization is the process of restructuring flat source records into a hierarchical tree. This is necessary when mapping flat data (such as CSV or database rows) to a hierarchical target (such as XML or JSON) to ensure that parent-child relationships are created correctly without duplicating parent nodes.
By default, Harmony uses a normalization algorithm to construct the target tree. This process converts the flat structure of the source into a hierarchical source structure, allowing it to be mapped to the hierarchical target.
Normalization can be disabled using a Jitterbit variable depending on the target structure you are mapping to:
- Flat-to-flat:
jitterbit.transformation.disable_normalization - Flat-to-XML:
jitterbit.transformation.flat_to_xml.disable_normalization
The behavior of the transformation mapping changes based on whether normalization is enabled:
-
With normalization (default): Redundant data in flat rows is collapsed. For example, if you have five rows of
Orderline items for oneOrder ID, oneOrderparent with five child items is created. -
Without normalization: Every flat record is treated as a unique branch. In the example above, this would result in five separate orders, each containing a single line item.
Single-instance nodes
If a target node is defined as a single-instance node, only the first record encountered for that node is kept. Any subsequent flat records that would otherwise map to that node are ignored.
Handle complex XML schemas
When you use a schema that contains derived types or substitution groups, you need to provide some input before you can proceed with the transformation mapping.
Important
Mirrored schemas that use substitution groups aren't supported and will result in an operation runtime error.
Specify the schema
Derived types or substitution groups are common in XML-based XSD and WSDL schemas. You can upload these types of schemas in an activity or in a transformation, or they may be fetched directly from the endpoint by some connectors. For example, response schemas returned by a saved search in a NetSuite Search activity often contain derived types.
For more information, see Choose schema sources.
Select derived types or substitution group
After you specify the schema, select the derived types or substitution group within the transformation. There might be nodes for which you can select derived types on either the source or target side of the transformation.
A link to Select Derived Type(s) or Substitution Group is displayed next to the node name as applicable:
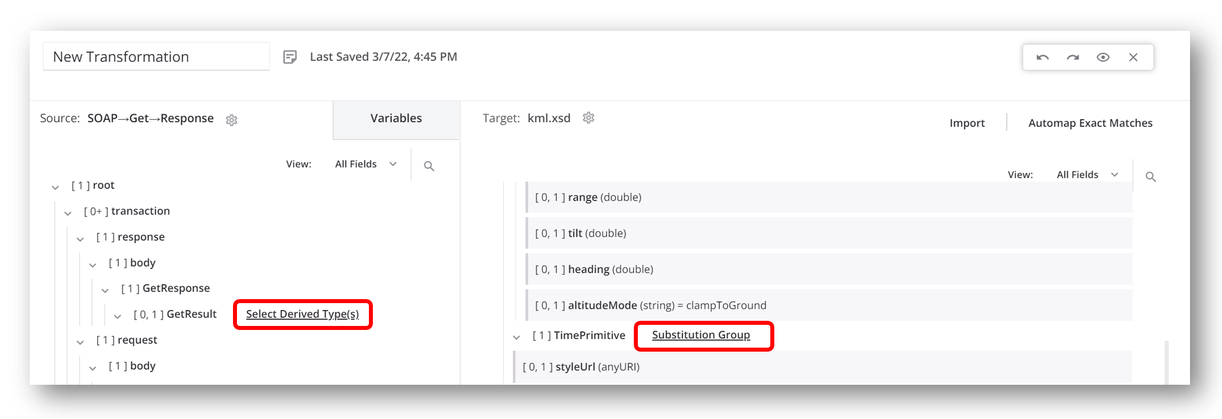
The user interface is the same for both selecting derived types and selecting a substitution group.
Click the link Select Derived Type(s) or Substitution Group to open a dialog where you can select from the available nodes:
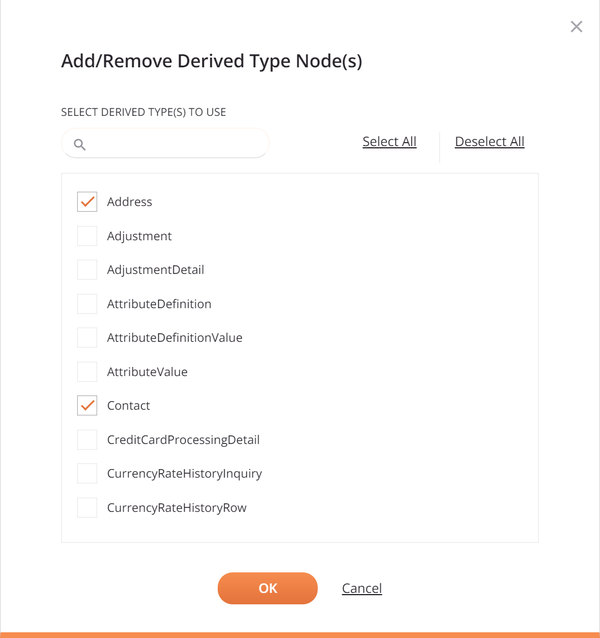
To filter the list of nodes, enter any part of the node name into the search box. The search is not case-sensitive.
Select the nodes that you want using the checkboxes next to the node names. The Select All and Deselect All links can be used to select or clear all nodes at once. Then click OK to use the derived-type nodes within the schema.
Note
When you select a large number of derived-type nodes at once (30 or more), the system might respond slowly when updating the transformation.
The selected nodes are then shown within the schema. You can expand or collapse them to show additional child nodes and fields within them:

After you select nodes, you can change your selections by clicking the link Select Derived Type(s) or Substitution Group again to return to the selection screen and add or remove nodes as appropriate.
You can then proceed with the transformation mapping as normal by mapping the source fields within those selected nodes to target fields, or by mapping to target fields within selected nodes.