Create a transformation and define schemas in Jitterbit Studio
Introduction
This page shows you how to create schemas within transformations. To learn when to use transformation-defined versus activity-defined schemas, see Choose schema sources.
Create a transformation
You can create a new transformation from these locations:
-
The project pane's Components tab using the Create New option (see Components tab actions menu in Project pane Components tab).
-
The design component palette's Tools tab (see Tools in Design component palette).
-
The design canvas using a drop zone (see Drop zone actions menu in Design canvas).
New transformations are created with the default name New Transformation. For a step-by-step walkthrough, see Create your first transformation.
Configure a transformation
When you create a new transformation, the transformation configuration screen opens. The transformation's location in an operation determines the schemas that may be inherited from adjacent activities.
Define schemas
If no source or target schemas are inherited, these schema options are displayed:
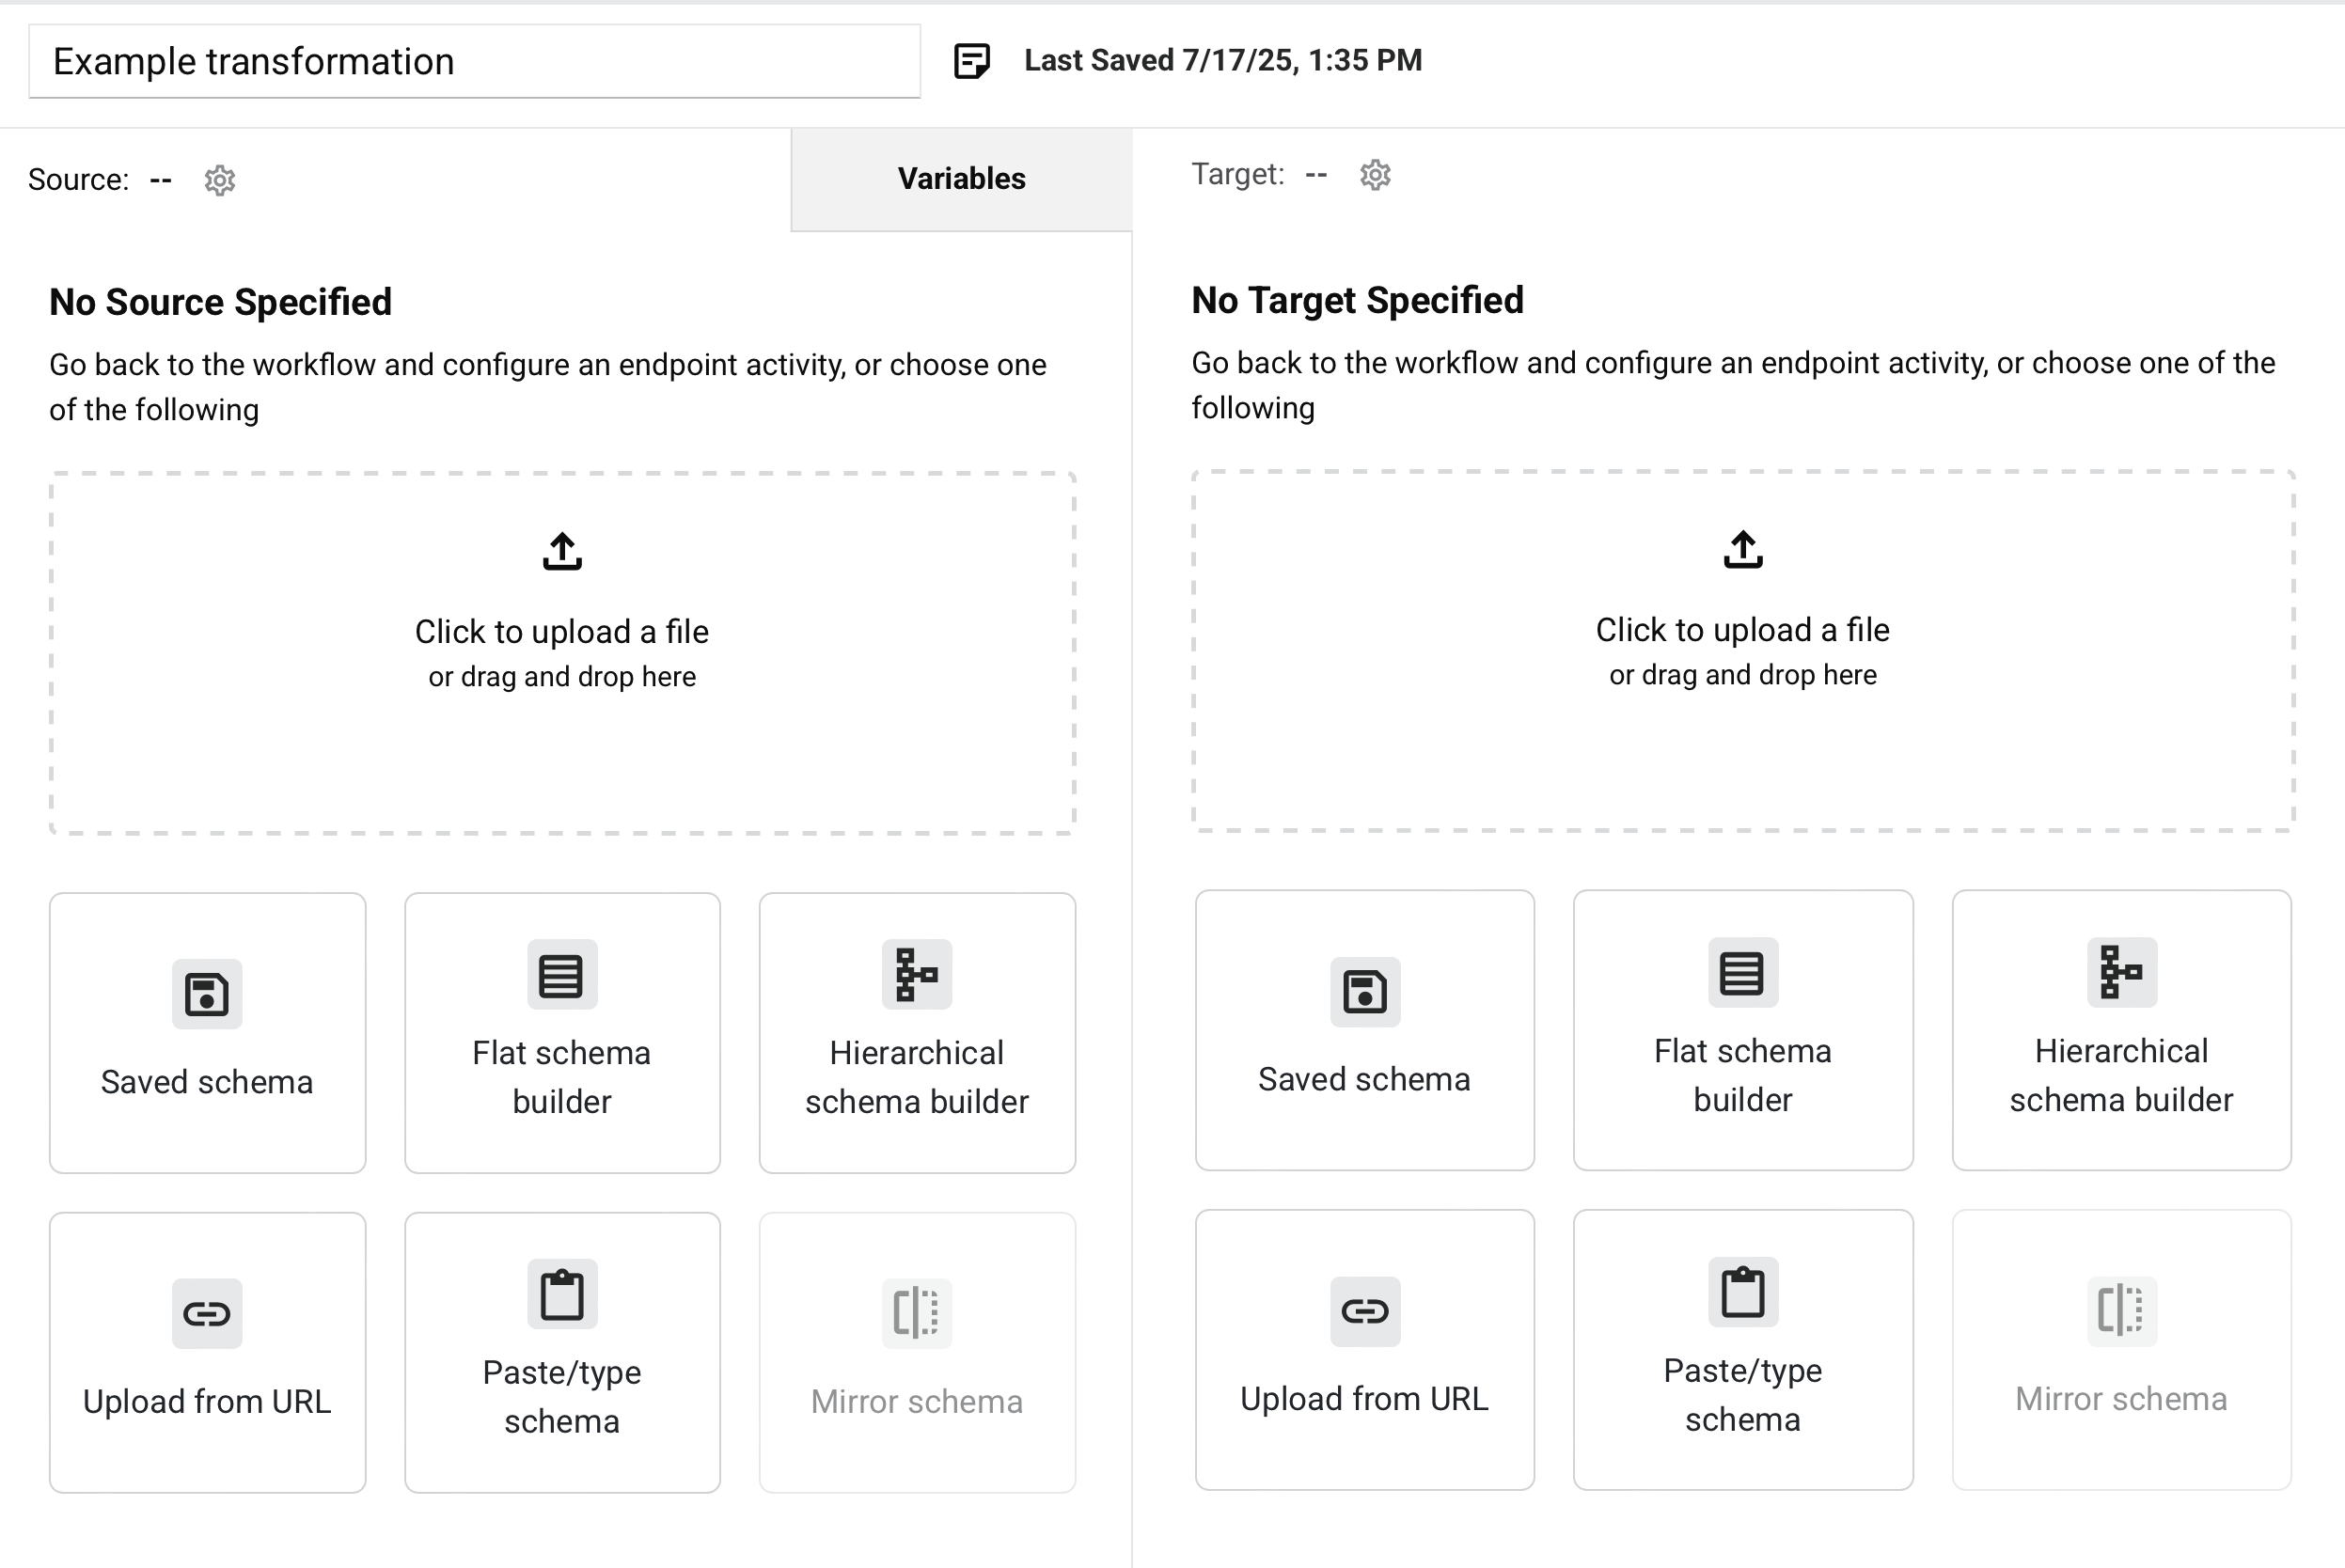
- Upload a file
- Saved schema
- Flat schema builder
- Hierarchical schema builder
- Upload from URL
- Paste or type schema
- Mirror schema
You can also define a schema in an activity.
Schema configuration guidelines
When configuring transformation schemas, follow these precedence rules:
- Schema priority: Activity-defined schemas always override transformation-defined schemas. If an adjacent activity provides a schema, that schema will be used instead of any custom schema you create in the transformation.
- Schema options availability: The custom schema options described below are only available when no adjacent activity is providing a schema, or the adjacent activity is configured without a schema.
Choose one approach consistently to prevent conflicts and ensure predictable schema behavior:
- For activity-defined schemas: Configure your activities and let transformations inherit their schemas automatically.
- For transformation-defined schemas: Ensure adjacent activities don't provide schemas on the same side (either user-provided or connector-generated).
Upload a file
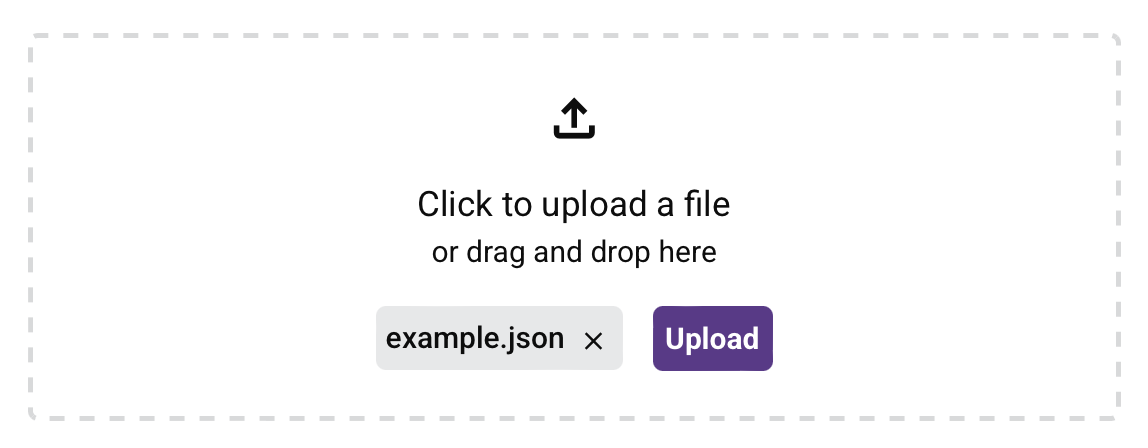
You can provide a new schema from the upload zone. The upload zone appears on each side of the transformation that does not have a schema defined in an activity. You can drag and drop a sample file to the upload zone or manually select a file.
When clicked, a file selection dialog opens. Select the file and then click Upload:
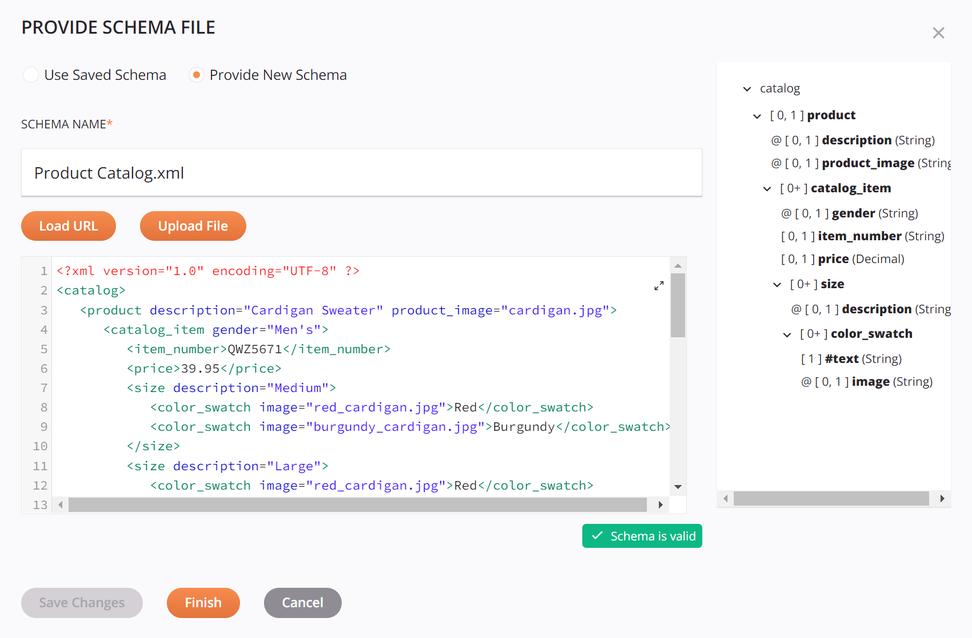
The schema editor opens:
-
Schema name: The file's name and extension (
.csv,.json,.xml,.xsd, or.zip) is populated automatically. The name is editable. -
View/Edit Schema: You can view or edit the schema directly within the text area.
To view or edit the schema in a larger area, click the expand icon. After opening that area, click the collapse icon to return to this screen.
This text area can also be copied using
Control+C(Windows or Linux) orCommand+C(macOS). -
Validation: As you edit a schema, validation information is provided below the text area, with any errors reported one line at a time. That is, after resolving an error on one line, additional syntax errors to resolve may be reported for subsequent lines. Validation is based on the file extension of the provided schema.
-
Preview Schema: A preview of the schema is displayed on the right. After loading a new schema or making edits in the text area on the left, you must first click Save Changes for the changes to be reflected in the preview area. The schema is displayed using the standard interface elements described under Nodes and fields.
-
Save Changes: Click to save the schema and refresh the schema preview shown on the right side.
Warning
If you try to upload a file with the same name as an existing file already defined in the project, a dialog (transcribed below) asks if you want to overwrite the existing file. If you click Continue, the file is replaced with the new file with the same name in all places where it is used in the project. If you don't want to overwrite the file, click Cancel and then manually modify the file so it has a name that is not already being used, then try to save it again.
Dialog text
Overwrite file?
A file with the same name already exists. Are you sure you want to overwrite the old file?Note
When uploading an XSD file that contains multiple top-level elements, on clicking Save Changes, you are prompted to select the desired root node. Select the desired element and then click Finish to save:
Dialog text
Please select the root to use
More than one possible root exists in the selected XSD file. -
Finish: Click to save the schema and close the schema editor.
-
Cancel: Click to close the schema editor.
Note
If you have already used the Save Changes button, changes have already been saved and using Cancel only closes the configuration. Using Cancel without first using Save Changes closes the schema editor without saving.
Saved schema
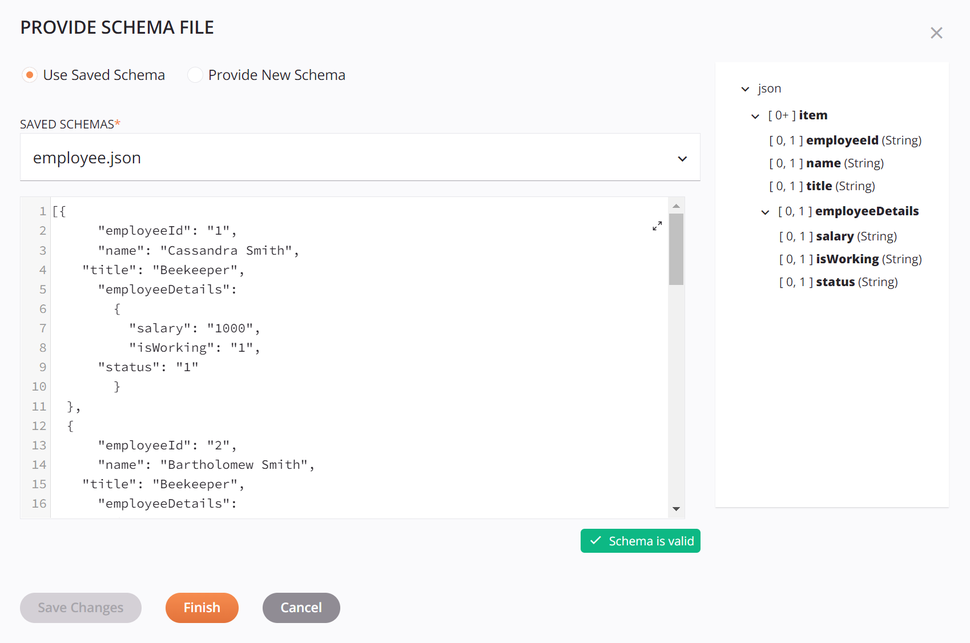
Click Saved schema to open the schema editor:
-
Saved schemas: Use the dropdown to select from an existing schema to reuse.
-
View Schema: After an existing uploaded schema is selected, you can view the schema directly within the text area below the dropdown. To view the schema in a larger area, click the expand icon. After opening that area, click the collapse icon to return to this screen.
Though a saved schema is not editable, this text area can be copied using
Control+C(Windows or Linux) orCommand+C(macOS).This text area is only for the display of existing uploaded schemas and does not display flat, hierarchical, or mirrored custom schemas.
-
Validation: Validation information is provided below the text area and is based on the file extension of the saved schema.
-
Preview schema: A preview of the schema is displayed on the right. The schema is displayed using the standard interface elements described under Nodes and fields.
-
Save Changes: This button is not usable, as it is not possible to make changes to a saved schema from the schema editor. To make changes to a saved schema, use the option Edit Schema available in a schema's actions menu.
-
Finish: Click to save the schema selection and close the schema editor.
-
Cancel: Click to close the schema editor.
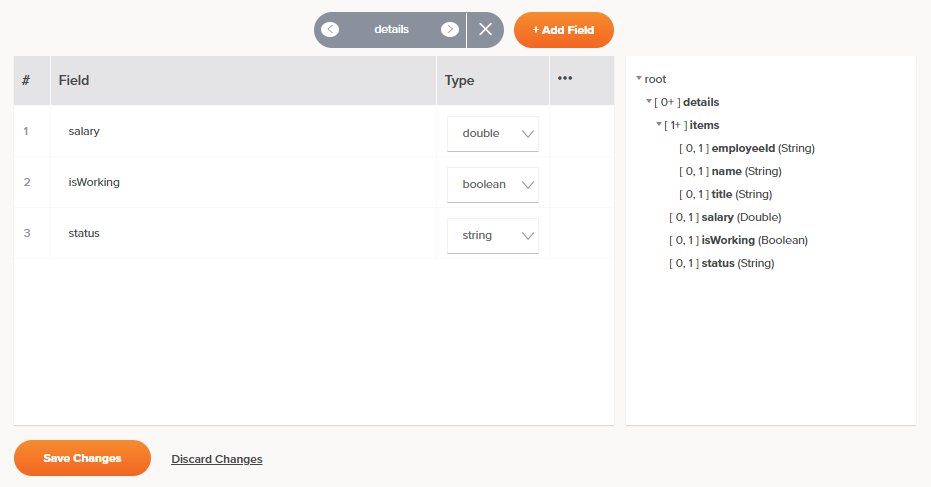
Flat schema builder
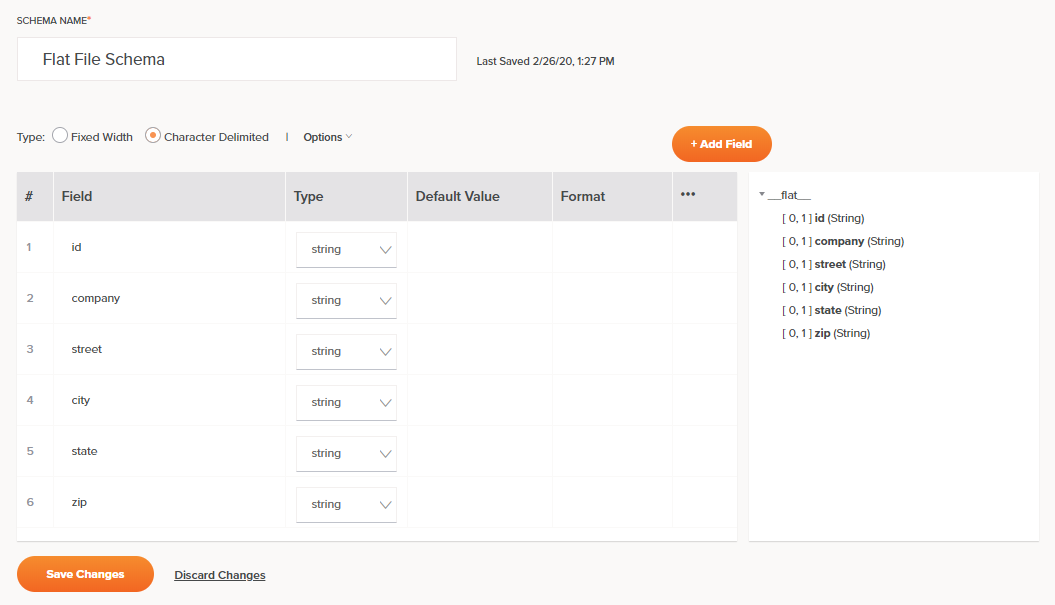
Click Flat schema builder to open the configuration screen:
-
Schema name: In the text entry box at the top of the screen, enter a name to use to identify the flat schema.
-
Save status: To the right of the schema name are the date and time that the schema's associated transformation was last saved. This information is not associated with the schema itself, which is saved using the Save Changes button located at the bottom of the configuration.
-
Type: Select between two types for a custom flat schema:
- Fixed Width: The schema will be created in CSV format using length to delineate fields.
- Character Delimited: The schema will be created in CSV format using characters to delineate fields.
-
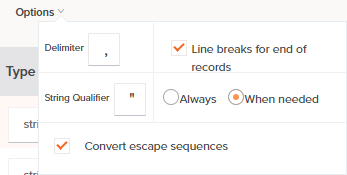
Options: When Character Delimited is selected, these options become available:
-
Delimiter: Enter the characters to use as field delimiters that specify the boundary between data fields. The default is a comma. You can also use multiple-character delimiters, such as a double pipe
||. To use a tab as a delimiter, enter\t. -
Line Breaks for End of Records: Select this checkbox to use line breaks to separate records. This option is selected by default. When this option is selected, end of records are denoted by line breaks so that each record exists on one line (unless using a qualifier). When disabled, line breaks are ignored and new records begin after the total number of fields are reached.
Note
This option is relevant only for schemas used on the source side of a transformation. For schemas used on the target side of a transformation, line breaks are always used to denote end of records.
-
String Qualifier: Enter the character to be used as a wrapper, indicating a string of text that is to be treated as a single unit of data. The default is a double quote character. If left empty, no string qualifier is used.
When using a String Qualifier, select either Always or When Needed to indicate when the qualifier should be used. The default, When Needed, is recommended, so that if the characters specified as the Delimiter occur within the string, then the string is wrapped by the specified string qualifier characters. If the delimiter does not occur, then the string is not wrapped.
During the processing of sources, the string qualifier is stripped away. During the processing of targets, the string qualifier is added.
-
Convert Escape Sequences: Select this checkbox to convert or ignore escape sequences as indicated by a backslash
\. By default, escape sequences are converted following Java standards. When disabled, text conversion occurs with no interpretation of escape sequences.Note
This option is relevant only for schemas used on the source side of a transformation.
-
-
Add Field: Click to add new field rows one at a time to the table. These columns are available for each row:
-
#: Each field row is automatically assigned a number in the order the row appears. To reorder rows, either drag and drop to another position within the table, or hover over the number and click the up or down arrow.
-
Field: Enter a name for the field. The field name cannot contain whitespace characters or symbols such as these:
@ $ % & / + ( ) : ; ,. In addition, the field name cannot begin with a number, period (.), or hyphen (-).Tip
For reference, see NCNameChar for the allowed characters as defined by the W3C.
-
Type: Use the dropdown to select a data type. Options for new custom schemas are
boolean,date,decimal,double,float,integer,long, andstring. The default isstring. If a custom schema was created by mirroring a schema from a server-based activity, additional data types may be listed. -
Begin: For Fixed Width schemas only, enter the starting character position. Note that 1 is considered to be the position for the beginning of the file.
The default value for subsequent rows is the next character after the previous field's ending position. For example, if the previous field's ending position is 50, then the next field's beginning position will be 51.
-
Length: For Fixed Width schemas only, enter the number of characters to be reserved for this field. When the starting character position and ending character position are already entered, this field is calculated automatically.
Fixed-length text files always specify a certain number of characters that are reserved for each field. For example, you may identify a field called
LastNamethat always has 30 characters reserved for it. If the actual value is "Smith", only 5 characters are used; the remaining characters have nothing in them. -
End: For Fixed Width schemas only, enter the ending character position. When the starting character position and length are already entered, this field is calculated automatically.
Note
By default, fixed-length segments are terminated with a newline character.
-
Default Value: If you want this field to have a default value, enter the value here.
-
Format: If you want this field to have a specific format, such as for date or currency, enter the format here.
-
Actions: For actions you can take on an existing field row, hover over the field on the far right under the actions menu icon. Then click the duplicate icon to duplicate the field row, or click the delete icon to delete the field row.
-
-
Review Schema: As you manually define each field within the schema, a preview of the schema is displayed on the right side. The schema is displayed using the standard interface elements described under Nodes and fields.
-
Save Changes: Click to save and close the schema.
-
Discard Changes: Click to close the schema without saving changes.
Hierarchical schema builder
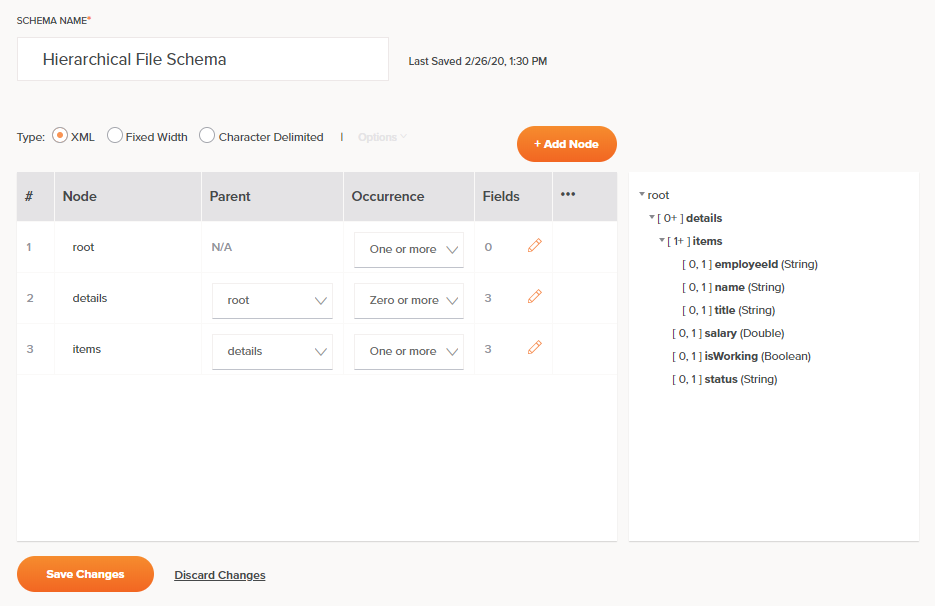
Click Hierarchical schema builder to open the configuration screen:
-
Schema name: Enter a name to use to identify the hierarchical schema.
-
Save status: To the right of the schema name are the date and time that the schema's associated transformation was last saved. This information is not associated with the schema itself, which is saved using the Save Changes button located at the bottom of the configuration.
-
Type: Select among the available types for a custom hierarchical schema:
- XML: The schema will be created in XML format.
- Fixed Width: The schema will be created in CSV format using length to delineate fields.
- Character Delimited: The schema will be created in CSV format using characters to delineate fields.
Note
Creating a hierarchical schema in JSON format is not supported.
-
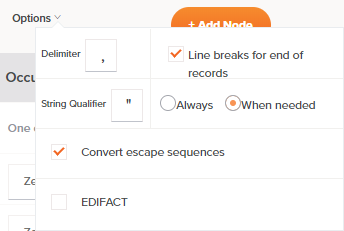
Options: When Character Delimited is selected, these options become available:
-
Delimiter: Enter the characters to use as field delimiters that specify the boundary between data fields. The default is a comma. You can also use multiple-character delimiters, such as a double pipe
||. To use a tab as a delimiter, enter\t. -
Line Breaks for End of Records: Select this checkbox to use line breaks to separate records. This option is selected by default. When this option is selected, end of records are denoted by line breaks so that each record exists on one line (unless using a qualifier). When disabled, line breaks are ignored and new records begin after the total number of fields are reached.
Note
This option is relevant only for schemas used on the source side of a transformation. For schemas used on the target side of a transformation, line breaks are always used to denote end of records.
-
String Qualifier: Enter the character to be used as a wrapper, indicating a string of text that is to be treated as a single unit of data. The default is a double quote character. If left empty, no string qualifier is used.
When using a String Qualifier, select either Always or When Needed to indicate when the qualifier should be used. The default, When Needed, is recommended, so that if the characters specified as the Delimiter occur within the string, then the string is wrapped by the specified string qualifier characters. If the delimiter does not occur, then the string is not wrapped.
During the processing of sources, the string qualifier is stripped away. During the processing of targets, the string qualifier is added.
-
Convert Escape Sequences: Select this checkbox to convert or ignore escape sequences as indicated by a backslash
\. By default, escape sequences are converted following Java standards. When disabled, text conversion occurs with no interpretation of escape sequences.Note
This option is relevant only for schemas used on the source side of a transformation.
-
EDIFACT: Select this checkbox if the data follows the EDIFACT standard of syntax rules.
-
-
Add Node: Click the Add Node button to add new nodes one at a time to the table. These columns are available for each node row:
-
#: Each node row is automatically assigned a number in the order the row appears. Once you have at least two rows with the same parent in the tree, hover over the number and click the up or down arrow. The node serving as the root node (without a parent) cannot be reordered, nor can nodes be reordered to a different level in the tree structure (instead, this can be done by changing the parent of the node).
-
Node: Enter a name for the node. The node name cannot contain whitespace characters or symbols such as these:
@ $ % & / + ( ) : ; ,. In addition, the field name cannot begin with a number, period (.), or hyphen (-).Tip
For reference on all unallowed characters, see NCName as defined by W3C.
-
Parent: Use the dropdown to select the parent of the node. Note that selecting a parent node that would cause a circular reference is not possible.
-
Occurrence: Use the dropdown to select how the node is to occur in the complex document:
- Zero or More: Select this option if this node may or may not occur, but if it does, it can occur any number of times.
- Zero or One: Select this option if this node may or may not occur, but if it does, it can occur only once.
- One or More: Select this option if this node must occur at least once, but can also be repeated.
- Exactly Once: Select this option if this node must occur once and only once in the document.
-
Fields: The number of fields defined for the node is listed. To define the node's fields, click the edit icon to the right of the number of fields. This opens a field editor for the specific node, as follows.

Note
Nodes should contain at least one field in order to be able to map to them when completing a transformation mapping.
-
Node Cycle: Click the left or right arrows to cycle through nodes in the hierarchical schema to show the field table for the selected node.
-
Back: Click the close icon to return to the node table.
Node Navigator: Along the top of the table is an expanded gray button that allows you to change the table display by navigating to another node:
-
-
Add Field: Click to add new field rows one at a time to the table. Depending on the selected schema Type, these columns are available for each field row:
-
#: Each field row is automatically assigned a number in the order the row appears. To reorder rows, either drag and drop to another position within the table, or hover over the number and click the up or down arrow.
-
Field: Enter a name for the field. The field name cannot contain whitespace characters or symbols such as these:
@ $ % & / + ( ) : ; ,. In addition, the field name cannot begin with a number, period (.), or hyphen (-).Tip
For reference, see NCNameChar for the allowed characters as defined by the W3C.
-
Type: Use the dropdown to select a data type. Options for new custom schemas are
boolean,date,decimal,double,float,integer,long, andstring. The default isstring. If a custom schema was created by mirroring a schema from a server-based activity, additional data types may be listed. -
Begin: For Fixed Width schemas only, enter the starting character position. Note that 1 is considered to be the position for the beginning of the file.
The default value for subsequent rows is the next character after the previous field's ending position. For example, if the previous field's ending position is 50, then the next field's beginning position will be 51.
-
Length: For Fixed Width schemas only, enter the number of characters to be reserved for this field. When the starting character position and ending character position are already entered, this field is calculated automatically.
Fixed-length text files always specify a certain number of characters that are reserved for each field. For example, you may identify a field called
LastNamethat always has 30 characters reserved for it. If the actual value is "Smith", only 5 characters are used; the remaining characters have nothing in them. -
End: For Fixed Width schemas only, enter the ending character position. When the starting character position and length are already entered, this field is calculated automatically.
Note
By default, fixed-length segments are terminated with a newline character.
-
Default Value: For Fixed Width or Character Delimited schemas, if you want this field to have a default value, enter the value here.
-
Format: For Fixed Width or Character Delimited schemas, if you want this field to have a specific format, such as for date or currency, enter the format here.
-
Actions: For actions you can take on an existing field row, hover over the field on the far right under the actions menu icon. Then click the duplicate icon to duplicate the field row, or click the delete icon to delete the field row.
-
-
Review Schema: As you manually define each field within the schema, a preview of the schema is displayed on the right side. The schema is displayed using the standard interface elements described under Nodes and fields.
-
Save Changes: Click to save and close the schema.
-
Discard Changes: Click to close the schema without saving changes.
-
-
Actions: For actions you can take on an existing node row, hover over the field in the actions column. Then click the duplicate icon to duplicate the node row, or click the delete icon to delete the node row.
-
-
Review schema: As you manually define each node within the schema, a preview of the schema is displayed on the right side. The schema is displayed using the standard interface elements described under Nodes and fields.
Caution
If you have created nodes that do not have any fields, then you cannot map to any fields within these nodes when completing a transformation mapping.
-
Save Changes: Click to save and close the schema.
-
Discard Changes: Click to close the schema without saving changes.
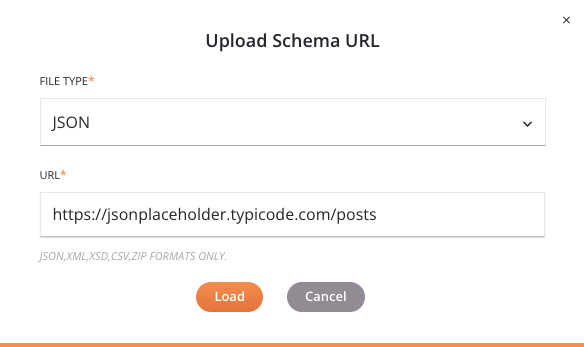
Upload from URL
Click Upload from URL to open a dialog where you can load a schema from a URL:
-
File type: Use the dropdown to select from the supported file types, including CSV, JSON, XML, XSD, and ZIP. Take note:
-
XSD: An XSD provided by URL can import/include other XSD URLs by reference.
-
ZIP: A ZIP archive can contain a collection of XSDs, which can import/include each other by reference. Any non-XSD files in the archive are ignored. Multiple directory levels are supported.
-
-
URL: Enter a URL that is accessible without authentication. Files up to 5 MB in size can be uploaded.
-
Load: Click to load the schema from the URL. Note that the file is retrieved only a single time for schema generation. In addition, be aware that some data may be converted during processing as described in Schema processing.
-
Cancel: Click to close the Upload Schema URL dialog without saving.
Paste or type schema
Click Paste/type schema to open the schema editor:
-
Schema name: Enter a name to use to identify the hierarchical schema.
-
View/edit schema: You can paste or type the schema directly within the text area.
To edit the schema in a larger area, click the expand icon. After opening that area, click the collapse icon to return to this screen.
This text area can also be copied using
Control+C(Windows or Linux) orCommand+C(macOS). -
Validation: As you edit a schema, validation information is provided below the text area, with any errors reported one line at a time. That is, after resolving an error on one line, additional syntax errors to resolve may be reported for subsequent lines. Validation is based on the file extension of the provided schema.
-
Preview Schema: A preview of the schema is displayed on the right. After loading a new schema or making edits in the text area on the left, you must first click Save Changes for the changes to be reflected in the preview area. The schema is displayed using the standard interface elements described under Nodes and fields.
-
Save Changes: Click to save the schema and refresh the schema preview shown on the right side.
Warning
If you try to upload a file with the same name as an existing file already defined in the project, a dialog (transcribed below) asks if you want to overwrite the existing file. If you click Continue, the file is replaced with the new file with the same name in all places where it is used in the project. If you don't want to overwrite the file, click Cancel and then manually modify the file so it has a name that is not already being used, then try to save it again.
Dialog text
Overwrite file?
A file with the same name already exists. Are you sure you want to overwrite the old file?Note
When uploading an XSD file that contains multiple top-level elements, on clicking Save Changes, you are prompted to select the desired root node. Select the desired element and then click Finish to save:
Dialog text
Please select the root to use
More than one possible root exists in the selected XSD file.
Mirror schema
For the Mirror schema option to be available, these conditions must be met:
-
The schema on the opposite side (source or target) of the transformation must not already be defined. To stop a transformation from inheriting a schema from an adjacent activity, you can select None in the schema dropdown selection.
-
The source or target that the schema is being mirrored to cannot have an adjacent connector-generated schema; however, any source or target activity with a user-defined schema can have a schema mirrored to it, even if the source of the mirror is from a connector-generated activity. For example, you can mirror the schema generated from a Database Query used as the source of a transformation if the target of a transformation has a user-defined schema such as that from an FTP Write activity. However, you cannot mirror a schema provided by an FTP Read activity to use as the target schema for a Database Insert activity, as you must use the schema generated by the Database endpoint. In such cases, the mirroring option is not present.
Provided the above conditions are met, click Mirror schema to copy the source or target structure from one side of the transformation to the other, respectively, creating a new JSON schema called Mirrored Schema by default.
In most cases, the resulting mirrored schema is an exact copy of the schema being mirrored, converted to JSON format. There are these exceptions:
-
Database activities: If the schema being mirrored is from a Database activity using a single table (without joins), then the resulting mirrored schema is automatically created with an additional child node called
row. When fields within this additional node are mapped to, the node becomes a loop node to allow all records to be looped through. -
Salesforce-based activities: If the schema being mirrored is from a non-bulk Salesforce, Salesforce Service Cloud, or ServiceMax activity, then the resulting mirrored schema is automatically created with an additional root node called
recordswith the child node(s) mirroring the schema. When fields within the child node(s) are mapped to, the node becomes a loop node to allow all records to be looped through. -
XSD-based schemas with substitution groups: Mirrored schemas that use substitution groups aren't supported and will result in an operation runtime error.
Once created, the mirrored schema is independent of the source schema it was mirrored from. That is, you can rename or edit this schema in any way you choose without affecting the original source schema. Because mirroring a schema copies the entire schema, in this way you can first mirror a schema and then edit it to remove fields to trim the schema (for example, to copy a database schema for only some tables being joined).
Define a schema in an activity
Depending on the connector, the ability for a user to provide a schema may be included as an activity configuration step. The interface for defining schemas is covered in each connector's documentation.
Some connectors where schemas can be defined by a user have a common interface, including these:
- API: Request and Response activities
- File Share: Read and Write activities
- FTP: Read and Write activities
- HTTP: GET, PUT, POST, DELETE, and Custom activities
- HTTP v2: GET, PUT, POST, PATCH, DELETE, HEAD, and OPTIONS activities
- Local Storage: Read and Write activities
- Temporary Storage: Read and Write activities
- Variable: Read and Write activities
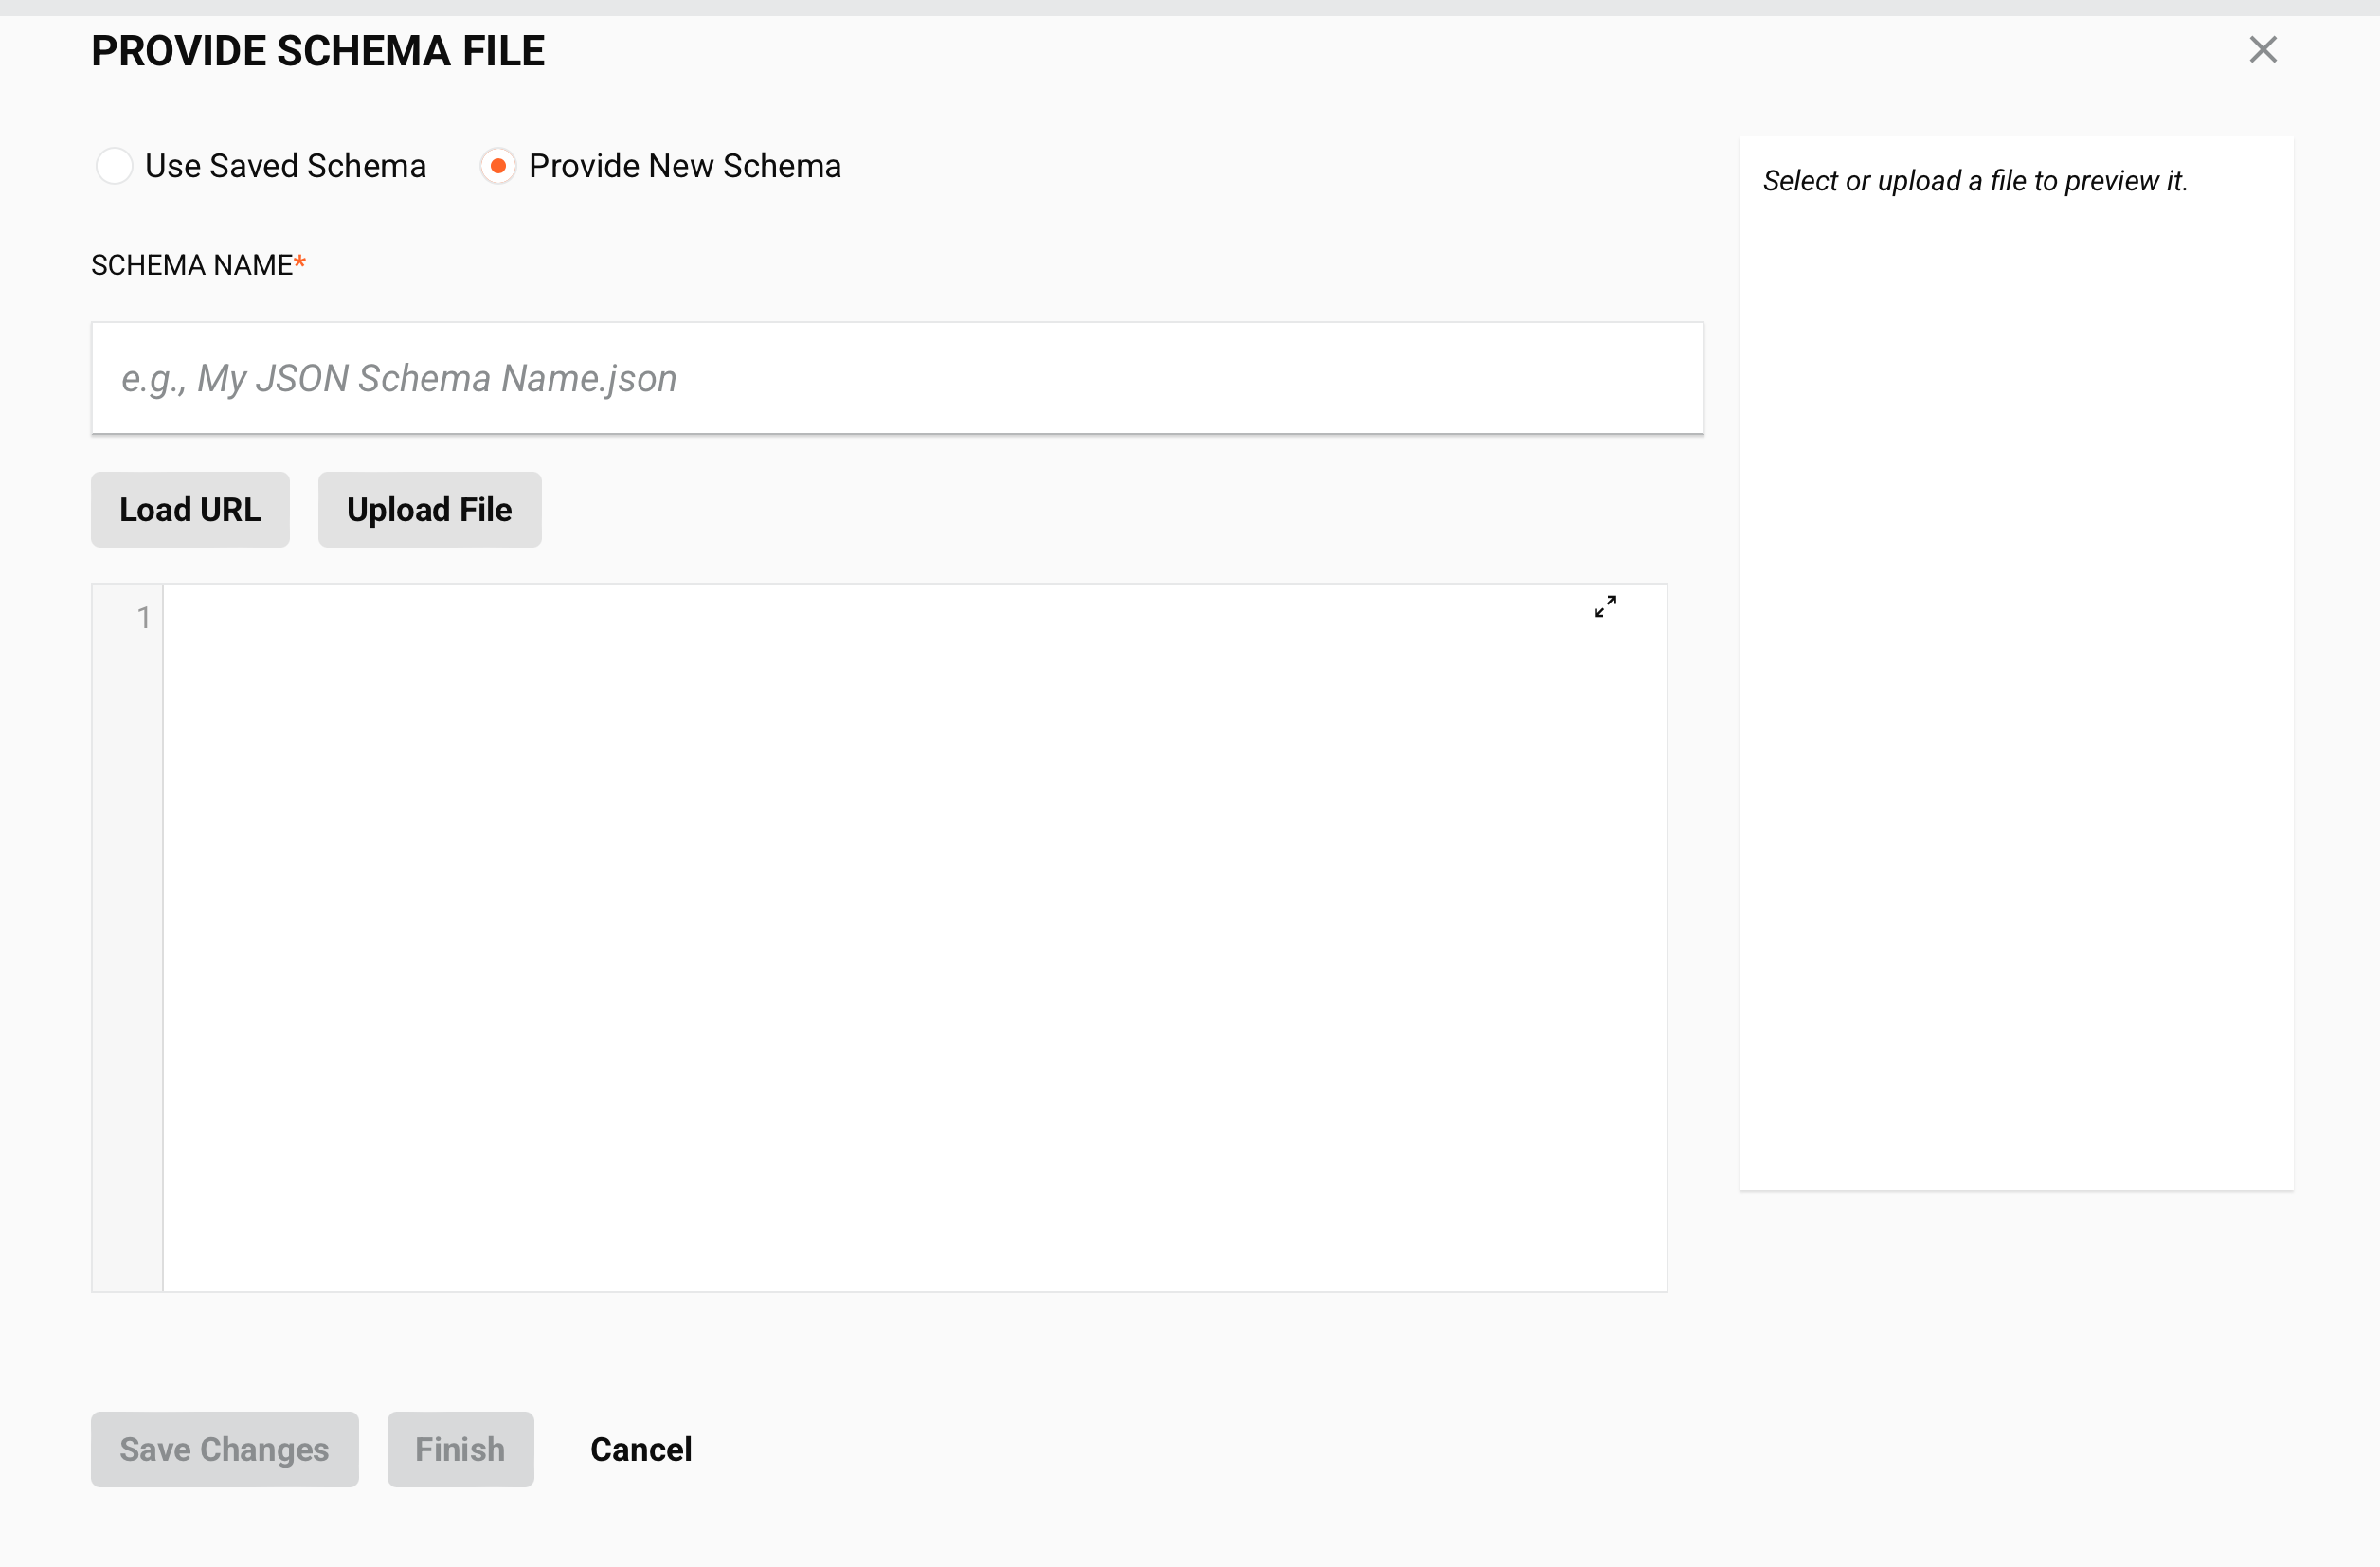
During configuration of the above activities, you select one of three options in a section called Provide response schema or Provide request schema:

-
No: Choose this option to skip providing a schema. You may want to select this option for a number of reasons:
- If the connector provides a fixed schema when a user-defined schema is not provided.
- If no schema is required for your use case.
-
Yes, use saved schema: Choose this option to select an existing schema that has previously been defined in the current project. When this option is selected, this section becomes available:

-
Saved schemas: Use the dropdown to select from an existing schema to reuse.
-
View schema: After an existing uploaded schema is selected, you can view the schema directly within the text area below the dropdown. To view the schema in a larger area, click the expand icon. After opening that area, click the collapse icon to return to this screen.
Though a saved schema is not editable, this text area can be copied using
Control+C(Windows or Linux) orCommand+C(macOS).This text area is only for the display of existing uploaded schemas and does not display flat, hierarchical, or mirrored custom schemas.
-
Validation: Validation information is provided below the text area and is based on the file extension of the saved schema.
-
-
Yes, provide new schema: Choose this option to define a new schema by loading one from a URL, uploading a file, or manually entering one into the text area.
- Schema name: Enter a name for the schema into the upper text box, including the file extension (
.csv,.json,.xml,.xsd, or.zip). If no file extension is provided, the content is analyzed to autodetect the file type to use for validation. If you are loading the schema from a URL or uploading a file, you can leave this blank, as the name will be populated once the file is loaded.
- Schema name: Enter a name for the schema into the upper text box, including the file extension (