Introducción a App Builder - Lección 3: Crear reglas
Esta es la tercera lección de la serie de tutoriales Introducción a App Builder.
Capa de negocio
En la lección anterior, creamos y configuramos una tabla para almacenar los datos de nuestra aplicación. Hicimos eso en la primera de las capas de App Builder: la capa de datos. Sin embargo, almacenar datos es todo lo que hacen las tablas. Para permitir que los usuarios finales vean o interactúen con estos datos almacenados de alguna manera, necesitamos objetos de negocio, también llamados reglas. Estos se pueden crear en la capa de negocio, que es donde trabajaremos ahora.
Crear un objeto fuente
Comenzaremos creando un tipo específico de regla llamada objeto fuente. El propósito de esta regla es exponer el contenido de una tabla dada en la capa de datos de tu aplicación. Para crear uno, sigue estos pasos:
-
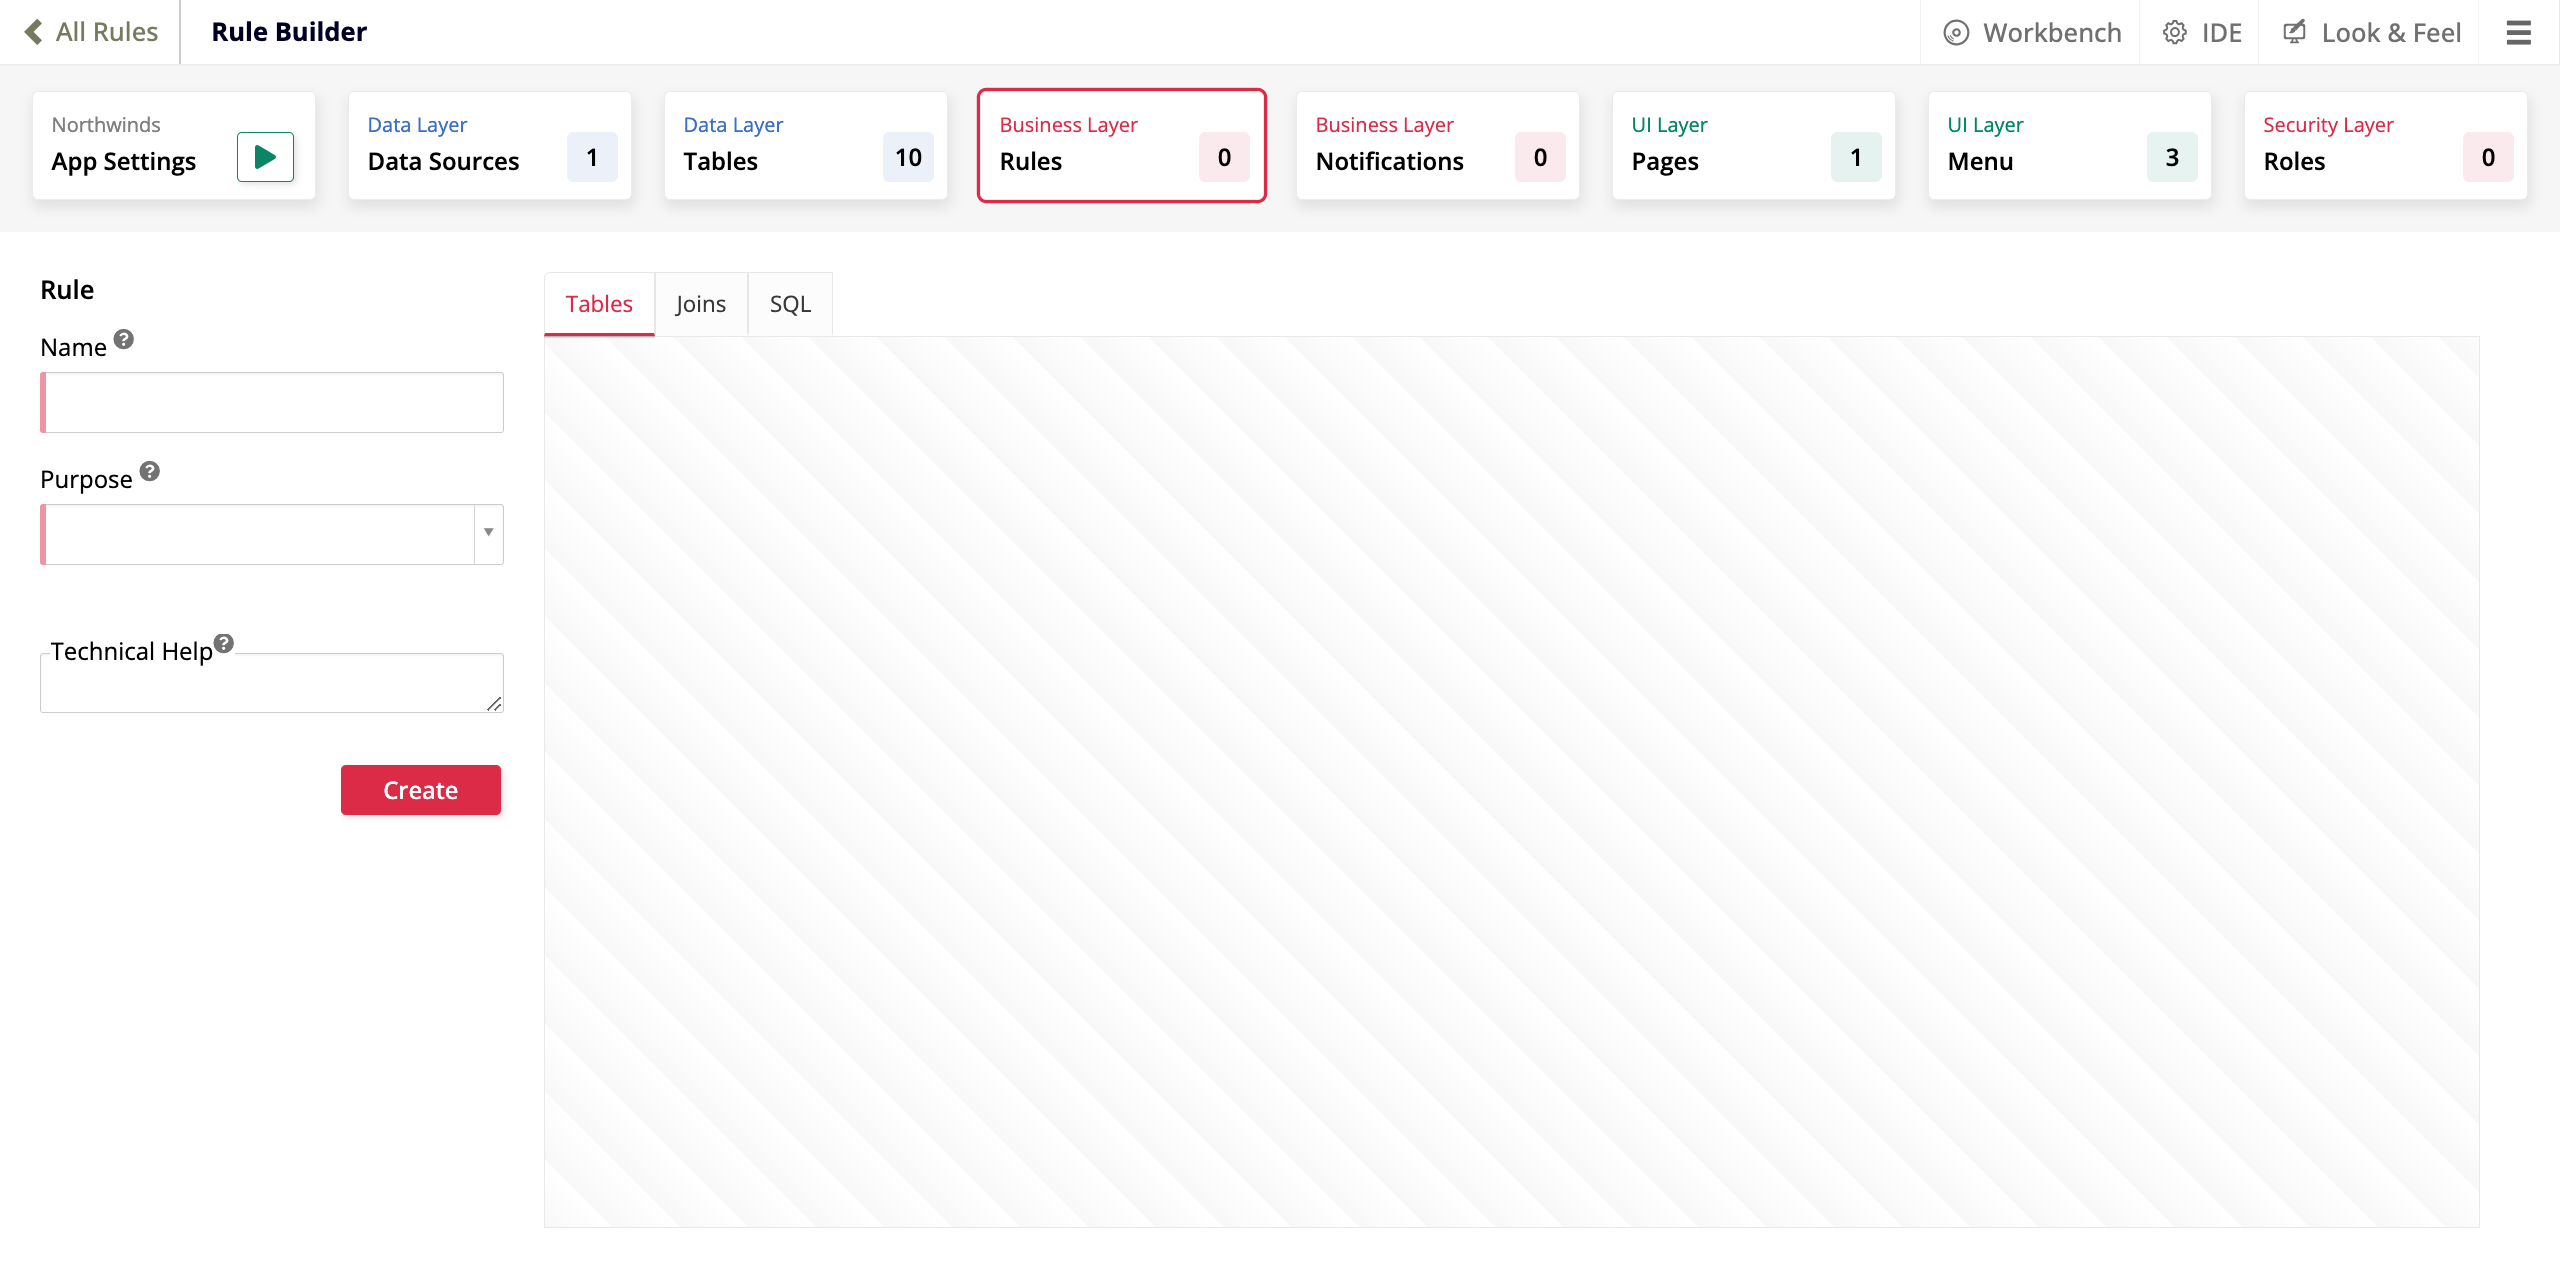
Accede a la App Workbench de tu aplicación.
-
Ve a la pestaña Reglas y haz clic en el botón + Regla. Se abre la página Constructor de Reglas:
-
En el campo Nombre, ingresa el nombre
Región (Fuente).Nota
De acuerdo con las convenciones de nomenclatura de App Builder, los nombres de las reglas deben ser los mismos que la tabla que modifican, con su propósito entre paréntesis.
-
En el campo Propósito, selecciona Objeto de Negocio.
-
En el campo Objetivo, selecciona Región, la tabla que hemos creado previamente.
-
(Opcional) En el campo Ayuda Técnica, ingresa una descripción del propósito de esta regla. Esta información no será visible para los usuarios finales; está destinada a ayudar a otros desarrolladores.
-
Haz clic en Crear.
App Builder creará la regla. Después de eso, la pantalla entrará automáticamente en modo de edición para la nueva regla, permitiéndote continuar configurándola.
Configurar funcionalidad para un objeto fuente
Cuando creas una nueva regla, el Constructor de Aplicaciones entra automáticamente en modo de edición para ella, y puedes comenzar a agregar funcionalidad. Si has salido del modo de edición para la regla de Región (Fuente) que acabas de crear, búscala en la pestaña App Workbench > Reglas, y ya sea haz doble clic en su fila en la lista o haz clic en el ícono de lápiz al final de la fila para entrar nuevamente en modo de edición.
La pestaña Tablas muestra de dónde obtiene la regla sus datos. Aunque las reglas solo pueden modificar los datos en una tabla (la que seleccionas durante la creación de la regla), pueden obtener datos de múltiples tablas. Sin embargo, la regla que estamos creando ahora tiene el propósito de simplemente mostrar lo que hay en la tabla Región, así que esa es la única que necesitamos. Dado que hemos seleccionado la tabla Región como el objetivo de nuestra regla, el Constructor de Aplicaciones ya la muestra en la pestaña Tablas, por lo que no necesitamos agregarla.
El siguiente paso es seleccionar qué columnas queremos utilizar. El Constructor de Aplicaciones no selecciona automáticamente todas las columnas de las tablas porque puede haber un número muy grande de ellas; por lo tanto, debes seleccionar manualmente las columnas que necesitas:
-
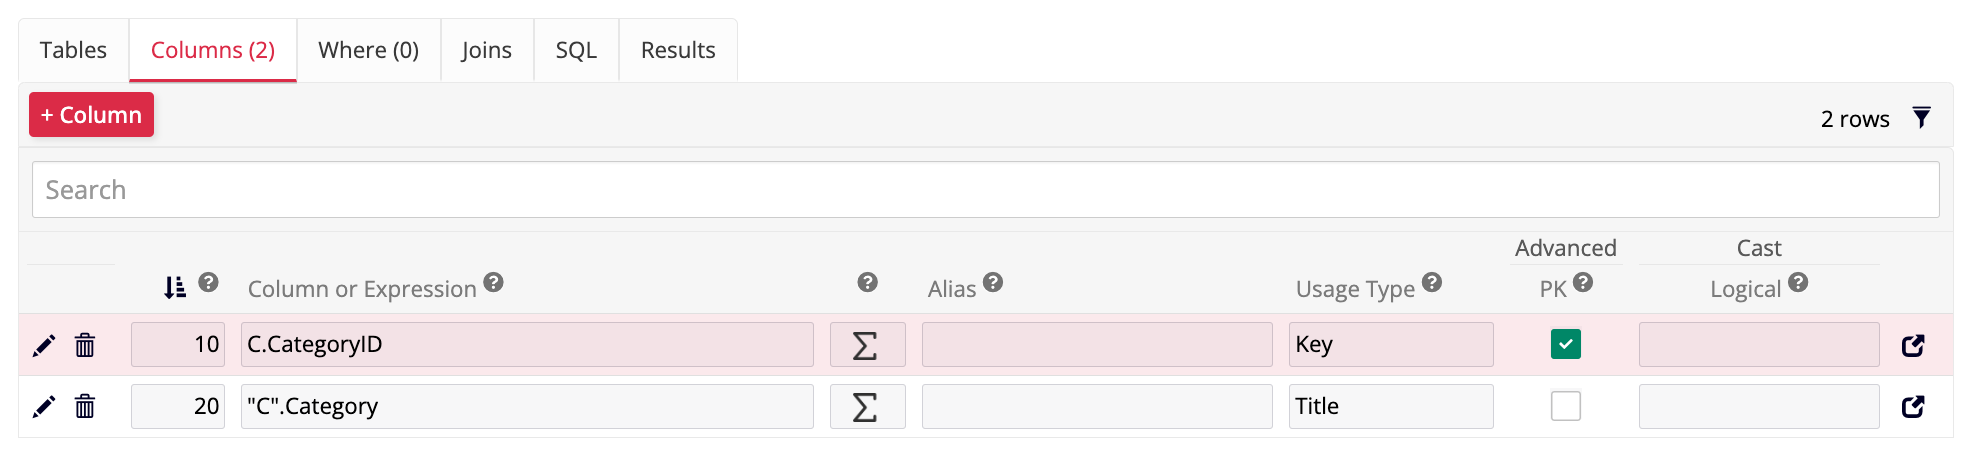
En la pestaña Tablas, donde se muestra la tabla Región, selecciona las casillas de verificación para las columnas RegionID y Región. No selecciones las columnas que fueron creadas por la función de auditoría ligera.
Una vez que hayas seleccionado ambas columnas, haz clic en el panel de Columnas, que ahora debería tener un (2) al final, indicando cuántas columnas has elegido. Debería verse así:

-
Haz clic en el botón Resultados en el panel de Regla para asegurarte de que los resultados se están mostrando correctamente.
Nota
Es una buena práctica hacer clic periódicamente en el botón Resultados mientras configuras una regla.
Tiempo de práctica: Crear objetos fuente
Es hora de practicar lo que has aprendido. La aplicación que estamos creando necesitará datos de varias tablas presentes en la base de datos Northwinds. Revisa las tablas listadas a continuación y crea objetos fuente para cada una siguiendo los pasos descritos anteriormente. Puedes encontrar botones + Regla en la página de inicio de App Workbench, o en su pestaña Reglas.
-
Categoría
-
Cliente
-
Empleado
-
DetalleDeOrden
-
Orden
-
Parámetro
-
Producto
Crear un objeto de lista
Ahora, crearemos otro tipo de regla llamada objeto de lista. Los objetos de lista son lo que usamos para crear menús desplegables en nuestras aplicaciones de App Builder. Los objetos de lista son bastante simples de crear porque solo requieren dos columnas: una clave primaria (PK) y un título. Vamos a crear un objeto de lista basado en Categoría, una de las tablas presentes en la base de datos Northwinds. Sigue estos pasos:
-
Desde la pestaña App Workbench > Reglas, haz clic en + Regla como lo hicimos antes para el objeto fuente.
-
En el campo Nombre, ingresa el nombre
Categoría (Lista).Nota
De acuerdo con las convenciones de nomenclatura de App Builder, los nombres de los objetos de lista deben ser los mismos que la tabla de la que extraen datos, con la palabra "Lista" entre paréntesis.
-
En el campo Propósito, selecciona Lista.
-
En el campo Objetivo, selecciona Categoría.
-
Haz clic en Crear.
-
Una vez que App Builder crea la regla, verás las columnas de la tabla Categoría listadas en la pestaña Tabla, donde puedes elegir qué columnas usar. App Builder selecciona automáticamente la clave primaria de la tabla porque es lo que utiliza para identificar los registros, pero debes elegir una columna (solo una) con datos legibles por humanos que se mostrarán en el menú desplegable que este objeto construirá. Para este ejercicio, selecciona la columna Categoría.
-
En la pestaña Columnas, utiliza la columna Tipo de Uso para indicar a App Builder para qué se utilizará cada columna. Esto ayudará a acelerar nuestro proceso de desarrollo más adelante, ya que permitirá que algunos campos se completen automáticamente. Selecciona Clave para la columna CategoryID y Título para la columna Categoría.
-
Haz clic en Resultados en el panel de Regla.
Eso es todo, hemos creado un objeto de lista. Si has seguido los pasos anteriores, tu panel de Columnas debería verse así:
Tiempo de práctica: Crear objetos de lista
Nuestra aplicación también necesitará objetos de lista basados en varias de las tablas de la base de datos Northwinds. Para practicar lo que has aprendido y crear los objetos requeridos para la aplicación, crea objetos de lista para las siguientes tablas:
-
Categoría (hecho arriba)
-
Cliente
-
Pedido
-
Producto
La función Concat
Al crear objetos de lista, no siempre hay una columna en la tabla que sea una opción ideal para un título, es decir, la información legible por humanos que se mostrará en la interfaz de usuario de la aplicación. Por ejemplo, en la pestaña App Workbench > Tablas, selecciona la tabla Empleado y observa sus Resultados. ¿Qué columna elegirías si quisieras crear un objeto de lista basado en esta tabla? No hay una opción obvia.
Sin embargo, hay una columna FirstName y una columna LastName, y combinar datos de ellas podría ser la mejor opción. Para esto, utilizaremos una función de App Builder: Concat().
Vamos a crear un objeto de lista basado en la tabla Empleado. Sigue estos pasos:
-
Desde la pestaña App Workbench > Reglas, haz clic en + Regla.
-
En el campo Nombre, ingresa
Empleado (Lista). -
En el campo Propósito, selecciona Lista.
-
En el campo Objetivo, selecciona Empleado.
-
Haz clic en Crear.
-
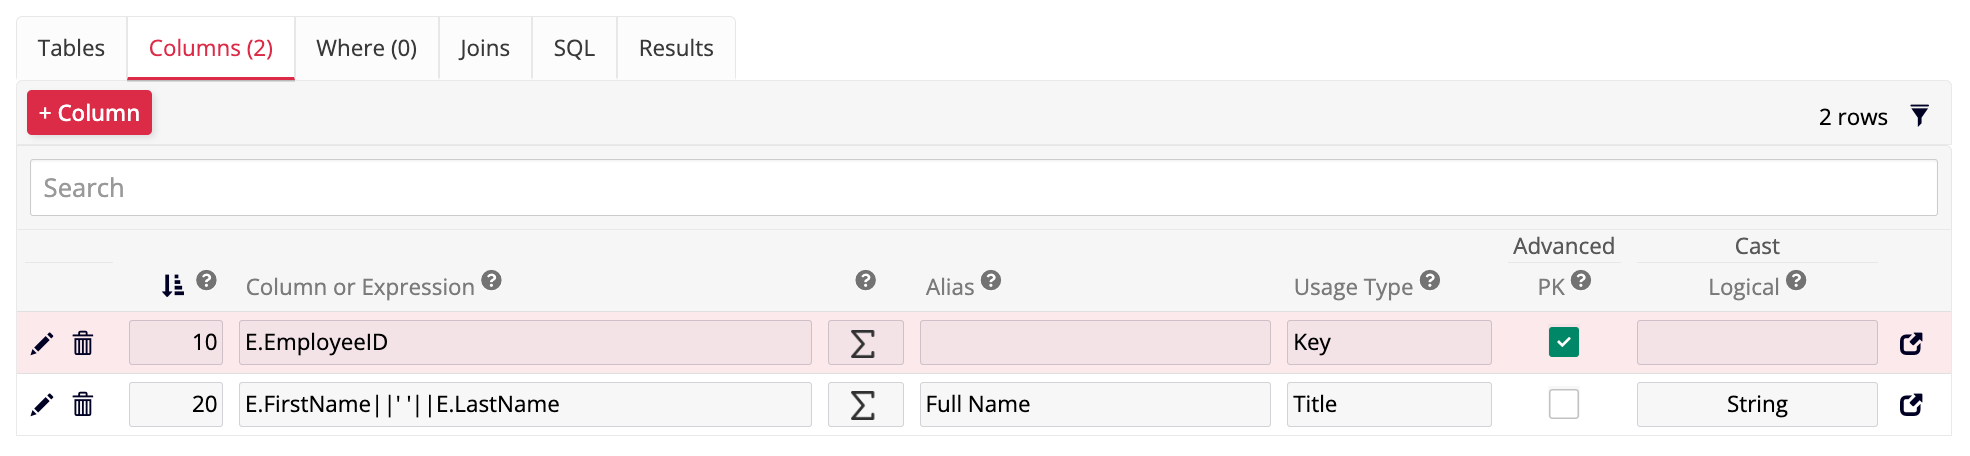
Una vez que App Builder crea la regla, seleccionará automáticamente la clave primaria. Ahora, para usar la función Concat para combinar las columnas
FirstNameyLastNameen una sola, ve a la pestaña Columnas y haz clic en + Columna allí. Se abre el cuadro de diálogo Columna - Agregar columna: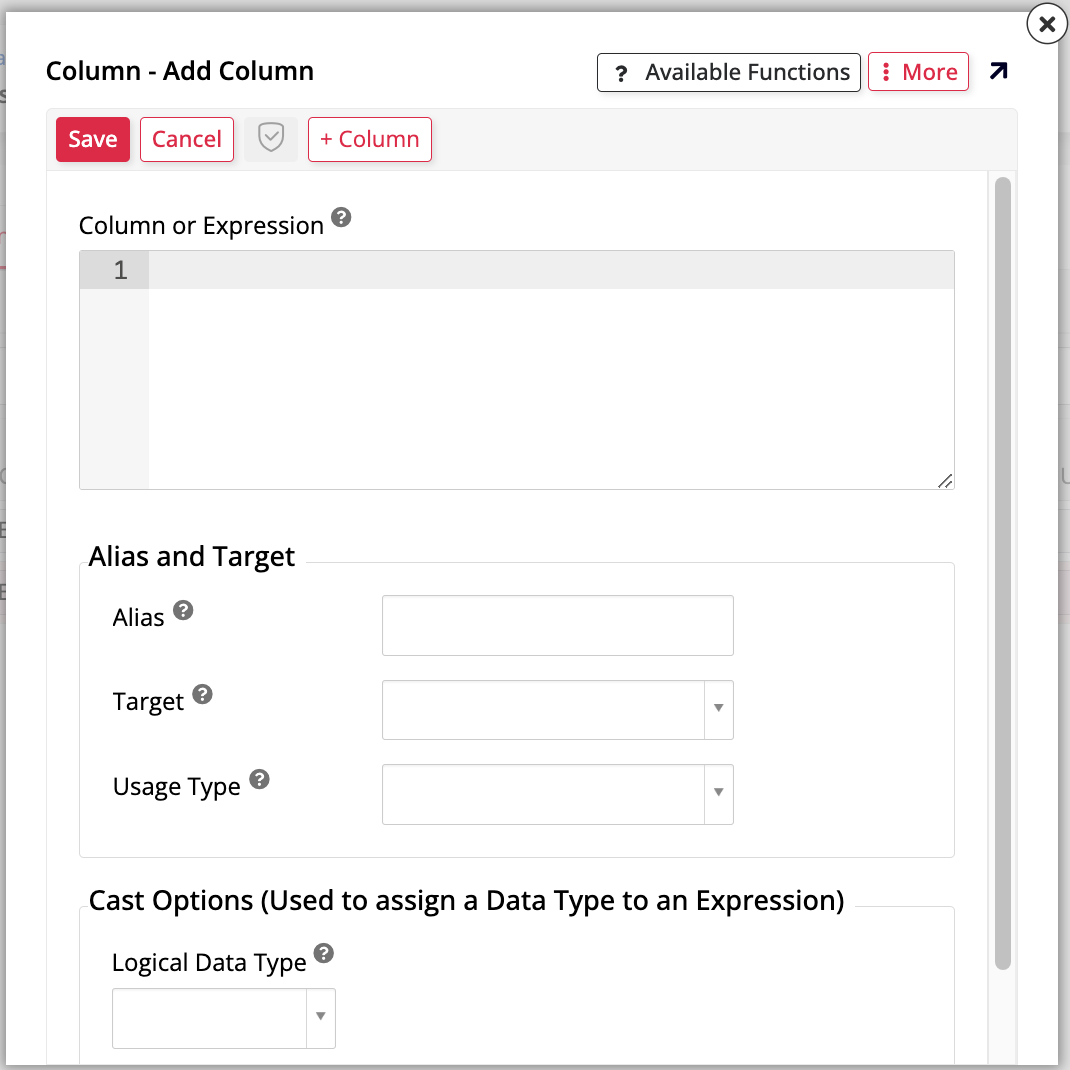
Nota
También hay un botón + Columna en la pestaña Tabla. Funciona de la misma manera.
-
En el cuadro de texto Columna o Expresión, ingresa las columnas que deseas combinar. Cuando comiences a escribir el nombre de una columna, aparecerá una lista de opciones donde podrás hacer clic en la que estás buscando. Los dobles pipes (
||) representan la funciónConcat(). Recuerda agregar un espacio vacío entre las columnasFirstNameyLastName, para que el resultado final sea legible. Así que, para combinar estas dos columnas en una, ingresa:
E.FirstName||' '||E.LastName
Lectura adicional
-
En la sección Alias y Objetivo, ingresa
Full Nameen el campo Alias. Este campo identifica la nueva columna que estás creando. -
Haz clic en Guardar. El panel de Columnas debería verse así:
-
Haz clic en Resultados para asegurarte de que la nueva columna
Full Namese esté mostrando correctamente.
Acelerador de creación de reglas
Has creado manualmente varios objetos de origen y listas, pero App Builder ofrece una forma más rápida de realizar este proceso. Usando el acelerador, puedes crear reglas directamente desde la capa de datos, permitiendo que App Builder utilice la configuración de una tabla como guía para establecer reglas derivadas de ella:
-
Navega a App Workbench > Tablas y abre la tabla Región.
-
En el panel Tabla, hay una sección titulada Aceleradores. Haz clic en el botón Publicar en la Capa de Negocios. App Builder te pedirá confirmación de que estás intentando crear reglas de objeto de negocio y de lista. Haz clic en Continuar.
App Builder tomará unos momentos para crear las dos reglas, luego te mostrará un mensaje de confirmación. Si visitas App Workbench > Reglas ahora, verás que la tabla Región ahora tiene dos reglas basadas en ella. Son idénticas a las que has creado manualmente para las otras tablas.
Nota
El acelerador utiliza el descriptor más genérico "Objeto de Negocio" en lugar de "Origen" en los paréntesis del objeto de origen. Esto no afecta su funcionamiento.
Ahora, para practicar también el uso del acelerador, utilízalo para crear reglas basadas en las dos tablas restantes: Shipper y Supplier.
Revisión y conclusión
Revisemos lo que hemos hecho en esta lección. Comenzamos con las tablas de las que aprendimos en la lección anterior y las utilizamos para crear objetos de negocio, o reglas, que pueden mostrar los datos de las tablas en la interfaz de usuario de nuestra aplicación. Aprendimos sobre y creamos dos tipos de reglas: objetos de origen y objetos de lista.
Ahora estamos listos para pasar a la tercera capa de desarrollo en App Builder, la capa de UI. Ve a Lección 4: La capa de UI.