Implementación de alta disponibilidad en AWS para Jitterbit App Builder
Introducción
Puedes utilizar los siguientes productos de AWS para construir un entorno de App Builder de alta disponibilidad (HA):
-
Un bucket S3, configurado con acceso de lectura/escritura para App Builder, con el propósito de crear y compartir claves de seguridad.
-
Una instancia RDS en EC2 para la base de datos de App Builder.
-
ElastiCache, utilizado como un bus de mensajes para compartir información entre instancias de App Builder.
-
(Opcional) Elastic Beanstalk se puede utilizar para gestionar instancias de App Builder y proporcionar un balanceador de carga para distribuir las solicitudes de los clientes.
El siguiente diagrama muestra una forma en la que estos servicios pueden ser utilizados como un entorno de App Builder:
load balancer] W[fa:fa-globe Web browser] AB1[fa:fa-window-restore App Builder] AB2[fa:fa-window-restore App Builder] AB3[fa:fa-window-restore App Builder] KS@{shape: das, label: "fa:fa-key S3
key storage"} MB["fa:fa-random Message bus
(Redis)"] ABDB[(fa:fa-database App Builder
database)] ODS@{ shape: lin-cyl, label: "fa:fa-table Other
data sources" } A --> B W --> B subgraph Process_Group [Elastic Beanstalk] B --> AB1 B --> AB2 B --> AB3 end AB1 --> MB AB2 --> MB AB3 --> MB subgraph EC[ElastiCache] MB end MB --> ABDB MB --> ODS KS -.- AB1 KS -.- AB2 KS -.- AB3
Almacenamiento de claves de cifrado de datos en un S3
Como se indica en Configuración de cifrado de datos, el almacenamiento local de la instancia EC2 no puede ser utilizado para almacenamiento a largo plazo. En consecuencia, las Claves de Cifrado de Datos (DEKs) deben ser almacenadas en buckets S3, según los siguientes detalles:
- Bucket:
vinyl-data-encryption-keys(Bucket S3 predeterminado utilizado por los entornos de Elastic Beanstalk.) - Dirección:
https://s3.amazonaws.com/vinyl-data-encryption-keys - Acceso:
aws-elasticbeanstalk-ec2-role
Dentro del bucket, las DEKs están prefijadas con el nombre del entorno de Elastic Beanstalk.
Configurar el almacenamiento de Clave de Cifrado de Datos (DEK) del entorno de Elastic Beanstalk
App Builder incluye un script .ebextensions que registra las propiedades del entorno para el almacenamiento de DEK. Estas propiedades incluyen lo siguiente:
| Propiedad | Predeterminado | Ejemplo |
|---|---|---|
DataEncryptionKeyStorage |
S3 | S3 |
DataEncryptionKeyS3BucketEndpoint |
https://{bucket}.s3{-aws-region}.amazonaws.com |
https://s3.amazonaws.com/vinyl-data-encryption-keys |
DataEncryptionKeyS3KeyPrefix |
{elastic-beanstalk-environment-name} |
abacceptance |
El App Builder no se iniciará con las propiedades de entorno predeterminadas de Elastic Beanstalk. Debe cambiar los valores de DataEncryptionKeyS3BucketEndpoint y DataEncryptionKeyS3KeyPrefix.
Conceder acceso a los entornos de Elastic Beanstalk a los buckets de S3
Las instancias de EC2 dentro de un entorno de Elastic Beanstalk están asignadas a un rol. La siguiente política de ejemplo concede acceso a un bucket de S3:
{
  "Version": "2025-10-17",
  "Statement": [
    {
       "Effect": "Allow",
       "Action": "s3:*",
       "Resource": "arn:aws:s3:::{bucket-name}/*"
     },
     {
       "Effect": "Allow",
       "Action": [
         "s3:ListAllMyBuckets",
         "s3:GetBucketLocation",
         "s3:ListBucket"
       ],
       "Resource": "*"
     }
   ]
}
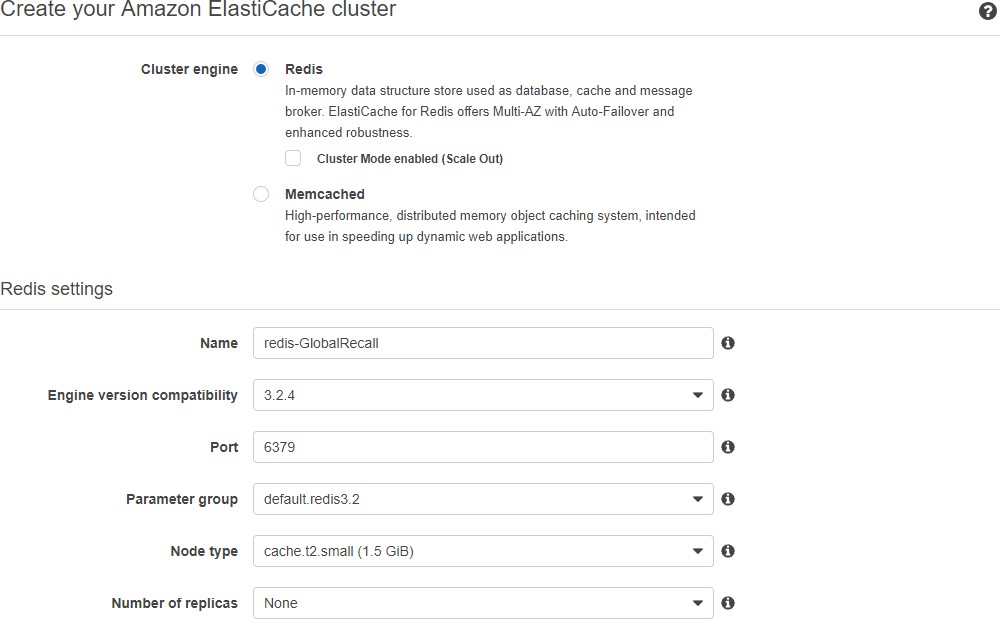
Configuración de ElastiCache
Puede usar ElastiCache para comunicarse entre los servidores de App Builder. Un nodo pequeño, sin réplicas ni fragmentos, es suficiente.
Utilice la siguiente información al configurar los servidores de aplicaciones en las configuraciones de Beanstalk:
Configuración de la base de datos
La configuración de la base de datos está fuera del alcance de este documento. Jitterbit puede proporcionar instrucciones de configuración de RDS si se desea.
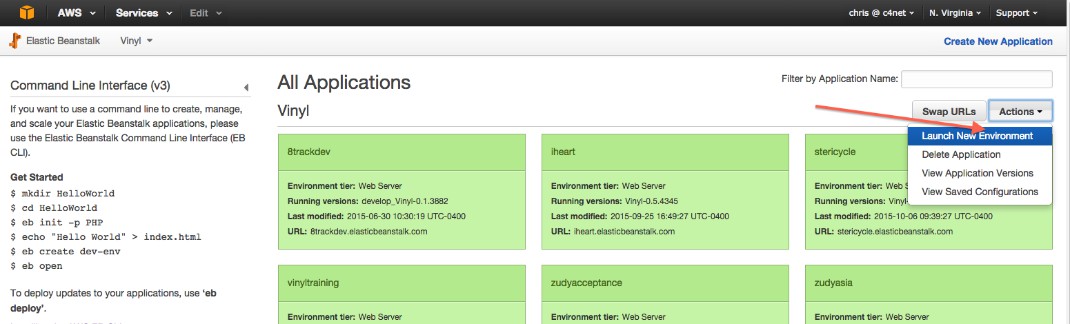
Configuración de Elastic Beanstalk
Para configurar un servicio de AWS Elastic Beanstalk, siga estos pasos:
-
Cree el entorno:
-
Seleccione Crear servidor web:
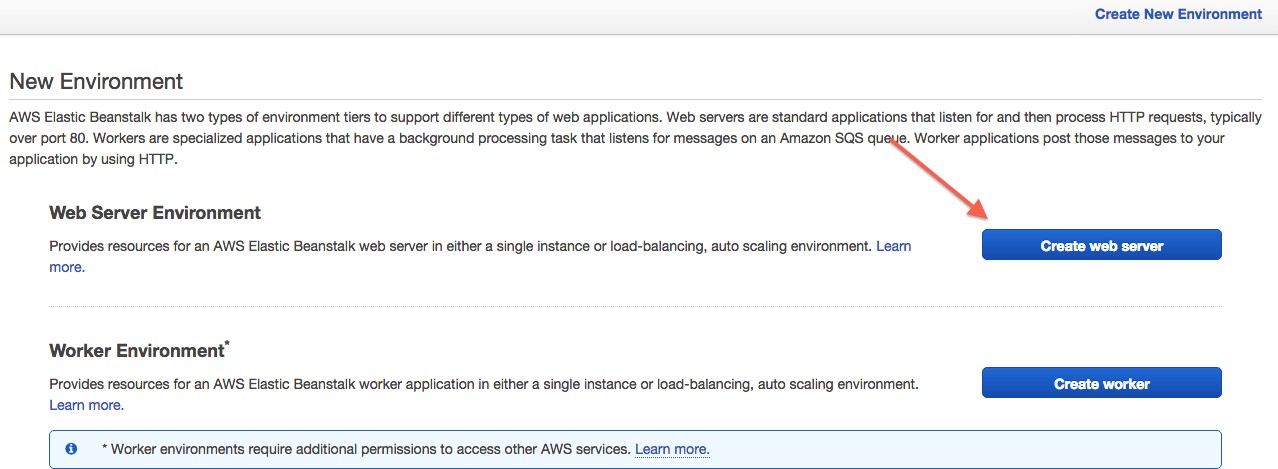
-
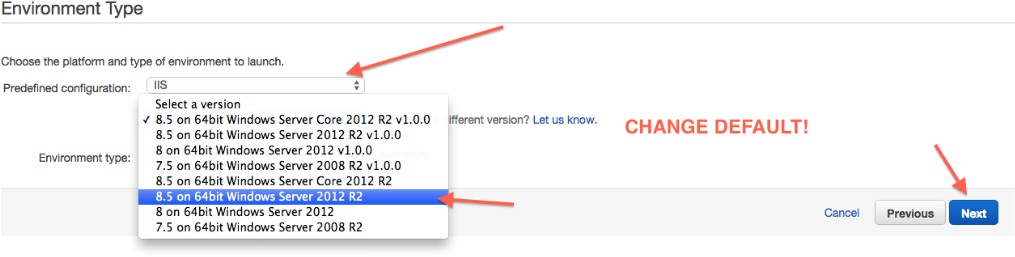
Seleccione IIS:
Para cambiar los valores predeterminados, seleccione Cambiar versión de plataforma, luego seleccione 8.5 en Windows Server 2012 R2 de 64 bits:
-
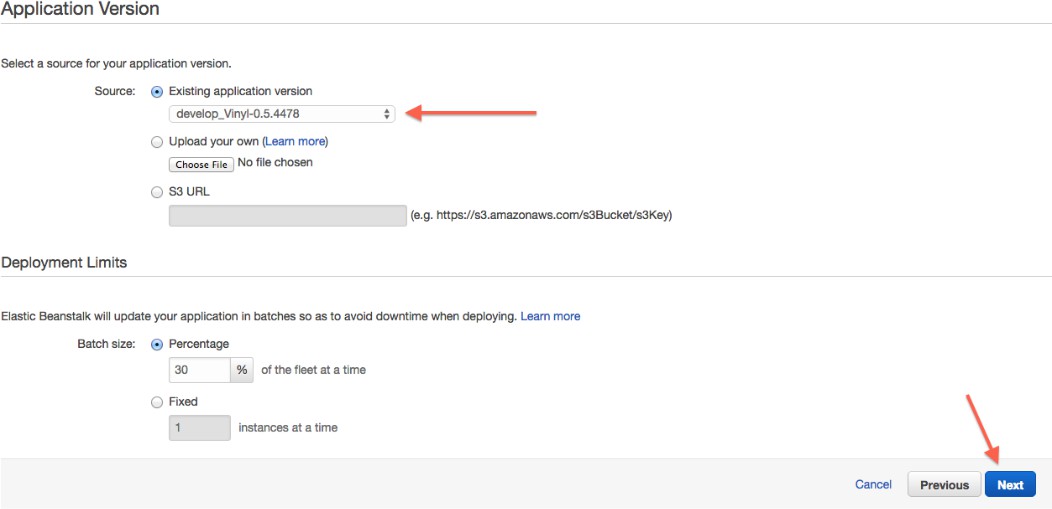
Seleccione la versión de aplicación apropiada:
-
Ingrese el nombre del entorno. Esto se convierte en parte de una URL que se puede usar para acceder a este entorno:
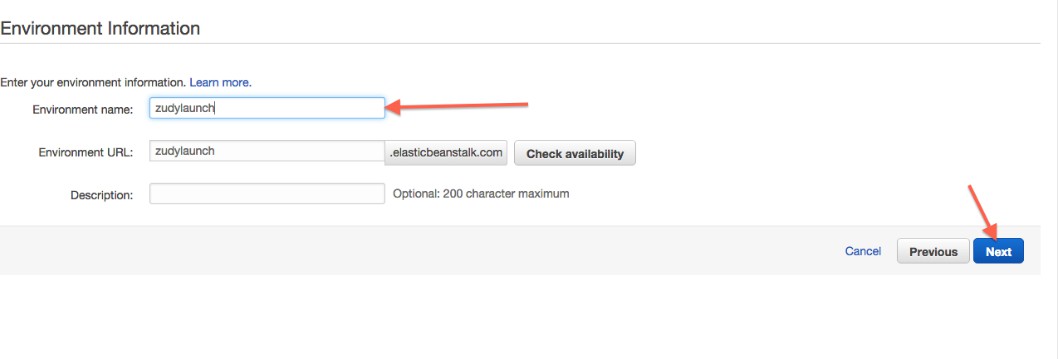
Consejo
Este espacio de nombres se utiliza en todas las instancias de Elastic Beanstalk para todos los clientes de AWS.
-
Marque Crear este entorno dentro de un VPC:

-
Establezca los siguientes valores:
- Tipo de instancia: t2.small (Jitterbit recomienda instancias
T2.smallyT2.mediumpara desarrollo y propósitos de QA, y instancias más grandes para entornos de producción.) - Par de claves EC2: vinyl
- (Opcional) Ingresa tu dirección de correo electrónico para ser notificado sobre problemas del entorno.

- Tipo de instancia: t2.small (Jitterbit recomienda instancias
-
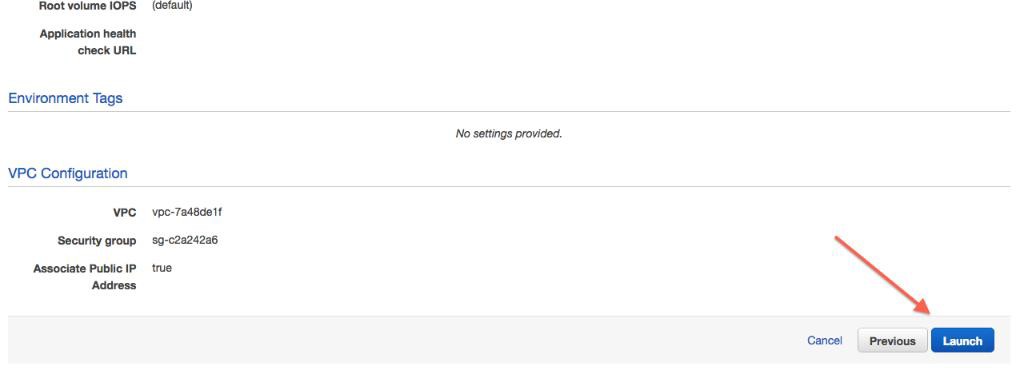
Configura los ajustes de VPC según sea apropiado. (La visibilidad de ELB debe ser Externa.)

-
Revisa el resumen:
-
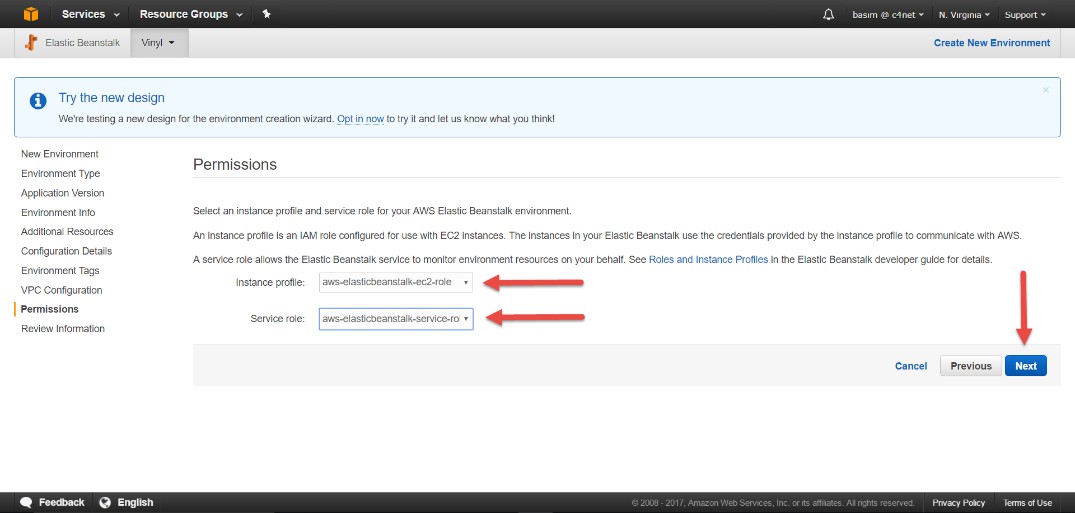
Establece permisos:
-
Guarda la configuración:

Después de que el entorno esté activo
Después de que el entorno aparezca en verde en el panel de control, debes configurar algunos parámetros adicionales. En Configuración > Configuración de Software, establece valores para los siguientes campos de información de conexión:
-
ConnectionInfo:DatabaseType
-
ConnectionInfo:HostName
-
ConnectionInfo:DatabaseName
-
ConnectionInfo:UserName
-
ConnectionInfo:Password
Después de completar estos campos, se abrirá App Builder. (Pueden ser necesarios pasos adicionales para la instalación o actualización de una base de datos.)
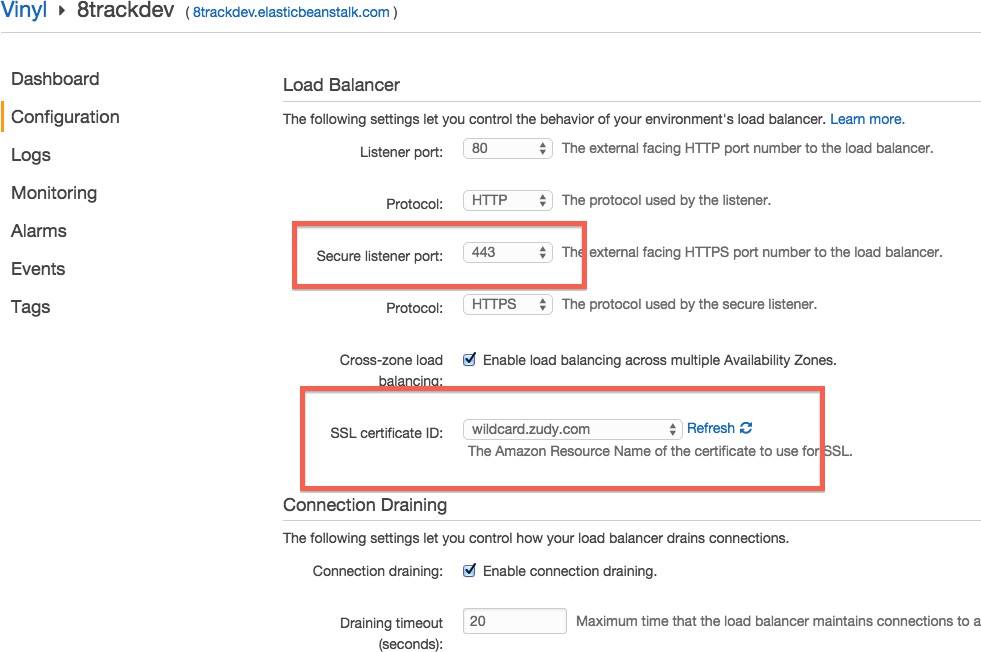
Configurando HTTPS
Los entornos de Elastic Beanstalk terminan la conexión HTTPS en el Elastic Load Balancer. El soporte de App Builder para proxies inversos le permite detectar y manejar este escenario. App Builder reconoce tres propiedades de entorno definidas cuando se despliega la instancia de Elastic Beanstalk. Estas variables de entorno están scriptadas; no necesitarás configurarlas tú mismo.
Se recomienda encarecidamente HTTPS para todos los nuevos entornos de Elastic Beanstalk. Sin embargo, por defecto, los nuevos entornos de Elastic Beanstalk no están configurados para HTTPS. Para configurar Elastic Beanstalk para aceptar solicitudes HTTPS, sigue estos pasos:
-
Inicie sesión en la Consola de Amazon Web Services.
-
En Servicios, elija Elastic Beanstalk.
-
Seleccione el entorno que está actualizando.
-
Seleccione Configuración en el menú de la izquierda.
-
Seleccione el ícono de engranaje junto a Balanceo de Carga.
-
Establezca el Puerto del Listener Seguro en 443.
-
Seleccione el ID del Certificado SSL que sea aplicable.
-
Haga clic en el botón Guardar: