Jitterbit Knowledge Agent
Übersicht
Der Jitterbit Knowledge Agent (Knowledge Agent) ist ein KI-Agent, der über den Jitterbit Marketplace bereitgestellt wird und dazu dient, Ihrem internen Team intelligente Antworten aus den internen Daten Ihrer Organisation zu ermöglichen. Dieser Agent verwendet die Technik der Retrieval-Augmented Generation (RAG), die das Denken von LLM mit dem Zugriff auf externe Werkzeuge und Datenquellen kombiniert. Er führt Folgendes aus:
-
Stellt eine Verbindung zu den folgenden Quellen her und ruft Informationen mithilfe von Jitterbit Studio ab:
- Atlassian Confluence-Seiten
- Atlassian Jira-Tickets
- Google Drive-Dokumente
- Salesforce-Supportfälle (aus dem
Case-Objekt)
-
Integriert sich mit Azure OpenAI, um einen intelligenten KI-Chatbot mit Daten aus den oben genannten Quellen zu betreiben, die über eine benutzerdefinierte API abgerufen werden, die mit dem Jitterbit API Manager erstellt wurde.
Dieses Dokument erklärt, wie man diesen KI-Agenten einrichtet und betreibt. Es behandelt die Architektur und Voraussetzungen, Beispielaufforderungen, die zeigen, was der Agent tun kann, sowie die Schritte zur Installation, Konfiguration und Betrieb des KI-Agenten.
Architektur des KI-Agenten
Das folgende Diagramm zeigt die Architektur, die im Knowledge Agent implementiert ist:
Datenfluss des Agenten
Slack app/bot) JB_CUSTOM_API(
Jitterbit API Manager
custom API) REQ_AZURE_OPENAI(Request to
Azure OpenAI) SLACK_API_REQ_H(Slack
API request handler
workflow) RES_AZURE_OPENAI(Response from Azure OpenAI) TIMEOUT(Timeout handling) subgraph LIVE_AGENT_DATA_FLOW[ ] direction RL subgraph EXTAPP[**External app**] SLACKAPP end JB_CUSTOM_API subgraph STUDIO[ **Jitterbit Studio**] REQ_AZURE_OPENAI RES_AZURE_OPENAI SLACK_API_REQ_H TIMEOUT end end SLACKAPP -->|Request| JB_CUSTOM_API JB_CUSTOM_API -->|Request| SLACK_API_REQ_H JB_CUSTOM_API -->|Response| SLACKAPP SLACK_API_REQ_H -->|Response|JB_CUSTOM_API SLACK_API_REQ_H --> REQ_AZURE_OPENAI REQ_AZURE_OPENAI --> RES_AZURE_OPENAI RES_AZURE_OPENAI --> SLACK_API_REQ_H REQ_AZURE_OPENAI --> TIMEOUT --> SLACK_API_REQ_H classDef Clear fill:white, stroke:white, stroke-width:0px, rx:15px, ry:15px classDef Plain fill:white, stroke:black, stroke-width:3px, rx:15px, ry:15px class LIVE_AGENT_DATA_FLOW Clear class EXTAPP,APIM,STUDIO Plain
Initialer Datenlade- und Datenpflege-Workflow
Voraussetzungen
Um den Knowledge Agent zu verwenden, sind die folgenden Komponenten erforderlich oder werden im Design des Agenten vorausgesetzt.
Harmony-Komponenten
Sie müssen über eine Jitterbit Harmony-Lizenz mit Zugriff auf die folgenden Komponenten verfügen:
- Jitterbit Studio
- Jitterbit API Manager
- Jitterbit Knowledge Agent, der als Lizenz-Add-On erworben wurde
Unterstützte Endpunkte
Die folgenden Endpunkte sind in das Design des Agenten integriert.
Großes Sprachmodell (LLM)
Der KI-Agent verwendet Azure OpenAI als LLM-Anbieter. Um Azure OpenAI zu nutzen, benötigen Sie ein Microsoft Azure-Abonnement mit Berechtigungen, um die folgenden Ressourcen zu erstellen und zu verwalten:
- Azure OpenAI-Ressource mit einem bereitgestellten
gpt-4oodergpt-4.1Modell. - Azure Storage mit einem Blob-Container zum Speichern abgerufener Daten.
- Azure AI Search mit einem Suchdienst, der mit einem Index und einem Indexer konfiguriert werden kann.
Tipp
Für Preisinformationen siehe Azure AI Search Preistabellen.
Wissensdatenbank
Sie können einen oder alle dieser Endpunkte als Wissensdatenbank für diesen KI-Agenten verwenden:
- Atlassian Confluence: Die Quelle der Confluence-Seiten.
- Atlassian Jira: Die Quelle der Jira-Tickets.
- Google Drive: Die Quelle der auf einem Google-Shared-Drive gespeicherten Dateien.
- Salesforce: Die Quelle Ihrer Kundenservicefälle aus dem
Case-Objekt.
Chat-Schnittstelle
Das Design des Agenten integriert Slack als Chat-Schnittstelle für die Interaktion mit dem KI-Agenten. Wenn Sie eine andere Anwendung als Chat-Schnittstelle verwenden möchten, sind ein separater Workflow und Anweisungen für eine generische API-Einrichtung in diesem KI-Agenten enthalten.
Beispielaufforderungen
Hier sind Beispielaufforderungen, die der Wissensagent mit Zugriff auf die entsprechenden Daten bearbeiten kann. Der Agent kann Informationen über einen oder alle verbundenen Endpunkte finden.
- "Ich habe ein Problem mit der Komponente 'ABC'. Können Sie mir dabei helfen?"
- "Wie kann ich mich mit einer MySQL-Datenbank über JDBC verbinden?"
- "Können Sie mir Details zum Jira-Ticket mit der Nummer 123 geben?"
- "Gibt es Jira-Tickets zum SQL-Connector?"
- "Was ist die Sicherheitsrichtlinie für die Installation von Software auf meinem Arbeitscomputer?" (Es könnte ein Dokument auf Google Drive oder eine Confluence-Seite zu diesem Thema geben.)
Installation, Konfiguration und Betrieb
Befolgen Sie diese Schritte, um diesen KI-Agenten zu installieren, zu konfigurieren und zu betreiben:
- Laden Sie Anpassungen herunter und installieren Sie das Studio-Projekt.
- Überprüfen Sie die Projekt-Workflows.
- Erstellen Sie Microsoft Azure-Ressourcen.
- Erstellen Sie die Slack-App.
- Richten Sie ein Google-Dienstkonto und ein freigegebenes Laufwerk ein.
- Konfigurieren Sie Projektvariablen.
- Testen Sie die Verbindungen.
- Stellen Sie das Projekt bereit.
- Erstellen Sie die Jitterbit benutzerdefinierte API.
- Überprüfen Sie die Projekt-Workflows.
- Lösen Sie die Projekt-Workflows aus.
- Fehlerbehebung.
Anpassungen herunterladen und das Projekt installieren
Befolgen Sie diese Schritte, um Anpassungsdateien herunterzuladen und das Studio-Projekt zu installieren:
-
Melden Sie sich im Harmony-Portal unter https://login.jitterbit.com an und öffnen Sie Marketplace.
-
Suchen Sie den KI-Agenten mit dem Namen Jitterbit Knowledge Agent. Um den Agenten zu finden, können Sie die Suchleiste verwenden oder im Filter-Bereich unter Typ KI-Agent auswählen, um die Anzeige auf die verfügbaren KI-Agenten zu beschränken.
-
Klicken Sie auf den Dokumentations-Link des KI-Agenten, um dessen Dokumentation in einem separaten Tab zu öffnen. Halten Sie den Tab geöffnet, um später darauf zurückzugreifen, nachdem Sie das Projekt gestartet haben.
-
Klicken Sie auf Projekt starten, um einen zweistufigen Konfigurationsdialog zu öffnen, um Anpassungen herunterzuladen und den KI-Agenten als Studio-Projekt zu importieren.
Hinweis
Wenn Sie den KI-Agenten noch nicht gekauft haben, wird stattdessen Diesen Agenten erhalten angezeigt. Klicken Sie darauf, um einen Informationsdialog zu öffnen, und klicken Sie dann auf Absenden, damit sich ein Vertreter mit Ihnen in Verbindung setzt, um den KI-Agenten zu kaufen.
-
Im Konfigurationsschritt 1, Download Customizations, werden die folgenden Dateien bereitgestellt, um die Einrichtung des Index und des Indexers in Azure AI Search zu erleichtern und die Slack-App zu erstellen. Wählen Sie die Dateien aus und klicken Sie auf Download Files:
-
Azure AI Search Index- und Indexer-JSON-Definitionsdateien
Azure_AI_Search_Datasource_Definition.jsonAzure_AI_Search_Index_Definition.jsonAzure_AI_Search_Indexer_Definition.json
-
Slack-App-Manifestdatei
slack_app_manifest.json
Tipp
Der Konfigurationsdialog enthält eine Warnung, die Vorlage nicht zu importieren, bevor die Endpunktanpassungen angewendet werden. Diese Warnung gilt nicht für diesen KI-Agenten und kann ignoriert werden. Befolgen Sie die empfohlene Reihenfolge der Schritte in dieser Dokumentation.
Klicken Sie auf Next.
-
-
Im Konfigurationsschritt 2, Create a New Project, wählen Sie eine Umgebung aus, in der Sie das Studio-Projekt erstellen möchten, und klicken Sie dann auf Create Project.
-
Ein Fortschrittsdialog wird angezeigt. Nachdem angezeigt wird, dass das Projekt erstellt wurde, verwenden Sie den Dialoglink Go to Studio oder öffnen Sie das Projekt direkt von der Studio-Seite Projects.
Microsoft Azure-Ressourcen erstellen
Erstellen Sie die folgenden Microsoft Azure-Ressourcen und behalten Sie die folgenden Informationen zur Konfiguration des KI-Agenten. Um diese Ressourcen zu erstellen und zu verwalten, benötigen Sie ein Microsoft Azure-Abonnement mit den entsprechenden Berechtigungen.
Azure Blob-Container
Sie müssen einen Azure Blob-Container erstellen, um Kundendaten zu speichern. Daten aus dem Blob-Container werden in Azure AI Search mithilfe eines Index und eines Indexers indiziert.
Sie benötigen die SAS-URL des Containers, um die Werte der Azure Blob Storage-Projektvariablen zu bestimmen. Um die SAS-URL zu generieren:
- Gehen Sie im Azure-Portal zu Speicherkonten und öffnen Sie das spezifische Speicherkonto.
- Wählen Sie im Ressourcenmenü unter Datenspeicherung Container aus und öffnen Sie den spezifischen Container.
- Wählen Sie im Ressourcenmenü unter Einstellungen Geteilte Zugriffstoken aus.
-
Verwenden Sie das Menü Berechtigungen, um zu überprüfen, ob die URL für die Shared Access Signature (SAS) für diesen Container mindestens über die Berechtigungen Lesen und Schreiben verfügt:
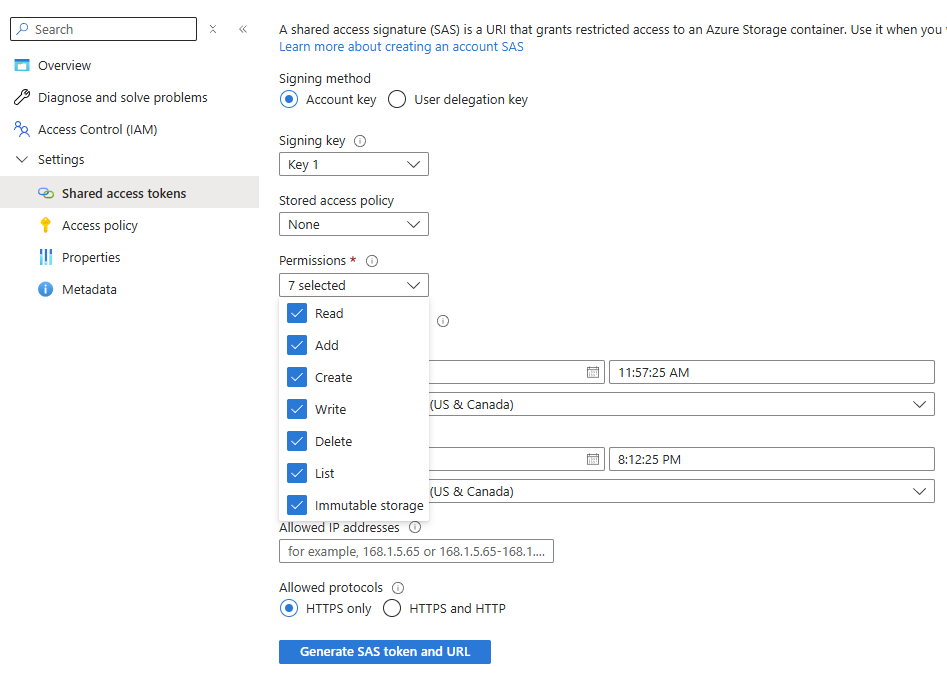
-
Klicken Sie auf SAS-Token und URL generieren.
- Kopieren Sie die Blob-SAS-URL, die unten angezeigt wird.
- Bestimmen Sie die Werte der Projektvariablen für Azure Blob Storage aus der SAS-URL. Die SAS-URL hat das Format
{{ azure_blob_base_url }}/{{ Azure_Blob_Container_Name }}?{{ azure_blob_sas_token }}.
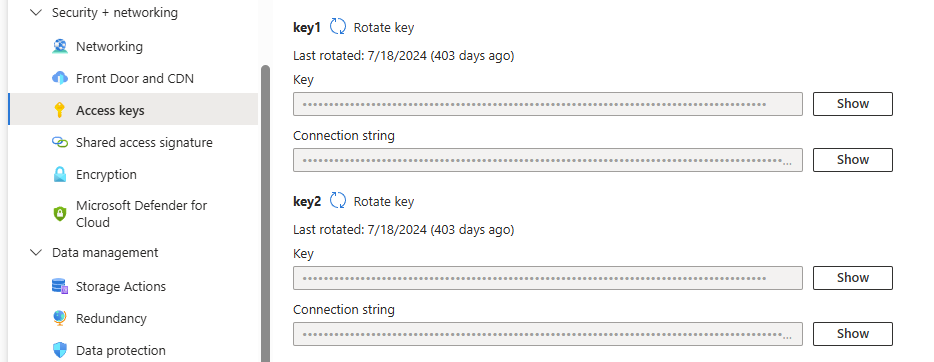
Wenn Sie die in den Anpassungsdateien des KI-Agenten enthaltenen JSON-Definitionsdateien verwenden, um den Index und den Indexer zu generieren, benötigen Sie auch den Azure Blob Storage-Kontenschlüssel. Um Kontozugriffsschlüssel anzuzeigen:
- Öffnen Sie im Azure-Portal Speicherkonten und öffnen Sie das spezifische Speicherkonto.
- Wählen Sie im Ressourcenmenü unter Sicherheit + Netzwerk Zugriffsschlüssel aus.
-
Klicken Sie auf Schlüssel anzeigen, um den Zugriffsschlüssel anzuzeigen, der während der Konfiguration von Azure AI Search verwendet werden soll.
Azure AI Search-Dienst
Sie müssen einen Azure AI Search-Dienst erstellen und dessen Index und Indexer konfigurieren, um die Daten aus dem Blob-Container zu verarbeiten.
Sie benötigen die URL und den API-Schlüssel des Azure AI Search-Dienstes, um die Werte der Azure AI Search-Projektvariablen zu bestimmen:
- URL: Um den Wert für
azure_ai_search_urlzu erhalten, beziehen Sie sich auf die Azure-Dokumentation Dienstinformationen abrufen. - API-Schlüssel: Um den Wert für
azure_ai_search_api_keyzu erhalten, beziehen Sie sich auf die Azure-Dokumentation Rollenspezifischen Zugriff konfigurieren.
Sie können die in den Anpassungsdateien des KI-Agenten enthaltenen JSON-Definitionsdateien verwenden, um den Index und den Indexer zu generieren, oder Sie können sie selbst erstellen.
Wenn Sie die bereitgestellten Definitionsdateien verwenden, müssen Sie die folgenden Platzhalter durch Ihre eigenen Konfigurationswerte ersetzen:
Azure_AI_Search_Indexer_Definition.json
| Platzhalter | Beschreibung |
|---|---|
{{Ihr Azure AI Suchdienstname}} |
Der Name des Azure AI Suchdienstes. |
Azure_AI_Search_Datasource_Definition.json
| Platzhalter | Beschreibung |
|---|---|
{{Ihr Azure AI Suchdienstname}} |
Der Name des Azure AI Suchdienstes. |
{{Ihr Azure Blob-Kontoname}} |
Der Name des Azure Blob-Kontos. |
{{Ihr Azure Blob-Kontenschlüssel}} |
Der Zugriffsschlüssel für das Azure Blob-Speicherkonto, wie oben im Abschnitt Azure Blob-Container beschrieben. |
{{Ihr_azure_blob_container_name}} |
Der Name des Azure Blob-Containers. |
Azure OpenAI-Ressource
Sie müssen eine Azure OpenAI-Ressource erstellen und ein Modell gpt-4o oder gpt-4.1 über das Azure AI Foundry-Portal bereitstellen.
Sie benötigen den Bereitstellungsnamen, die Azure OpenAI-Endpunkt-URL und den API-Schlüssel, um die Werte der Azure OpenAI-Projektvariablen zu bestimmen. Um diese Werte zu finden:
- Öffnen Sie im Azure AI Foundry-Portal die spezifische OpenAI-Ressource.
-
Die Werte für die Endpunkt-URL (
azure_openai_base_url) und den API-Schlüssel (azure_openai_api_key) werden auf der Startseite der Ressource angezeigt: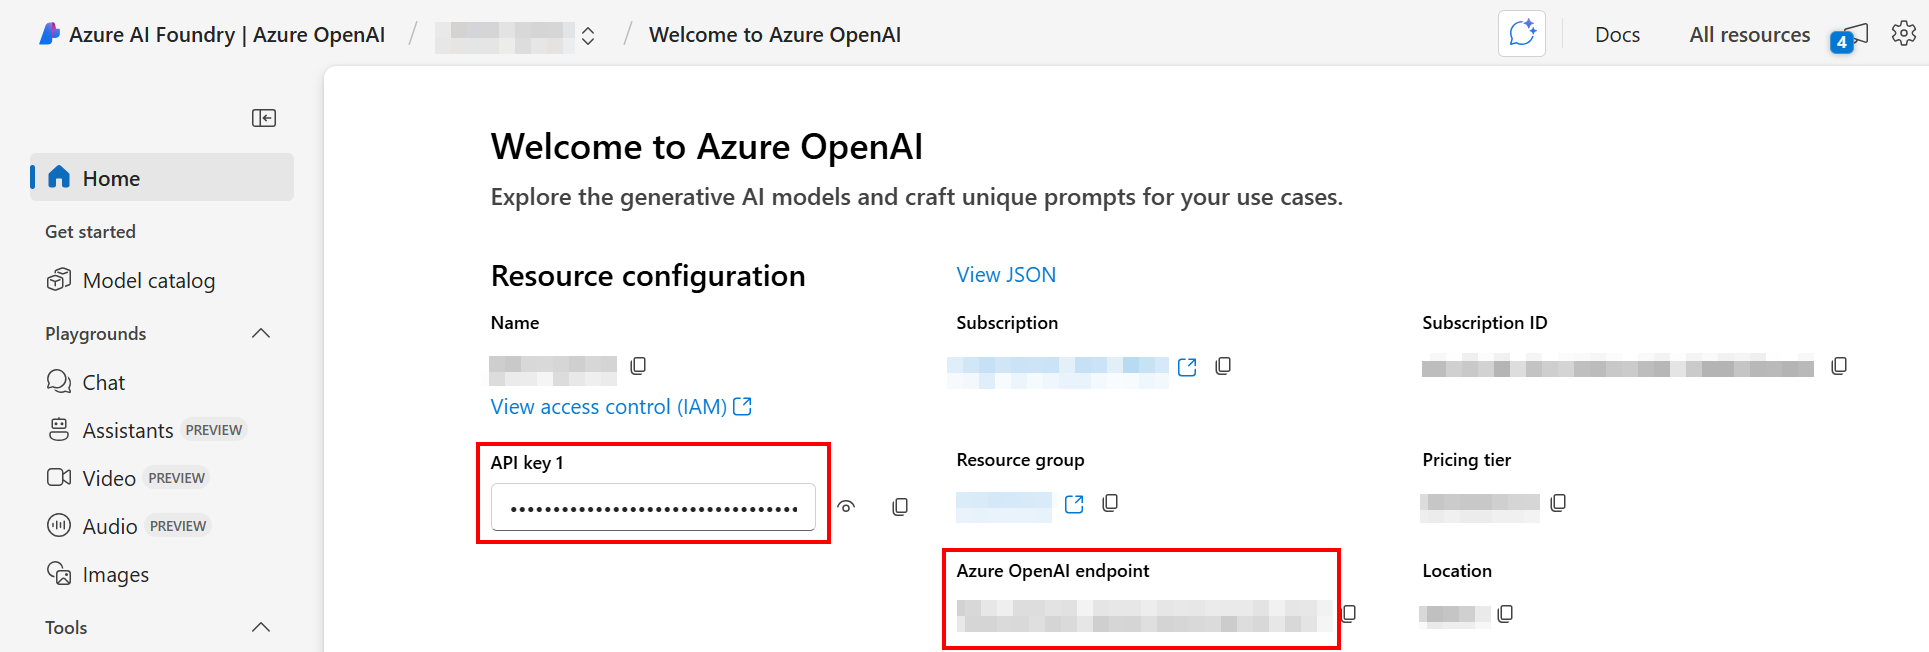
-
Wählen Sie im Navigationsmenü unter Geteilte Ressourcen Bereitstellungen aus. Der Bereitstellungsname (
Azure_OpenAI_Deployment_Name) wird angezeigt.
Erstellen Sie die Slack-App
Um die Chat-Oberfläche des Knowledge Agent in Slack zu erstellen, befolgen Sie diese Schritte:
-
Erstellen Sie eine Slack-App mit der Slack-App-Manifestdatei (
slack_app_manifest.json), die mit den Anpassungsdateien dieses KI-Agenten bereitgestellt wurde. Alternativ können Sie die App von Grund auf neu erstellen. -
Wenn Sie die bereitgestellte Manifestdatei verwenden, ersetzen Sie die folgenden Platzhalter durch Ihre eigenen Konfigurationswerte:
Platzhalter Beschreibung {{Ersetzen Sie durch den Namen des Slack-Bots}}Der Name, den Ihr Slack-Bot haben soll, wie er den Benutzern angezeigt wird. Ersetzen Sie diesen Wert an zwei Stellen im Manifest. {{Ersetzen Sie durch die Jitterbit-API-URL}}Die Dienst-URL der benutzerdefinierten Jitterbit-API, die Sie in Erstellen Sie die benutzerdefinierte Jitterbit-API erstellt haben. -
Installieren Sie die App in Ihrem Slack-Arbeitsbereich.
-
Erhalten Sie das Bot-Token (für das Feld Bot User OAuth Token der Slack-Verbindung) und geben Sie dessen Wert für die Projektvariable
slack_bot_oauth_user_tokenein. -
Konfigurieren Sie die Projektvariable
slack_channel_namemit dem Kanal, in dem Benachrichtigungen gesendet werden sollen. -
Geben Sie den Wert des Bot-Tokens für die Projektvariable
slack_bot_oauth_user_tokenund den Kanalnamen für die Projektvariableslack_channel_nameein. Sie werden diese im nächsten Schritt konfigurieren.
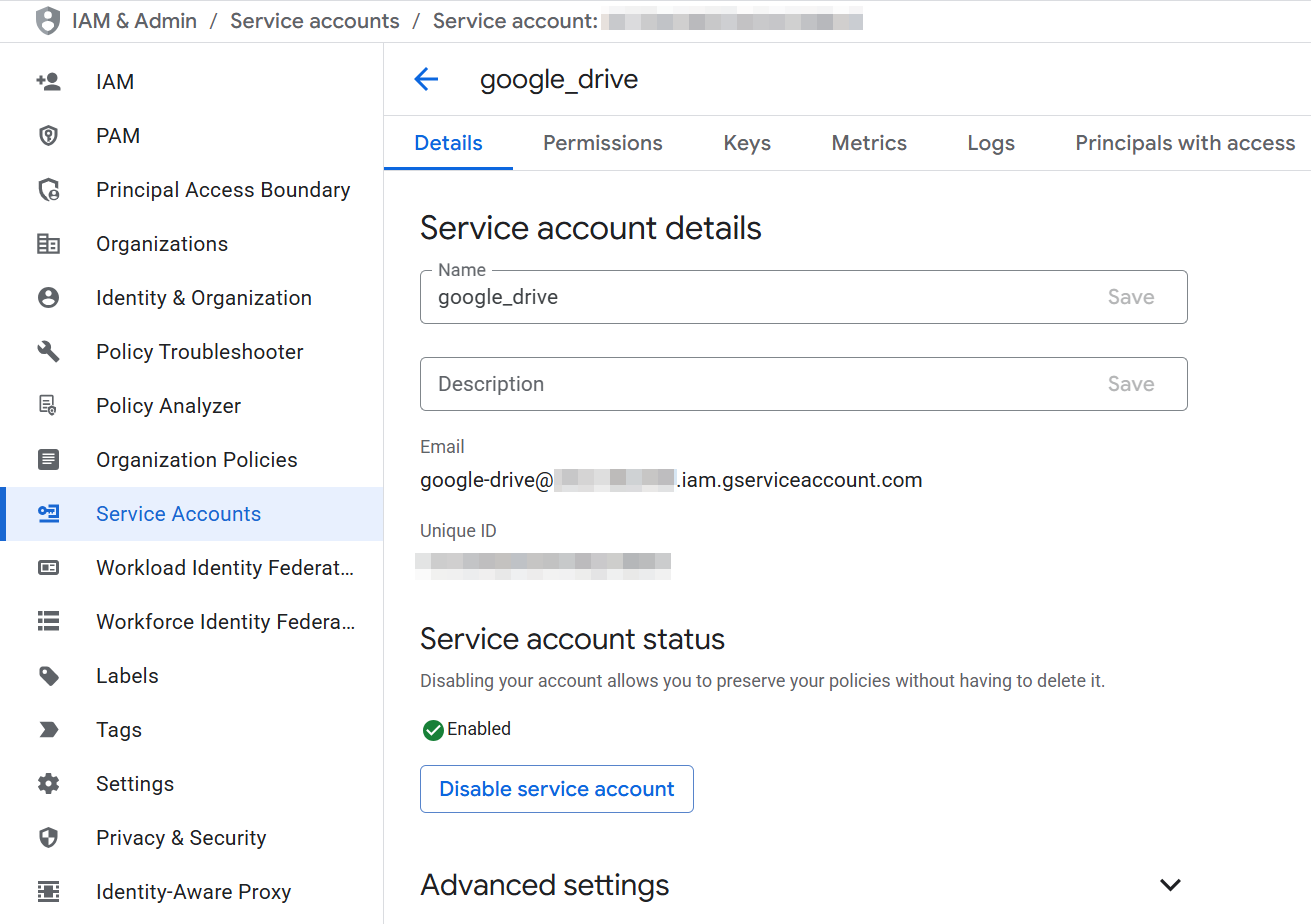
Richten Sie ein Google-Dienstkonto und ein freigegebenes Laufwerk ein
Dieses Setup ist nur erforderlich, wenn Sie den Workflow Data upload Utility - Google Drive to Azure Blob verwenden. Sie müssen ein aktives Google Cloud-Projekt haben, um fortzufahren. Wenn Sie noch keines haben, können Sie eines erstellen, indem Sie die Anweisungen von Google befolgen.
Erstellen Sie ein Google-Dienstkonto
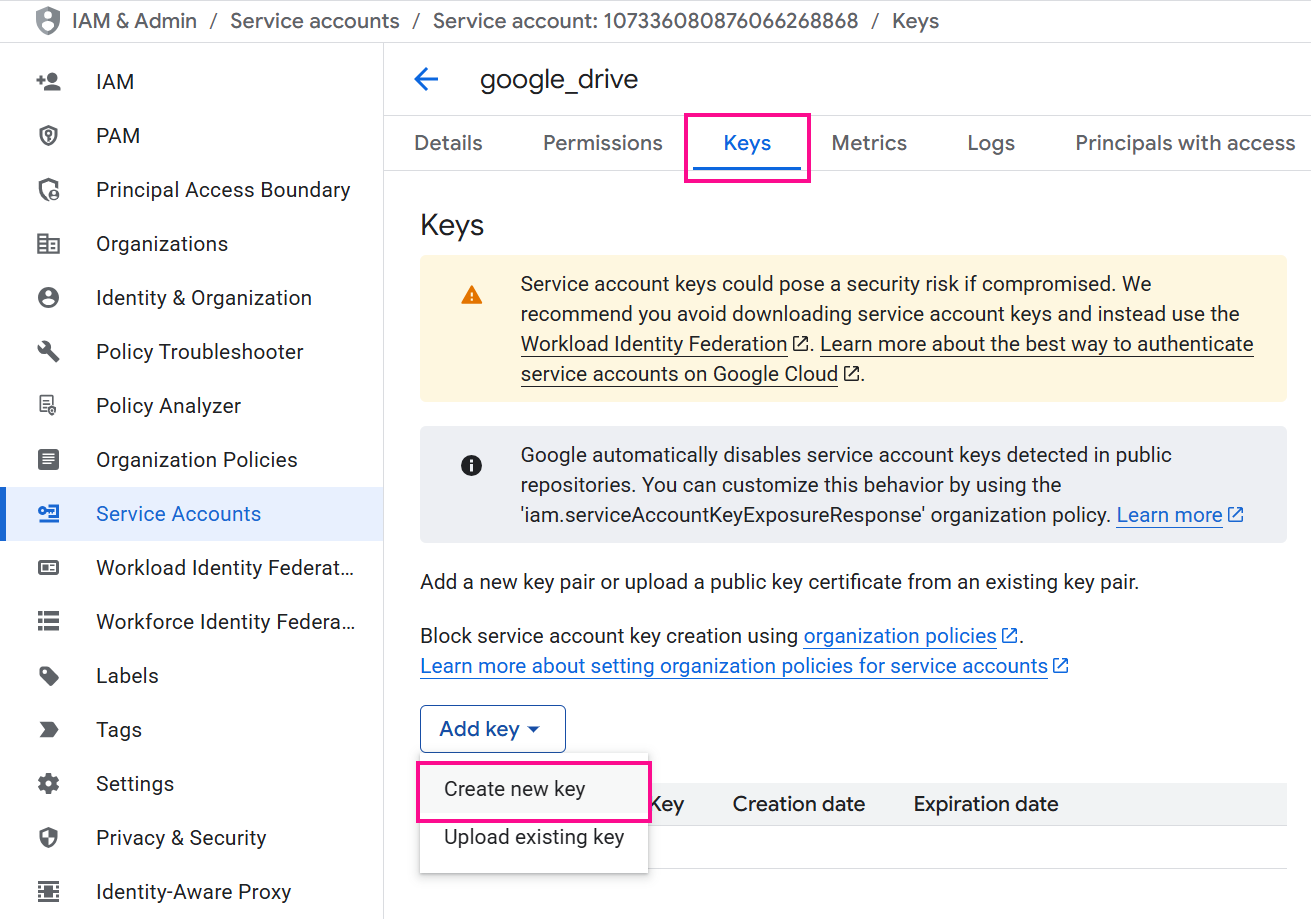
Befolgen Sie die folgenden Schritte, um einen Schlüssel für das Google-Dienstkonto zu erstellen, damit das Dienstprogramm sicher auf Ihre Google Drive-Dateien zugreifen kann:
-
Gehen Sie in der Google Cloud-Konsole zur Suchleiste, um die Seite Dienstkonten zu finden und zu navigieren.
-
Wenn Sie bereits ein Dienstkonto haben, das Sie verwenden möchten, fahren Sie mit Schritt 3 fort. Andernfalls klicken Sie auf Dienstkonto erstellen, geben Sie einen Namen ein und klicken Sie auf Fertig. Es sind keine zusätzlichen Berechtigungen oder Zugriffe erforderlich.
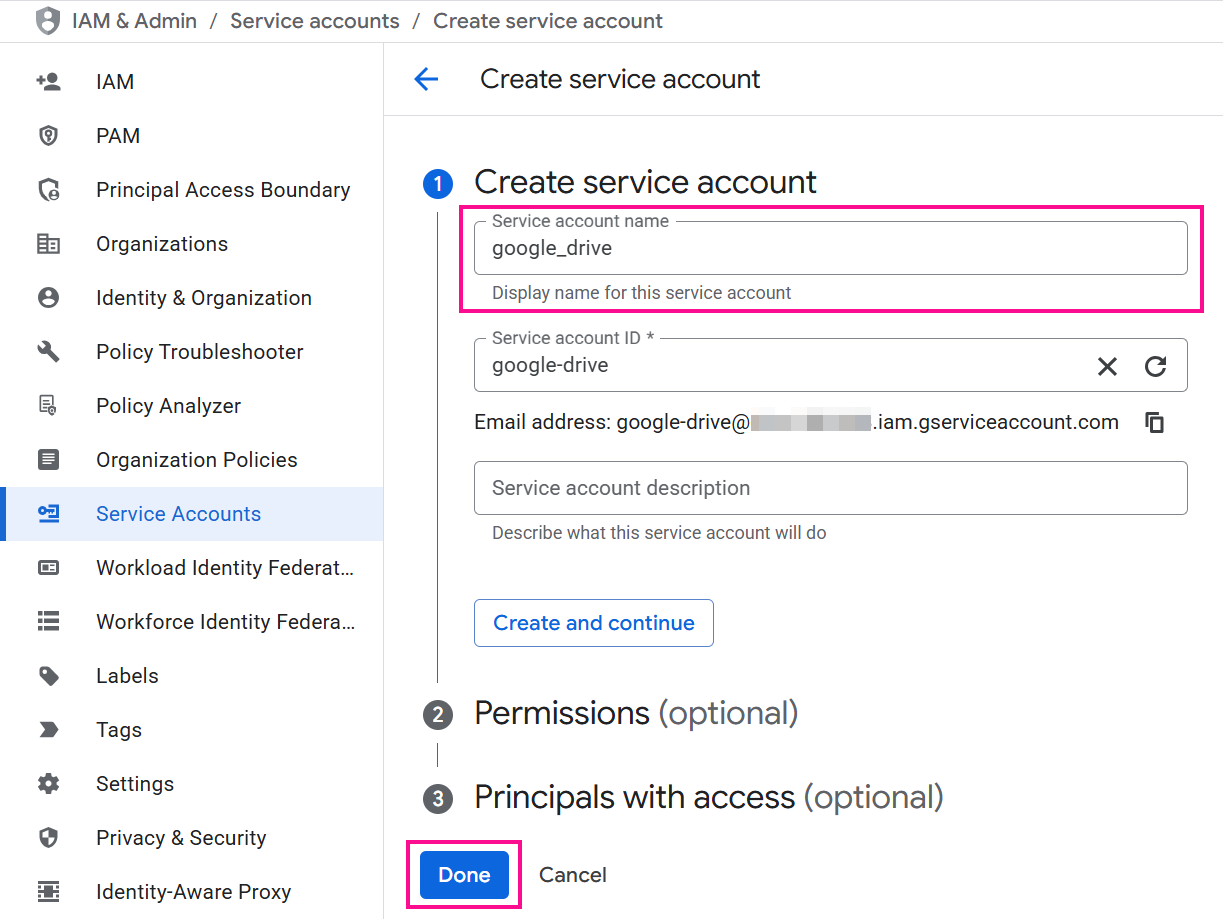
-
Wählen Sie das Dienstkonto aus, um die Details des Dienstkontos zu öffnen:
-
Navigieren Sie zum Tab Schlüssel und verwenden Sie das Menü Schlüssel hinzufügen, um Neuen Schlüssel erstellen auszuwählen.
-
Wählen Sie JSON als Schlüsseltype und klicken Sie auf Erstellen. Eine JSON-Datei mit den Anmeldeinformationen wird auf Ihren Computer heruntergeladen.
-
Öffnen Sie die heruntergeladene JSON-Datei, um die folgenden Werte zu finden, die zur Konfiguration der Google Drive-Projektvariablen benötigt werden:
client_email: Dies ist der Wert für die ProjektvariableGoogle_Client_Emailund wird benötigt, um das Google-Freigabeverzeichnis im nächsten Abschnitt zu konfigurieren.private_key: Dies ist der Wert für die ProjektvariableGoogle_Private_Key.
-
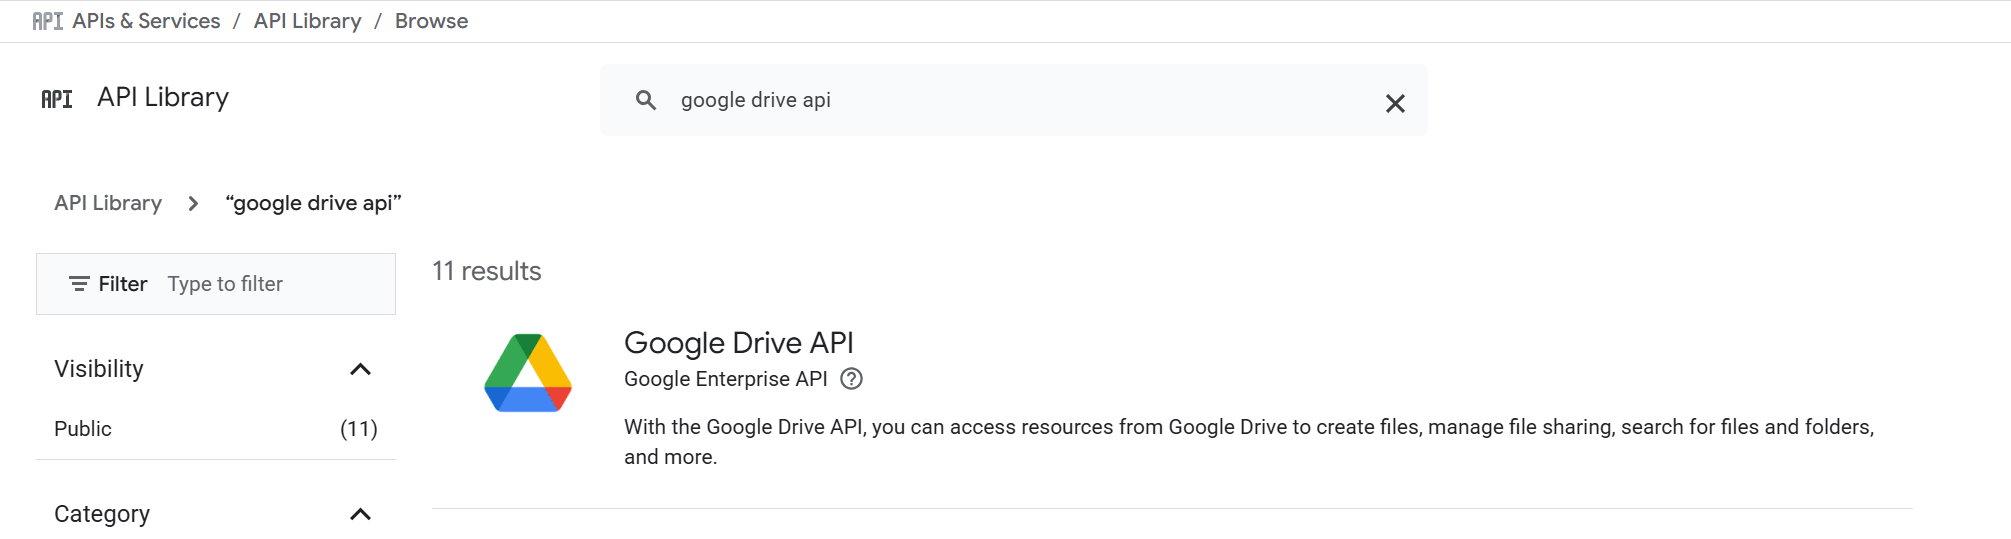
Aktivieren Sie die Google Drive API in Ihrem Google Cloud-Konto:
-
Gehen Sie in der Google Cloud-Konsole zur Suchleiste, um die Seite APIs & Dienste zu finden und zu navigieren.
-
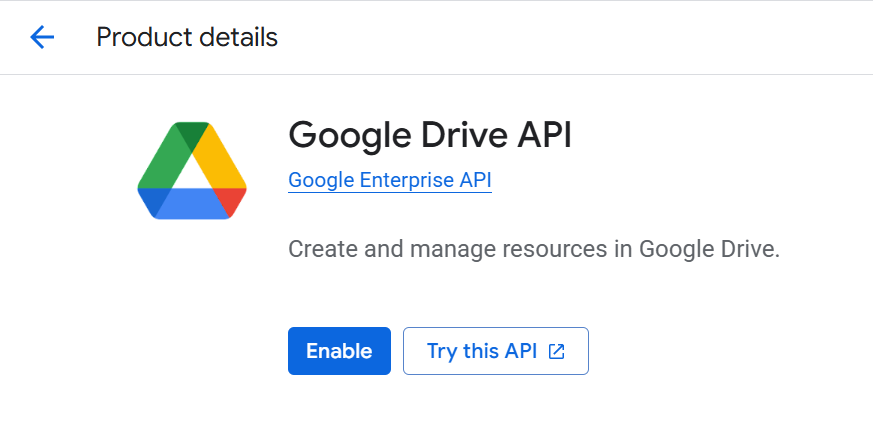
Greifen Sie auf die API-Bibliothek zu und wählen Sie die Google Drive API aus:
-
Klicken Sie auf die Schaltfläche Aktivieren:
-
Konfigurieren Sie das Google Shared Drive
Das Google Shared Drive sollte wie folgt konfiguriert werden, um dem Dienstprogramm den Zugriff auf alle Dateien zu ermöglichen, die Sie hochladen:
-
Erstellen Sie ein Google Shared Drive, falls Sie noch keines haben.
-
Öffnen Sie das Shared Drive und kopieren Sie die ID aus der URL des Browsers. Die ID ist die lange Zeichenfolge am Ende. Wenn die URL beispielsweise
https://drive.google.com/drive/folders/dftg-LbGrP7hdfdlautet, ist die IDdftg-LbGrP7hdfd. Diese ID ist der Wert für die ProjektvariableGoogle_Drive_ID, wenn Sie Google Drive-Projektvariablen konfigurieren. -
Klicken Sie oben auf der Seite auf den Namen des Shared Drives und wählen Sie Mitglieder verwalten. Ein Dialogfeld erscheint.
-
Fügen Sie im Feld Personen und Gruppen hinzufügen den Wert der
client_emailaus der zuvor heruntergeladenen JSON-Datei ein. -
Weisen Sie dem Dienstkonto die Rolle Inhaltsmanager zu und bestätigen Sie die Aktion.
Konfigurieren Sie Projektvariablen
Im zuvor über den Marketplace installierten Studio-Projekt müssen Sie Werte für die folgenden Projektvariablen festlegen.
Dies kann über das Aktionsmenü des Projekts erfolgen, um Projektvariablen auszuwählen und eine Schublade am unteren Rand der Seite zu öffnen, in der Sie die Werte überprüfen und festlegen können.
Salesforce
| Variablenname | Beschreibung |
|---|---|
SF_Login_URL |
Server-Host in der Salesforce-Verbindung |
SF_Password |
Passwort in der Salesforce-Verbindung |
SF_Security_Token |
Sicherheitstoken in der Salesforce-Verbindung |
SF_User_Name |
Benutzername in der Salesforce-Verbindung |
SF_Cases_Incremental_Run |
Flag zur Steuerung, ob nur neue oder aktualisierte Salesforce-Fälle seit dem letzten Lauf abgerufen werden sollen. Wenn true, werden nur inkrementelle (neue oder aktualisierte) Fälle aus Salesforce seit dem letzten Lauf abgerufen. Wenn false, wird ein vollständiger Abruf ab dem Standarddatum und -uhrzeit (SF_Cases_Default_Modified_Date) durchgeführt. |
SF_Cases_Default_Modified_Date |
Das Standarddatum und die Standarduhrzeit, ab denen Salesforce-Fälle abgerufen werden. Wird beim ersten Lauf oder wenn SF_Cases_Incremental_Run false ist, verwendet. Format: yyyy-MM-dd'T'HH:mm:ss.SSS'Z'. Beispiel: 2024-09-11T13:00:02.000Z. Wenn dieses Datum nicht festgelegt ist, wird ein Fehler ausgelöst. |
Jira
| Variablenname | Beschreibung |
|---|---|
JIRA_Username |
Die mit dem Jira-Konto verknüpfte Email-Adresse zur Authentifizierung. |
JIRA_Token |
API-Token, das zur Authentifizierung mit der JIRA-Instanz verwendet wird. Für Atlassian Cloud kann dieses Token in den Kontoeinstellungen generiert werden. |
JIRA_Projects |
Jira-Projekt-Keys, von denen Issues abgerufen werden sollen, im Format keys=PROJECT1&keys=PROJECT2. Beispiel: keys=SUPPORT&keys=ITHELP. |
JIRA_Issue_Types |
Liste der Jira-Issue-Typen, die abgerufen werden sollen, durch Kommas getrennt. Jeder Wert muss in einfache Anführungszeichen gesetzt werden. Beispiel: 'Story','Bug','Task'. |
Jira_Default_Modified_Date |
Das Standarddatum und die Uhrzeit, von denen Jira-Issues abgerufen werden. Wird während des ersten Laufs oder wenn JIRA_IncrementalRun false ist, verwendet. Format: yyyy-MM-dd HH:mm. Beispiel: 2025-08-07 10:00. Wenn dieses Datum nicht gesetzt ist, wird ein Fehler ausgelöst. |
JIRA_Incremental_Run |
Flag zur Steuerung, ob nur neue oder aktualisierte Jira-Issues seit dem letzten Lauf abgerufen werden sollen. Wenn true, werden nur inkrementelle (neue oder aktualisierte) Issues seit dem letzten Lauf aus Jira abgerufen. Wenn false, wird ein vollständiger Abruf vom Standarddatum und der Standarduhrzeit (Jira_Default_Modified_Date) durchgeführt. |
JIRA_Base_URL |
Die Basis-URL der Jira-Instanz, mit der verbunden werden soll. Fügen Sie keinen abschließenden Schrägstrich hinzu. Beispiel: https://yourdomain.atlassian.net. |
Confluence
| Variablenname | Beschreibung |
|---|---|
Confluence_Wiki_UserName |
Der Benutzername für das Confluence-Wiki. |
Confluence_Wiki_Password |
Das Passwort für das Confluence-Wiki. |
Confluence_Wiki_Base_Url |
Die Stamm-URL des Confluence-Wikis für API-Aufrufe und Inhaltsabruf. Beispiel: https://yourcompany.atlassian.net/wiki. |
Google Drive
| Variablenname | Beschreibung |
|---|---|
Google_Client_Email |
Die Client-Email des Google-Dienstkontos, das zur Authentifizierung beim Zugriff auf Google Drive verwendet wird. |
Google_Drive_Default_Modified_Date |
Das Standarddatum und die Uhrzeit, ab denen Google Drive-Dateien gelesen werden. Wird beim ersten Lauf oder wenn das inkrementelle Lesen deaktiviert ist, verwendet. Format: yyyy-MM-dd'T'HH:mm:ss. Beispiel: 2024-05-28T11:32:47. Wenn dieses Datum nicht festgelegt ist, wird ein Fehler ausgelöst. |
Google_Drive_ID |
Die ID des freigegebenen Google Drives, aus dem Dateien gelesen werden. Zum Beispiel, wenn die URL des freigegebenen Drives https://drive.google.com/drive/folders/1KTXaKx_FG7Ud8sWHf8QgG67XHy ist, ist die Drive-ID 1KTXaKx_FG7Ud8sWHf8QgG67XHy. |
Google_Drive_Incremental_Run |
Flag zur Steuerung, ob nur neue oder aktualisierte Google Drive-Dateien seit dem letzten Lauf abgerufen werden sollen. Wenn true, werden nur inkrementelle (neue oder aktualisierte) Dateien seit dem letzten Lauf von Google Drive abgerufen. Wenn false, wird ein vollständiger Abruf ab dem Standarddatum und der Standarduhrzeit (Google_Drive_Default_Modified_Date) durchgeführt. |
Google_Oauth_Scopes |
Der OAuth-Bereich, der erforderlich ist, um dem Google-Dienstkonto Zugriff auf Google Drive zu gewähren. Für diesen KI-Agenten geben Sie ein: https://www.googleapis.com/auth/. |
Google_Private_Key |
Der private Schlüssel des Google Cloud-Dienstkontos, das zur Authentifizierung für das Abrufen von Dateien aus Google Drive verwendet wird. |
Azure Blob Storage
| Variablenname | Beschreibung |
|---|---|
Azure_Blob_Container_Name |
Der Name des Azure Blob Storage Containers, in dem die abgerufenen Daten gespeichert oder abgerufen werden. Dies ist der Teil der SAS-URL, der unmittelbar nach der Domain des Speicherkontos folgt. Beispiel: In https://myaccount.blob.core.windows.net/mycontainer/myblob.txt?sv=... ist der Containername mycontainer. |
azure_blob_sas_token |
Das SAS-Token, das zur Authentifizierung des Zugriffs auf den Azure Blob Container Azure_Blob_Container_Name verwendet wird. Nur der Teil nach ? in der vollständigen Blob-URL sollte gespeichert werden. Beispiel-Token: sv=2025-08-01&ss=b&srt=sco&sp=rl&se=2025-08-30T12:00:00Z&st=2025-08-25T12:00:00Z&spr=https&sig=AbCdEfGhIjKlMnOpQrStUvWxYz1234567890. |
azure_blob_base_url |
Die Basis-URL des Azure Blob Storage Kontos, das verwendet wird, um auf Container und Blobs zuzugreifen. In einer SAS-URL wie https://myaccount.blob.core.windows.net/mycontainer/myblob.txt?sv=... ist die Basis-URL https://myaccount.blob.core.windows.net/. |
Tipp
Diese Werte können aus der SAS-URL abgeleitet werden, die das Format {{azure_blob_base_url}}/{{Azure_Blob_Container_Name}}?{{azure_blob_sas_token}} hat.
Azure AI Search
| Variablenname | Beschreibung |
|---|---|
Azure_AI_Search_Index_Name |
Der Name des Azure-Indexes, der Kundeninformationen aus Bestellformularen speichert. |
azure_ai_search_indexer |
Der Name des Azure AI Search Indexers, der verwendet wird, um den Suchindex Azure_AI_Search_Index_Name zu befüllen und zu aktualisieren. |
azure_ai_search_url |
Die Endpunkt-URL Ihres Azure AI Search-Dienstes. Fügen Sie keinen abschließenden Schrägstrich hinzu. Beispiel: https://<your-search-service>.search.windows.net. |
azure_ai_search_api_key |
Der API-Schlüssel, der zur Authentifizierung von Anfragen an Azure AI Search verwendet wird. |
Azure OpenAI
| Variablenname | Beschreibung |
|---|---|
Azure_OpenAI_Deployment_Name |
Der Name des Azure OpenAI-Deployments, das zum Zugriff auf das Modell verwendet wird. |
azure_openai_base_url |
Die Basis-URL für den Zugriff auf den Azure OpenAI-Dienst. Beispiel: https://<your-resource-name>.openai.azure.com. |
azure_openai_api_key |
Der API-Schlüssel, der zur Authentifizierung von Anfragen an den Azure OpenAI-Dienst verwendet wird. |
Slack
| Variablenname | Beschreibung |
|---|---|
Slack_Bot_Token |
Das Slack-Bot-Token, das nach Erstellen der Slack-App erhalten wird, verwendet für das Bot-Benutzer-OAuth-Zugriffstoken in der Slack-Verbindung. |
Hinweis
Die Slack-App wird in einem späteren Schritt erstellt. Für den Moment können Sie diese Variable leer lassen.
Common
| Variablenname | Beschreibung |
|---|---|
html_regex |
Regex zum Entfernen von HTML-Tags. Verwenden Sie den Standardwert: <(?:"[^"]*"['"]*|'[^']*'['"]*|[^'">])+> |
AI_Prompt |
Der Eingabetext oder die Anweisung, die dem KI-Modell bereitgestellt wird und anleitet, wie es eine Antwort generieren soll. Für diesen Agenten können Sie den folgenden Prompt verwenden:
|
Testverbindungen
Test die Endpunktkonfigurationen, um die Konnektivität mit den definierten Projektvariablenwerten zu überprüfen.
Um Verbindungen zu testen, gehen Sie zur Projektendpunkte und -verbindungen Registerkarte der Designkomponentenpalette, fahren Sie mit der Maus über jeden Endpunkt und klicken Sie auf Test.
Projekt bereitstellen
Bereitstellen des Studio-Projekts.
Um das Projekt bereitzustellen, verwenden Sie das Aktionsmenü des Projekts, um Bereitstellen auszuwählen.
Projekt bereitstellen
Bereitstellen des Studio-Projekts. Dies kann über das Aktionsmenü des Projekts erfolgen, um Bereitstellen auszuwählen.
Erstellen der Jitterbit benutzerdefinierten API
Erstellen Sie eine benutzerdefinierte API mit dem API-Manager für eine der folgenden:
- Slack-Bot-API-Anforderungs-Handler: Erforderlich, wenn die Slack-Benachrichtigung verwendet wird, die im Design dieses KI-Agenten enthalten ist.
- Allgemeiner API-Anforderungs-Handler: Optional. Verwenden Sie ihn zur Verarbeitung von API-Anfragen aus jeder Anwendung.
Erstellen des Slack-Bot-API-Anforderungs-Handlers
Diese benutzerdefinierte Jitterbit-API löst die Slack Bot API Request Handler-Operation aus. Konfigurieren und veröffentlichen Sie die benutzerdefinierte API mit den folgenden Einstellungen:
- API-Dienst:
Slack Bot API Request Handler - Pfad:
/ - Projekt: Wählen Sie das Studio-Projekt aus, das aus dem
Jitterbit Knowledge Agentim Marketplace erstellt wurde - Auszulösende Operation:
Slack Bot API Request Handler - Methode:
POST - Antworttyp:
Systemvariable
Behalten Sie die Dienst-URL der veröffentlichten API für die Erstellung der Slack-App. Die Dienst-URL finden Sie im API-Details-Bereich auf der Dienste-Registerkarte, indem Sie mit der Maus über die Aktionen-Spalte des Dienstes fahren und auf API-Dienst-URL kopieren klicken.
Generischer API-Anforderungs-Handler
Diese benutzerdefinierte Jitterbit-API löst die Operation Generischer API-Anforderungs-Handler aus. Sie ist nicht erforderlich. Erstellen Sie diese API, wenn Sie andere Anwendungen verwenden, um HTTP-API-Anfragen zu verarbeiten. Konfigurieren und veröffentlichen Sie die benutzerdefinierte API mit den folgenden Einstellungen:
- Dienstname:
Generischer API-Anforderungs-Handler - Projekt: Wählen Sie das Studio-Projekt aus, das aus dem
Jitterbit Knowledge Agentim Marketplace erstellt wurde - Operation:
Generischer API-Anforderungs-Handler - Methode:
POST - Antworttyp:
Systemvariable
Tipp
Sie können auch ein Sicherheitsprofil zur Authentifizierung hinzufügen.
{
    "username": "johnr",
    "prompt": "How to connect to mysql using a connector?"
}
{
    "message": "To connect to a MySQL database using the Database connector, follow these steps:   - Use the MySQL JDBC driver that ships with the agent for additional features like manual queries.",
    "references": [],
    "status_code": 200
}
Überprüfen der Projekt-Workflows
Überprüfen Sie im offenen Studio-Projekt die Workflows sowie die nachstehenden Beschreibungen, um zu verstehen, was sie tun.
Hinweis
Die ersten vier Workflows sind Daten-Upload-Dienstprogramm-Workflows, deren Zweck es ist, Daten abzurufen, die als Wissensbasis für den KI-Agenten verwendet werden. Sie können einen oder alle dieser Workflows verwenden, um Daten abzurufen. Mindestens eine Quelle ist erforderlich, um die Wissensbasis für den KI-Agenten zu bilden.
Diese Workflows sollten zuerst ausgeführt werden, um Wissen in den Agenten zu laden, bevor Sie mit ihm interagieren. Sie können einen Zeitplan einrichten, um regelmäßig aktualisierte Daten gemäß Ihren Anforderungen zu erhalten. Dies kann über das Aktionsmenü der ersten Operation in Einstellungen > Zeitpläne erfolgen.
-
Daten-Upload-Dienstprogramm - JIRA-Ticket zu Azure-Index
Dieser Workflow ruft Probleme aus Jira ab und führt dann den Workflow
Dienstprogramm - Azure-Daten-Upload und -Indexaus, um Probleme in Azure Blob Storage hochzuladen und sie im Azure AI-Suchindex zu indizieren.Die anfängliche Operation ist
Haupt - JIRA-Tickets hochladen. Die folgenden Felder werden abgerufen:"fields": [ "summary", "status", "assignee", "description", "reporter", "created", "updated", "priority", "issuetype", "components", "comment" ]Dieser Workflow kann so konfiguriert werden, dass er alle Probleme oder nur neue und aktualisierte Probleme abruft, indem die Jira-Projektvariablen verwendet werden.
-
Daten-Upload-Dienstprogramm - SF-Fälle zu Azure-Index
Dieser Workflow ruft Supportfälle aus Salesforce ab und führt dann den Workflow
Utility - Azure Data Upload and Indexaus, um die Fälle in Azure Blob Storage hochzuladen und sie im Azure AI Search-Index zu indizieren.Die erste Operation ist
Main - SF Cases Upload.In der Konfiguration der Salesforce-Abfrageaktivität ruft die folgende Abfrage Informationen zu Supportfällen nach Agent ab. Wenn Ihre Salesforce-Organisation diese Objekte und Felder nicht verwendet oder wenn Informationen zu Supportfällen in anderen Objekten und Feldern gespeichert sind, funktioniert dieser Workflow möglicherweise nicht richtig. Passen Sie die Abfrage in diesem Workflow an das Datenmodell Ihrer Salesforce-Organisation an:
SELECT Account.Name,
       Owner.Email,
       Owner.Name,
       (SELECT CreatedBy.Email,
               CreatedBy.Name,
               Id,
               CommentBody,
               CreatedDate,
               LastModifiedDate,
               LastModifiedBy.Email,
               LastModifiedBy.Name
        FROM   CaseComments),
       Id,
       CaseNumber,
       CreatedDate,
       Description,
       LastModifiedDate,
       Origin,
       Priority,
       Reason,
       Status,
       Subject,
       Type,
       CreatedBy.Email,
       CreatedBy.Name,
       LastModifiedBy.Email,
       LastModifiedBy.Name
FROM Case
Dieser Workflow kann so konfiguriert werden, dass er alle Fälle oder nur neue und aktualisierte Fälle abruft, indem die Salesforce-Projektvariablen verwendet werden.
-
Daten-Upload-Dienstprogramm - Confluence-Seiten zu Azure-Index
Dieser Workflow ruft Seiten aus Confluence ab und führt dann den Workflow
Utility - Azure Data Upload and Indexaus, um Dokumente in Azure Blob Storage hochzuladen und sie im Azure AI Search-Index zu indizieren.Die erste Operation ist
Main - Load Confluence Pages.Dieser Workflow ruft bei jeder Ausführung alle Confluence-Seiten ab.
-
Daten-Upload-Dienstprogramm - Google Drive zu Azure Blob
Dieser Workflow ruft Dateien aus Google Drive ab und führt dann den Workflow
Utility - Azure Data Upload and Indexaus, um sie im Azure AI Search-Index zu indizieren.Die erste Operation ist
Main - Google Drive Upload.Unterstützte Dateitypen sind Google Docs, Google Tabellen und solche, die von der Azure Storage Blob-Indizierung unterstützt werden.
Die maximal unterstützten Dateigrößen sind als maximale Blob-Größe in den Grenzen des Azure AI Search Indexers für Ihre AI-Suchdienststufe aufgeführt. Zum Beispiel beträgt das Limit für die Basisstufe 16 MB; für S1 beträgt das Limit 128 MB.
Dieser Workflow kann so konfiguriert werden, dass alle Dateien oder nur neue und aktualisierte Dateien abgerufen werden, indem die Google Drive-Projektvariablen verwendet werden.
-
Dienstprogramm - Azure-Daten-Upload und Indizierung
Dies ist ein gängiger Dienstprogramm-Workflow, der von den
Data upload Utility-Workflows verwendet wird, um Daten in Azure Blob Storage hochzuladen und in Azure AI Search zu indizieren. -
Haupteingang - Slack API-Anforderungs-Handler
Dieser Workflow verwaltet eingehende Slack-Bot-Anfragen. Er wird über eine benutzerdefinierte Jitterbit-API ausgelöst, jedes Mal, wenn Ihr Team mit der Slack-Bot-Chat-Benutzeroberfläche interagiert (d. h. eine Slack-Nachricht an ihn sendet). Die Konfiguration der benutzerdefinierten Jitterbit-API wird in Erstellen der benutzerdefinierten Jitterbit-API weiter unten auf dieser Seite beschrieben.
Wenn Sie Slack nicht verwenden, kann dieser Workflow ignoriert werden und wird nicht ausgelöst. Um eine andere Chat-Benutzeroberfläche für Ihr Team zu verwenden, verwenden Sie den Workflow
Generic API Request Handler, der ebenfalls über eine benutzerdefinierte Jitterbit-API ausgelöst wird. -
Generischer API-Anforderungs-Handler
Dieser Workflow verarbeitet HTTP-API-Anfragen von jeder Anwendung. Um mit Ihren Anwendungen zu integrieren, erstellen Sie eine benutzerdefinierte Jitterbit-API, die die Operation
Generic API Request Handlerauslöst. Die URL dieser API kann dann von jeder Anwendung verwendet werden, um Anfragen zu senden und zu empfangen.Die Konfiguration der benutzerdefinierten Jitterbit-API wird in Erstellen der benutzerdefinierten Jitterbit-API weiter unten auf dieser Seite beschrieben.
Triggern Sie die Projekt-Workflows
Für den initialen Daten-Load führen Sie einen oder alle der Data upload Utility-Workflows aus, abhängig von Ihren Datenquellen. Dies kann über die Ausführen-Option des initialen Vorgangs erfolgen, die angezeigt wird, wenn Sie über den Vorgang fahren. Sie müssen den Vorgang in Zukunft erneut ausführen, wenn Ihre Daten aktualisiert werden.
Tipp
Möglicherweise möchten Sie die initialen Vorgänge in den Data upload Utility-Workflows nach einem Zeitplan planen, um regelmäßig aktualisierte Daten zu erhalten. Dies kann über das Aktionsmenü des Vorgangs in Einstellungen > Zeitpläne erfolgen.
Die beiden anderen Haupt-Workflows werden durch die benutzerdefinierten Jitterbit-APIs ausgelöst:
-
Main Entry - Slack API Request Handler: Dieser Workflow wird von Slack über die benutzerdefinierte APISlack Bot API Request Handlerausgelöst. Das Senden einer Direktnachricht an die Slack-App initiiert den Trigger der benutzerdefinierten API. -
Generic API Request Handler: Dieser Workflow wird von einer anderen Anwendung über die benutzerdefinierte APIGeneric API request Handlerausgelöst. Das Senden einer Anfrage an die konfigurierte API initiiert den Trigger der benutzerdefinierten API.
Alle anderen Workflows werden durch andere Operationen ausgelöst und sind nachgelagert zu den oben genannten. Sie sind nicht dafür gedacht, eigenständig ausgeführt zu werden.
Fehlerbehebung
Wenn Sie auf Probleme stoßen, überprüfen Sie die folgenden Protokolle für detaillierte Informationen zur Fehlerbehebung:
Für zusätzliche Unterstützung kontaktieren Sie Jitterbit-Support.