AS2-Kommunikation in Jitterbit EDI
Einführung
AS2 (Applicability Statement 2) ist ein Protokoll zum sicheren und zuverlässigen Austausch von Daten über das Internet und eine beliebte Methode für Unternehmen, EDI-Dokumente mit ihren Handelspartnern auszutauschen.
Wenn Ihr Partner einen AS2-Endpunkt anbietet, können Sie ihn verwenden, um Dokumente zu senden und zu empfangen, indem Sie eine AS2-Kommunikationseinstellung konfigurieren und diese zuweisen. Diese Seite zeigt Ihnen, wie Sie dies tun.
Erstellen einer AS2-Verbindung
Wichtig
Um die AS2-Kommunikation zu aktivieren, muss Ihr Partner seine Firewall so konfigurieren (auf die Zulassungsliste setzen), dass die IP-Adresse 40.71.22.62 (für Harmony-Konten in Nordamerika) oder 20.166.31.85 (für EMEA und APAC) für eingehende und ausgehende Kommunikation zugelassen wird.
Um eine AS2-Verbindung zu erstellen, folgen Sie diesen Schritten:
-
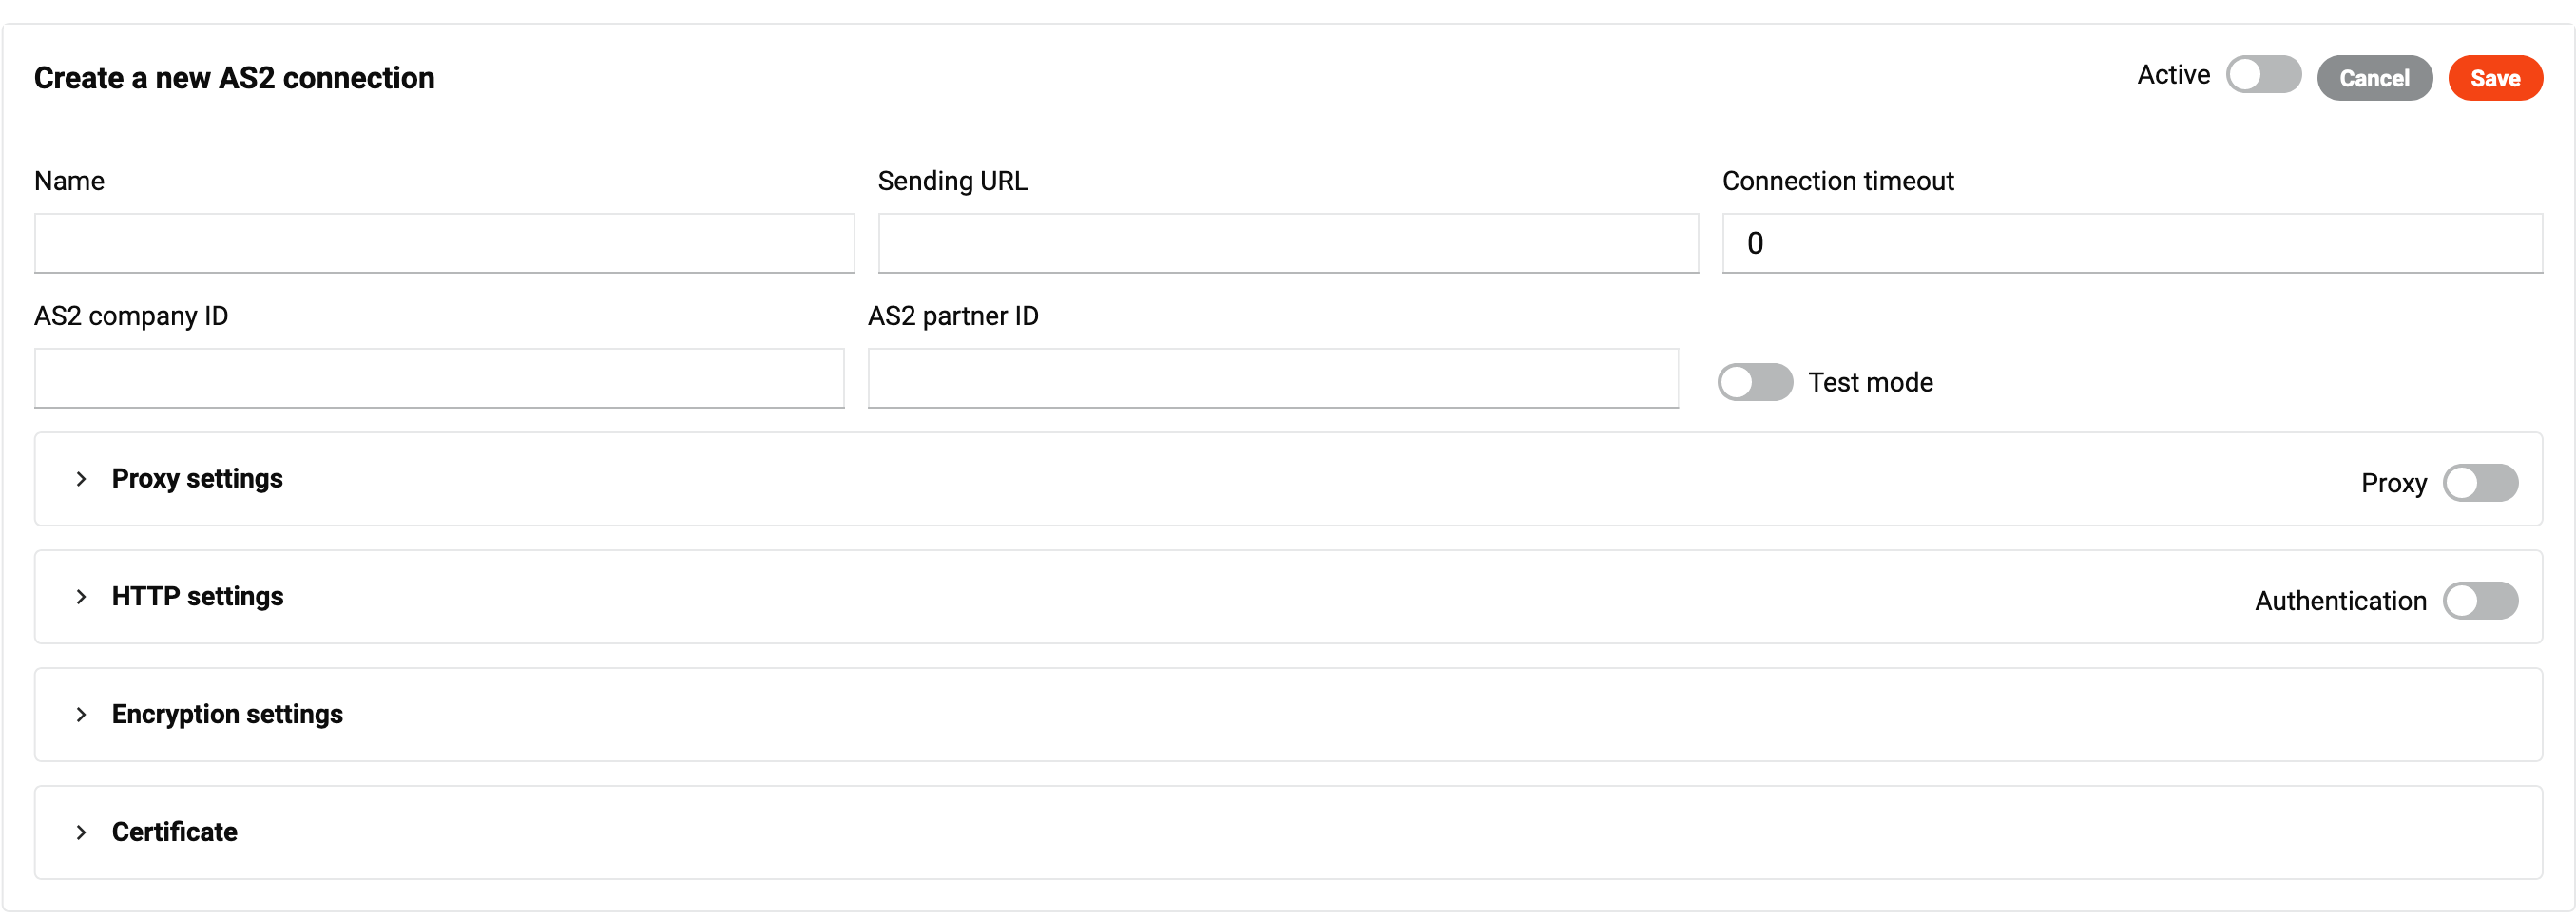
Klicken Sie auf die Schaltfläche Neu , und wählen Sie dann AS2-Verbindung. Das Panel Eine neue AS2-Verbindung erstellen erscheint (hervorgehoben):
-
Stellen Sie die folgenden Schalter ein:
-
Überprüfung auf doppelte Transaktionen: Aktivieren Sie dies, um auf doppelte Transaktionen zu prüfen, die über diese Verbindung übertragen werden.
Hinweis
Dies gilt nur für EDI und nicht für EDIXml oder XCBL-Dokumente.
-
Aktiv: Aktivieren Sie dies, um die Verbindung zur Nutzung verfügbar zu machen.
-
-
Geben Sie in der Gruppe der Grundeinstellungen Werte für die folgenden Felder ein:

-
Name: Der Verbindungsname.
-
Sendungs-URL: Die vom Handelspartner bereitgestellte URL zum Senden von Dokumenten über die AS2-Verbindung. Sie muss als Teil der AS2-Konfiguration enthalten sein.
Empfangs-URLs mit IP-Adressen für Firewall-Zulassungslisten
Sie müssen Ihrem Handelspartner auch eine Empfangs-URL bereitstellen, die der Region Ihres Harmony-Kontos entspricht, und sicherstellen, dass die entsprechende IP-Adresse in der Firewall-Zulassungsliste Ihres Partners für sowohl eingehende als auch ausgehende Kommunikation enthalten ist:
Region Empfangs-URL IP-Adresse Nordamerika na.as2.jitterbitedi.com/receiver.aspx40.71.22.62 EMEA emea.as2.jitterbitedi.com/receiver.aspx20.166.31.85 APAC emea.as2.jitterbitedi.com/receiver.aspx(APAC verwendet die URL von EMEA.)20.166.31.85 -
Verbindungszeitüberschreitung: Die anfängliche Verbindungszeitüberschreitung.
-
AS2 Firmen-ID: Der AS2 Firmenbezeichner.
-
AS2 Partner-ID: Der AS2 Partnerbezeichner.
-
-
(Optional) Erweitern Sie die Registerkarte Proxy-Einstellungen, und setzen Sie Werte für die folgenden Felder:

-
Proxy: Aktivieren Sie den Proxy-Server.
-
Adresse: Die Adresse des Proxy-Servers.
-
Domäne: Die Domäne des Proxy-Servers.
-
Benutzername: Der Benutzername für den Proxy-Server.
-
Passwort: Das Passwort für den Proxy-Server.
-
-
(Optional) Erweitern Sie die Registerkarte HTTP-Einstellungen, und setzen Sie Werte für die folgenden Felder:

-
Authentifizierung: Aktivieren Sie die HTTP-Authentifizierung.
-
Authentifizierungstyp: Der Typ der HTTP-Authentifizierung. Wählen Sie einen der folgenden:
-
Authentifizierungsbenutzer: Der Benutzername für die HTTP-Authentifizierung.
-
Authentifizierungs-Passwort: Das Passwort für die HTTP-Authentifizierung.
-
Betreff: Der Betreff, der den Zweck des Endpunkts beschreibt.
-
-
(Optional) Erweitern Sie die Registerkarte Verschlüsselungseinstellungen, und setzen Sie Werte für die folgenden Felder:

-
Signaturalgorithmus: Der Signaturalgorithmus.
-
Verschlüsselungsalgorithmus: Der Verschlüsselungsalgorithmus.
-
Signieren: Aktivieren, um nicht signierte eingehende Nachrichten abzulehnen.
-
Verschlüsseln: Aktivieren, um unverschlüsselte eingehende Nachrichten abzulehnen.
-
MDN anfordern: Eine MDN (Nachrichtenverteilungsbenachrichtigung) anfordern.
-
Signierte MDN anfordern: Eine signierte MDN anfordern.
-
Komprimieren: Aktivieren, um ZLIB-Komprimierung zu verwenden.
-
-
(Optional) Erweitern Sie die Zertifikat-Registerkarte:

Die Registerkarte hat zwei Bereiche:
-
Meine Zertifikate: Zertifikate für Ihre Organisation. Dies sind private Zertifikate, die im
pfx-Format vorliegen müssen und nur private Schlüssel enthalten. -
Partnerzertifikate: Zertifikate für den Handelspartner. Dies sind öffentliche Zertifikate, die im
.cer-Format vorliegen müssen und nur öffentliche Schlüssel enthalten.
Hochgeladene oder erstellte Zertifikate erscheinen als Zeile, die den Namen, das Ablaufdatum und die folgenden Symbole zeigt:
-
Zuweisen: Weisen Sie das Zertifikat der Verbindung zu.
-
Herunterladen: Laden Sie das Zertifikat als
.cer-Datei herunter. -
Löschen: Löschen Sie das Zertifikat. Um die Aktion zu bestätigen, geben Sie das Wort DELETE in das Textfeld des Dialogs ein und klicken Sie dann auf die Schaltfläche Löschen.
Um ein Zertifikat hochzuladen, befolgen Sie diese Schritte:
-
Klicken Sie auf das Hochladen-Symbol für eine der Parteien.
-
Geben Sie im sich öffnenden Panel Werte für Zertifikatname und Passwort: ein:

-
Klicken Sie auf die Schaltfläche Datei hochladen und wählen Sie die Zertifikatdatei aus. (Akzeptierte Dateitypen sind
.cerund.pfx.) -
Klicken Sie im Panel Zertifikat hochladen auf die Schaltfläche Speichern.
Um ein Zertifikat für Ihre Organisation zu erstellen, befolgen Sie diese Schritte:
-
Klicken Sie auf das Erstellen-Symbol.
-
In dem sich öffnenden Panel geben Sie Werte für Zertifikatname und Gültigkeitsjahre ein.

-
Klicken Sie im Panel Neues Zertifikat erstellen auf die Schaltfläche Speichern.
-
-
(Optional) Klicken Sie im Panel Neue AS2-Verbindung erstellen auf die Schaltfläche Verbindung testen, um die AS2-Konnektivität eines Partners, die Anwesenheit des Zertifikats und die erfolgreiche Nachrichtenübertragung mit MDN-Empfang zu bestätigen.
-
Klicken Sie im Panel Neue AS2-Verbindung erstellen auf die Schaltfläche Speichern. Die neue Verbindung ist nun bereit, um sie einem Partner zu zuweisen.