Einführung in den App Builder - Lektion 6: Binding
Dies ist die sechste Lektion der Einführung in den App Builder Tutorialreihe.
In dieser Lektion lernen wir ein grundlegendes Konzept im App Builder kennen: Binding. Wir werden es kennenlernen, während wir eine wichtige Seite in unserer Northwinds-Anwendung erstellen.
Seiten mit mehreren Panels: Die Bestellseite
Alle Seiten, die wir bisher erstellt haben, hatten nur ein Panel. Wir werden sehen, wie wir Seiten mit mehreren Panels erstellen können und wie diese mithilfe von Binding zusammenarbeiten.
Um zu beginnen, erstellen wir eine Seite namens Bestellungen.
-
Verwenden Sie die gleichen Schritte, die wir in den vorherigen Lektionen befolgt haben, um die neue Seite Bestellungen zu erstellen. Sie sollte vorerst ein Vollseiten-Panel haben, wir fügen später mehr hinzu.
-
Sobald der App Builder die Seite erstellt hat, fügen Sie ein Panel vom Typ Grid hinzu, wobei Bestellung (Quelle) als Panelquelle verwendet wird. Sie können den App Builder das Panel automatisch erstellen lassen, wir werden die Steuerelemente später bearbeiten. Wenn Sie die Vorschau der Seite besuchen, sehen Sie, dass sie einfach alle im Datenbank vorhandenen Bestellungen auflistet.
Jetzt fügen wir der Seite Bestellungen ein zweites Panel hinzu. Unser Ziel ist es, ein anfängliches Panel zu haben, das alle Bestellungen auflistet, während die Details jeder Bestellung in anderen Panels auf derselben Seite angezeigt werden. So wird beim Klicken des Endbenutzers auf eine Bestellung automatisch in den anderen Panels die Anzeige der Details zur ausgewählten Bestellung aktualisiert.
-
Navigieren Sie zur Seite Bestellungen und klicken Sie auf Seite anzeigen, um eine Vorschau anzuzeigen.
-
Greifen Sie auf den Live-Designer zu.
-
Wenn der Live-Designer geöffnet wird, klicken Sie auf die Schaltfläche + Panel. Der Dialog Panel erstellen öffnet sich.
-
Wählen Sie Grid als Paneltyp und klicken Sie auf Weiter.
-
Wählen Sie BestellDetail (Quelle) als Panelquelle und klicken Sie auf Weiter.
-
Sie können den App Builder das Panel automatisch erstellen lassen, wir werden die Steuerelemente später bearbeiten. Klicken Sie auf Weiter und dann auf Fertigstellen.
Da die Bestellung-Tabelle einen Fremdschlüssel hat, der mit der BestellDetail-Tabelle verbunden ist, und die beiden Panels Daten aus Regeln ziehen, die auf diesen beiden Tabellen basieren, bindet der App Builder sie automatisch. Das bedeutet, dass jetzt, wenn Sie die Vorschau der Seite Bestellungen besuchen, das Klicken auf eine Zeile einer Bestellung im Bestellungen-Panel das Bestelldetails-Panel automatisch mit den Details der ausgewählten Bestellung füllt.
Fügen Sie eine Bindung manuell hinzu
Wenn zwei Panels auf derselben Seite Daten aus Regeln abrufen, die verbindende Fremdschlüssel haben, bindet der App Builder sie automatisch. Wenn Sie jedoch zwei Panels manuell binden müssen, gehen Sie wie folgt vor:
-
Navigieren Sie zu der Seite mit den Panels, die Sie binden möchten.
-
Klicken Sie auf das Panel, das automatisch mit den Details der Benutzerauswahlen in einem anderen Panel gefüllt werden soll.
-
Im Tab Panel finden Sie das Feld Elternpanel & Bindung.
-
Verwenden Sie das Menü, um das Elternpanel auszuwählen.
-
Klicken Sie auf die Schaltfläche mit dem Bindungssymbol. Der Dialog Bindungsspalten öffnet sich.
-
Klicken Sie auf + Bindung und verwenden Sie die Menüs, um auszuwählen:
-
Typ: Der Typ der Bindung.
-
Kindspalte: Wählen Sie aus, welche Spalte aus der Basisregel des Kindpanels das Kind sein soll.
-
Elternspalte: Wählen Sie aus, welche Spalte aus der Basisregel des Elternpanels das Elternteil sein soll.
-
-
Klicken Sie auf das Häkchen-Symbol, um zu bestätigen und das Fenster zu schließen.
-
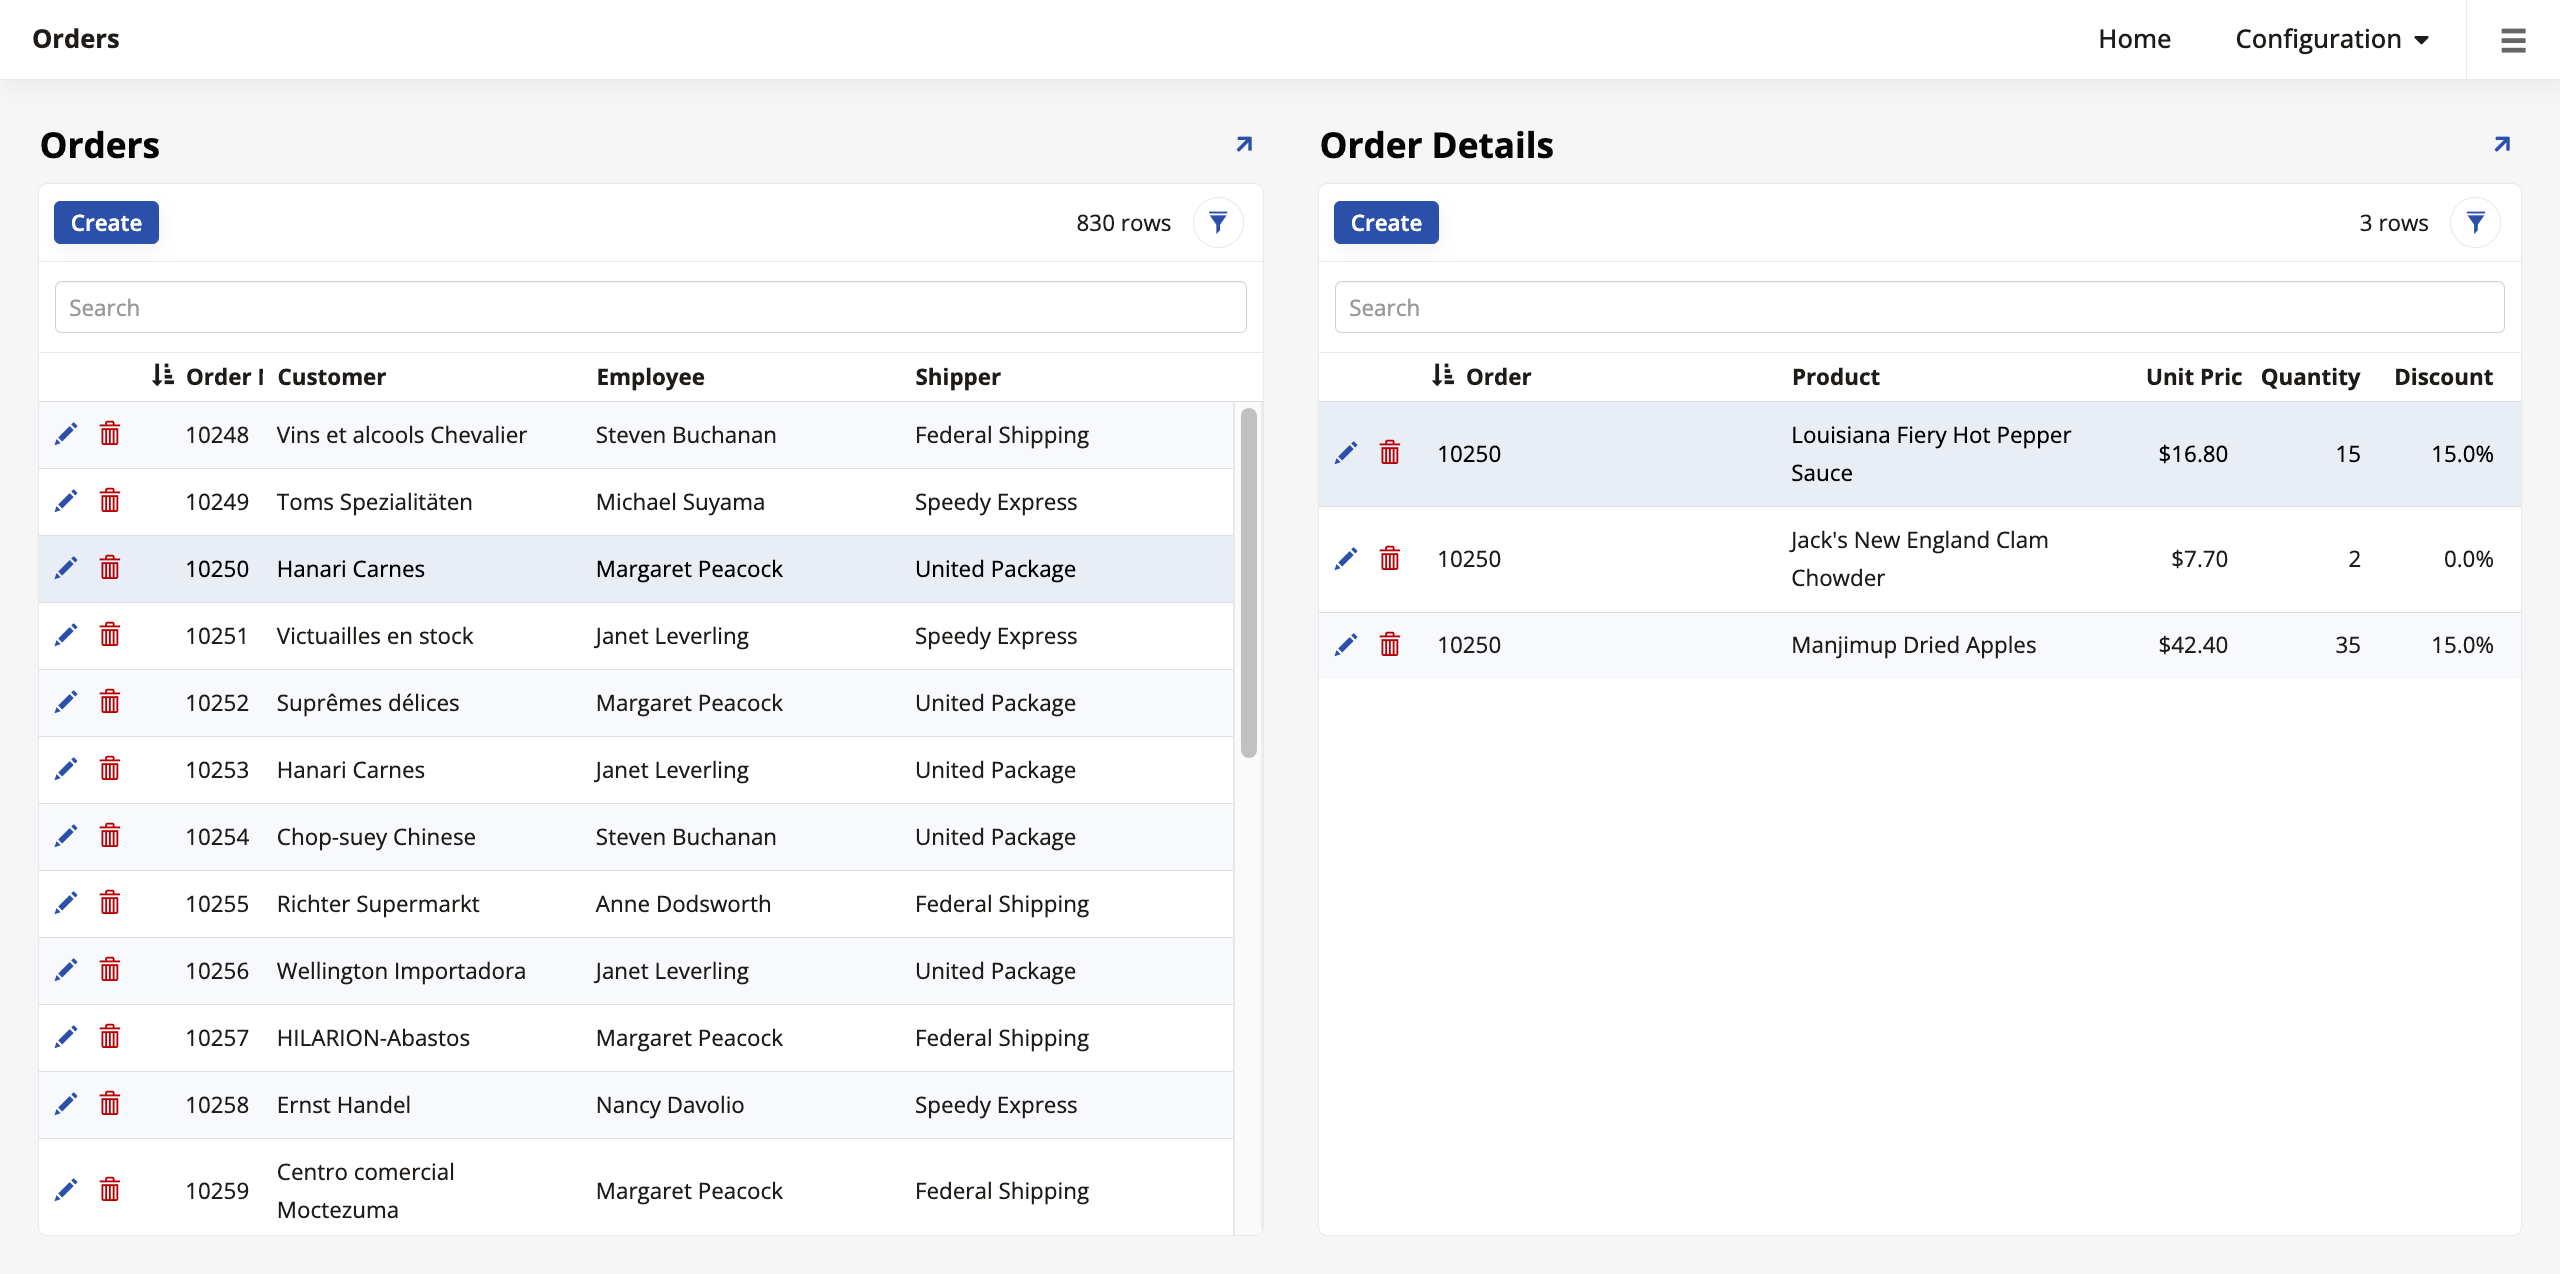
Klicken Sie auf Seite anzeigen, um die Bestellungen-Seite jetzt mit zwei Panels in der Vorschau anzuzeigen. Testen Sie, indem Sie verschiedene Zeilen im Elternpanel auswählen und sehen Sie, wie sich die Informationen im Kindpanel entsprechend ändern:
Anzeigewerte bearbeiten
Beachten Sie, dass das Panel Bestelldetails nur die Stückpreise jedes Artikels anzeigt. Allerdings wurden mehrere Artikel in großen Mengen gekauft. Darüber hinaus wurden mehrere von ihnen mit Rabatten gekauft. Lassen Sie uns das Panel so ändern, dass es die Preisgesamtsummen berechnet und anzeigt.
-
Gehen Sie zu App Workbench > Regeln, greifen Sie auf die Regel OrderDetail (Quelle) zu und klicken Sie auf Bearbeiten. Klicken Sie im Tab Spalten auf + Spalte.
-
Um den Stückpreis mit der Menge zu multiplizieren und den Rabatt abzuziehen, benötigen wir den folgenden Ausdruck:
OD.UnitPrice*OD.Quantity*(1-OD.Discount) -
Geben Sie im Feld Alias
Zeilenbetragein. Klicken Sie auf Speichern. -
Verwenden Sie in der aktualisierten Tabelle der Spalten die Logische Spalte, um das neue Feld Zeilenbetrag als Währung zu formatieren. Nutzen Sie diese Gelegenheit auch, um die Spalte Stückpreis als Währung und die Spalte Rabatt als Prozent zu formatieren.
-
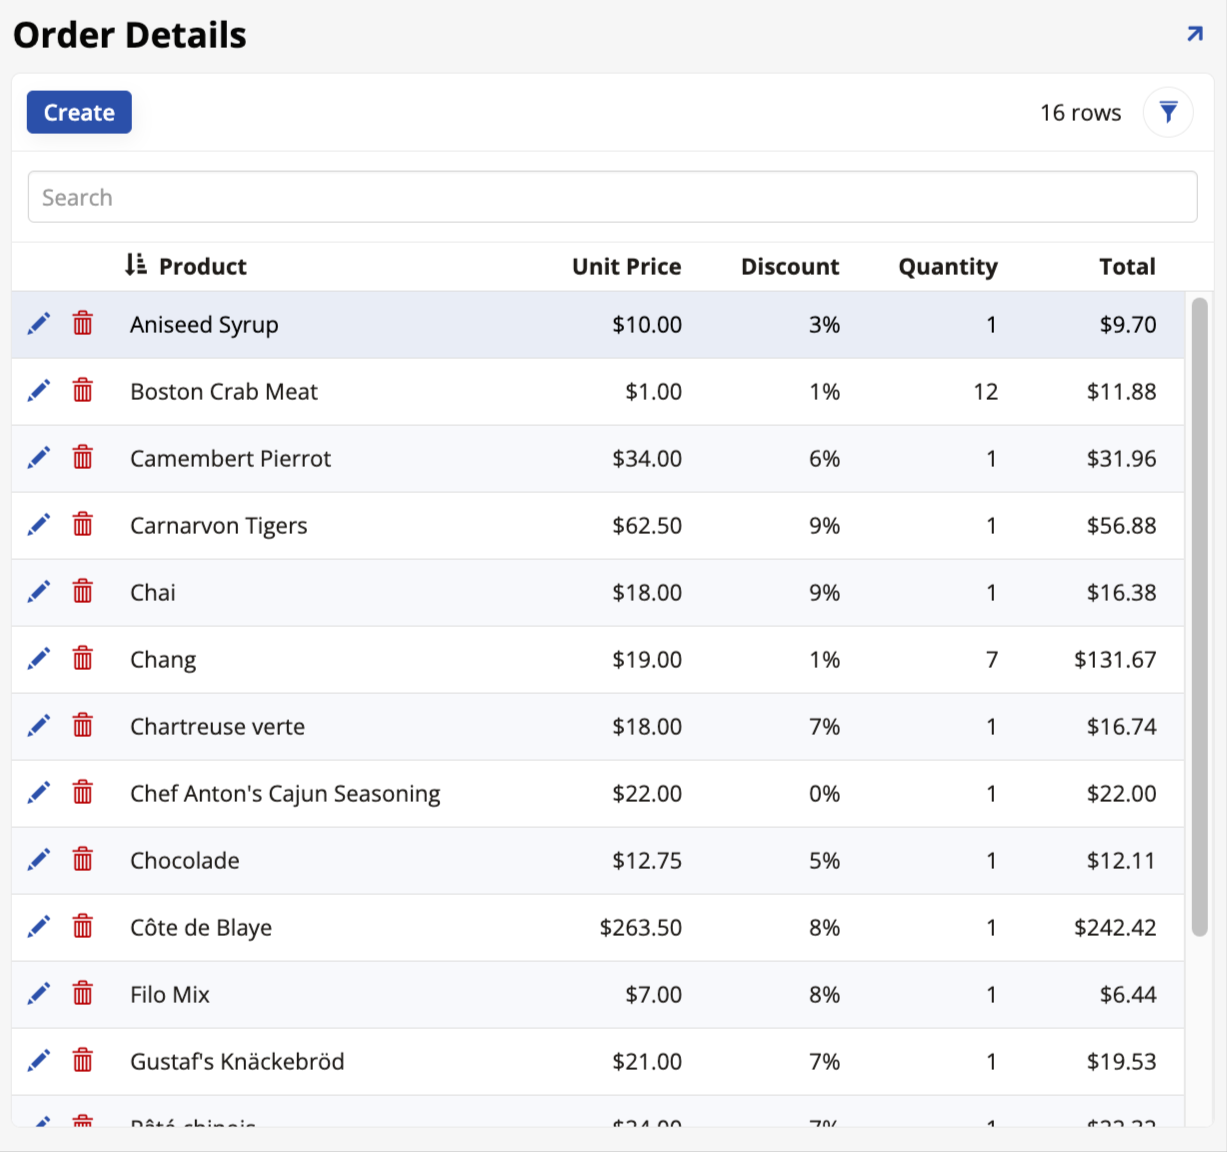
Klicken Sie auf Ergebnisse, um die angezeigten Werte zu sehen. Gehen Sie nun zurück zum Bearbeitungsbildschirm der Bestellungen-Seite und fügen Sie die neue Gesamtbetrag-Steuerung zum Bestelldetails-Panel hinzu, und geben Sie ihr den Namen Total. Nachdem Sie das getan haben, besuchen Sie erneut die Vorschau der Bestellungen-Seite. Das Bestelldetails-Panel zeigt jetzt die Summen am Ende jeder Zeile an:
Jetzt, da wir einen Gesamtbetrag für jeden einzelnen Artikel haben, fügen wir auch eine weitere Steuerung hinzu, um den Gesamtpreis einer gesamten Bestellung anzuzeigen:
-
Gehen Sie zur Vorschau der Bestellungen-Seite und greifen Sie auf den Live-Designer zu.
-
Wählen Sie die Total-Steuerung im Bestelldetails-Panel aus, damit der Live-Designer Bearbeitungsoptionen dafür anzeigt.
-
Gehen Sie zum Tab Steuereigenschaften, suchen Sie das Feld Aggregatfunktion und klicken Sie auf Summe.
-
Klicken Sie auf Speichern.
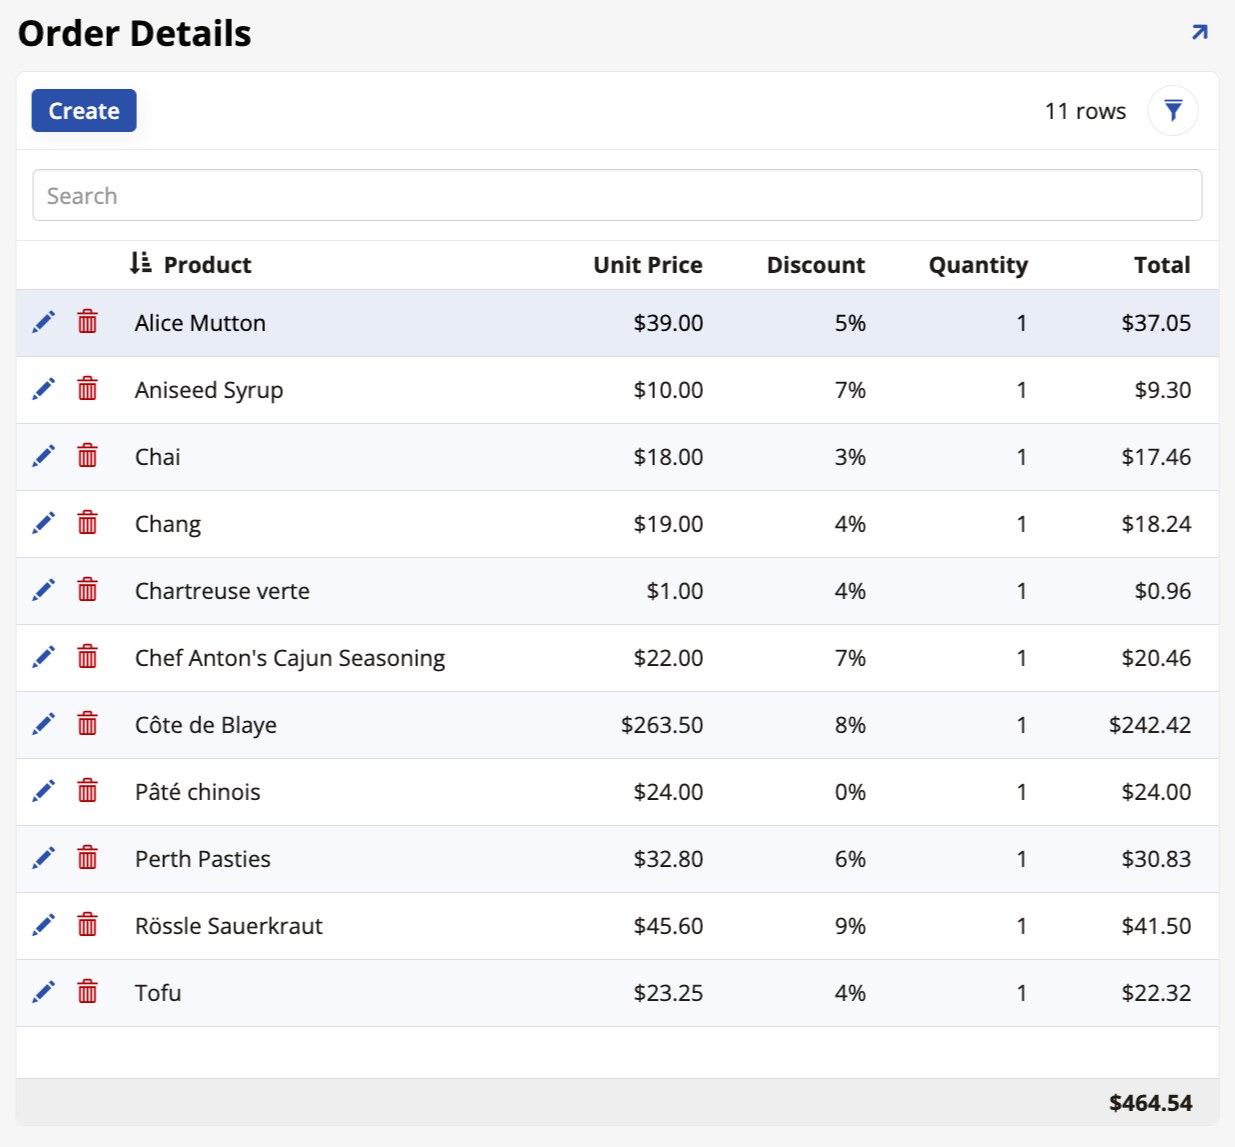
Jetzt zeigt das Bestelldetails-Panel den Gesamtpreis für eine gesamte Bestellung am Ende der Total-Spalte an:
Eine Steuerung schreibgeschützt machen
Wir möchten nicht, dass Endbenutzer alle Steuerungen auf einer Seite bearbeiten können. Zum Beispiel können wir auf der Bestellungen-Seite, die wir erstellen, nicht zulassen, dass Benutzer den Preis eines Artikels bearbeiten. Befolgen Sie diese Schritte:
-
Navigieren Sie zur Vorschau der Bestellungen-Seite und greifen Sie auf den Live-Designer zu.
-
Klicken Sie auf die Einzelpreis-Steuerung im Bestelldetails-Panel, damit der Live-Designer Bearbeitungsoptionen dafür anzeigt.
-
Gehen Sie zum Tab Position & Breite, suchen Sie das Feld Bearbeitungsoptionen und klicken Sie auf Schreibgeschützt.
-
Klicken Sie auf Speichern.
Wenn Sie zur Seitenvorschau zurückkehren, beachten Sie, dass das Klicken auf das Bearbeitungssymbol in einer der Zeilen des Bestelldetails-Panels nicht mehr ermöglicht, die Einzelpreis-Spalte zu bearbeiten.
Verbesserungen der Bestellungen-Seite
Trotz der Verbesserungen, die wir bereits vorgenommen haben, ist die Bestellungen-Seite immer noch nicht sehr benutzerfreundlich. Das Bestellungen-Panel hat mehr Steuerungen, als bequem auf dem Bildschirm gelesen werden können, und einige wichtige Informationen, die Endbenutzer gerne wissen würden, sind auf der Seite nicht zu finden. Lassen Sie uns weiter an dieser Seite arbeiten.
Versandinformationen-Panel
Das Bestellungen-Panel hat zu viele Steuerelemente. Werfen Sie einen Blick darauf in der Vorschau der Bestellungen-Seite. Es gibt so viele Steuerelemente, dass sie nicht auf den Bildschirm passen und es nicht möglich ist, alles bequem zu lesen.
Hinweis
Wenn Ihr Bestellungen-Panel nicht so viele Steuerelemente hat, bedeutet das, dass nicht alle angezeigt werden. Navigieren Sie zum Bearbeitungsbildschirm der Bestellungen-Seite und wählen Sie das Bestellungen-Panel aus. Im Tab Panel finden Sie ein Feld mit der Bezeichnung Einstellungen für responsives Design. Wenn die Option Spaltenauswahl-Service ausgewählt ist, versucht der App Builder zu bestimmen, welche Spalten am wichtigsten sind, um angezeigt zu werden, und lässt andere weg. Wenn Sie stattdessen die Option Scrollen wählen, erscheint ein Scrollbalken in der Seitenvorschau.
Um unsere Anwendung benutzerfreundlicher zu gestalten, fügen wir der Seite weitere Panels hinzu, um die Informationen besser zu verteilen.
-
Navigieren Sie zum Bearbeitungsbildschirm der Bestellungen-Seite und klicken Sie auf + Panel hinzufügen.
-
Sobald es erscheint, klicken Sie auf + Paneltyp wählen.
-
Diesmal sollte der Paneltyp Formular sein. Die Panelquelle sollte Bestellung (Quelle) sein, genau wie beim Haupt-Bestellungen-Panel. Wählen Sie diesmal jedoch Manuell wählen für die Steuerelemente des neuen Panels. Wenn der Bildschirm Spalten wählen erscheint, wählen Sie alle Spalten außer Bestellnummer und Bestelldatum aus.
-
Klicken Sie auf Weiter und Veröffentlichen.
-
Wenn der App Builder die Seite aktualisiert, ändern Sie den Namen des neuen Panels in Versandinformationen und klicken Sie auf Speichern.
Der App Builder wird dieses neue Panel automatisch mit dem Bestellungen-Panel über die Spalte Bestell-ID verknüpfen. Da wir nun ein neues Panel zur Anzeige der Versanddetails haben, muss das Haupt-Bestellungen-Panel nicht mehr all diese Steuerelemente enthalten. Besuchen Sie den Bearbeitungsbildschirm des Bestellungen-Panels und reduzieren Sie die Anzahl der Steuerelemente dort, indem Sie nur Bestellnummer und Bestelldatum belassen, die beiden, die auch nicht im Versandinformationen-Panel vorhanden sind.
Das neue Versandinformationen-Panel hat jedoch immer noch viele Steuerelemente, daher werden wir sie etwas besser organisieren:
-
Im Bearbeitungsbildschirm der Bestellungen-Seite wählen Sie das Panel Versandinformationen aus und klicken Sie auf Steuerelemente.
-
Wenn wir uns alle verfügbaren Steuerelemente ansehen, können wir sie in zwei Gruppen unterteilen, also machen wir das. Klicken Sie auf + Steuerelement.
-
Lassen Sie das Feld Spalte aus, da wir keine neuen Steuerelemente benötigen, wir werden nur die vorhandenen organisieren. Wählen Sie im Feld Steuerelementtyp Akkordeon aus. Geben Sie im Feld Name
Versandinfoein. -
Klicken Sie auf Weiter und Fertigstellen.
-
Wiederholen Sie die Schritte 2 bis 4 und erstellen Sie eine weitere Gruppe mit dem Namen
Daten & Kosten.
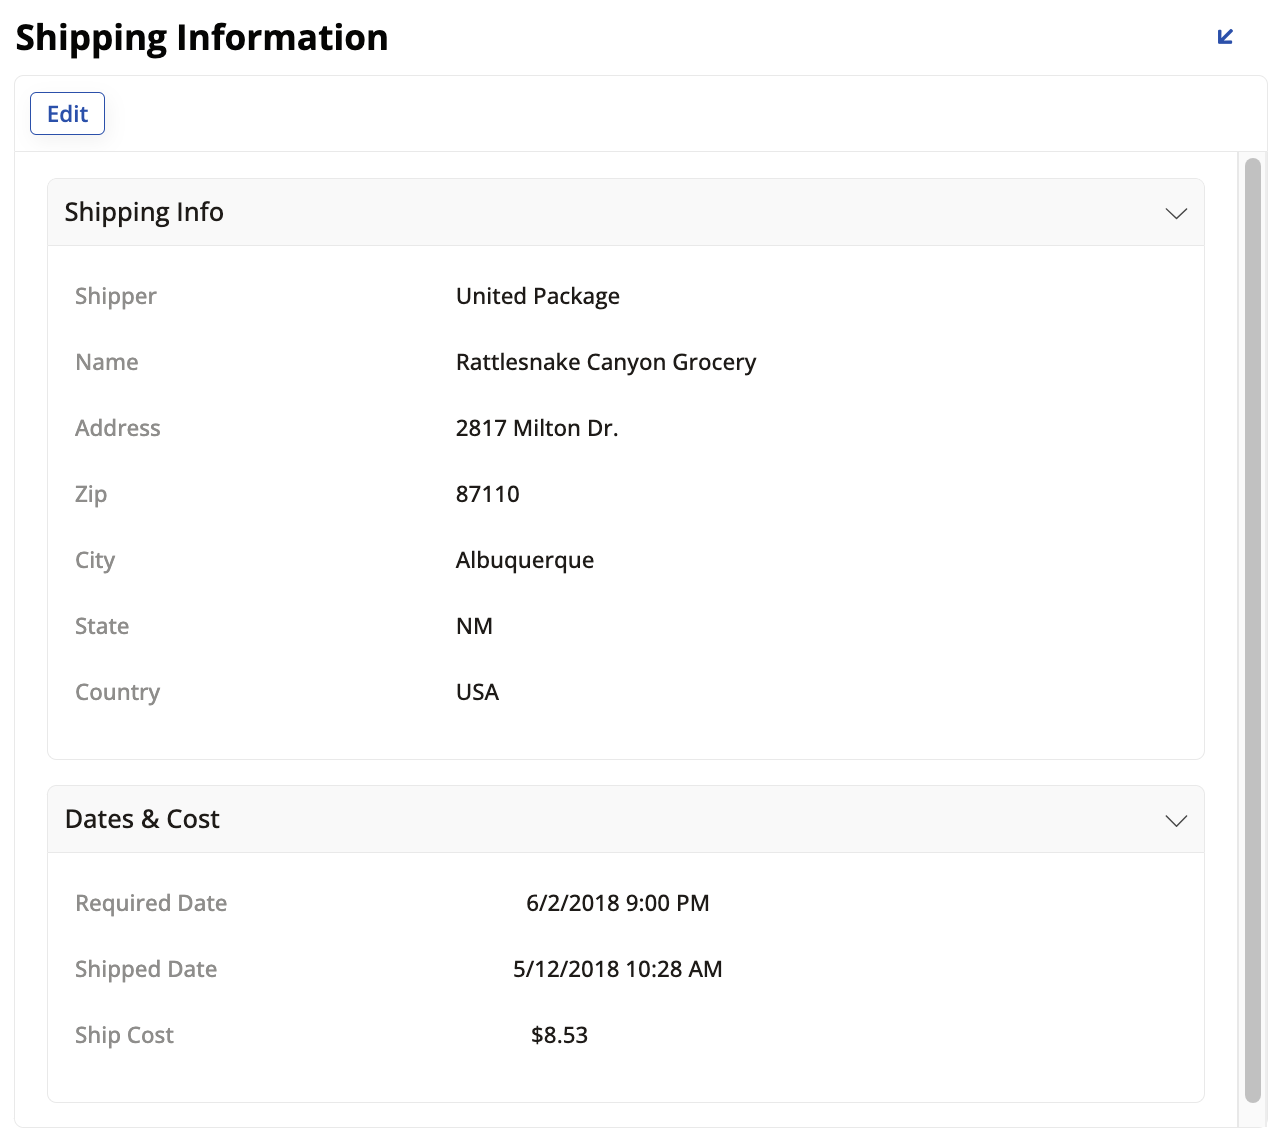
Wenn der App Builder Sie zur Liste der Steuerelemente zurückbringt, sehen Sie, dass die beiden Gruppen jetzt aufgelistet sind. Gehen Sie alle Steuerelemente durch und entscheiden Sie, welches davon in jede Gruppe gehört, indem Sie deren Elternteil auf eine der beiden ändern. Wenn Sie fertig sind und zur Vorschau der Bestellungen-Seite zurückkehren, sollte das Panel Versandinformationen viel organisierter aussehen:
Kundeninformationspanel
Lassen Sie uns ein weiteres Panel zur Bestellungen-Seite hinzufügen, da es derzeit keine Informationen darüber anzeigt, wer die Bestellungen aufgegeben hat. Es zeigt uns, was gekauft wurde, aber nicht, wer es gekauft hat.
-
Navigieren Sie zum Bearbeitungsbildschirm der Bestellungen-Seite und klicken Sie auf + Panel hinzufügen.
-
Sobald es erscheint, klicken Sie auf + Paneltyp wählen.
-
Der Paneltyp sollte wieder Formular sein. Die Panelquelle sollte Kunde (Quelle) sein, da wir Informationen darüber möchten, wer die Bestellung aufgibt. Sie können den App Builder alle Steuerelemente automatisch auswählen lassen, da wir sie in den nächsten Schritten selbst organisieren werden.
-
Klicken Sie auf Weiter und Veröffentlichen. Der App Builder wird dieses neue Panel automatisch mit dem Hauptpanel Bestellungen verbinden, wobei CustomerID als Bindungskriterium verwendet wird.
-
Wenn der App Builder die Seite aktualisiert, ändern Sie den Namen des neuen Panels in Kundeninformationen und klicken Sie auf Speichern.
-
Jetzt lassen Sie uns die Steuerelemente im neuen Panel organisieren. Gehen Sie zu seinem Bearbeitungsbildschirm und klicken Sie auf + Steuerelement.
-
Wählen Sie diesmal jedoch einen anderen Typ von Organizer aus. Wählen Sie im Feld Control Type Tab aus. Geben Sie diesem ersten Tab den Namen
Customer. -
Wiederholen Sie die Schritte 6 und 7, um einen weiteren Tab mit dem Namen
Contactzu erstellen. -
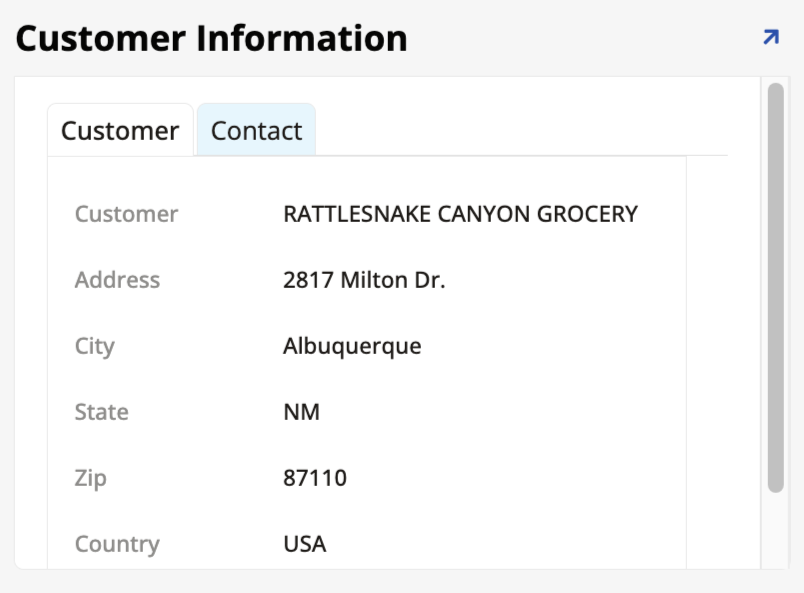
Wenn die neuen Tabs bereit sind, gehen Sie die Steuerelemente durch und verteilen Sie sie auf die beiden Tabs. Welche Steuerelemente passen Ihrer Meinung nach am besten unter jeden einzelnen? Wenn Sie fertig sind, besuchen Sie die Vorschau der Orders-Seite, und das Customer Information-Panel wird die beiden von Ihnen erstellten Tabs enthalten:
Verwenden Sie Panelgruppen, um Ihre Seite zu organisieren
Obwohl wir gebundene Panels verwenden konnten, um die Informationen auf unserer Orders-Seite zu unterteilen, haben wir jetzt ein neues Problem, da die vier Panels um Platz auf dem Bildschirm kämpfen und es momentan nicht sehr lesbar ist. Wir werden dieses Problem mit Panelgruppen beheben, mit denen wir Panels auf unseren Seiten organisieren können, um das Erscheinungsbild zu verbessern.
-
Klicken Sie im Bearbeitungsbildschirm der Orders-Seite auf die Schaltfläche Groups unter dem Panel Page Panel Layout.
-
Klicken Sie auf + Group.
-
Wählen Sie im Feld Parent Orders (Page), die Seite, die wir erstellen. Geben Sie der Gruppe den Namen
Top row. -
Wählen Sie im Feld Layout Side by side aus.
-
Klicken Sie auf das -Symbol, um zu speichern.
Als Nächstes verlassen Sie den Dialog zur Gruppenerstellung und wählen das Orders-Panel aus. Wir möchten es in der oberen Reihe haben, also suchen Sie im Tab Panel die Eigenschaft Position und wählen Sie im Feld Parent Top row aus. Klicken Sie auf Save. Wir möchten auch die Panels Shipping Information und Customer Information in der oberen Reihe haben, also wiederholen Sie den Vorgang für diese. Verwenden Sie die Zahlen im Feld Order, um zu bestimmen, welches Panel zuerst kommt.
Erstellen Sie nun eine zweite Gruppe, geben Sie ihr jedoch diesmal den Namen Bottom row. Sie wird das Panel Order Details enthalten, das wir so gestalten möchten, dass es den gesamten unteren Bereich des Bildschirms einnimmt. Stellen Sie daher sicher, dass die Zahl im Feld Order größer ist als das entsprechende Feld in der ersten Gruppe. Nachdem Sie die neue Gruppe erstellt haben, stellen Sie sicher, dass Sie sie als Parent des Panels Order Details zuweisen.
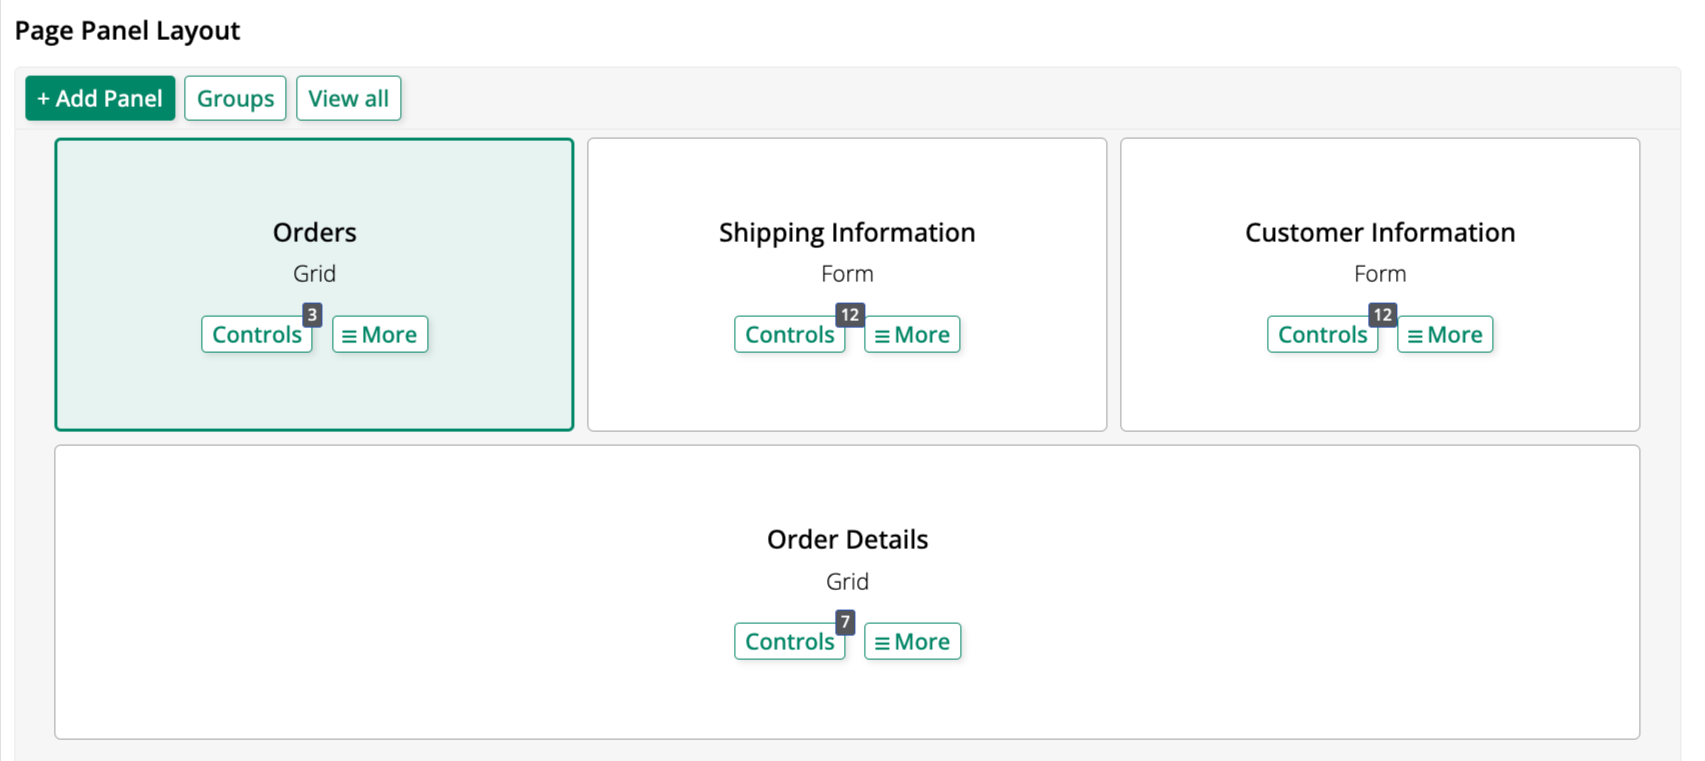
Schließlich ändern Sie im Bearbeitungsbildschirm der Bestellung die Layout-Einstellung auf Gestapelt. Der App Builder wird dann die beiden Gruppen entsprechend der numerischen Reihenfolge der beiden Gruppen stapeln. Wenn Sie die Seite aktualisieren, sollte das Seitenpanel-Layout so aussehen:
Und die Vorschau der Bestellungen-Seite sollte so aussehen:
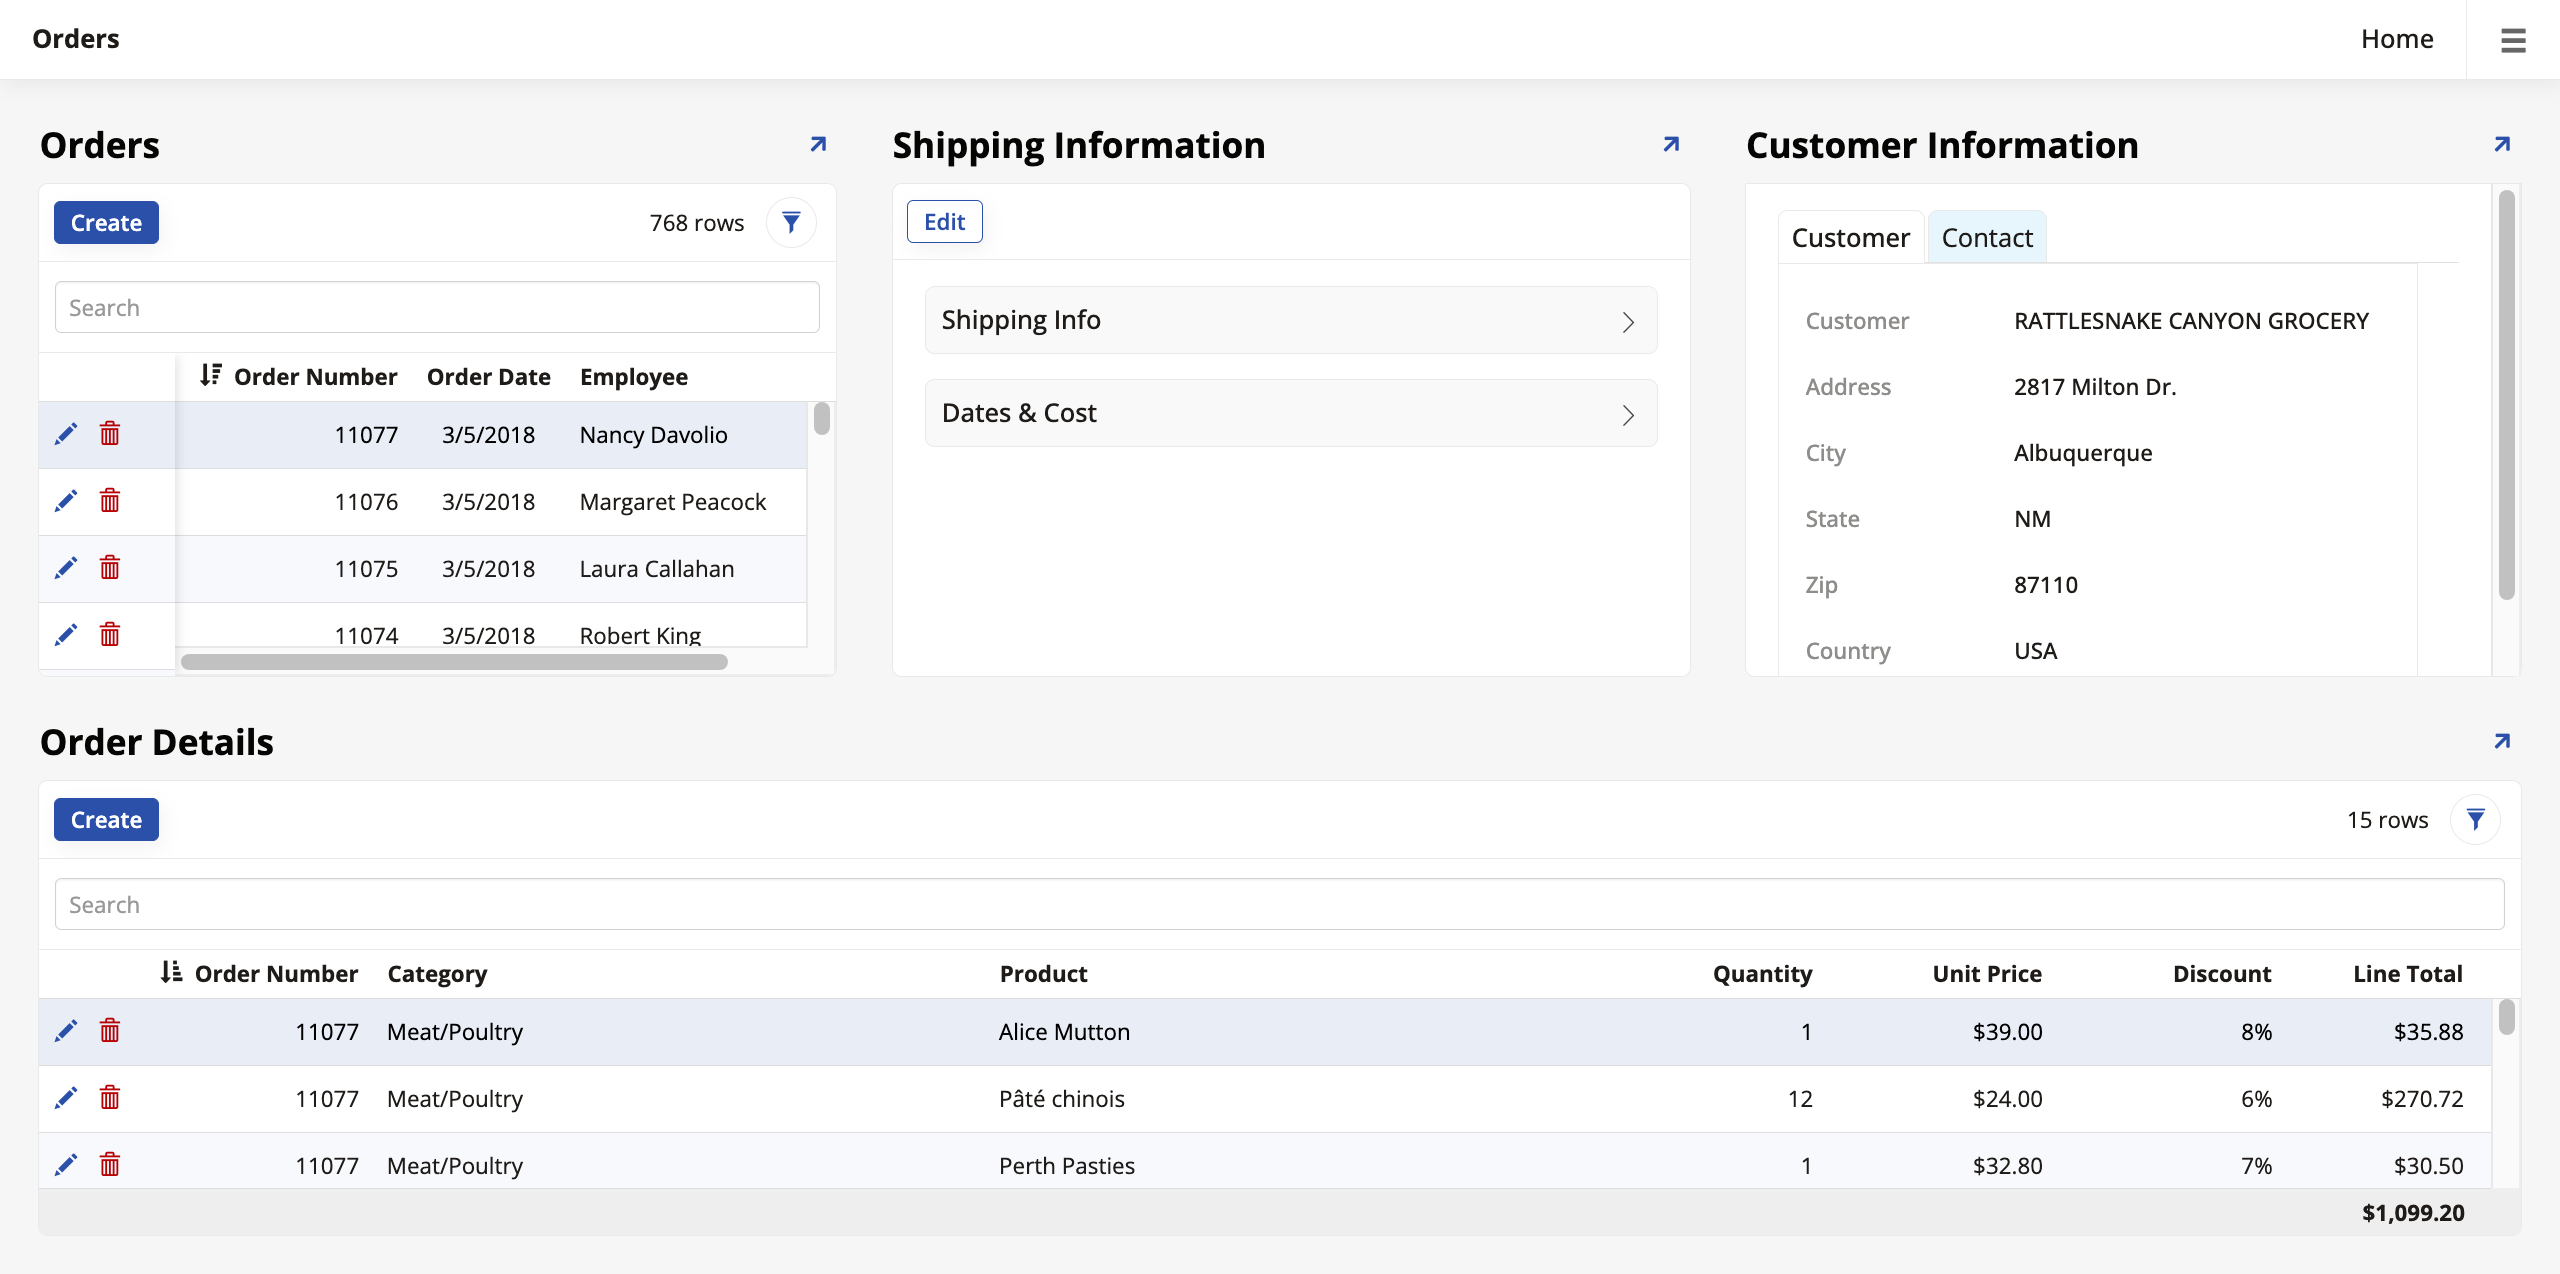
Welche weiteren Verbesserungen können Sie an der Bestellungen-Seite vornehmen? Zum Beispiel haben wir im obigen Screenshot eine Mitarbeiter-Steuerung zum Bestellungen-Panel hinzugefügt, damit die Benutzer sehen können, mit welchem Mitarbeiter ein Kunde bei der Bestellung gesprochen hat. Wie würden Sie diese Steuerung zu Ihrem Bestellungen-Panel hinzufügen? Hier sind einige weitere Ideen für Verbesserungen:
-
Werden alle Preise korrekt als Währungen angezeigt?
-
Werden alle Rabatte als Prozentsätze angezeigt?
-
Wie können Sie eine Kategorie-Steuerung zum Bestelldetails-Panel hinzufügen, wie im obigen Screenshot?
-
Sollten Sie Endbenutzern erlauben, die Einträge in den Versandinformationen und Kundeninformationen-Panels zu löschen? Wie können Sie verhindern, dass sie dies tun?
Überprüfung und Zusammenfassung
In dieser Lektion haben wir das Konzept des Bindens verwendet, um unsere Seiten reaktionsfähiger und vollständiger zu gestalten. In den nächsten Lektionen werden wir unser Verständnis der Entwicklungskonzepte im App Builder weiter verbessern. Fahren Sie fort mit Lektion 7: Mehr über Regeln.