Multi File Upload widget in Jitterbit App Builder
Description
The Multi File Upload widget uses the FilePond library. This widget allows multiple files to be uploaded synchronously or asynchronously by temporarily storing files in a single column. It uses the Save event to pull the file binary and move it to a separate table. From there, it can be processed further or moved to a local or network file system.
To download the Multi File Upload widget, see Multi File Upload in Widget downloads.
-
Original Creator: JP Fortier
-
Updated By: Andros Haggins & Shrey Kumar
-
Type: Control Widget
-
Parameters:
Parameter Name Default Translatable Description allowImagePreview1 No Enable (1) or disable (0) preview for image file types. allowMultiple1 No Enable (1) or disable (0) adding multiple files. forceReload1 No Enable (1) or disable (0) running a global refresh after a batch of files has been uploaded. runSave1 No Enable (1) or disable (0) running the save event for each file being uploaded to the Business Object's file column. allowFileSizeValidation1 No Enable (1) or disable (0) to allow use of the maxFileSize parameter setting. maxFileSize5000KB No Value for the largest file size the widget will allow. Must be expressed in kilobytes and is a string value. More parameters are available to be configured based on the FilePond documentation under the Properties section. To add additional parameters/properties, you will need to edit the
binder.jsfile in the widget directly.Note
Any additional parameters/properties added may not work as expected and only the parameters above have been tested.
Configuration
An example of how to set up and use the Multi File Upload widget is given below. The walkthrough is divided into two steps:
Step 1: Set up tables, business objects, and rules
For the Multi File Upload widget to work correctly we'll first need two tables. One for the files to be saved to, which we'll call the File table, and another that will associate your file uploads with other data based on your application's use case, which we'll call the Ticket table.
Table definitions
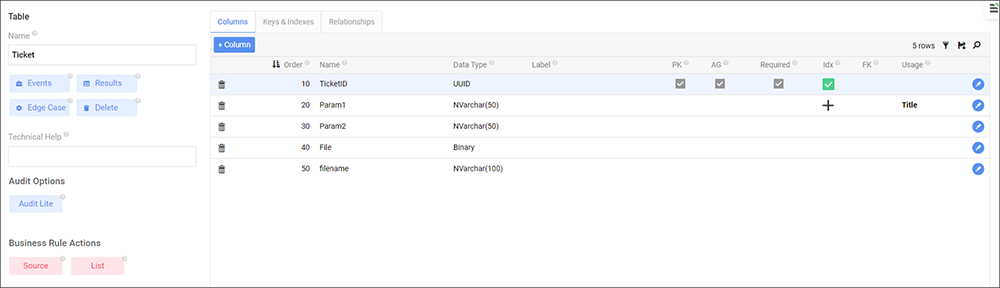
The Ticket table can be defined as shown in the screenshot below. Even though other columns are shown, the only ones that are required are the Private Key (PK) (TicketID) and the Binary (File) columns.
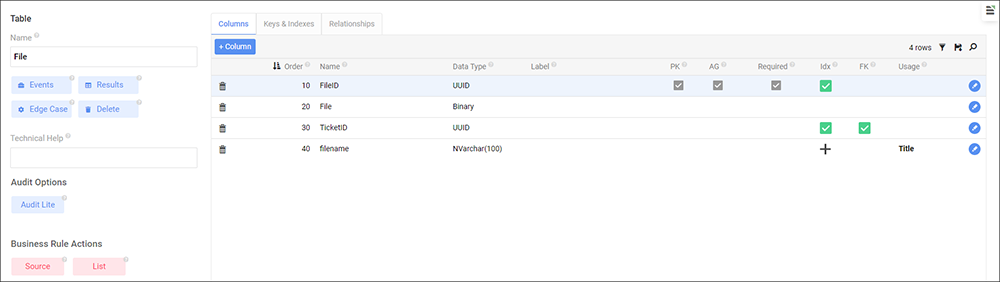
The following screenshot shows the definition of the File table. Even though other columns are shown, the only ones that are required are the Private Key (PK) (FileID), the Binary (File), and the Foreign Key (FK) (TicketID) columns.
Now that the tables are set up, we can configure the three rules (two business objects and one CRUD rule) we'll need.
Rule definitions
First, we'll need a business object, called Ticket (Source), to act as a source object for the Ticket table. This is the business object our panel with the widget will bind to, allowing us to associate a file with a specific record:

Our second business object, called Ticket (File), targets the same Ticket table, but only contains the TicketID (which is the Primary Key), File, and filename (optionally) columns. This is important because we need a separate business object for the widget to be on for multiple files to be able to be uploaded in parallel:

Our last business rule is an Insert CRUD rule, called Ticket (Insert to File), that will insert a new record to the File table. We target the File table and add a NewUUID() to the FileID column. This CRUD rule will be added to the Save event for our previous business object in the next step:

We now associate the Ticket (Insert to File) CRUD rule with the Save event of our second business object, Ticket (File), and add a binding on TicketID as shown below. This will move every file to the File table once it is done uploading. Because our Ticket table only has one binary file column, this configuration allows a dynamic number of files to be associated with a single record in Ticket:


Step 2: Set up the Multi File Upload widget
Now we can move to the UI layer to set up the widget itself. Our page will consist of two panels. One using Ticket (Source) and the other using Ticket (File):

The panel using Ticket (Source) has fewer restrictions when it comes to configuration as long as our next panel is bound to it. This is what ours looks like:

Our next panel using Ticket (File) has a single File control where we will configure the widget:


In the File control's settings, click the Edge Case tab and under the Edge Case field group, you'll find the Widget field. Select the Multi File Upload widget. If you would like to change any of the default parameters, you can do so now:
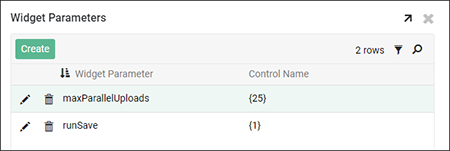
Notice that we've changed the value of maxParallelUploads to 25. Although the value of runSave is still 1, we are showing it here to highlight its importance to the functionality of this widget. Since our CRUD rule that moves our file to the File table is configured on the Save event of Ticket (File), we need to make sure this is set to 1 to work properly. If runSave is not set to 1, we are not able to handle multiple files.
If you have any further processing/actions that need to be done to a file, it should be done on the Insert event for the File table. This would include moving the file off to a local or network file system.
Note
If you are uploading files to Amazon S3 Bucket, and want to create a tiered directory structure for the files, please see the Amazon S3 file system article.