Introduction to App Builder - Appendix A: The data layer in App Builder (Advanced)
This is the first appendix of the Introduction to App Builder tutorial series. These appendices complement the lessons in the series, and provide more in-depth information about the concepts introduced.
In this lesson, we'll further explore the data layer of App Builder, the area where we store the data that our application will need to retrieve and manipulate.
Logical data types
As we've already learned, the data layer is where we store the information that our applications will need to perform their tasks. App Builder provides tools to organize, categorize and label your data logically, making future retrieval easier and more efficient.
Logical vs. physical data types
Before examining each type, it is important to understand the core distinction between logical and physical data types, as this concept applies to all columns created in App Builder.
-
Logical data types: These define the data's purpose and how it is represented within the application's business and user interface (UI) layers. The logical type dictates how App Builder displays the data and what operations are valid for it.
-
Physical data types: These define the data's storage type, the specific format used to save the information in the database.
For example, consider the values 0 and 1. These two values can be represented in several different logical ways, depending on the context:
-
As a boolean (representing
True/False) -
As a number (the integers 0 and 1)
-
As text (the characters
0and1) -
As a percent (representing 0% and 100%)
-
As currency (representing $0.00 and $1.00)
Each of these logical types is treated differently by the application, even if the underlying data is similar. Correspondingly, these values may be physically stored in different formats. A boolean False/True might be stored as a Bit (0/1), while the text 0/1 would be stored as an NVarchar.
As we explore the data types below, you will see that for each logical type selected, App Builder provides one or more compatible physical type options.
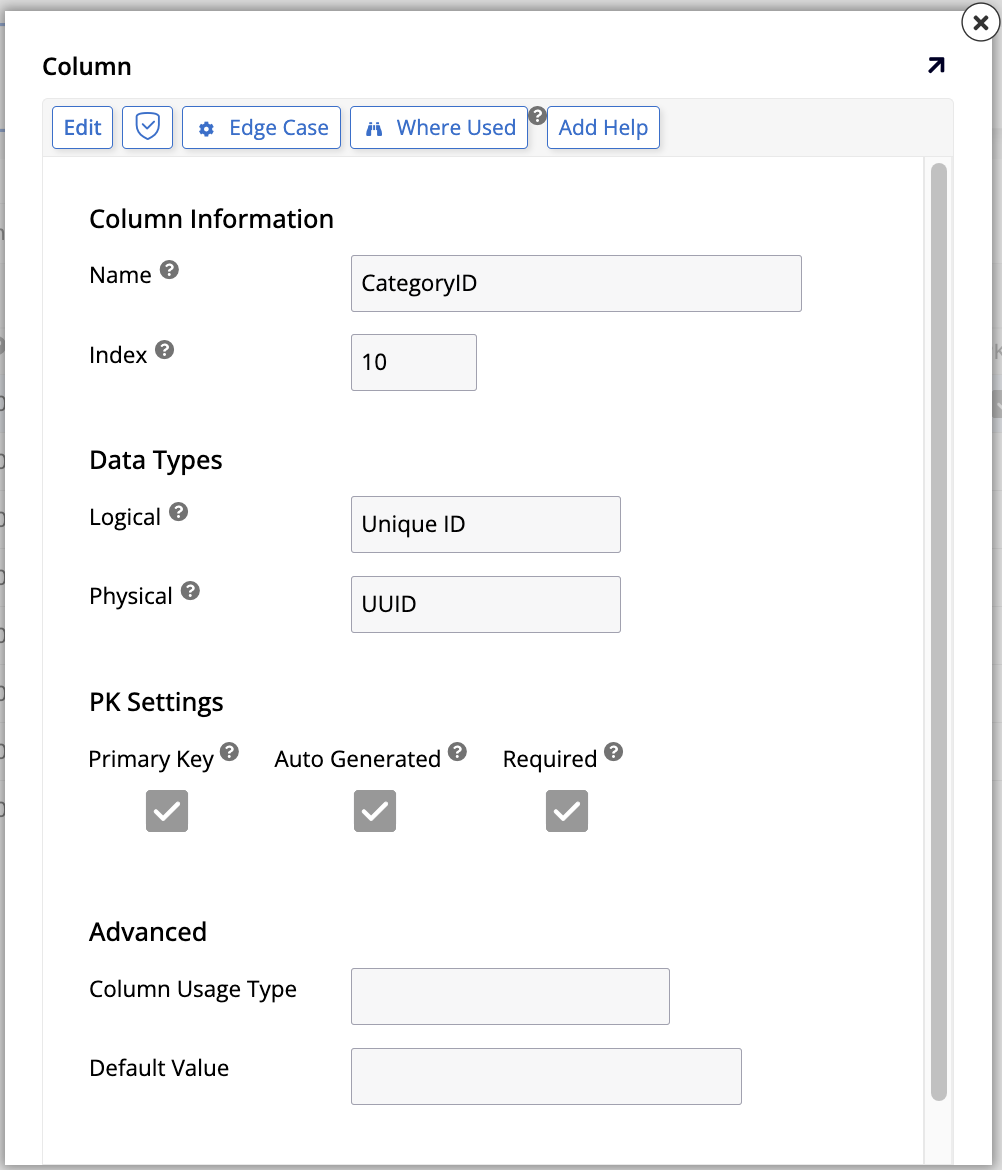
Unique ID
The logical data type Unique ID is used to store a unique identifier value. In Lesson 2, we briefly alluded to this data type when we created the Region table. We mentioned that App Builder automatically created a column to identify the entries in that table and gave it this data type. Now, however, let's see in closer detail how it works. Follow these steps:
-
In App Workbench > Tables, locate and select the Category table.
-
In the Columns tab, find the CategoryID column and click the edit icon at the end of the row. You'll see the following edit screen:
-
In the Data Types section, take note of the following details:
-
The Logical field is where you define a column's logical data type. This column was created automatically by App Builder, and it selected Unique ID.
-
The Physical field shows the physical data types available for a column with this logical data type:
-
Char: Character data of fixed length.
-
UUID (currently selected): This acronym means Universally Unique Identifier. It is a 128-bit number used to uniquely identify information.
-
-
-
In the PK Settings section, the following checkboxes are available. App Builder checked all of them, which is the recommended setup when creating a single-column primary key that uses an auto-generated value. For more complex scenarios, such as multi-part keys (for instance, a key composed of two foreign keys), you might use different settings:
-
Primary Key: This checkbox indicates if a column should be its table's primary key, that is, the one that makes a record unique.
-
Auto Generated: When this checkbox is selected, App Builder will automatically generate a value for this column every time a new record is created in the table.
-
Required: This checkbox indicates whether this column can be left empty (that is, have a null value) when a new record is created.
-
-
In the Advanced section, the following options appear:
-
Column Usage Type: This indicates to App Builder what a given column will be used for (see Usage for more information). Currently, there is no selection here, as the purpose of a unique identifier is to allow App Builder, not users or developers, to identify a record.
-
Default Value: This field, currently empty, is where you could define a default value for the column (see Default values for more information). In the case of auto generated values, however, a value is always provided.
-
String
Now, let's review String, probably the most frequently used logical data type. It allows you to store a variable-length sequence of characters, such as letters, symbols, and numbers. Let's take a closer look at one of our columns that use this data type:
-
In App Workbench > Tables, locate and select the Employee table.
-
In the Columns tab, find the FirstName column and click the edit icon at the end of the row. You will see the column's edit screen:

-
In the Data Types section, the following options appear:
-
The Logical field is where this column was assigned the String logical data type.
-
The Physical field has the following options:
-
Char: Character data of fixed length.
-
Encrypted Text: Encrypted text data.
-
NChar: UNICODE character data of fixed length.
-
NVarchar (currently selected): UNICODE character data of indeterminate length. Typically, all App Builder strings are stored as this physical type so they can support Unicode and take up less space.
-
Varchar: Character data of indeterminate length.
-
-
Length: Number of bytes used to store the number. For binary, varbinary, and image data types, the length is the number of bytes.
-
-
In the PK Settings section, there are options to aid in the manual creation of primary keys:
-
Primary Key: This checkbox indicates that the column should act as the table's primary key.
-
Required: This checkbox indicates whether this column can be left empty (that is, have a null value) when a new record is created.
-
-
In the Advanced section, the following options appear:
-
Column Usage Type: This indicates to App Builder what a given column will be used for (see Usage for more information). This can speed up the development process later on.
-
Default Value: In this field, you may enter a default value to be used for the column if one isn't provided (see Default values for more information).
-
Translatable: If enabled, this checkbox turns on translations for a given column, meaning that data in the column that gets added or edited through the business layer is translated into another language automatically at runtime. Translating the application bundle also translates all data in the column.
-
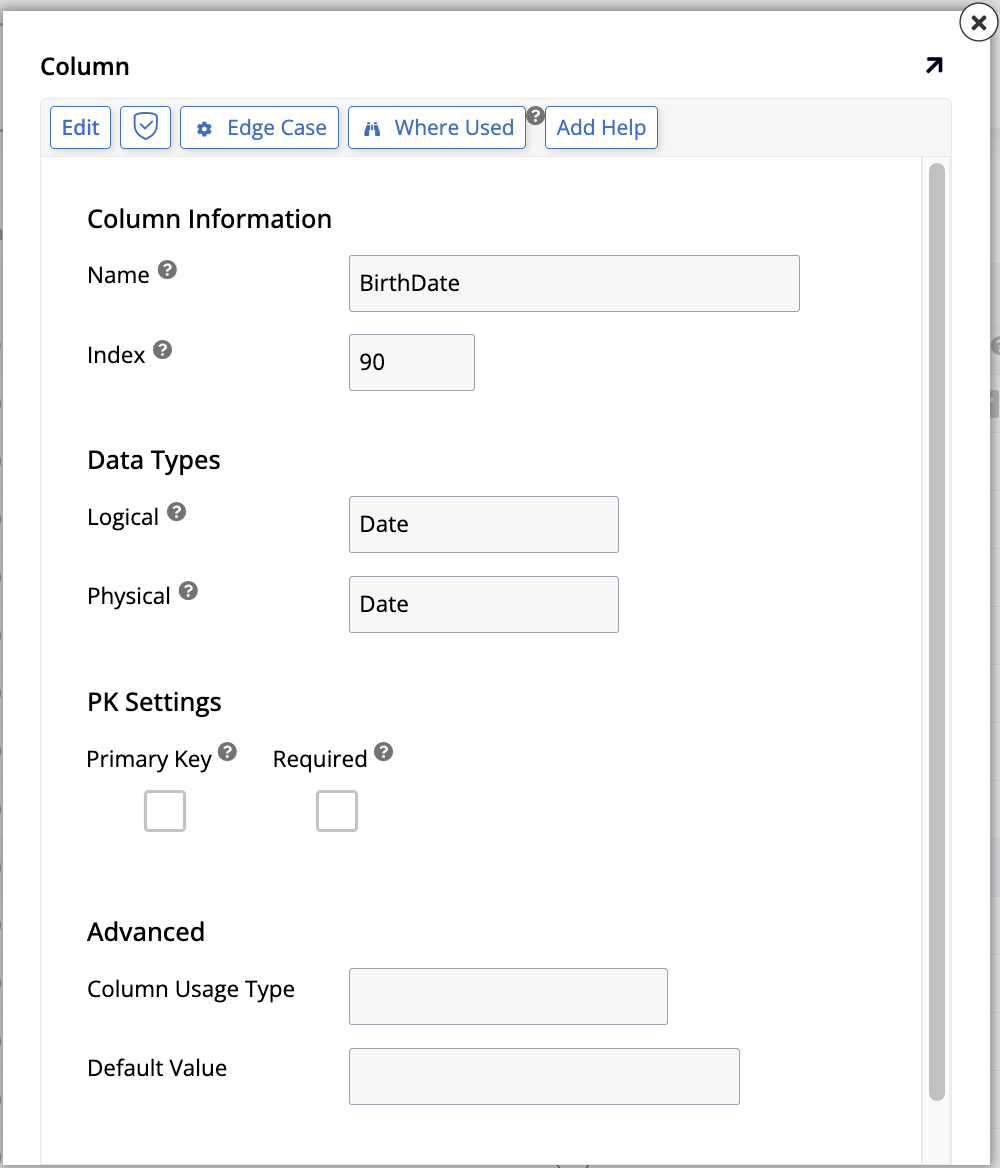
Date, Date/Time, Time
These are the formats used by App Builder to store a specific date, time, or both. The date information is formatted as MM/DD/YYYY. When you try to edit a field with this logical data type, you see a calendar popup that lets you choose a new date value.
We'll take a closer look at how this data type works by analyzing the BirthDate column in our Employee table.
-
In App Workbench > Tables, locate and select the Employee table.
-
In the Columns tab, find the BirthDate column and click the edit icon at the end of the row. You will see the column's edit screen:
-
In the Data Types section, the following fields appear:
-
Logical: This is where you select either Date, Date/Time, or Time.
-
Physical: The physical data type options change depending on your selection of logical data type:
-
When the logical data type is Date:
-
Date: Only stores the date.
-
Decimal: Stores a decimal value, between
1038 + 1and1038 - 1. -
Integer - Int: Stores an integer, between
-2,147,483,648and2,147,483,647.
-
-
When the logical data type is Date/Time:
- DateTime: Stores the date and the time of day.
-
When the logical data type is Time:
- Time: Stores the time of day only.
-
-
-
In the PK Settings section, there are options to aid in the manual creation of primary keys:
-
Primary Key: This checkbox indicates that the column should act as the table's primary key.
-
Required: This checkbox indicates whether this column can be left empty (that is, have a null value) when a new record is created.
-
-
In the Advanced section, the following options appear:
-
Column Usage Type: This indicates to App Builder what a given column will be used for (see Usage for more information). This can speed up the development process later on.
-
Default Value: In this field, you may enter a default value to be used for the column if one isn't provided (see Default values for more information).
-
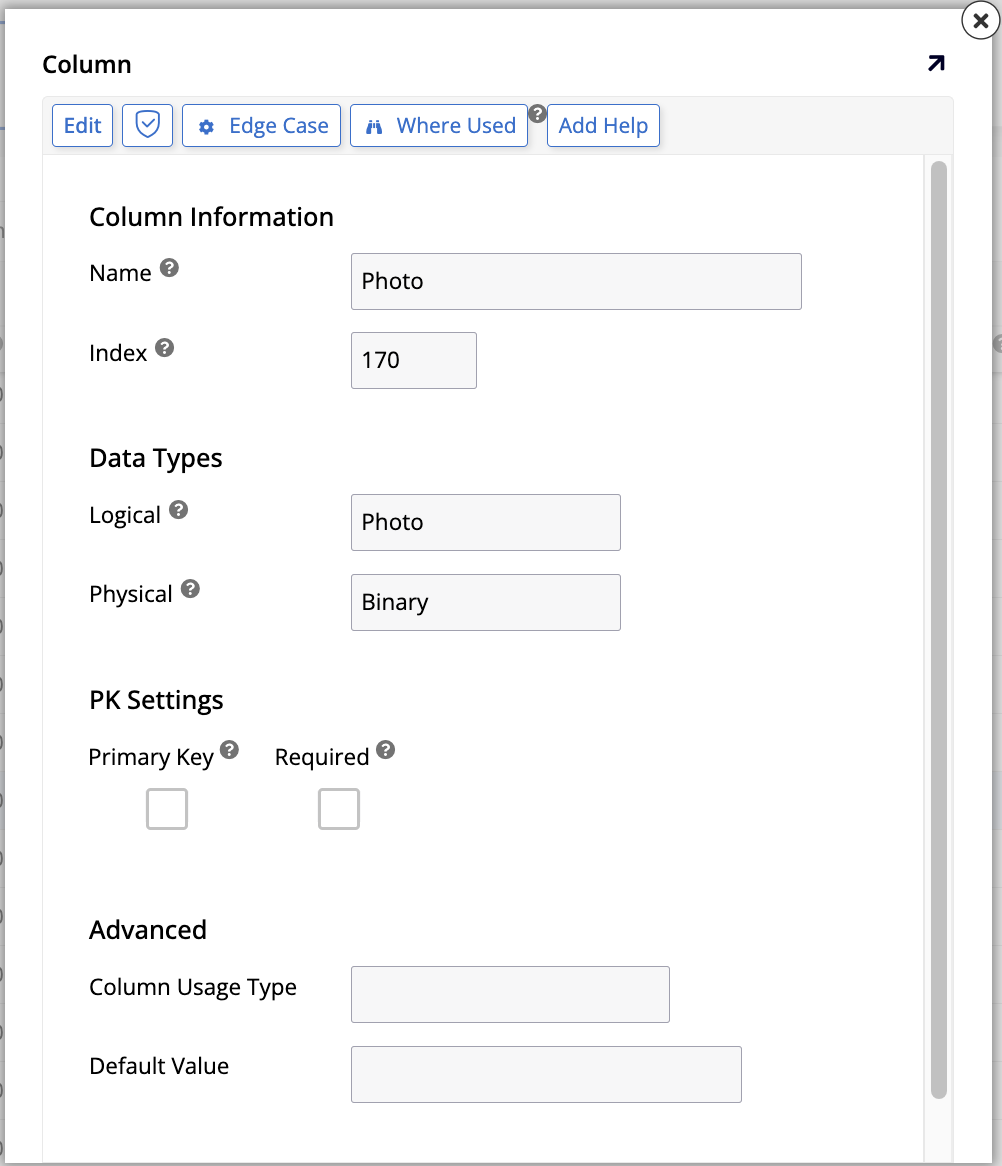
Photo
Another logical data type that can be used in the App Builder data layer is Photo. We'll explore its options by looking at the Photo column of our Employee table.
-
In App Workbench > Tables, locate and select the Employee table.
-
In the Columns tab, find the Photo column and click the edit icon at the end of the row. You will see the column's edit screen:
-
In the Data Types section, the following fields are available:
-
Logical: This is where Photo is selected as the logical data type.
-
Physical: Columns with this logical data type have only one option of physical data type: Binary. It is numerically represented by a combination of zeros and ones.
-
-
In the PK Settings section, there are options to aid in the manual creation of primary keys:
-
Primary Key: This checkbox indicates that the column should act as the table's primary key.
-
Required: This checkbox indicates whether this column can be left empty (that is, have a null value) when a new record is created.
-
-
In the Advanced section, the following options appear:
-
Column Usage Type: This indicates to App Builder what a given column will be used for (see Usage for more information). This can speed up the development process later on.
-
Default Value: In this field, you may enter a default value to be used for the column if one isn't provided (see Default values for more information).
-
File
The File logical data type is used to store a file. Developers can use it to allow end users to upload new files to the database. In our Employee table, we currently don't have any columns with the File data type, but we can use the Photo column we looked at earlier to learn about it.
-
In App Workbench > Tables, locate and select the Employee table.
-
In the Columns tab, find the Photo column and click the edit icon at the end of the row.
-
In the Data Types section:
-
Change the selection in the Logical field from Photo to File:

Note
Doing this doesn't affect the look of your application's Employee page, because in its Controls page, the control type is still Photo, so App Builder renders it correctly.
-
The Physical field for columns with this logical data type has three options:
-
Binary: Binary data.
-
Encrypted Binary: Same as the previous option, but with encryption.
-
NVarchar: UNICODE character data of indeterminate length.
-
-
-
In the PK Settings section, there are options to aid in the manual creation of primary keys:
-
Primary Key: This checkbox indicates that the column should act as the table's primary key.
-
Required: This checkbox indicates whether this column can be left empty (that is, have a null value) when a new record is created.
-
-
In the Advanced section, the following options appear:
-
Column Usage Type: This indicates to App Builder what a given column will be used for (see Usage for more information). This can speed up the development process later on because it makes some fields and options be configured automatically.
-
Default Value: In this field, you may enter a default value to be used for the column if one isn't provided (see Default values for more information).
-
Number, Percent
The Number logical data type stores numeric data. If you want to store, present, or calculate percentage values, there is also a Percent logical data type available. Let's analyze these two by looking at the UnitsInStock column of our Product table:
-
In App Workbench > Tables, locate and select the Product table.
-
In the Columns tab, find the UnitsInStock column and click the edit icon at the end of the row. You will see its edit screen:

-
In the Data Types section, the following fields are available:
-
Logical: This is where Number or Percent are selected as the logical data type.
-
Physical: Columns with this logical data type have the following physical data type options:
-
Decimal: Select this to store a number with a large decimal value, between
1038 + 1and1038 - 1. This is the only option available when the logical data type is Percent. -
Float: Select this to store smaller decimal values, between
-1.79E + 308and-2.23E -308. -
Integer - BigInt: Select this to store very large integer numbers, between
-9,223,372,036,854,775,808and9,223,372,036,854,775,807. -
Integer - Int (currently selected): The standard selection for integer numbers, between
-2,147,483,648and2,147,483,648. -
Integer - SmallInt: Select this to store small integer numbers, between
-32,768and32,767. -
Integer - TinyInt: Select this to store integers between
0and255. -
Real: Select this to store real numbers, between
-3.40E + 38and-1.18E - 38.
-
-
-
In the PK Settings section, there are options to aid in the manual creation of primary keys:
-
Primary Key: This checkbox indicates that the column should act as the table's primary key.
-
Auto Generated: When this checkbox is selected, App Builder will automatically generate a value for this column every time a new record is created in the table.
-
Required: This checkbox indicates whether this column can be left empty (that is, have a null value) when a new record is created.
-
-
In the Advanced section, the following options appear:
-
Column Usage Type: This indicates to App Builder what a given column will be used for (see Usage for more information). This can speed up the development process later on.
-
Default Value: In this field, you may enter a default value to be used for the column if one isn't provided (see Default values for more information).
-
Currency
The Currency logical data type is used to store monetary values with proper formatting. In the UI layer, controls that make use of currency columns are identified as currency. To better analyze this logical data type, let's use the UnitPrice column of our Product table.
-
In App Workbench > Tables, locate and select the Product table.
-
In the Columns tab, find the UnitPrice column and click the edit icon at the end of the row. You will see its edit screen:

-
In the Data Types section, the following fields are available:
-
Logical: This is where you select Currency as the logical data type.
-
Physical: Columns with this logical data type have only one physical data type option: Decimal, used to store a number with a large decimal value, between
1038 + 1and1038 - 1. -
Precision: In this field, enter the number of digits that numbers should have. For example, the number
123.45has precision5. For currencies, this is the default value. -
Scale: In this field, enter the number of digits displayed to the right of the decimal point in a number. For example, the number
123.45has scale2. For currencies, this is the default value.
-
-
In the PK Settings section, there are options to aid in the manual creation of primary keys:
-
Primary Key: This checkbox indicates that the column should act as the table's primary key.
-
Required: This checkbox indicates whether this column can be left empty (that is, have a null value) when a new record is created.
-
-
In the Advanced section, the following options appear:
-
Column Usage Type: This indicates to App Builder what a given column will be used for (see Usage for more information). This can speed up the development process later on.
-
Default Value: In this field, you may enter a default value to be used for the column if one isn't provided (see Default values for more information).
-
Note
The currency symbol shown in the UI varies depending on which currency is set as the default. To change the default, follow these steps:
-
In App Workbench > Data Sources, locate and select the Northwinds (Default) source.
-
Click Edit. The Data Storage Layer dialog opens.
-
Click the Utilities tab and then Advanced Settings. The Data Source Settings dialog will open.
-
In the Currency field, change the default currency.
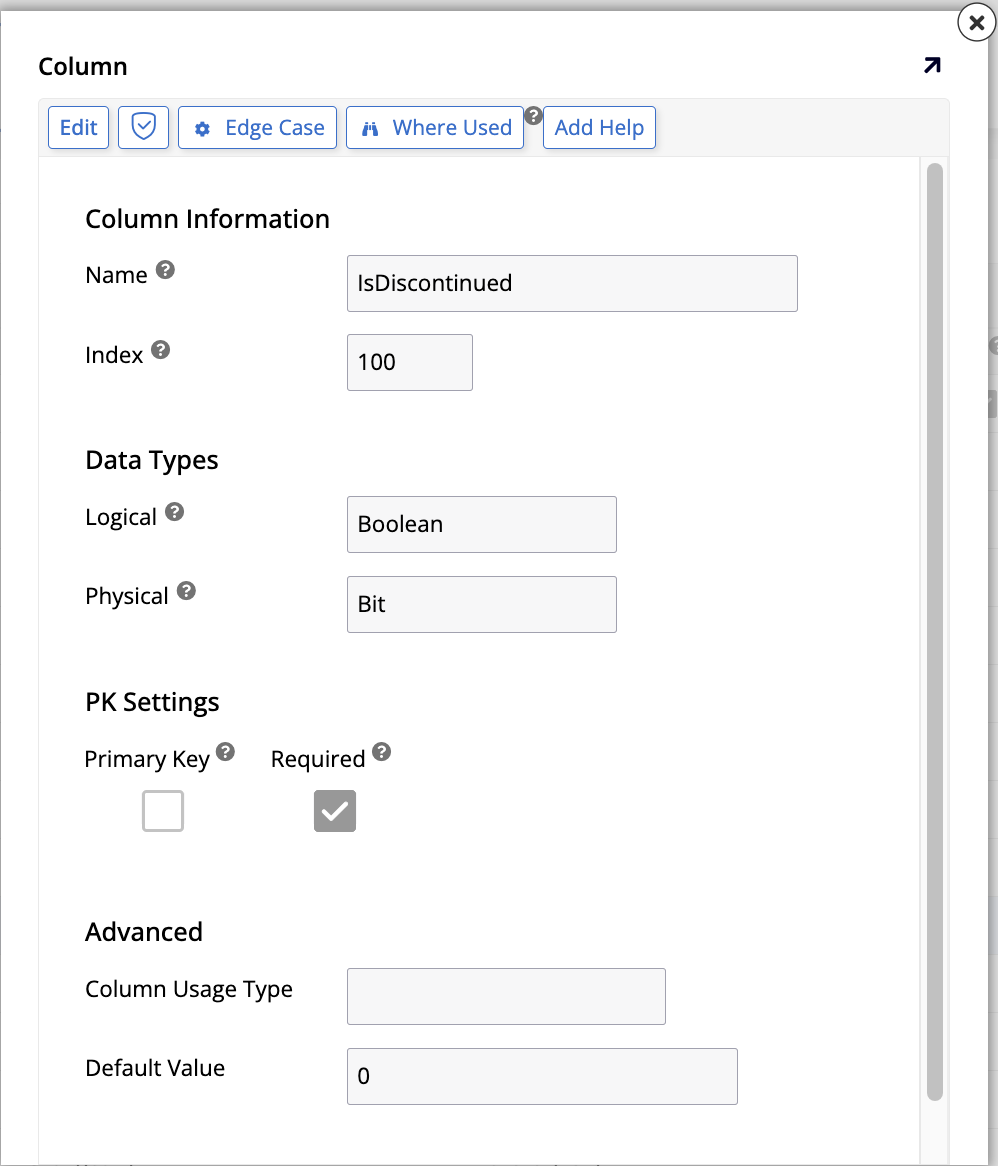
Boolean
The Boolean logical data type can only store two possible values, true or false, and is used to provide logic. To analyze how it works, let's use the IsDiscontinued field in our Product table:
-
In App Workbench > Tables, locate and select the Product table.
-
In the Columns tab, find the IsDiscontinued column and click the edit icon at the end of the row. You will see its edit screen:
-
In the Data Types section, the following fields are available:
-
Logical: This is where you select Boolean as the logical data type.
-
Physical: Columns with this logical data type have the following physical data type options:
-
Bit: Stores data as
0(meaningFalse) or1(meaningTrue). This is typically the option used when you want to represent a checkbox in the UI layer, where unchecked meansFalseand checked meansTrue. -
Char: Character data of fixed length. If you select Char, the UI layer will show a list that presents
TrueandFalseas options, instead of a checkbox. -
Decimal: Select this to store a number with a large decimal value, between
1038 + 1and1038 - 1.
-
-
-
In the PK Settings section, there are options to aid in the manual creation of primary keys:
-
Primary Key: This checkbox indicates that the column should act as the table's primary key.
-
Required: This checkbox indicates whether this column can be left empty (that is, have a null value) when a new record is created.
-
-
In the Advanced section, the following options appear:
-
Column Usage Type: This indicates to App Builder what a given column will be used for (see Usage for more information). This can speed up the development process later on.
-
Default Value: In this field, you may enter a default value to be used for the column if one isn't provided (see Default values for more information).
-
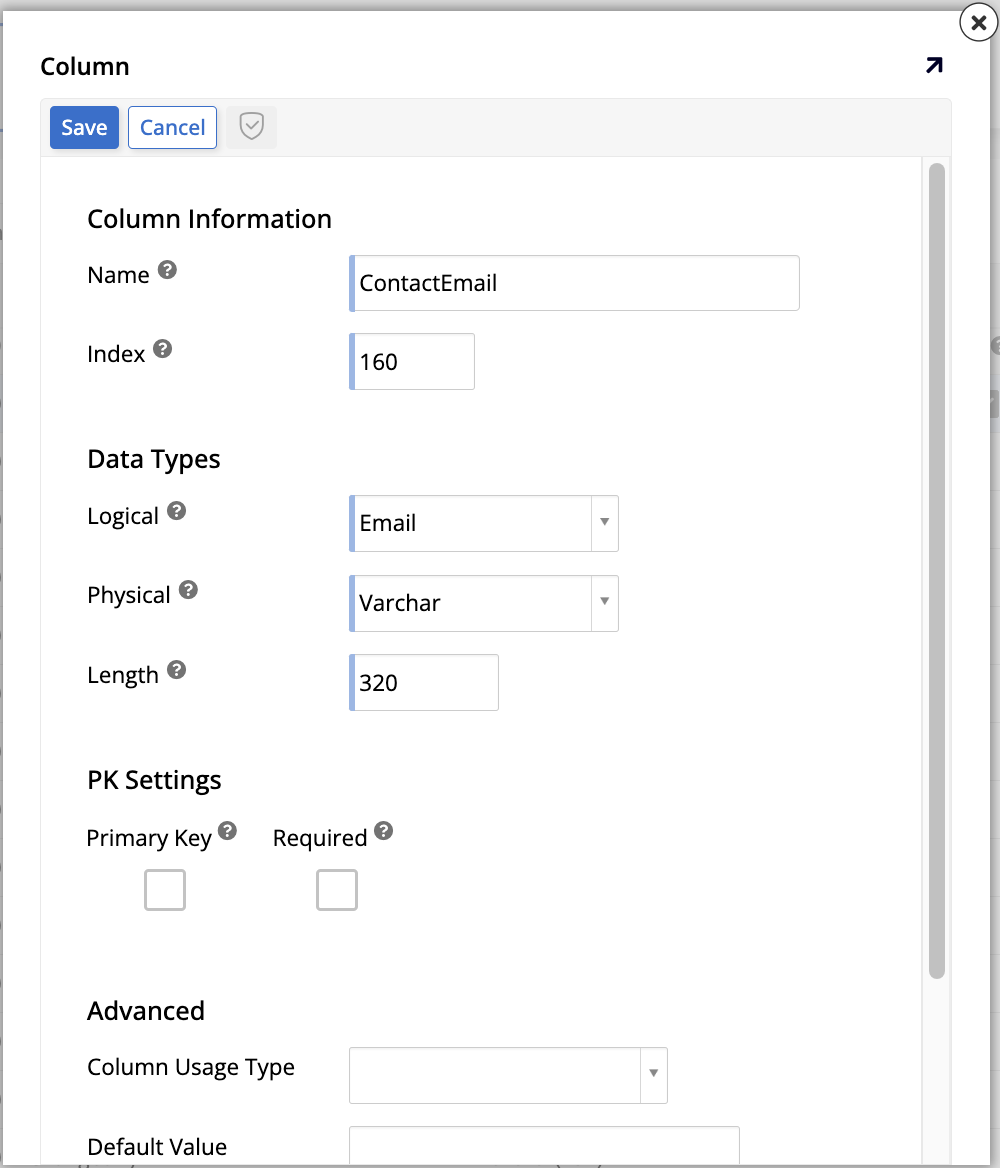
Email, URL
The Email logical data type is used to capture, store, and display email addresses. Similarly, the URL type has the same purpose, but for web addresses. Although it's technically possible to use other logical data types to store this information, using these types ensures data consistency by storing all email or URL entries with the recommended length and giving them the same default control type.
These types are excellent examples of column templates, which are pre-configured column definitions that ship with App Builder to speed up development. You can learn more about them and even create your own in Column templates.
-
In App Workbench > Tables, locate and select the Customer table.
-
In the Columns tab, click + Column. The column creation screen will appear.
-
In the Name field, enter
ContactEmailorCustomerWebsite, depending on which type of data you want to save. -
In the Data Types section, the following options are available:
-
Logical: Select Email or URL as the logical data type. Doing this alters some of the default values shown underneath:
-
Physical: Columns with this logical data type have the following physical data type options:
-
Char: Character data of fixed length.
-
Encrypted Text: Encrypted text data.
-
NChar: UNICODE character data of fixed length.
-
NVarchar: UNICODE character data of indeterminate length. This is the default selection for the URL data type.
-
Varchar: Character data of indeterminate length. This is the default selection for the Email data type.
-
-
Length: The length of the web or email address. For the URL data type, the default is
2000and for Email, it's320.
-
-
In the PK Settings section, there are options to aid in the manual creation of primary keys:
-
Primary Key: This checkbox indicates that the column should act as the table's primary key.
-
Required: This checkbox indicates whether this column can be left empty (that is, have a null value) when a new record is created.
-
-
In the Advanced section, the following options appear:
-
Column Usage Type: This indicates to App Builder what a given column will be used for (see Usage for more information). This can speed up the development process later on.
-
Default Value: In this field, you may enter a default value to be used for the column if one isn't provided (see Default values for more information).
-
Translatable: If enabled, this checkbox turns on translations for a given column, meaning that data in the column that gets added or edited through the business layer is translated automatically at runtime. Translating the application bundle also translates all data in the column.
-
Default values
Columns in App Builder can be created with default values. This can be useful, for example, when many records are supposed to have the same value for a given column with few or no exceptions. In the latter case, using a default value and disabling update operations would completely ensure data integrity.
To demonstrate how to give a column a default value, we'll use the Country column of the Employee table. We're going to assume that the majority of our company's staff are from the United States. Therefore, that should be the column's default.
-
In App Workbench > Tables, locate and select the Employee table.
-
In the Columns tab, find the Country column and click the edit icon at the end of the row. The column's edit screen will appear.
-
In the Advanced section, enter
United StatesorUSAin the Default Value field.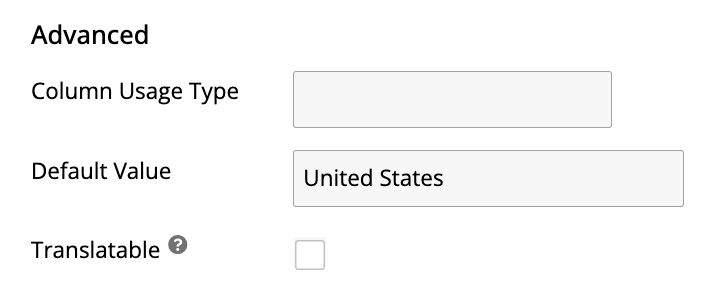
-
Click Save.
Test your work by clicking the Results button in the Table panel. When the list of records appears, click Create and see if the default value is being displayed in the right column. If it is, your change has worked and now, whenever a new record is added to the Employee table, the Country column will automatically have the value you entered (United States or USA). But if an individual entry requires it, you can edit that value manually, of course. This would help you save a lot of time in a scenario where there are few or no employees living in other countries.
Practice time: Set a default on the Product table
Following the steps we used above for the Employee table, add a default value to one of the columns on the Product table. Let's assume that when a new product gets added to our company's catalog, initially there are no units in stock. Therefore, give the UnitsInStock column a default value of 0. Test your results after setting the default value.
Usage
All columns in App Builder have a Column Usage Type field (shortened as Usage in the Columns tab). This field allows you to specify a column's intended purpose. Although optional, we recommend using it if one of the predefined options fits your needs. Doing so allows App Builder to enable relevant features, validation, or UI components for that column automatically, speeding up your development process.
The Column Usage Type field can be found in the Advanced section of a column's edit screen. The full list of options is available in Column usage types, but the most frequently used are as follows:
-
Title: Used to indicate that a column contains a list title. Therefore, when you are creating list objects to make dropdown menus in the UI, App Builder will know to use that column.
-
Subtitle: Used to provide context for title fields. When you assign this usage type to a column, App Builder will display its contents underneath the title.
-
ENUM: An abbreviation for "enumeration," this usage type associates a meaningful string value with a unique identifier (like a primary key). This allows you to use the enumerated string (e.g., 'Monday', 'Tuesday') to uniquely identify a record in a human-readable way, rather than relying on a UUID (e.g.,
a1b2c3d4) which has no meaning to a user. -
Added By/Added On: Columns with this designation are filled in with who created a record or when it happened. The Audit lite function creates columns with these usage types automatically.
-
Changed By/Changed On: Columns with this designation are filled in with a record of who modified a record or when it happened. The Audit lite function creates columns with these usage types automatically.
-
IsActive: Columns with this designation indicate whether an entry is currently active or not. The Audit lite function creates columns with these usage types automatically.
Practice time: Set column usage types
For practice, let's set Subtitle and ENUM usage types.
-
Our Category table has a Description column. Edit that column and assign it the Subtitle usage type. When you do, in any UI component that uses the Category column as the title, App Builder will automatically suggest using Description as the subtitle.
-
Still in our Category table, add a new column called CategoryStatus with String as its logical data type and assign it the ENUM usage type. When you do, you are flagging this column as the human-readable identifier for the category. While CategoryID (a UUID) is the primary key, CategoryStatus could be used as the unique enumerated value (e.g., "Active", "Archived", "Draft") that business logic could reference.
Keys and indexes
In the data layer, it is important to understand how the database identifies and organizes records. This is managed through keys and indexes, which are crucial for ensuring data integrity and optimizing performance.
Keys
Keys are columns (or sets of columns) used to uniquely identify records in a table. There are the following kinds:
-
Primary Key (PK): This is the main identifier for a table. Every record must have a value for the primary key, and that value must be unique within the table. In our tables, OrderID, ProductID, and EmployeeID are all primary keys, often configured as auto-generated unique IDs.
-
Foreign Key (FK): This is a column in one table that refers to a column in another table. It is the mechanism behind bindings. For example, the OrderID column in the OrderDetail table is a foreign key that points to the OrderID (the primary key) in the Order table.
-
Unique Key (UK): This is a constraint that ensures all values in a specific column (or set of columns) are unique, similar to a primary key. A unique key can also, in some database systems, allow a single null value, whereas a primary key cannot.
Indexes
An index is a data structure used by the database to find records more quickly. Instead of scanning an entire table for a value, the database can use an index to go directly to the relevant records.
You should add an index to columns that are frequently used in search operations, join conditions, or WHERE clauses. In our database, the OrderNumber column in the Order table is a good candidate for an index because we might frequently search for orders by this number.
Primary keys are always indexed automatically, which is why they are so fast for lookups. Adding indexes to other columns, like foreign keys or commonly-searched fields (like OrderNumber), can significantly improve application performance. You may see a + symbol next to certain columns in App Builder, which is a suggestion that adding an index could be beneficial.
Insert, update, and delete
In App Builder's data layer, every table and column can support inserting, updating, and/or deleting data. By altering these options in the data layer, developers can control how the data gets interacted with throughout all the other layers, including the final application. This means that the changes made here supersede similar modifications made in other layers. For example, even if the control in a given page shows a delete button and a user has delete permissions, deleting a record still won't be possible if the delete operation was disabled here, and attempting to do so will cause an error.
To demonstrate how these options can be controlled, let's take as an example our current Employee table.
-
In App Workbench > Tables, locate and select the Employee table.
-
In the Table panel, click More > Edge Case. The Edge Case Settings dialog appears, and the CRUD Support section shows three checkboxes, currently all checked:

-
Insertable: If enabled, allows table records to be inserted via CRUD rules.
-
Updatable: If enabled, allows table records to be updated via CRUD rules.
-
Deletable: If enabled, allows table records to be deleted via CRUD rules.
Unchecking one of the checkboxes would disable the operations for that table across all layers. In the Employee table, though, we want all these operations to be possible, since new employees can be hired, the existing employees' details can change, or they can leave the team.
-
Practice time: Disable CRUD operations
Another one of our tables, Product, holds records about all of our products. That table has a column called IsDiscontinued. So if we ever stop selling a certain product, we simply need to change the status of that field from False to True. Therefore, there is no need to allow delete operations in that table. Following the steps described above, disable the delete operation for that table.
Relationships
Relationships in App Builder are a powerful tool for ensuring data integrity. They define connections between tables to prevent users from entering invalid data or creating orphaned records (records in one table that no longer have a related record in another).
When creating a relationship, one table is designated as the parent (the "one" side of a one-to-many relationship) and the other as the child (the "many" side). The relationship links columns that contain matching data. Typically, this involves linking the primary key of the parent table (a column that uniquely identifies each record) to a corresponding column in the child table, which is then referred to as a foreign key. While relationships are most often based on a table's primary key, it is also possible to define them on other unique columns. A relationship can also be defined using multiple columns from each table.
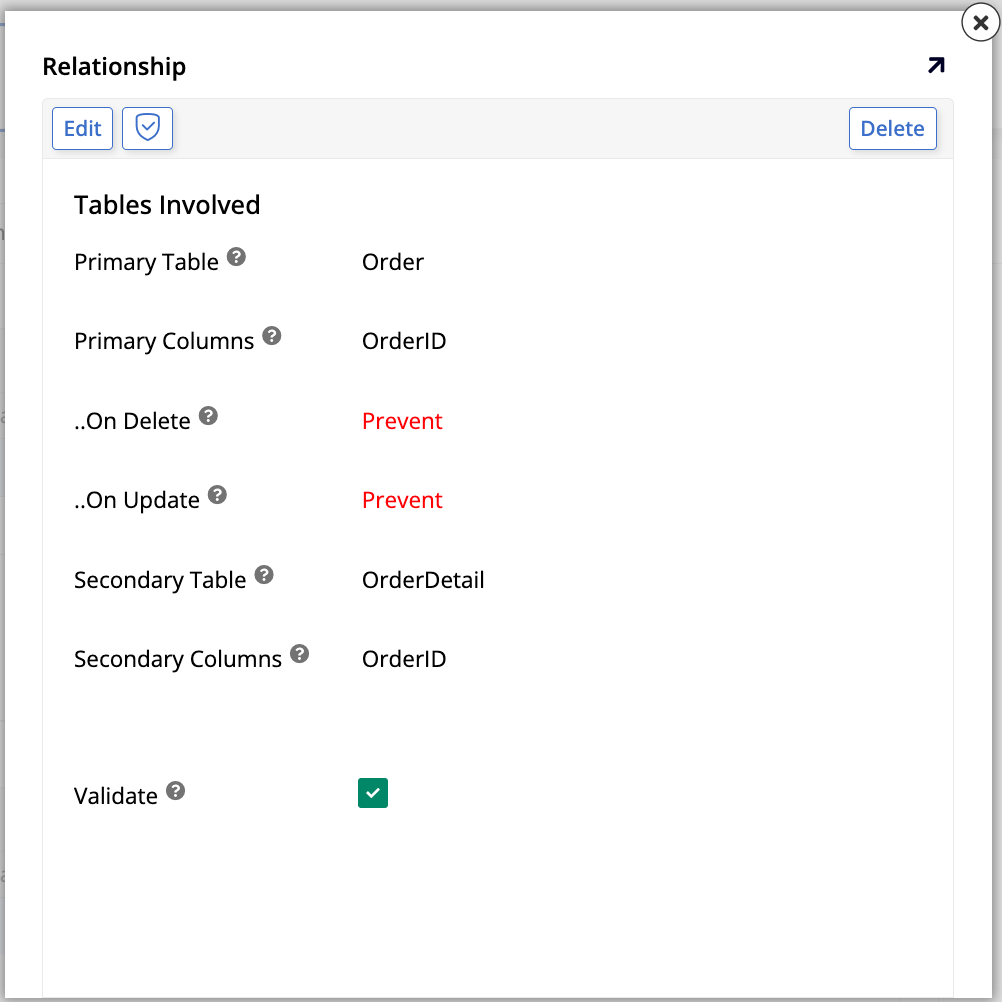
Let's examine the existing parent-child relationship between the Order and OrderDetail tables in our Northwinds database.
-
In App Workbench > Tables, locate and select the Order table.
-
Click the Relationships tab and notice the information shown:
-
Many to One: This section lists relationships where the current table (Order) is the child. In this case, many orders can be associated with one customer, one employee, and one shipper. The foreign keys for these relationships (CustomerID, EmployeeID, and ShipperID) exist on the Order table.
-
One to Many: This section lists relationships where the current table (Order) is the parent. The OrderDetail table is listed here because many order details can belong to one order.
Click the edit icon for the OrderDetail relationship. The Relationship popup opens:
-
Primary Table: Identifies the parent table in the relationship (the "one" side).
-
Primary Columns: Shows the column(s) from the parent table that uniquely identify records for this relationship.
-
...On Delete: This dropdown defines what should happen to the child records in the Secondary Table when a corresponding parent record in the Primary Table is deleted. The options are:
-
Cascade: Deletes all corresponding child records automatically when the parent record is deleted.
-
Default: Sets the value of the foreign key column(s) in the child records to their predefined default value when the parent record is deleted.
-
Null: Sets the value of the foreign key column(s) in the child records to
NULLwhen the parent record is deleted. This is only possible if the foreign key column is not set as "Required". -
Prevent: (Default) Prevents the parent record from being deleted if any child records exist. This is the safest option for maintaining data integrity.
-
-
...On Update: This defines what should happen to the foreign key value in child records when the corresponding key value in the parent record is updated. The options (Cascade, Default, Null, and Prevent) function similarly to the On Delete actions.
-
Secondary Table: Identifies the child table in the relationship (the "many" side).
-
Secondary Columns: Shows the foreign key column(s) in the child table that correspond to the primary column(s).
-
Validate: This checkbox, enabled by default, ensures that App Builder checks these relationship rules (foreign key constraints) every time a save or delete operation occurs. It is highly recommended to keep this option enabled.
-
-
Further learning
This concludes this deep dive into the details of App Builder's data layer. For a closer look at the other layers, see Appendix B and Appendix C.