Managed tables in Jitterbit App Builder
In App Builder, Managed Tables are like regular tables, except that the data that gets stored in them is being managed or maintained by App Builder. They are managed by either User, Window or Session, depending on how the table gets configured when it is created. There is no limit to the number of Managed Tables an application can have configured.
Managed Tables are designed to allow developers to essentially store temporary data about either a User, Window or Session. Data for these tables gets automatically removed after a specified window of time, depending on what type data you are storing:
- User = App Builder checks nightly and if User no longer in system will delete accordingly
- Window = App Builder checks every 2 days and deletes accordingly
- Session = App Builder checks once a month and deletes accordingly
The perfect use case for Managed Tables is for Search panels or pages that need to store temporary data before creating an insert into a final table, such as during a multi-step process such as a Wizard.
For example: if User is selected as the Managed Type then the data in this table will only exist for the current user logged into App Builder. Behind the scenes App Builder adds an invisible UserId column to the Managed Table. Whenever data is selected against it there is a UserId in the where clause, and whenever data is inserted the UserId gets automatically inserted.
Note
If you are using Managed Tables in a CRUD Rule you must use Business Layer when configuring the Rule information.
Managed types
App Builder allows you to create Managed Tables based on the following three criteria options:
- User = Current user logged into App Builder.
- Window = Each window or tab of a browser is uniquely identified.
- Session = Each long lasting browser session.
Auto insert
Auto Insert is an option that can be configured when setting up a Managed Table. If enabled, App Builder will automatically "prime" the table with at least one record.
For search panels it is often required to always have one row that will exist in the table. If Auto Insert is checked or enabled, before returning data App Builder will check if the table is empty and if it is, perform a New event and then Insert. You can add actions on Insert and Defaults on New to prepopulate data.
To create a managed table
- Navigate to the App Workbench > + Table
- Select the data source to add the Table to (if app has > 1 data source)
- Assign the table Name. For example: Search
- Click Save
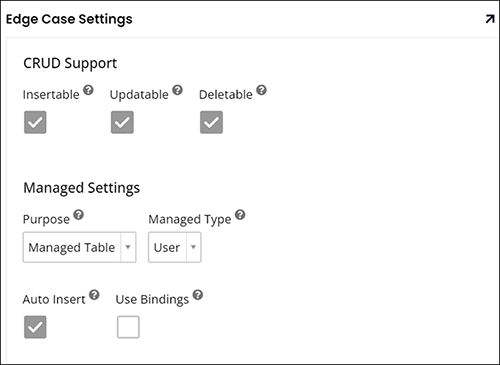
- Navigate to More > Edge Case
- Set the Purpose to Managed Table
- Set the Managed Type to the value you wish to create. For example: User
- Decide if you want App Builder to Auto Insert a record or not, if yes click to enable
-
Click Save

-
From the Columns tab, add any columns you would like to the Managed Table Type value on your panel. For example: SearchID, Country
-
Click Results to view real time data.
Note
The dynamic result will not display a primed record
In the example described here, you can now use this table in a panel for Search by Country, for example.
Managed table behavior in rules
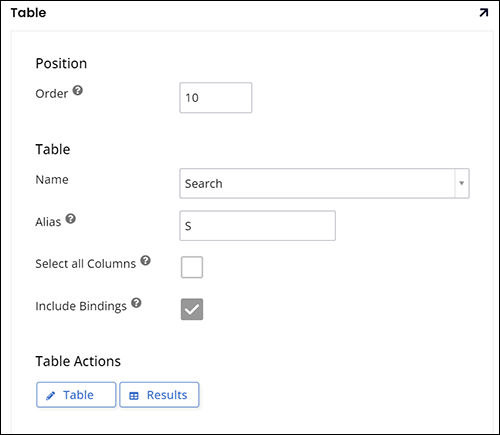
When a Managed Table is used in a business rule, the developer has the ability to configure the behavior of the records returned using the Include Bindings option.
The default setting for Include Bindings is enabled, which instructs App Builder to include the bindings for the Session/User/Window when running the subquery on the Managed Table. If you want to instead report on all records contained in the table, without this binding, uncheck the Include Bindings option.
- Navigate to the App Workbench > Rules
- Locate the rule with a Managed Table and click the corresponding pencil edit icon
- From the Tables tab, click on the blue table name region
-
Set the Include Bindings option according to your desired results

-
Click the Results button to validate the records being returned are as intended