Maintenance page in Jitterbit App Builder
The Maintenance page is where administrators install release packages, lock and unlock applications or data sources during maintenance windows, and manage in-app and system notifications. To access it, go to the IDE. In the Deploy section, click Maintenance.
It is divided into three tabs, described in detail below:
Workflow tab
The Workflow tab is the default tab and is where administrators run, monitor, and configure guided workflows. It contains two panels initially: Start Workflow and On-Going Workflows.
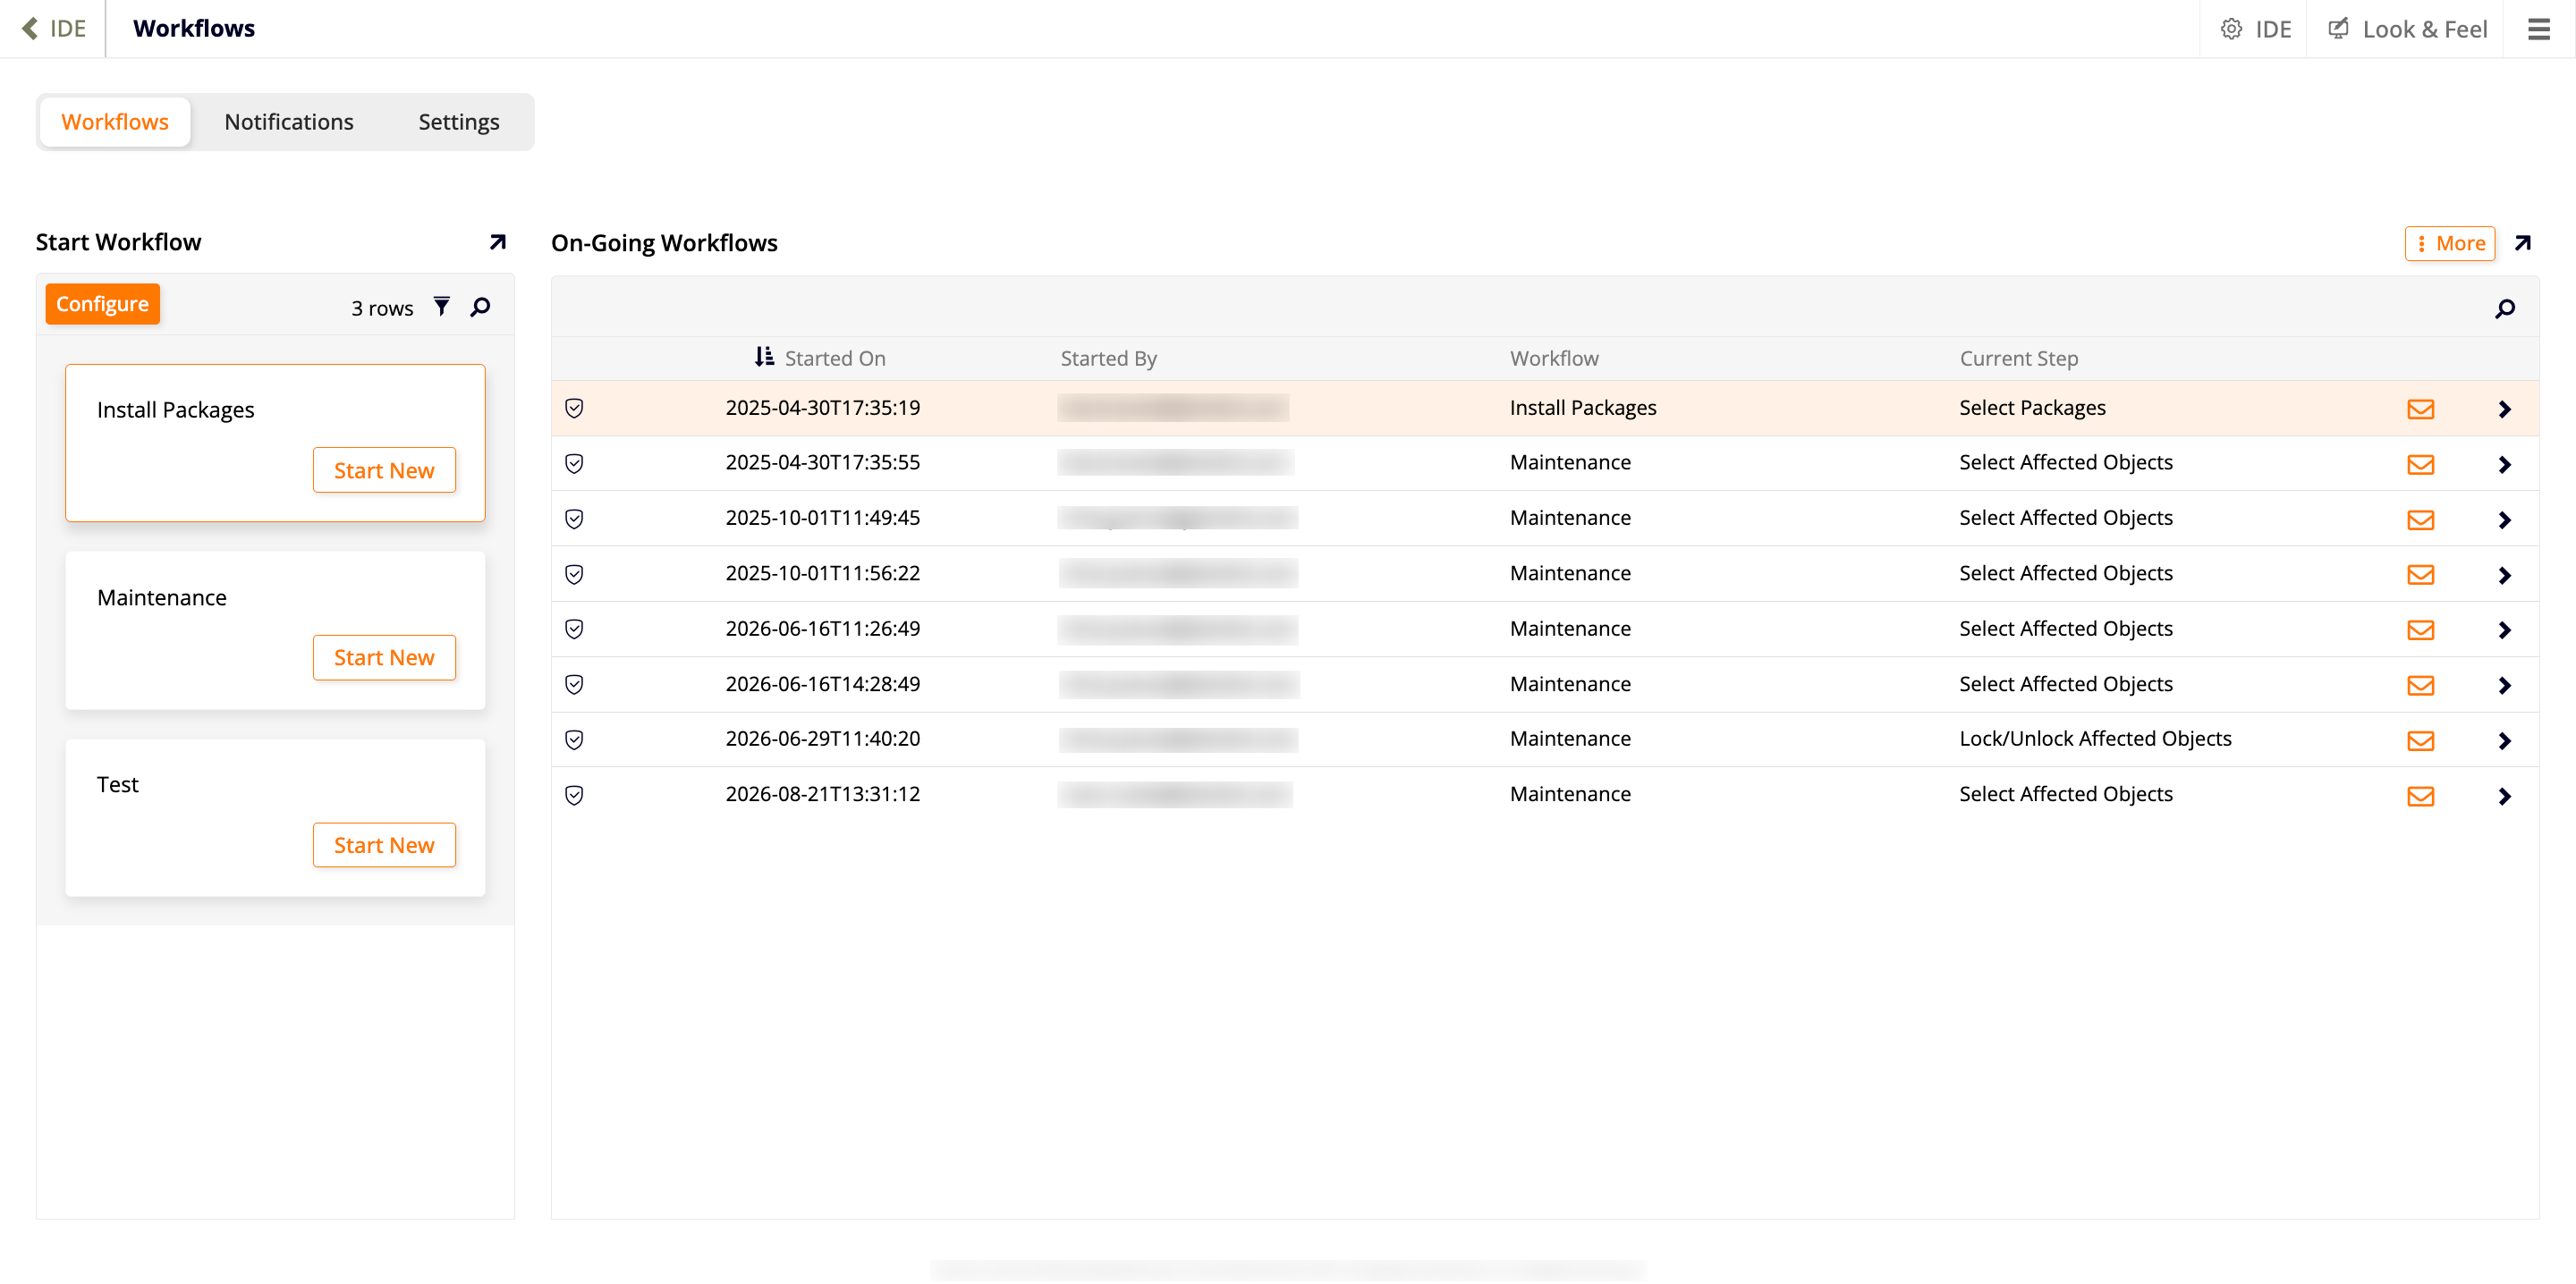
Start Workflow
Lists the guided workflows available in the environment, including the two that ship with App Builder (Install Packages and Maintenance) and any custom ones. The panel includes filter () and search () tools in its toolbar, and a row count indicator.
Click Start Now on a guided workflow to begin a new instance of it, or click Configure to reveal two additional panels: Workflows and Steps.
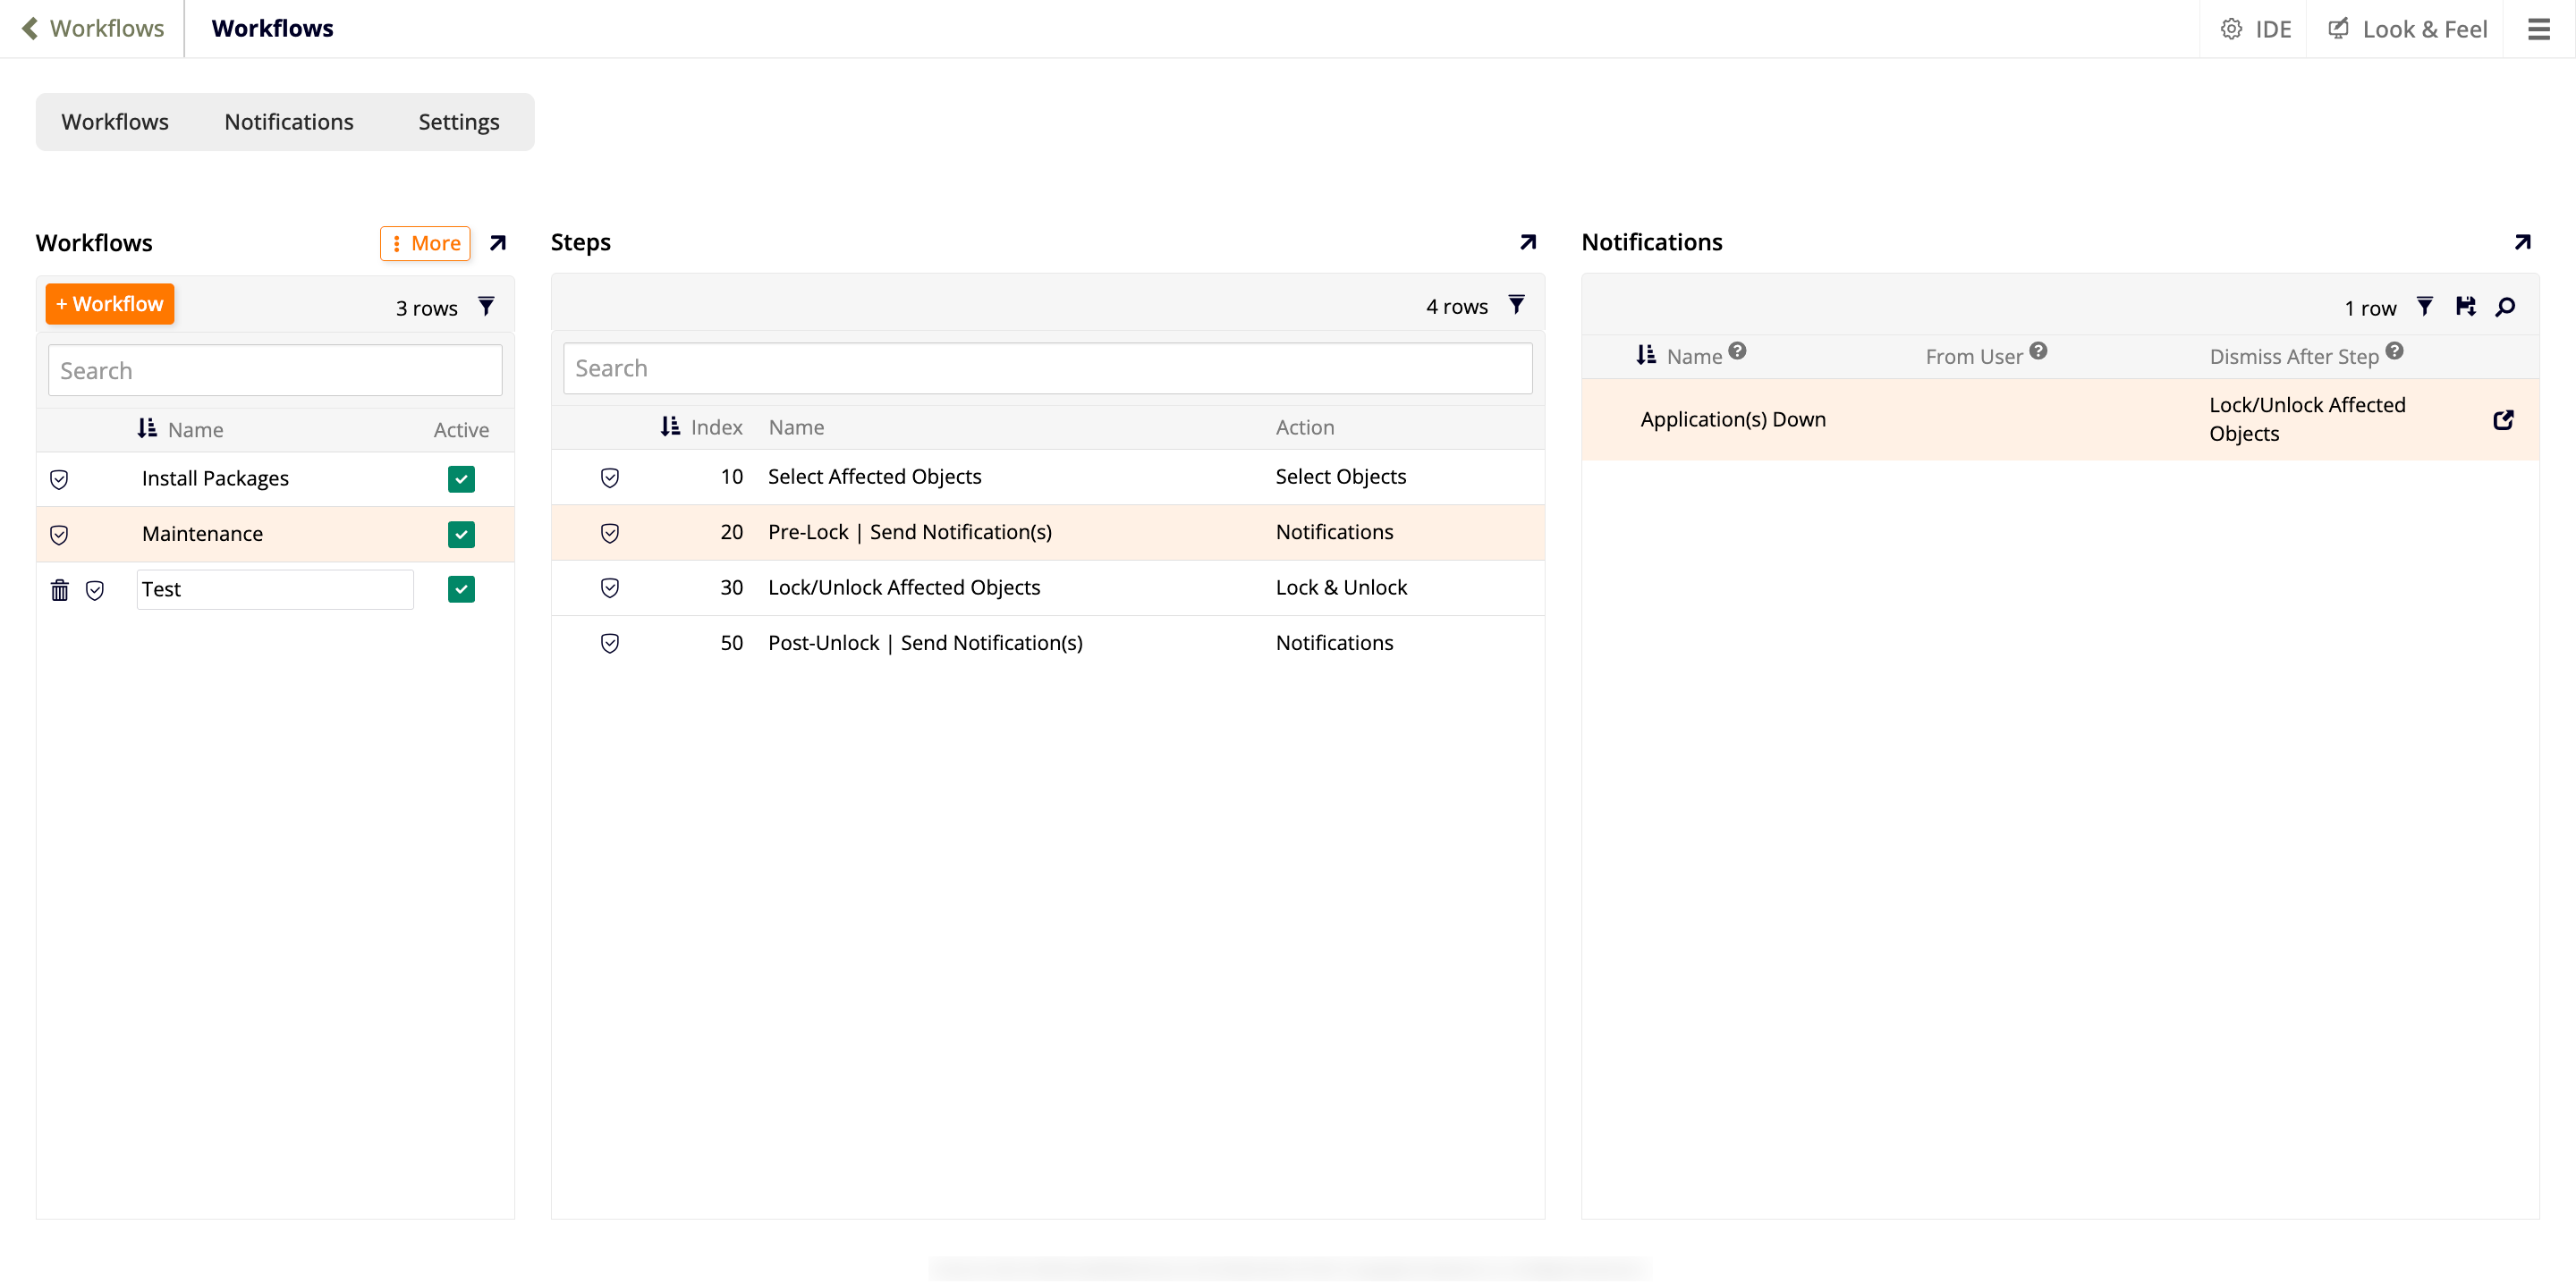
Workflows
Opened by clicking Configure on the Start Workflow panel. Lists every guided workflow in the environment, with filter () and search () tools, a row count indicator, and Name and Active columns. Click + Workflow to add a custom guided workflow. Selecting a row populates the neighboring Steps panel with that guided workflow's steps.
Steps
Lists the steps of the guided workflow selected in the Workflows panel, with filter () and search () tools, a row count indicator, and Index, Name, and Action columns. Click + Step to add a step, giving it a name and one of the following actions:
-
Select/Upload Packages: Lets the user add a release package to the guided workflow, either by selecting one already available in the environment (for example, one delivered by one-click deployment or a CI/CD integration), or by clicking Upload New Package to upload one directly.
-
Select Objects: Lets the user select which Application and Data Source objects the guided workflow affects. When this step follows a Select/Upload Packages step, App Builder automatically populates it with the solution objects from the package's manifest; the user can add more objects manually. The objects selected here become available to the Add Affected Objects option of any later Notifications step, and define the scope of any Lock & Unlock step.
-
Notifications: Lets the user configure one or more pre-built notification templates to send during this step, in a Notifications panel described in Notifications below.
While a guided workflow instance is running, the administrator can click Send on any pre-built template to send it. Once sent, the Send button is disabled; click the icon on the row to dismiss the sent notification, which re-enables Send. Pre-built notifications cannot be edited while the guided workflow instance is running.
Independently of any pre-built templates, the administrator can click On-Demand Notification at this step to send an ad hoc message, with the same fields as a system notification plus Dismiss After Step.
-
Install Packages: Lists the packages selected earlier in the guided workflow, with Installed, Installed By, and Installed On columns, and links to download the LP File and Manifest. Selecting a package opens a Release panel with its Name, Version, Developer, Release Date, Required App Builder Version, Description, and Release Notes. Click Install to begin installation.
Note
Installation runs in the background. The affected application remains available while the package installs, and progress can be monitored from IDE > Monitoring.
-
Lock & Unlock: Lets the user lock or unlock the applications and data sources selected in this guided workflow's Select Objects step, in a grid with Type, Object, and Locked On columns. Click Toggle Locks to change the lock state of the selected rows. (More objects can still be added at this step.)
Locking an object automatically grants access to it for any security group whose Application and Data Source Lock setting is enabled (Administrators and Developers by default); these appear in a Whitelist Security Groups panel next to the grid, where they can be added to or removed for this guided workflow instance. See Grant access to a locked application or data source for how to enable this setting on a group.
Any objects still locked when the guided workflow instance finishes are automatically unlocked.
Notifications
When a step with the Notifications action is selected in the Steps panel, a new panel called Notifications is revealed, listing the pre-built notification templates configured for that step. The panel includes a row count indicator, a filter () tool, an option to save the table as a CSV file (), a search () tool, and the following columns:
- Name: The notification name.
- From User: The sending identity. Defaults to the Service User.
- Dismiss After Step: A step after which App Builder automatically dismisses the notification for all recipients.
Click + Notification to add a new template, or click the icon at the end of a row to open the Workflow Notification dialog, with the following fields:
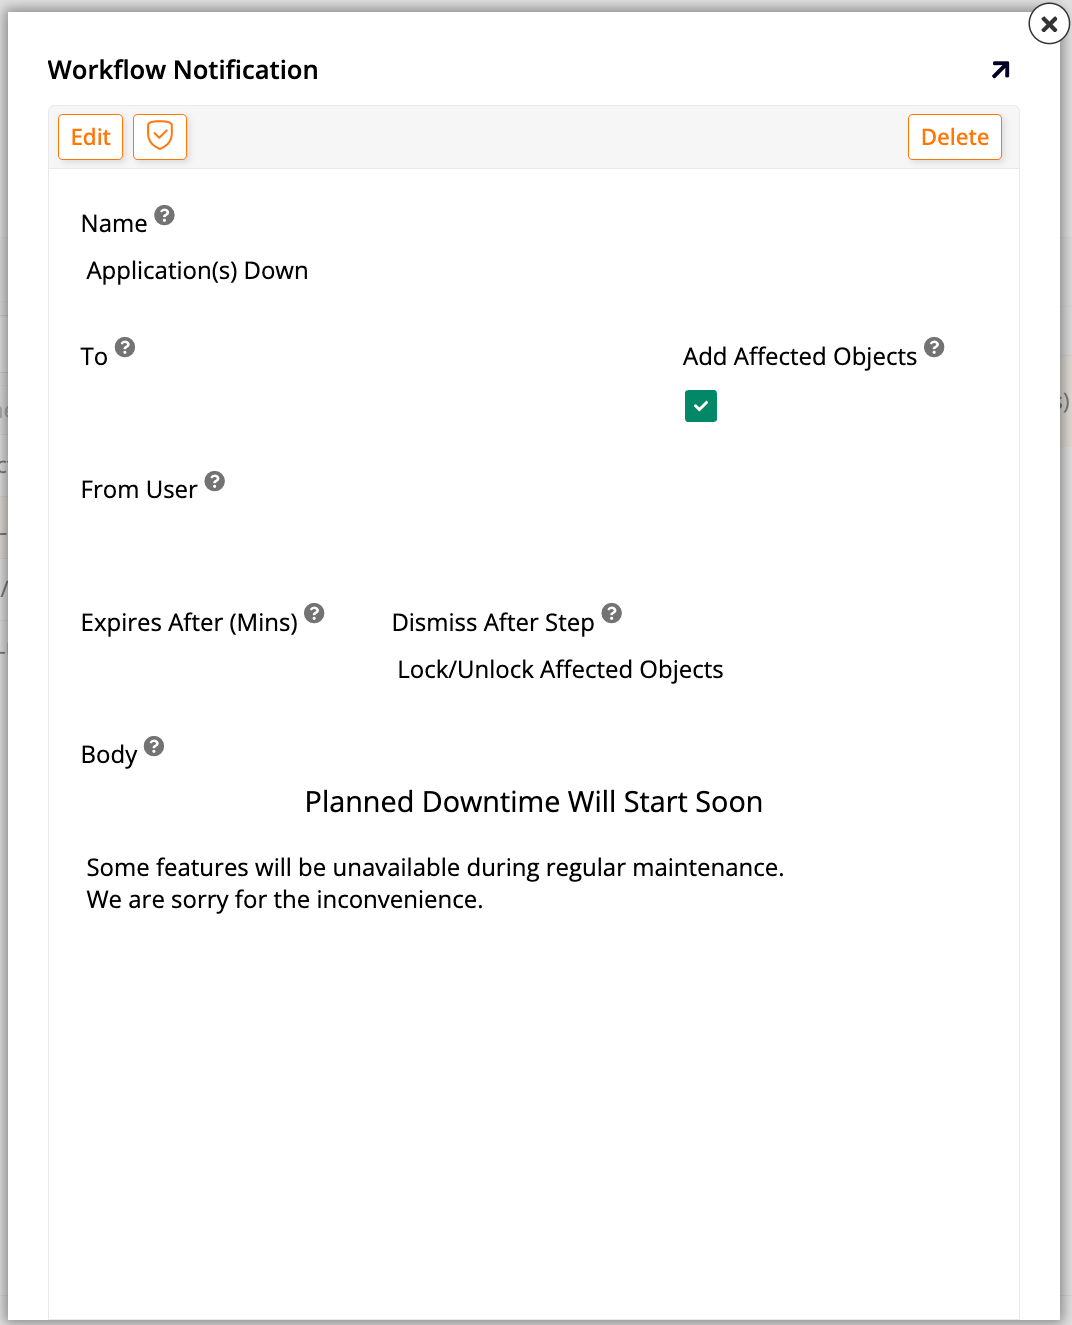
- Name: The notification name.
- To: Who the notification will be sent to. This field is required, unless Add Affected Objects is enabled.
- Add Affected Objects: Enable to also target the applications and data sources selected in this guided workflow's own Select Objects step. This has no effect if the workflow doesn't include a Select Objects step, or if that step hasn't been populated with any objects by the time this step runs. For example, a workflow that goes from a Notifications step straight to Install Packages, relying on that step's own package selection instead of a preceding Select Objects step, wouldn't have any objects to target.
- From User: The user that will be used to send the notification.
- Expires After (Mins): The message expiry time in minutes. This field is required, unless there is a selection in the Dismiss After Step field.
- Dismiss After Step: The step after which the notification will be dismissed and removed from the Notification Center. This feature can be used instead of a normal expiry wait time. If this isn't used, App Builder will still assign an expiry date to the notification, in days, in case a process is started but never completed.
- Body: The notification's message.
Note
These fields differ from system notifications: guided workflow notifications use Expires After (Mins) instead of an Expires On date and time, and add the Dismiss After Step option.
On-Going Workflows
This panel lists guided workflows currently in progress, with filter () and search () tools, a row count indicator, and the following columns:
- Started On: The date and time the guided workflow instance was started.
- Started By: The user who started the guided workflow instance.
- Workflow: The name of the guided workflow.
- Current Step: The step the guided workflow instance is currently on.
App Builder automatically saves a guided workflow instance's progress, so clicking a row resumes it from its current step, whether by the administrator who started it or a different one. Click More > Locks on a row to see the Locks dialog, which displays a table containing all objects (along with their respective type and parent object, if they have one) that are currently locked by that guided workflow instance.
Notifications tab
The Notifications tab is where administrators manage system notifications: messages sent by administrators to a group of users at once, independently of any guided workflow. It contains two panels: Scheduled Notifications and Sent System Notifications.
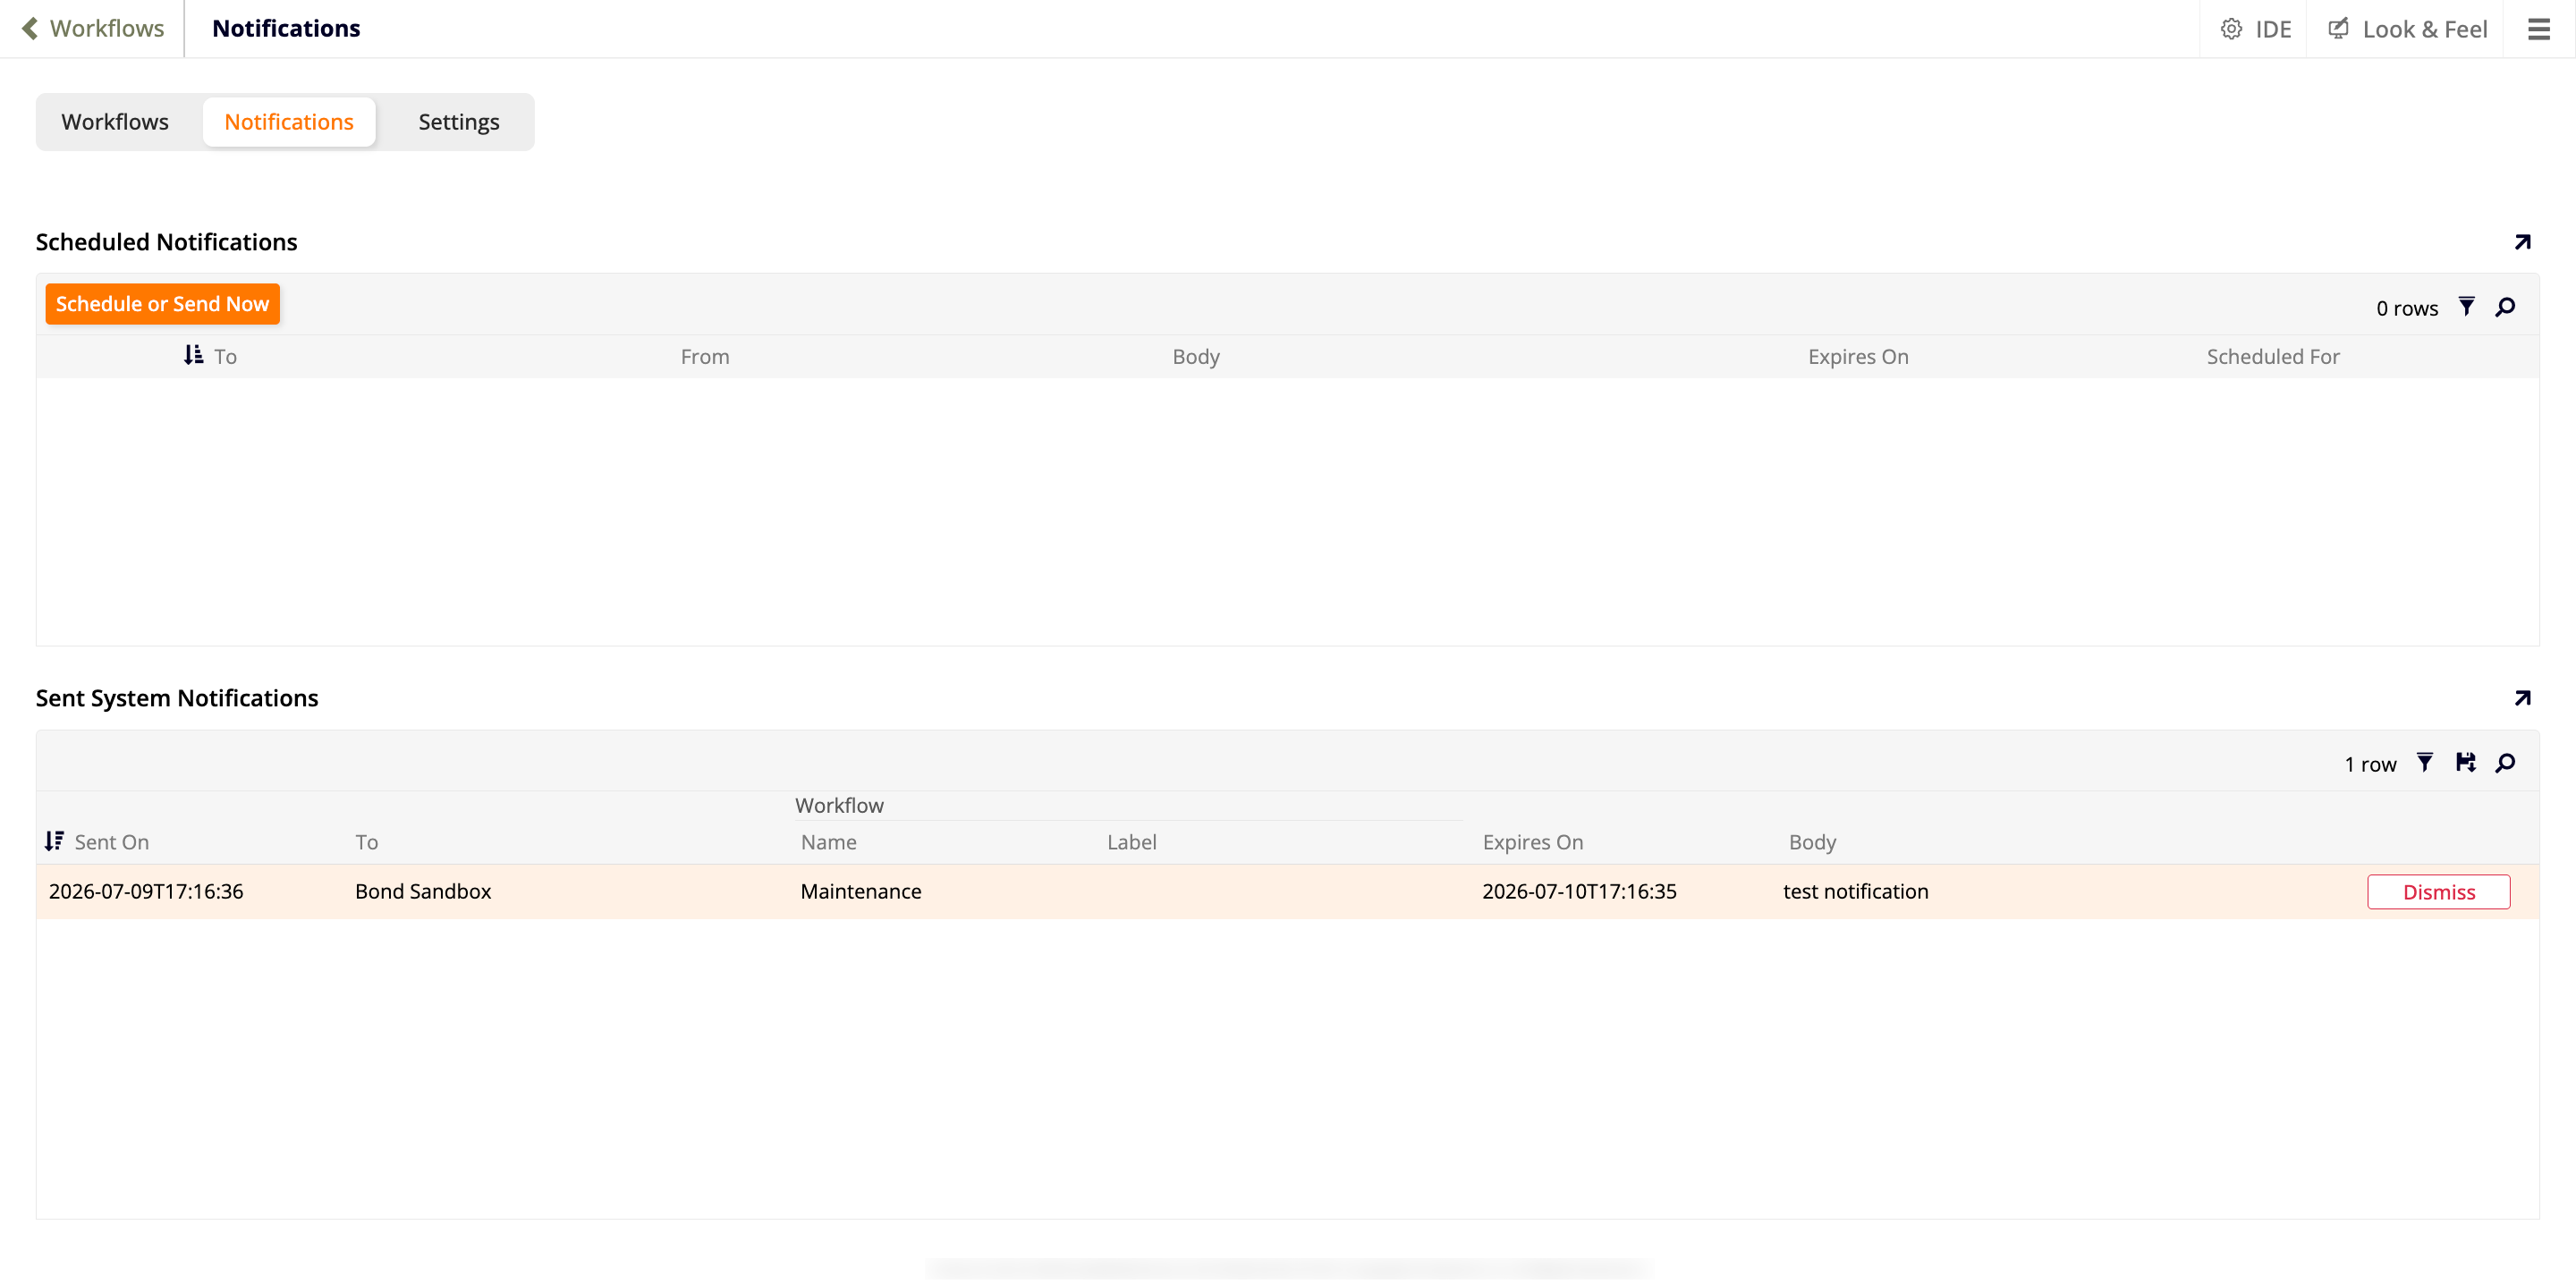
Scheduled Notifications
Lists system notifications that are scheduled but not yet sent. The panel includes filter () and search () tools, a row count indicator, and the following columns:
- To: The notification's target audience.
- From: The user the notification is sent from.
- Body: The notification's message.
- Expires On: The date and time the notification stops being shown to users who haven't yet seen it.
- Scheduled For: The date and time the notification is scheduled to be sent.
A pending notification can still be edited or deleted from this panel any time before it's sent. Click Schedule or Send Now to open the Notification dialog; see System notifications for its fields.
Sent System Notifications
Lists system notifications that have already been sent. The panel includes filter () and search () tools, a row count indicator, and the following columns:
- Sent On: The date and time the notification was sent.
- To: The notification's target audience.
- Workflow Name: The name of the guided workflow that sent the notification, if it originated from one.
- Label: The step of that guided workflow that sent the notification.
- Expires On: The date and time the notification stopped being shown to users who hadn't yet seen it.
- Body: The notification's message.
Click Dismiss on a row to remove that notification for all recipients, including from their Notification Center.
Note
A system notification is only shown to users in its target audience, and only while they're logged in or if they log in before its Expires On time. After Expires On passes, the notification remains in the Notification Center of any user who has already seen it, until an administrator clicks Dismiss.
Settings tab
The Settings tab configures defaults for the Maintenance page. It contains two panels: Configuration and Maintenance Pages.
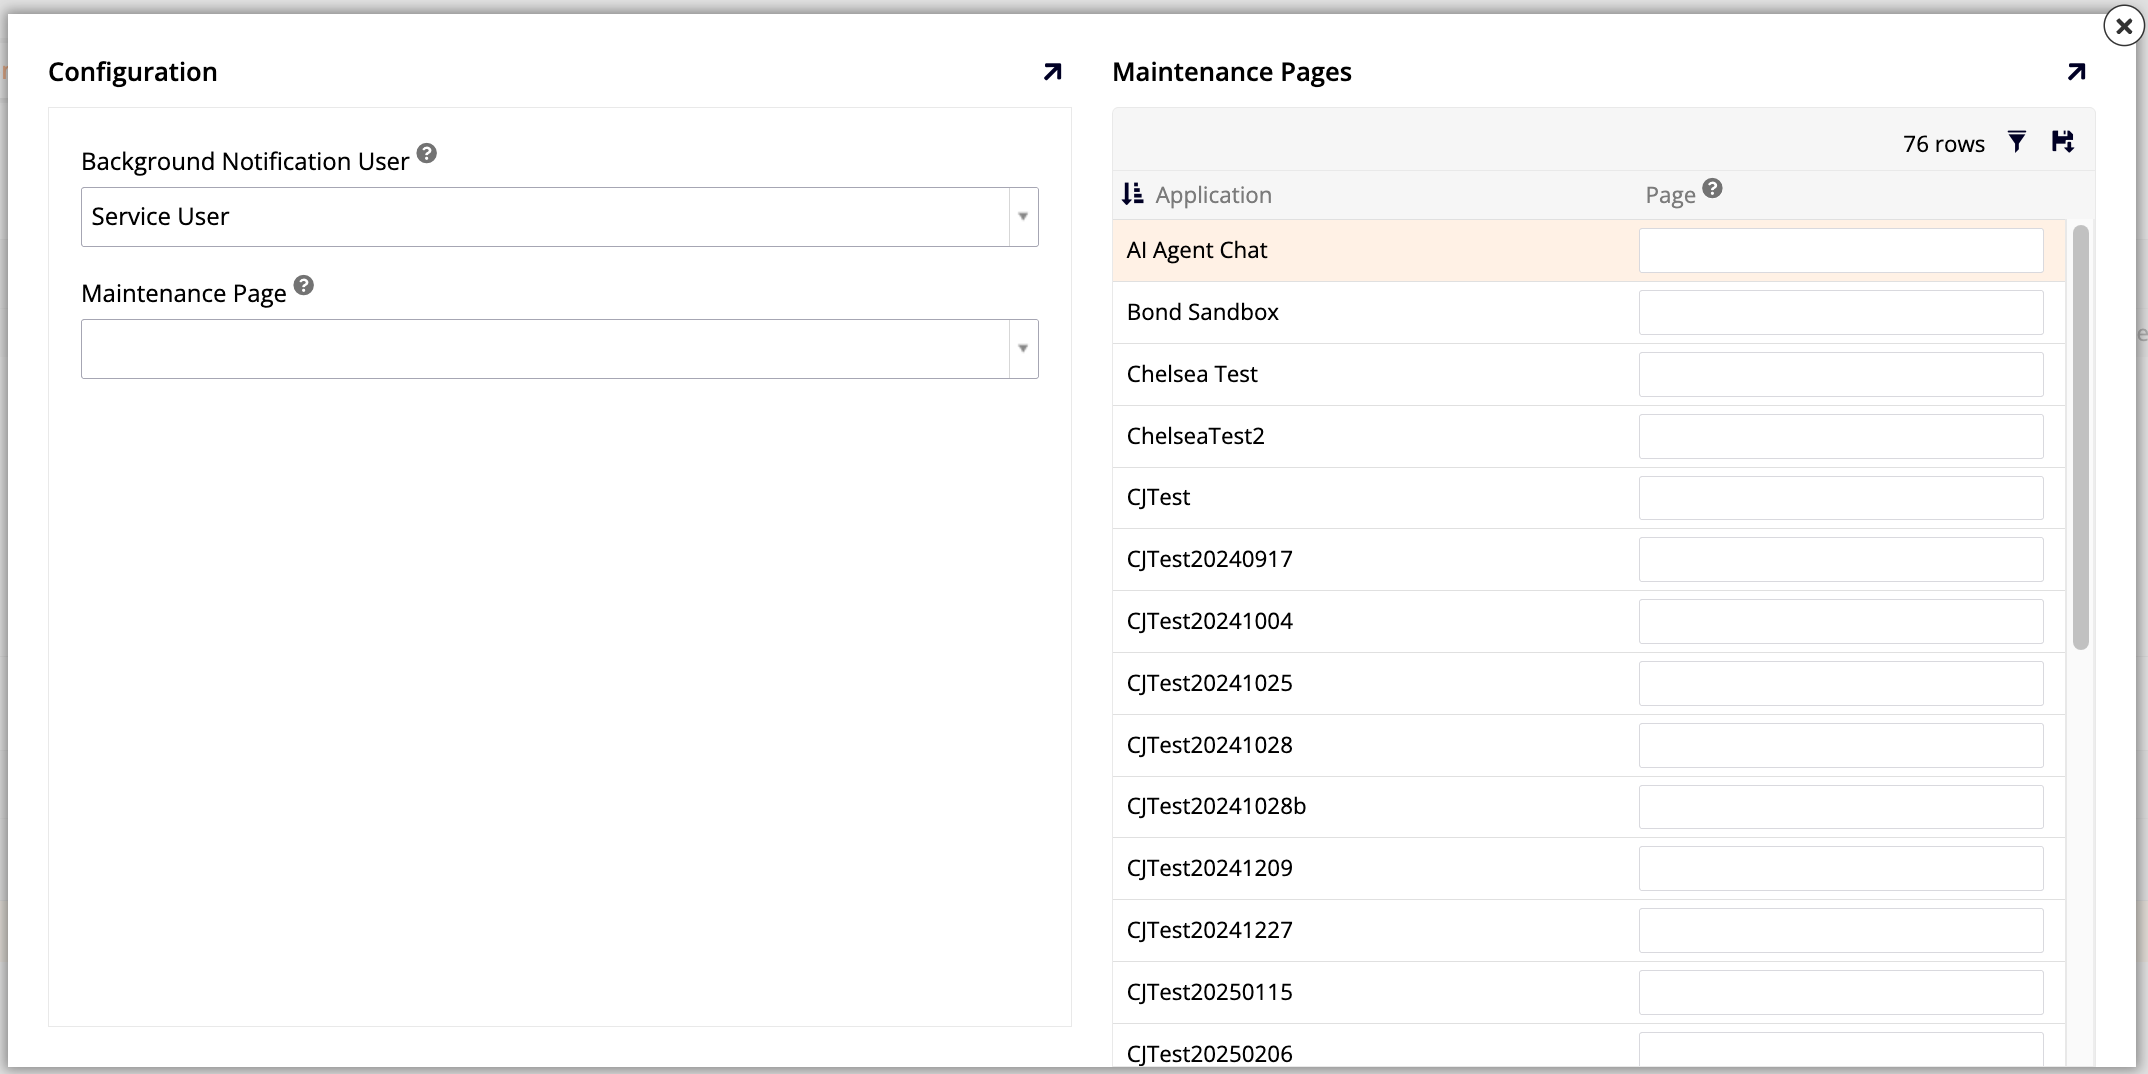
Configuration
There are two fields in this panel:
- Background Notification User: Select the user account that sends scheduled system notifications. Defaults to the Service User.
- Maintenance Page: The default page users are redirected to when they try to access a locked application or data source that has no custom maintenance page configured. Defaults to App Builder's built-in Maintenance page.
Note
For a user to be redirected to the default Maintenance page instead of getting an Access Denied error, they need permissions to the Vinyl - Maintenance app and the Everyone role on the Vinyl (Sealed) data source. See Grant access to the maintenance page for how to set this up. This requirement doesn't apply to a custom maintenance page set in the Maintenance Pages panel below.
Maintenance Pages
Lets administrators override the default maintenance page for individual applications. The panel includes a filter () tool, an option to save the table as a CSV file (), a row count indicator, and the following columns:
- Application: The application the override applies to.
- Page: The page to redirect that application's users to instead of the default maintenance page. Enter a page here to set an override, or clear it to remove one.
Note
A custom maintenance page must be marked Public, and its target users need at least Read access to it. If a user doesn't have access to the custom page, they're redirected to the default maintenance page instead; if they don't have access to either page, they get an Access Denied error.