Production upgrade strategies for Jitterbit App Builder
Introduction
Upgrading App Builder means installing a new platform release onto your App Builder environment, including any required updates to the Vinyl database (App Builder's underlying database). Because an upgrade changes your application's runtime and its database schema at the same time, planning it carefully helps you catch compatibility issues early and keep downtime predictable.
The best approach is to validate a platform release in a non-production environment first. Maintain at least a dual-environment topology (development and production), or a tri-environment topology (development, QA, and production) following the 3-tiered approach, so you can test platform releases, database schema migrations, and custom application logic before they reach production. Running a single production-only environment is strongly discouraged, since it leaves no environment to catch problems before they affect users.
This page lists the prerequisites for upgrading and then details the process in three steps:
-
Step 1: Upgrade and validate development and QA
Upgrade the platform release in your development and QA environments and validate it there. -
Step 2: Upgrade production
Choose a strategy for upgrading the production environment: an in-place upgrade or a Blue/Green deployment. -
Step 3: Verify the upgrade
Ensure that the upgrade was successful.
If you only maintain a production environment, see Single-environment (production-only) deployments for guidance on adapting the steps below instead.
Prerequisites
Before executing a platform upgrade in any environment, complete the following, in order:
-
Code freeze: Institute a code freeze across all environments. Do not start new application feature development until the platform upgrade is complete in all environments.
-
Database schema synchronization: Ensure custom database schemas (tables, columns, views, and stored procedures) are synchronized between development, QA, and production. Schema drift between environments can cause the platform upgrade or application logic to fail unpredictably. See Release management for how App Builder tracks and replays schema changes across environments.
-
System requirements check: Verify that the host environment meets the system requirements for the target release, across operating systems, container runtimes, and database engines.
-
Database, file, and folder backups: Immediately before starting maintenance, do the following:
-
Back up the Vinyl database (required) and any application databases undergoing physical or schema changes (highly recommended).
-
Keep a copy of the previous release archive file (
.tar.gzor.zip), or the previous application folder itself, on the host. Either lets you roll back quickly: re-extract the archive, or swap the old folder back into place. -
Preserve the following App Builder application directory contents when replacing application binaries or upgrading directories:
-
appsettings.json: Retains application-level configuration settings. -
Connection.xml: Retains the backend database connection strings and parameters. -
data: Contains locally stored application files, such as generated PDFs, file uploads, and other document attachments stored in the App Builder directory. -
keys: Contains the data encryption keys used to decrypt stored credentials, connection strings, and application data. Losing this folder makes encrypted data permanently unreadable. -
License file (
vinyl.lic): Avoids licensing errors on startup. -
logs: Retains system event logs, diagnostic logs, and audit trails.
-
-
Once these prerequisites are met, continue to Step 1: Upgrade and validate development and QA.
Step 1: Upgrade and validate development and QA
Before upgrading production under either strategy, upgrade the platform release in development and QA and validate it there. This lets developers and business users catch compatibility issues while the change has not yet reached production, regardless of which strategy you later choose for the production upgrade.
Upgrade and smoke test] --> QA[QA:
Upgrade and UAT] QA --> PROD[Step 2:
Upgrade production]
Refresh the development or QA database (optional)
As an additional precaution, restore a fresh copy of the production database into development or QA before upgrading those environments:
-
Restore to development for a migration dry run: Doing this lets developers test schema updates against real production data, catch data-specific conflicts early, and measure execution timing to plan the production downtime window.
-
Restore to QA for realistic User Acceptance Testing (UAT): This ensures business users perform UAT against authentic production data scenarios.
Caution
When copying production data to development or QA, review and adjust environment-specific settings to avoid unintended side effects. For example, disable scheduled background jobs or reconfigure the Simple Mail Transfer Protocol (SMTP) server settings so that non-production environments do not trigger automated tasks or send duplicate emails or notifications to real users.
Upgrade the development environment and perform smoke testing
Upgrading the development environment first lets developers validate the new platform release against real application logic and fix any compatibility issues before they reach QA or production.
-
(Optional) Refresh the development database, following the guidance above.
-
Upgrade the App Builder runtime and database in development.
-
Perform smoke testing on the upgraded instance, focusing on the following areas:
-
Core business processes: Business logic often relies on database-level functions, dynamic SQL generation, or stored procedures. A version upgrade can change how database queries execute, so validate your core paths.
-
Data source connections and integrations: Platform updates often include updated database drivers, Open Database Connectivity (ODBC) or Java Database Connectivity (JDBC) connectors, or revised authentication requirements. Verify that all remote data sources connect and query cleanly.
-
UI and UX elements (themes, HTML, CSS, layouts): Platform updates can change internal Document Object Model (DOM) structures or default element selectors. Custom styling and overrides can break if structural classes or selectors change.
-
Custom code (UI widgets, plugins, custom JavaScript): Custom code carries the highest risk during an upgrade, since Jitterbit QA cannot test code written outside the core platform. Test all interactive UI components to confirm their APIs or DOM targets haven't shifted.
-
Security, roles, and row-level permissions: Platform releases sometimes update security evaluation logic or row-level security filters. Verify that user roles, impersonation rules, and data access policies behave as expected.
-
Scheduled events, background jobs, and queues: Confirm that automated tasks fire and run to completion, since changes to background service configuration can affect them.
-
Platform release notes: Review the App Builder release notes for deprecations, breaking changes, and any required post-upgrade steps.
-
-
If developers find compatibility issues during smoke testing, make the required fixes in development, then build a release package to deploy the fixes to QA and production.
Upgrade QA and conduct UAT
With the development environment validated, this step brings QA to the same platform release, deploys the fixes made during development, and gives business users a chance to sign off before production is touched.
-
(Optional) Refresh the QA database, following the guidance above.
-
Upgrade the App Builder runtime and database in QA.
-
Deploy the release package containing the fixes exported from development. Installing a release package requires brief additional downtime for the affected applications.
-
Conduct full UAT to validate application functionality and obtain deployment sign-off.
Once development and QA are upgraded and validated, continue to Step 2: Upgrade production.
Step 2: Upgrade production
With development and QA upgraded and validated, and your release package ready, choose one of the following strategies for the production upgrade:
-
In-place upgrade: Applies the platform upgrade directly to production during a maintenance window. Recommended for standard development, QA, and production topologies.
-
Blue/Green deployment: Upgrades a parallel copy of production (Green) while the live environment (Blue) keeps serving users, then cuts over traffic once Green is verified. Recommended for mission-critical environments that require minimal downtime.
The following table compares the two strategies:
| Metric | In-place upgrade | Blue/Green deployment |
|---|---|---|
| Recommended topology | Development, QA, and production. | Development, QA, and production (or production-only with minimal-downtime requirements). |
| Downtime required | Full duration of the app and database migration (5 minutes to 1+ hour), plus application fixes and deployment (or the Maintenance guided workflow). | Duration of the final database sync and DNS cutover only. |
| Infrastructure cost | Low (uses the existing production footprint). | Temporary increase (requires a parallel environment). |
| Single-environment fix handling | In-place live fixes, or Maintenance guided workflow redirection. | Offloaded to the Green environment (zero impact on Blue). |
| Rollback complexity | High (requires full database and file restores). | Low (repoint the load balancer or DNS back to Blue). |
| Vinyl history continuity | Retained throughout. | Workflow, job, and log history generated during the Blue/Green window is lost. |
| Risk profile | Low to medium (mitigated with a database dry run). | Lowest. |
In-place upgrade
Recommended for standard development, QA, and production topologies using a scheduled maintenance window. This strategy applies the platform upgrade directly to production's live infrastructure, once the release has already been upgraded and validated in development and QA.
Note
Expect significant downtime: the environment is offline while App Builder updates its core database. This can take anywhere from 5 minutes to over an hour, depending on how much the current release differs from the target release. Account for additional downtime for application runtime updates and post-upgrade application package deployments.
To start, apply the platform update and the fixes validated in development and QA to production during your scheduled maintenance window. Follow these steps:
-
Stop Internet Information Services (IIS), application services, or containers on production to stop incoming traffic.
-
Back up the production databases and preserve the core files listed in Prerequisites.
-
Update the application runtime for your environment:
-
AWS: Deploy the new application bundle or update the target image tag, following Install App Builder in AWS.
-
Azure: Update the container image tag or application package, following Install App Builder in Microsoft Azure.
-
Docker: Update the image tag in
docker-compose.yml, keeping the volume mounts that persistkeys,logs,data,Connection.xml, andappsettings.json, then pull and restart the containers. See Upgrade to App Builder on Docker. -
Google Cloud Platform (GCP): Deploy the new container image tag to Cloud Run, Google Kubernetes Engine (GKE), or Compute Engine.
-
Windows/IIS: Follow Upgrade App Builder on Microsoft Windows, which covers restoring
Connection.xml,appsettings.json, and thekeysfolder, and granting the IIS application pool identity Full Control over thedata,logs, andkeysdirectories.
-
-
Start services to bring the upgraded platform online.
-
Deploy the release package containing the fixes validated in development and QA. Account for the brief additional downtime this requires.
-
Complete the checks in Step 3: Verify the upgrade, clear application caches, and reopen the environment to users.
Roll back an in-place upgrade
If the production upgrade fails or introduces critical issues, follow these steps to revert production to its pre-upgrade state.
-
Stop application services, IIS, or containers.
-
Restore the Vinyl database and application databases from the pre-upgrade backups.
Warning
Restoring database backups reverts any user activity or transactions recorded after the upgrade.
-
Revert the application runtime:
-
Windows/IIS: Replace the application directory with the preserved backup folder, or re-extract the previous release archive, keeping
keys,logs,data,Connection.xml,appsettings.json, and the license file intact. -
Docker or cloud containers (AWS, GCP, Azure): Revert to the previous release tag in your compose file, Cloud Run, GKE, or App Service configuration, then redeploy.
-
-
Start services and perform basic verification checks before reopening the environment.
Blue/Green deployment
Recommended for mission-critical production environments that require high availability and minimal maintenance windows.
Blue/Green is a deployment strategy for the production phase of your lifecycle. It does not replace non-production testing: complete the prerequisites and Step 1: Upgrade and validate development and QA before starting a Blue/Green cutover in production. (This does not apply if you are adapting Blue/Green for a single-environment deployment.)
This strategy upgrades Green while Blue stays online, then cuts over once Green is verified. Expect minimal downtime, limited to the final database synchronization and the DNS or load balancer cutover.
Warning
This strategy does not carry over Vinyl database records created on Blue after Green is provisioned. Workflow history, job history, and logs (event, request, and others) generated on Blue during the Blue/Green window are not migrated to Green and are lost at cutover.
To start, provision the Green environment. Green needs to exist as an independent environment, configured like Blue but not yet serving live traffic, before you can upgrade and validate the new release on it. Follow these steps:
-
On Blue, before cloning, add a site entry for Green so that Green does not inherit Blue's redirect. Select Security Providers > More > Sites, click + Site, and create an entry with Green's URL, leaving Default and Redirect unchecked. Once Green is cloned from Blue, requests to Green's own URL match this entry instead of falling back to Blue's default, redirect-enabled entry. (See Sites and aliases for more on this feature.)
-
Provision Green as a full clone of Blue, including its Vinyl database as of that moment (with its current encryption keys, workflow history, job history, and logs).
-
Update Green's
Connection.xml,appsettings.json, and environment variables to point to the Green database instance during staging, not to the live Blue database.
Tip
If you already provisioned Green without adding the site entry beforehand, you can instead add "Redirect": false to the Site section of Green's appsettings.json to disable the redirect until cutover, then remove that line once cutover is complete:
{
  "Site": {
    "Url": "https://localhost:5001",
    "Default": true,
    "Redirect": false,
    "Aliases": [
      {
        "Url": "https://localhost:5000"
      }
    ]
  }
}
Next, apply the upgrade to Green and validate it against production data. At this point, the users that Blue continues to serve still won't be impacted. Follow these steps:
-
Clone the production databases to Green.
-
Apply the platform upgrade, container updates, and database migrations on Green.
-
Deploy the release package containing the fixes validated in development and QA.
-
If your applications run background jobs that send email notifications, disable those jobs or adjust the SMTP server settings on Green during validation, to prevent duplicate emails from being sent to users while Blue remains live.
-
Complete validation and health checks on Green while Blue continues to handle live traffic.
Now that Green is fully validated, it's time to synchronize the last production changes and switch live traffic from Blue to Green:
-
Pause write operations on Blue, or briefly stop the Blue application services.
-
Take a final backup of Blue's user (application) databases and restore it to Green to reach complete data parity. Jitterbit recommends a full backup and restore. A differential backup is recommended only when the data volume makes a full backup impractical.
-
Synchronize encryption keys between Blue and Green:
-
If keys are stored in an external location, such as an S3 bucket, Blue and Green already share them, and no action is needed.
-
If keys are stored on the file system (the default), copy the Key Encryption Keys (KEKs) from Blue to Green now.
-
For each data source, open the Data sources tab, select the data source's row, then select Encryption Keys under Business Logic Layer to check for Data Encryption Key (DEK) records created since Green was provisioned:
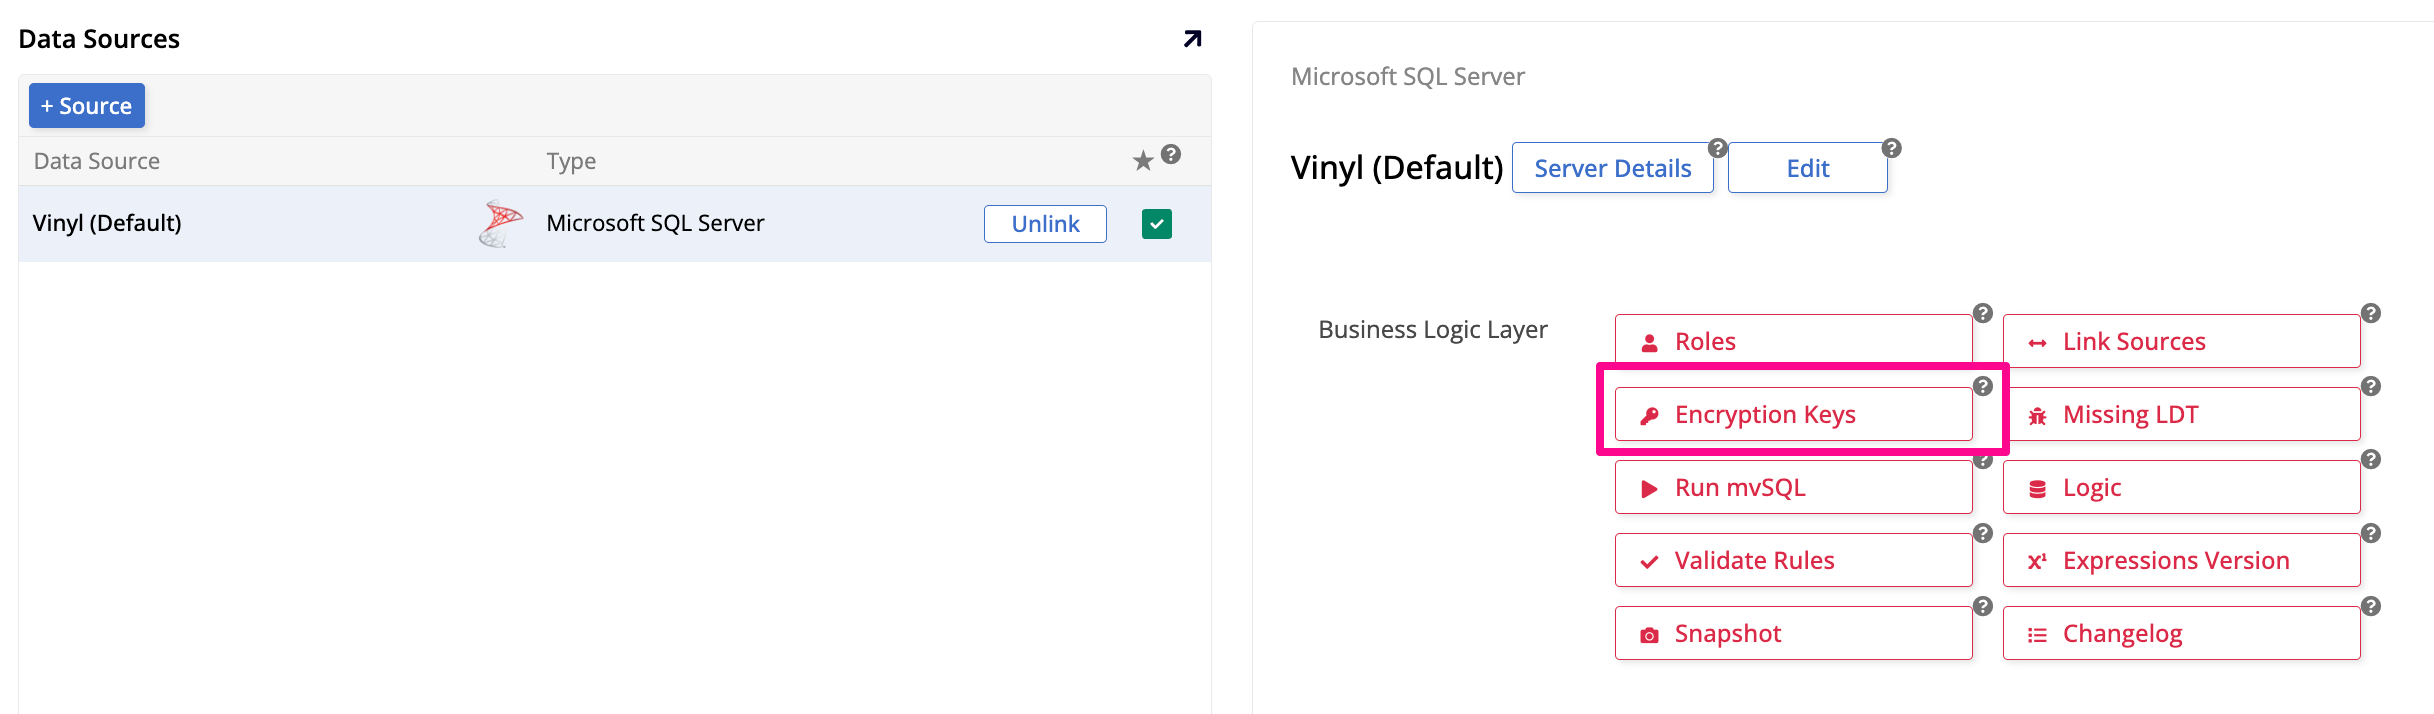
For any new records, have an administrator connect directly to Blue's Vinyl database, export the key from the
Se_DataEncryptionKeytable, and import it into Green's Vinyl database.
Warning
A running production environment must retain every encryption key generated over its lifetime, or the data it encrypts becomes permanently unreadable.
-
-
Re-enable or restore any SMTP settings or background jobs that you adjusted on Green during staging.
-
Warm up the application pools or containers on Green.
-
Repoint DNS records, load balancers, or reverse proxies from Blue to Green.
-
Complete the checks in Step 3: Verify the upgrade, monitor traffic on Green, and decommission or spin down Blue once stability is verified.
-
Once Blue is decommissioned, remove or update the site entry Green inherited from Blue (the one with Default and Redirect enabled).
Note
Left in place, this entry redirects any request that doesn't match Green's own site entry to the now-decommissioned Blue.
Roll back a Blue/Green cutover
If testing on Green surfaces issues, or a critical problem appears right after cutover, you may need to fall back to Blue. Because Blue remains untouched throughout testing and staging, falling back is straightforward, regardless of when the issue surfaces:
-
Before cutover: If testing on Green surfaces issues, terminate Green. Blue experiences zero impact or downtime.
-
After cutover: If critical issues occur immediately after switching DNS or routing, repoint DNS or load balancers back to Blue. Manually reconcile any write transactions recorded on Green after the cutover back to Blue before reverting.
Single-environment (production-only) deployments
Important
Maintaining only a production environment is strongly discouraged. If you operate with a single environment, choose one of the following approaches to handle post-upgrade smoke testing and application fixes.
If you have a single-environment (production-only) deployment, the upgrade strategy differs a little. To start, complete items 1, 3, and 4 of the prerequisites: the code freeze, the system requirements check, and the backups, as they all apply to a single-environment deployment. Item 2 (the database schema synchronization) does not apply, since there is no other environment to synchronize against. Because a single-environment deployment has no development or QA environment, you should also skip Step 1: Upgrade and validate development and QA. Choose one of the following approaches instead:
In-place upgrade in a single environment
This approach follows the same runtime update steps as the in-place upgrade: stop services, back up, update the application runtime, and start services again. Skip the step that deploys a release package built in development and QA, since neither exists in a single-environment deployment. Instead, because smoke testing happens directly in production after the upgrade, developers who find application issues must fix them in the live environment while users are logged in. If the upgrade itself fails, use the same rollback steps as the in-place upgrade.
To prevent users from encountering errors or corrupted workflows while developers apply fixes, use the Maintenance guided workflow to lock affected applications and redirect non-admin traffic to a maintenance page until testing and fixes are complete.
Blue/Green in a single environment
If you use a Blue/Green strategy in a single-environment setup, the Green environment acts as a temporary testing playground. Developers run the platform upgrade, complete full smoke testing, and apply any necessary application fixes on Green while Blue remains live and handles normal user traffic.
Once Green is fully tested and verified, sync the final database changes and cut over traffic, following Blue/Green deployment. Users do not experience broken app states or see maintenance windows during the fix cycle.
Once you complete the upgrade using either approach, continue to Step 3: Verify the upgrade.
Step 3: Verify the upgrade
Before ending the maintenance window (if you used the in-place upgrade) or decommissioning Blue (if you used Blue/Green deployment), confirm the following:
-
The App Builder license remains valid and active on the upgraded release.
-
Scheduled background jobs, queues, and thread pool workers are in a running or idle state, and did not fail on startup.
-
The
logsfolder shows no unhandled exceptions, Object-Relational Mapping (ORM) errors, or database connection timeouts. -
The App Builder version displayed in the application footer or diagnostic page matches the target release.