Embed the Conversational AI chat on an external page in Jitterbit App Builder
Overview
This guide explains how to embed the Conversational AI chat interface on an external web page, such as a customer-facing website or a third-party application. This approach differs from the chat bubble and the chat panel, which are both displayed within App Builder itself.
The embed is implemented as a web component (<jitterbit-chat>) loaded via a JavaScript bundle served by your App Builder instance. The embedded chat can run as the built-in anonymous user, or it can authenticate users with JWT SSO based on the host page's session. This page describes both options.
Prerequisites
The embedded chat requires App Builder 4.63 or later. Before embedding the chat on an external page, complete the following:
- Connect an AI agent as a REST API data source in App Builder.
- Set up a Conversational AI agent in the IDE with the Is Active option enabled.
How to embed the chat on an external page
Follow the steps below to embed the chat on an external page. The steps differ if you want the embedded chat to run as an anonymous user, or if you intend to configure JWT SSO authentication:
Step 1: Add the embed snippet
To embed the chat on an external page, add the following to your HTML:
<script src="{base-url}/js/jitterbit-chat-loader.bundle.js" defer></script>

<jitterbit-chat
    base-url="{base-url}"
    agent-ids="">
</jitterbit-chat>
Replace the following placeholder:
{base-url}: The URL of your App Builder instance.
Note
The title displayed in the chat window is the name of the active agent, as configured in the IDE.
The agent-ids attribute is optional. Leave it empty to display all agents available to the user, or enter one or more agent IDs as a comma-separated list to limit the chat to specific agents.
Step 2: Choose an access method
The embedded chat supports two access modes. Choose the one that fits your requirements:
Option A: Anonymous access
By default, the embedded chat runs as the built-in anonymous user. However, you need to allow anonymous users to interact with the chat. Create a dedicated group and grant it the appropriate privileges by following these steps:
- In the IDE, click User Management in the Runtime panel.
- Select the Groups tab and click + Group.
-
Enter a name (for example,
Anonymous Users) and a description, then click Save.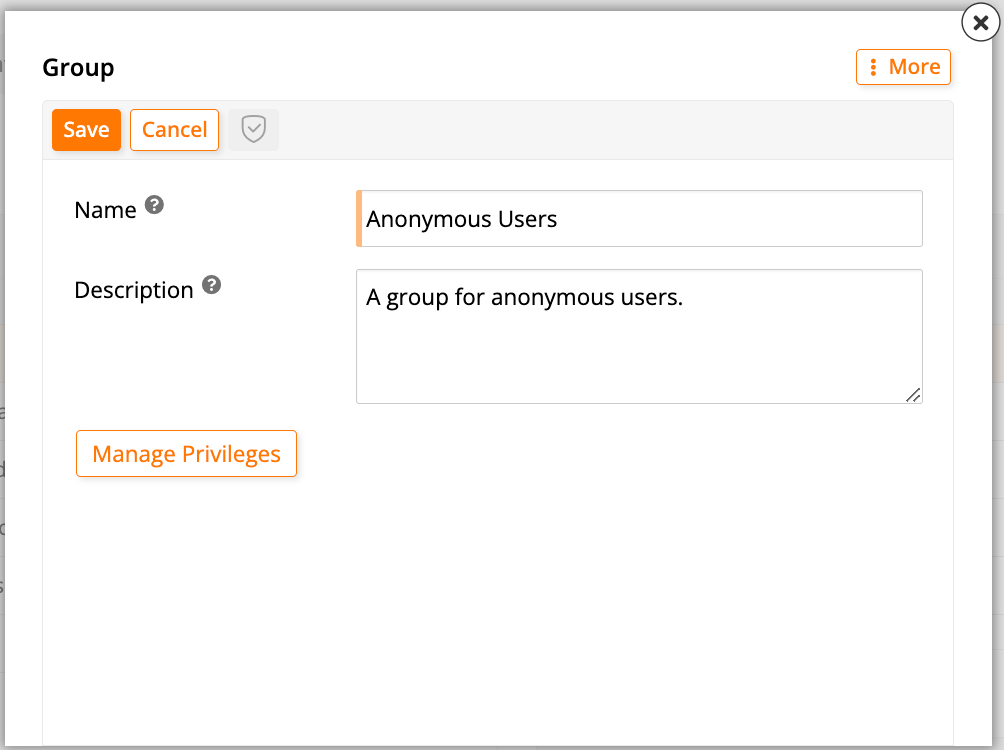
-
When the new group appears in the Groups panel, click its Manage Privileges button.
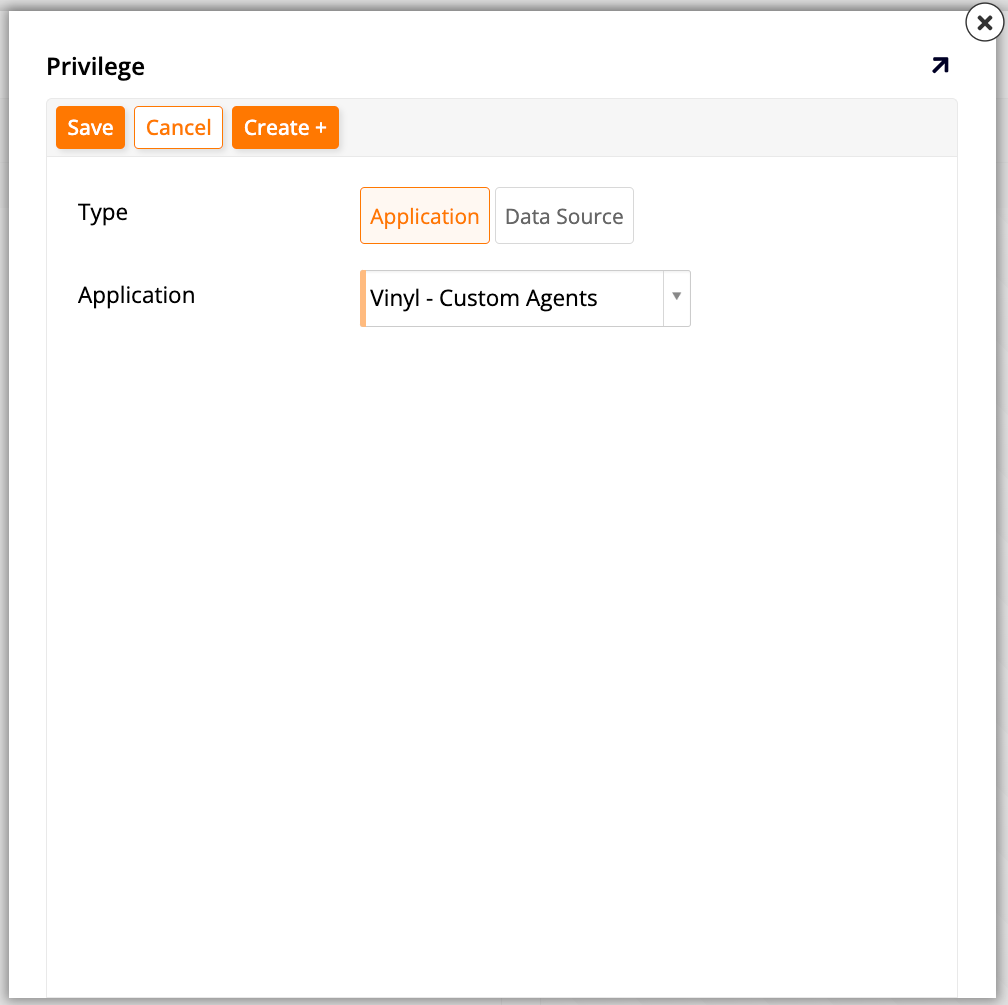
- In the Manage Privileges dialog, click Create in the Privileges panel.
- In the Create Privilege dialog, select Application in the Type field.
-
In the Application dropdown, select Vinyl - Custom Agents, then click Save.
-
Select the new privilege in the Privileges panel. The roles associated with it appear in the Roles panel.
- Locate the Agent Chat role and click Grant.
-
Exit the dialog to return to the Groups tab. With the new group selected in the Groups panel, click + Membership in the Membership panel. Select the built-in
anonymoususer from the User dropdown, and click to save.
For more information on managing groups and privileges, see User and Group Management.
Note
If the host page is served from a different hostname than your App Builder instance, configure CORS on the public-facing web server in front of App Builder (for example, IIS on Windows or Apache on Linux). Contact your infrastructure team or refer to your web server's documentation for configuration steps.
Next, add a role and grant it the relevant permissions by following these steps:
- In the IDE, click Data Servers in the Connect panel.
- In the data servers list, select the AI agent data server.
- In the panel on the right, double-click the box containing the server name or click the icon on the box. A dialog opens.
-
Click Roles. The Roles dialog opens.
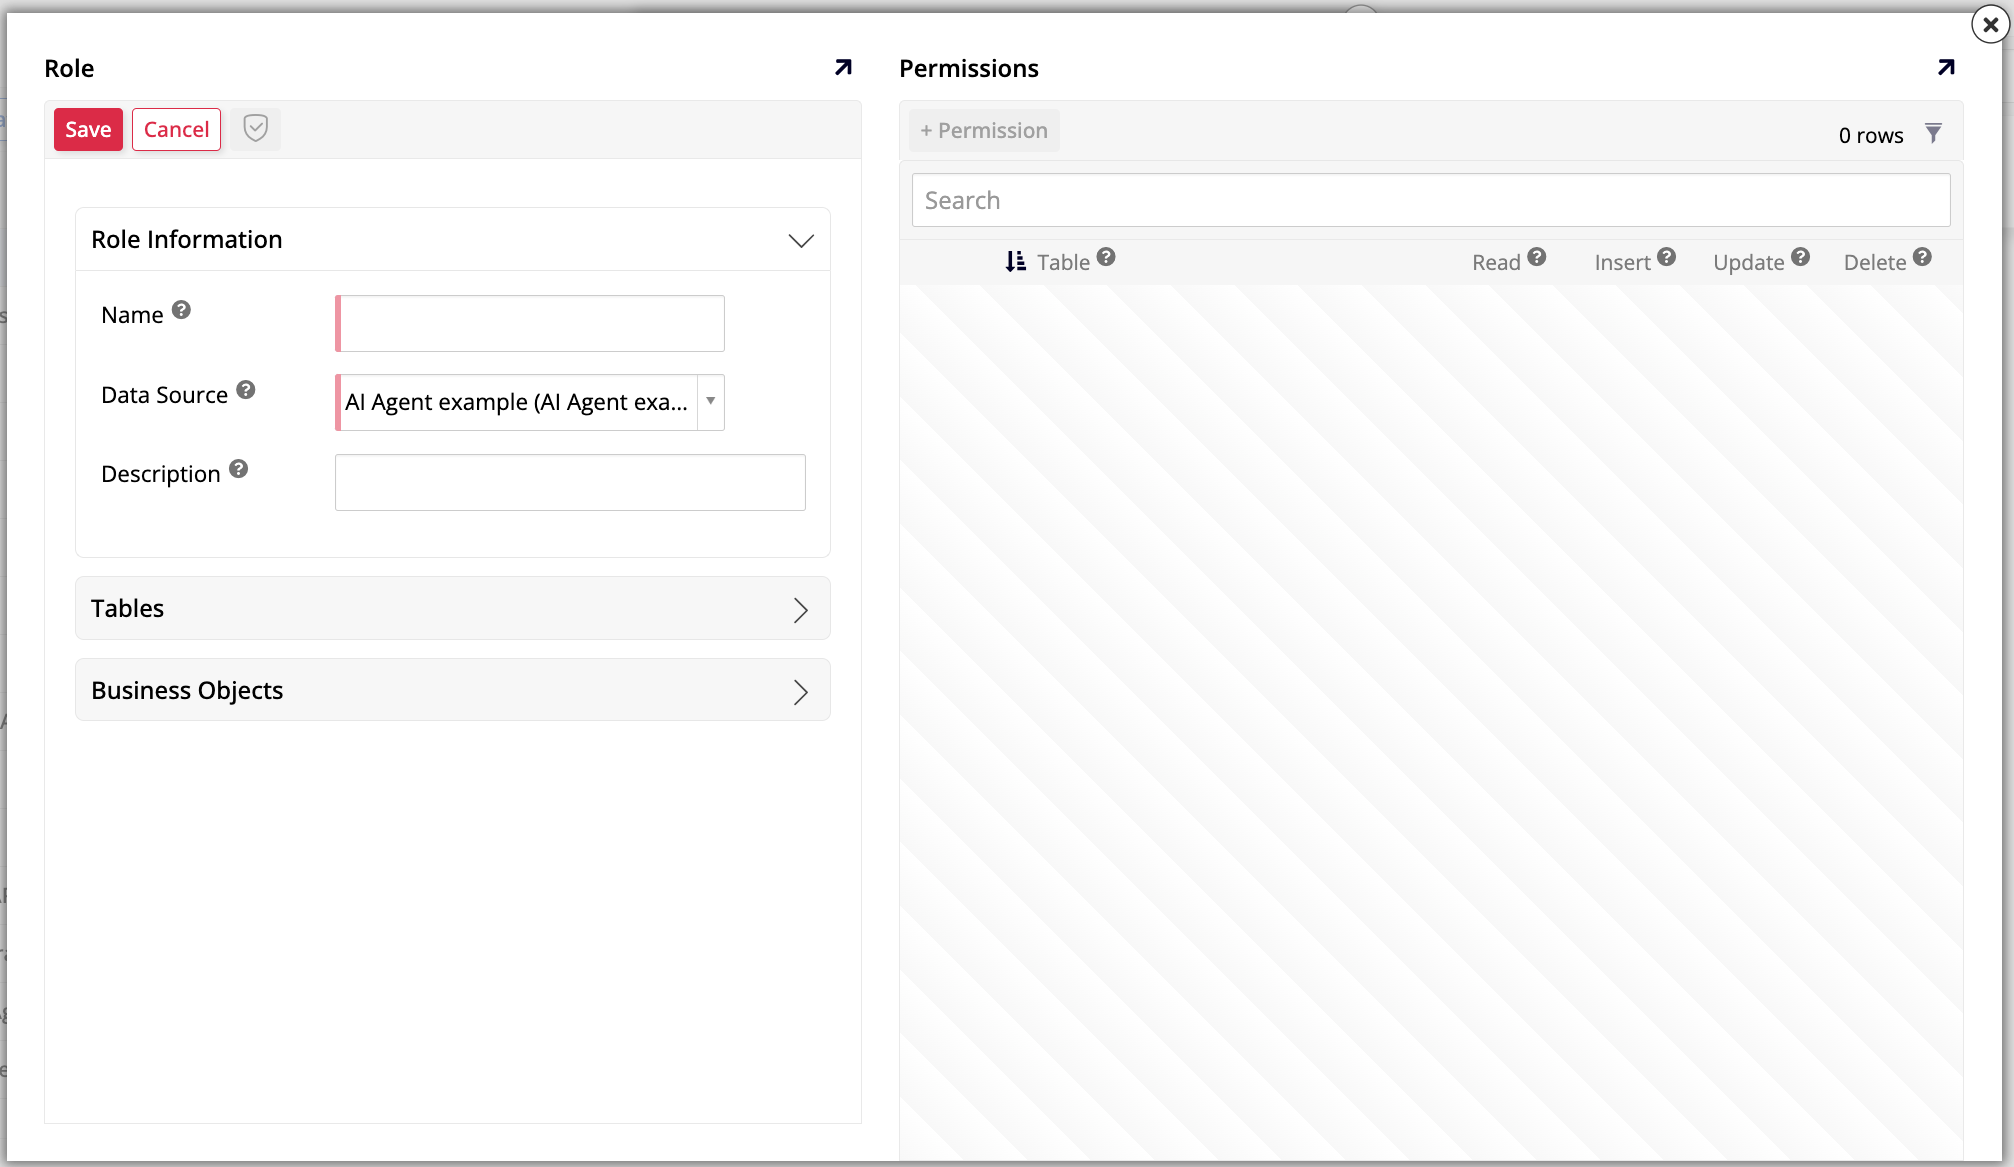
-
In the Role panel, under Role Information, enter a Name for the new role, then click Save.
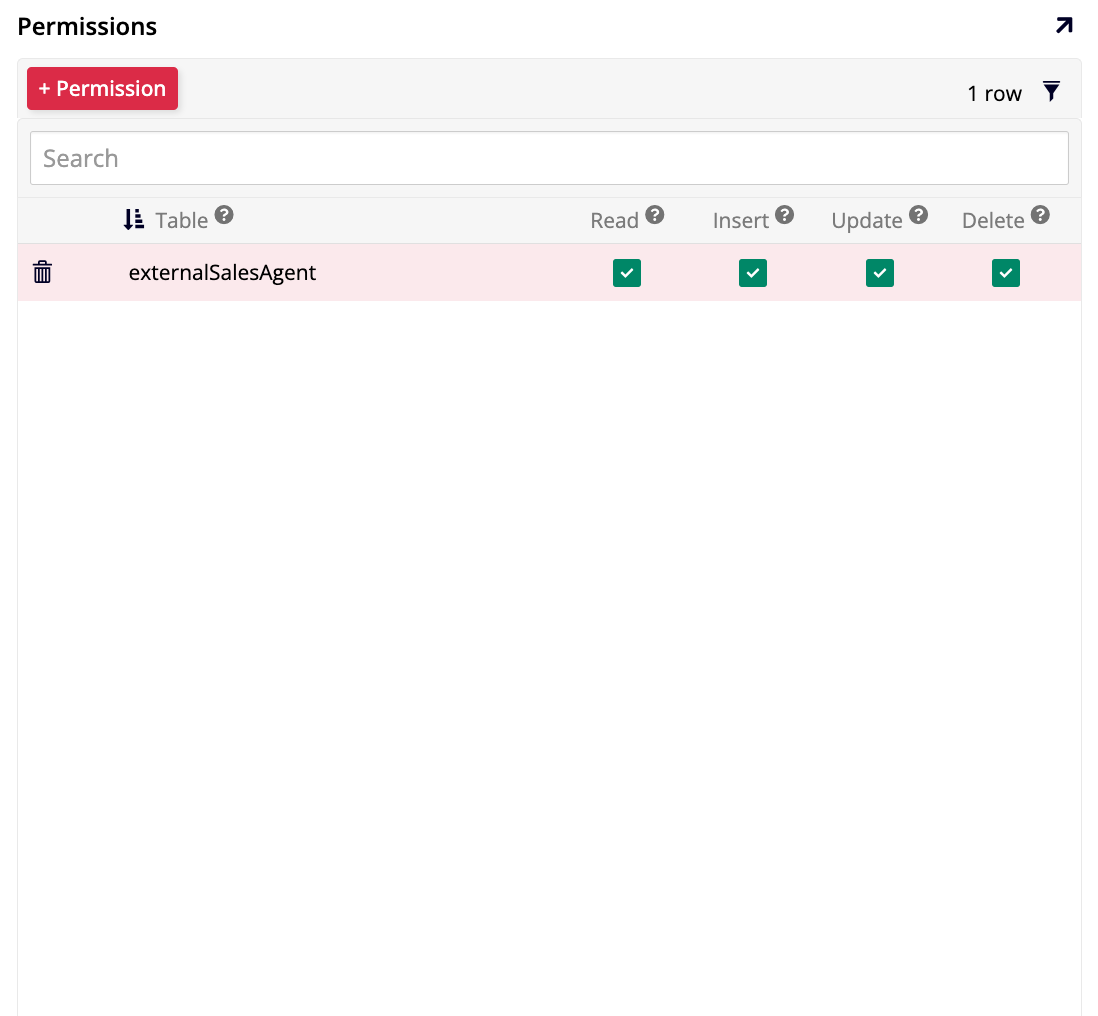
- In the Permissions panel, click + Permission.
- Under Table, select the main endpoint of the AI agent data server (for example,
chat). Do not select subsidiary tables such aschat/referencesorchat/ResponseHeaders, which are used internally by App Builder. -
Verify that Read, Insert, Update, and Delete are all selected, then click to save.
Finally, grant the Anonymous Users group access to the role:
- In the IDE, click User Management in the Runtime panel.
- Select the Groups tab and click the Anonymous Users group.
- Click Manage Privileges.
- In the Privileges panel, click Create.
- In the Create Privilege dialog, select Data Source in the Type field.
-
In the Data Source dropdown, select the AI agent data source, then click Save.
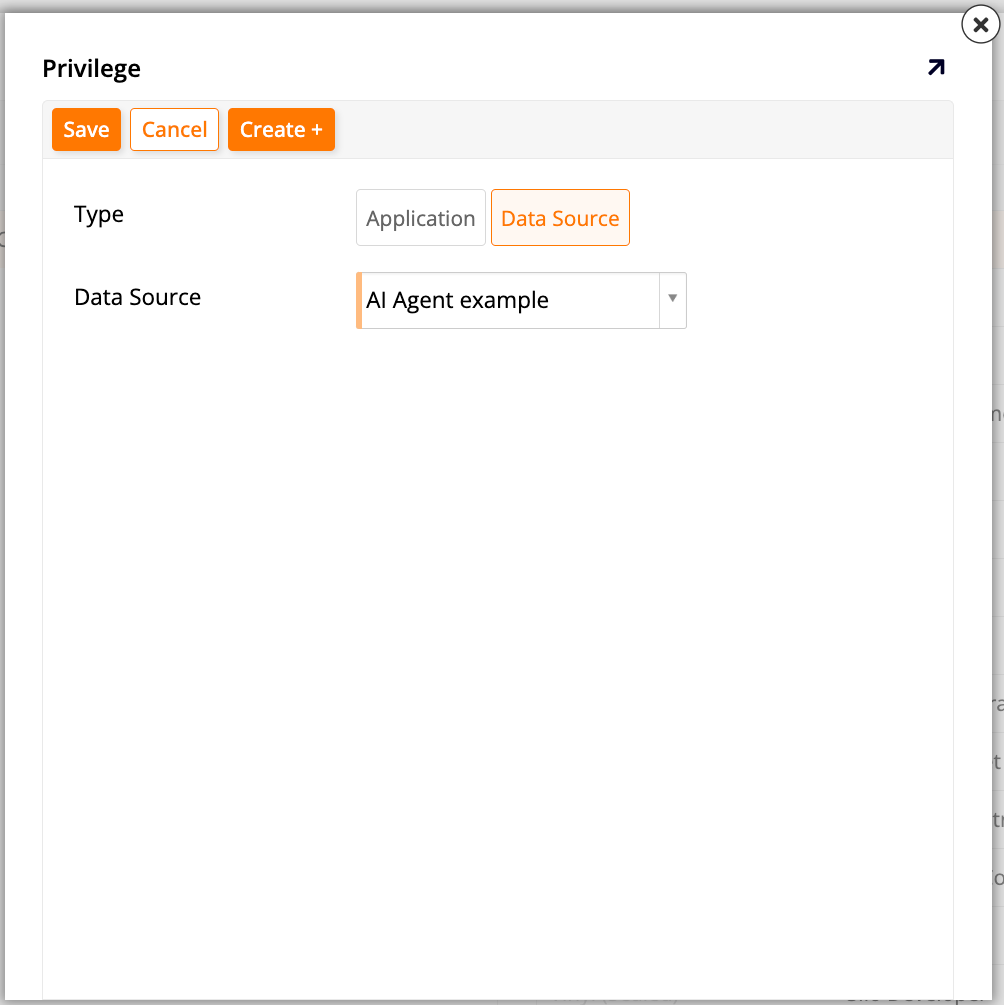
-
Select the new privilege in the Privileges panel. The roles associated with it appear in the Roles panel.
-
Locate the role created above and click Grant.

Option B: JWT SSO authentication
To authenticate users from the host page rather than running as anonymous, configure JWT SSO authentication. When JWT SSO is active, the embedded chat authenticates the user before making REST calls, automatically provisions the user in App Builder if they do not yet exist, and silently re-authenticates when session cookies expire.
First, configure the IDE settings by following these steps:
- In the IDE, click Security Providers in the Connect panel. The Security page opens.
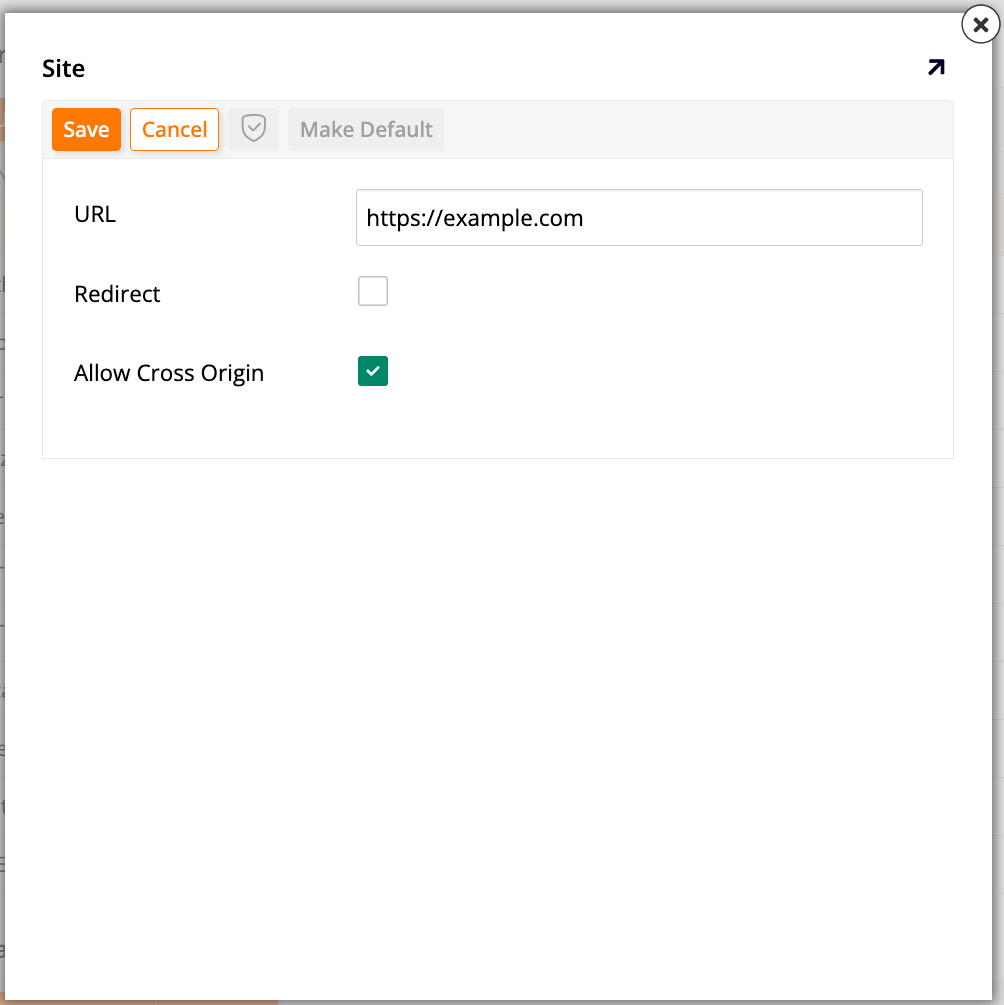
- In the Configuration panel, click More and select Sites. The Sites dialog opens.
- Click + Site.
- In the URL field, enter the base URL of your App Builder instance (for example,
https://example.com). - Leave the Redirect checkbox unselected.
- Select the Allow Cross Origin checkbox.
-
Click Save.
Next, set up a JWT SSO provider:
- In the IDE, click Security Providers in the Connect panel. The Security page opens.
-
In the User Authentication panel, click + User Authentication. The Provider page opens in creation mode:
-
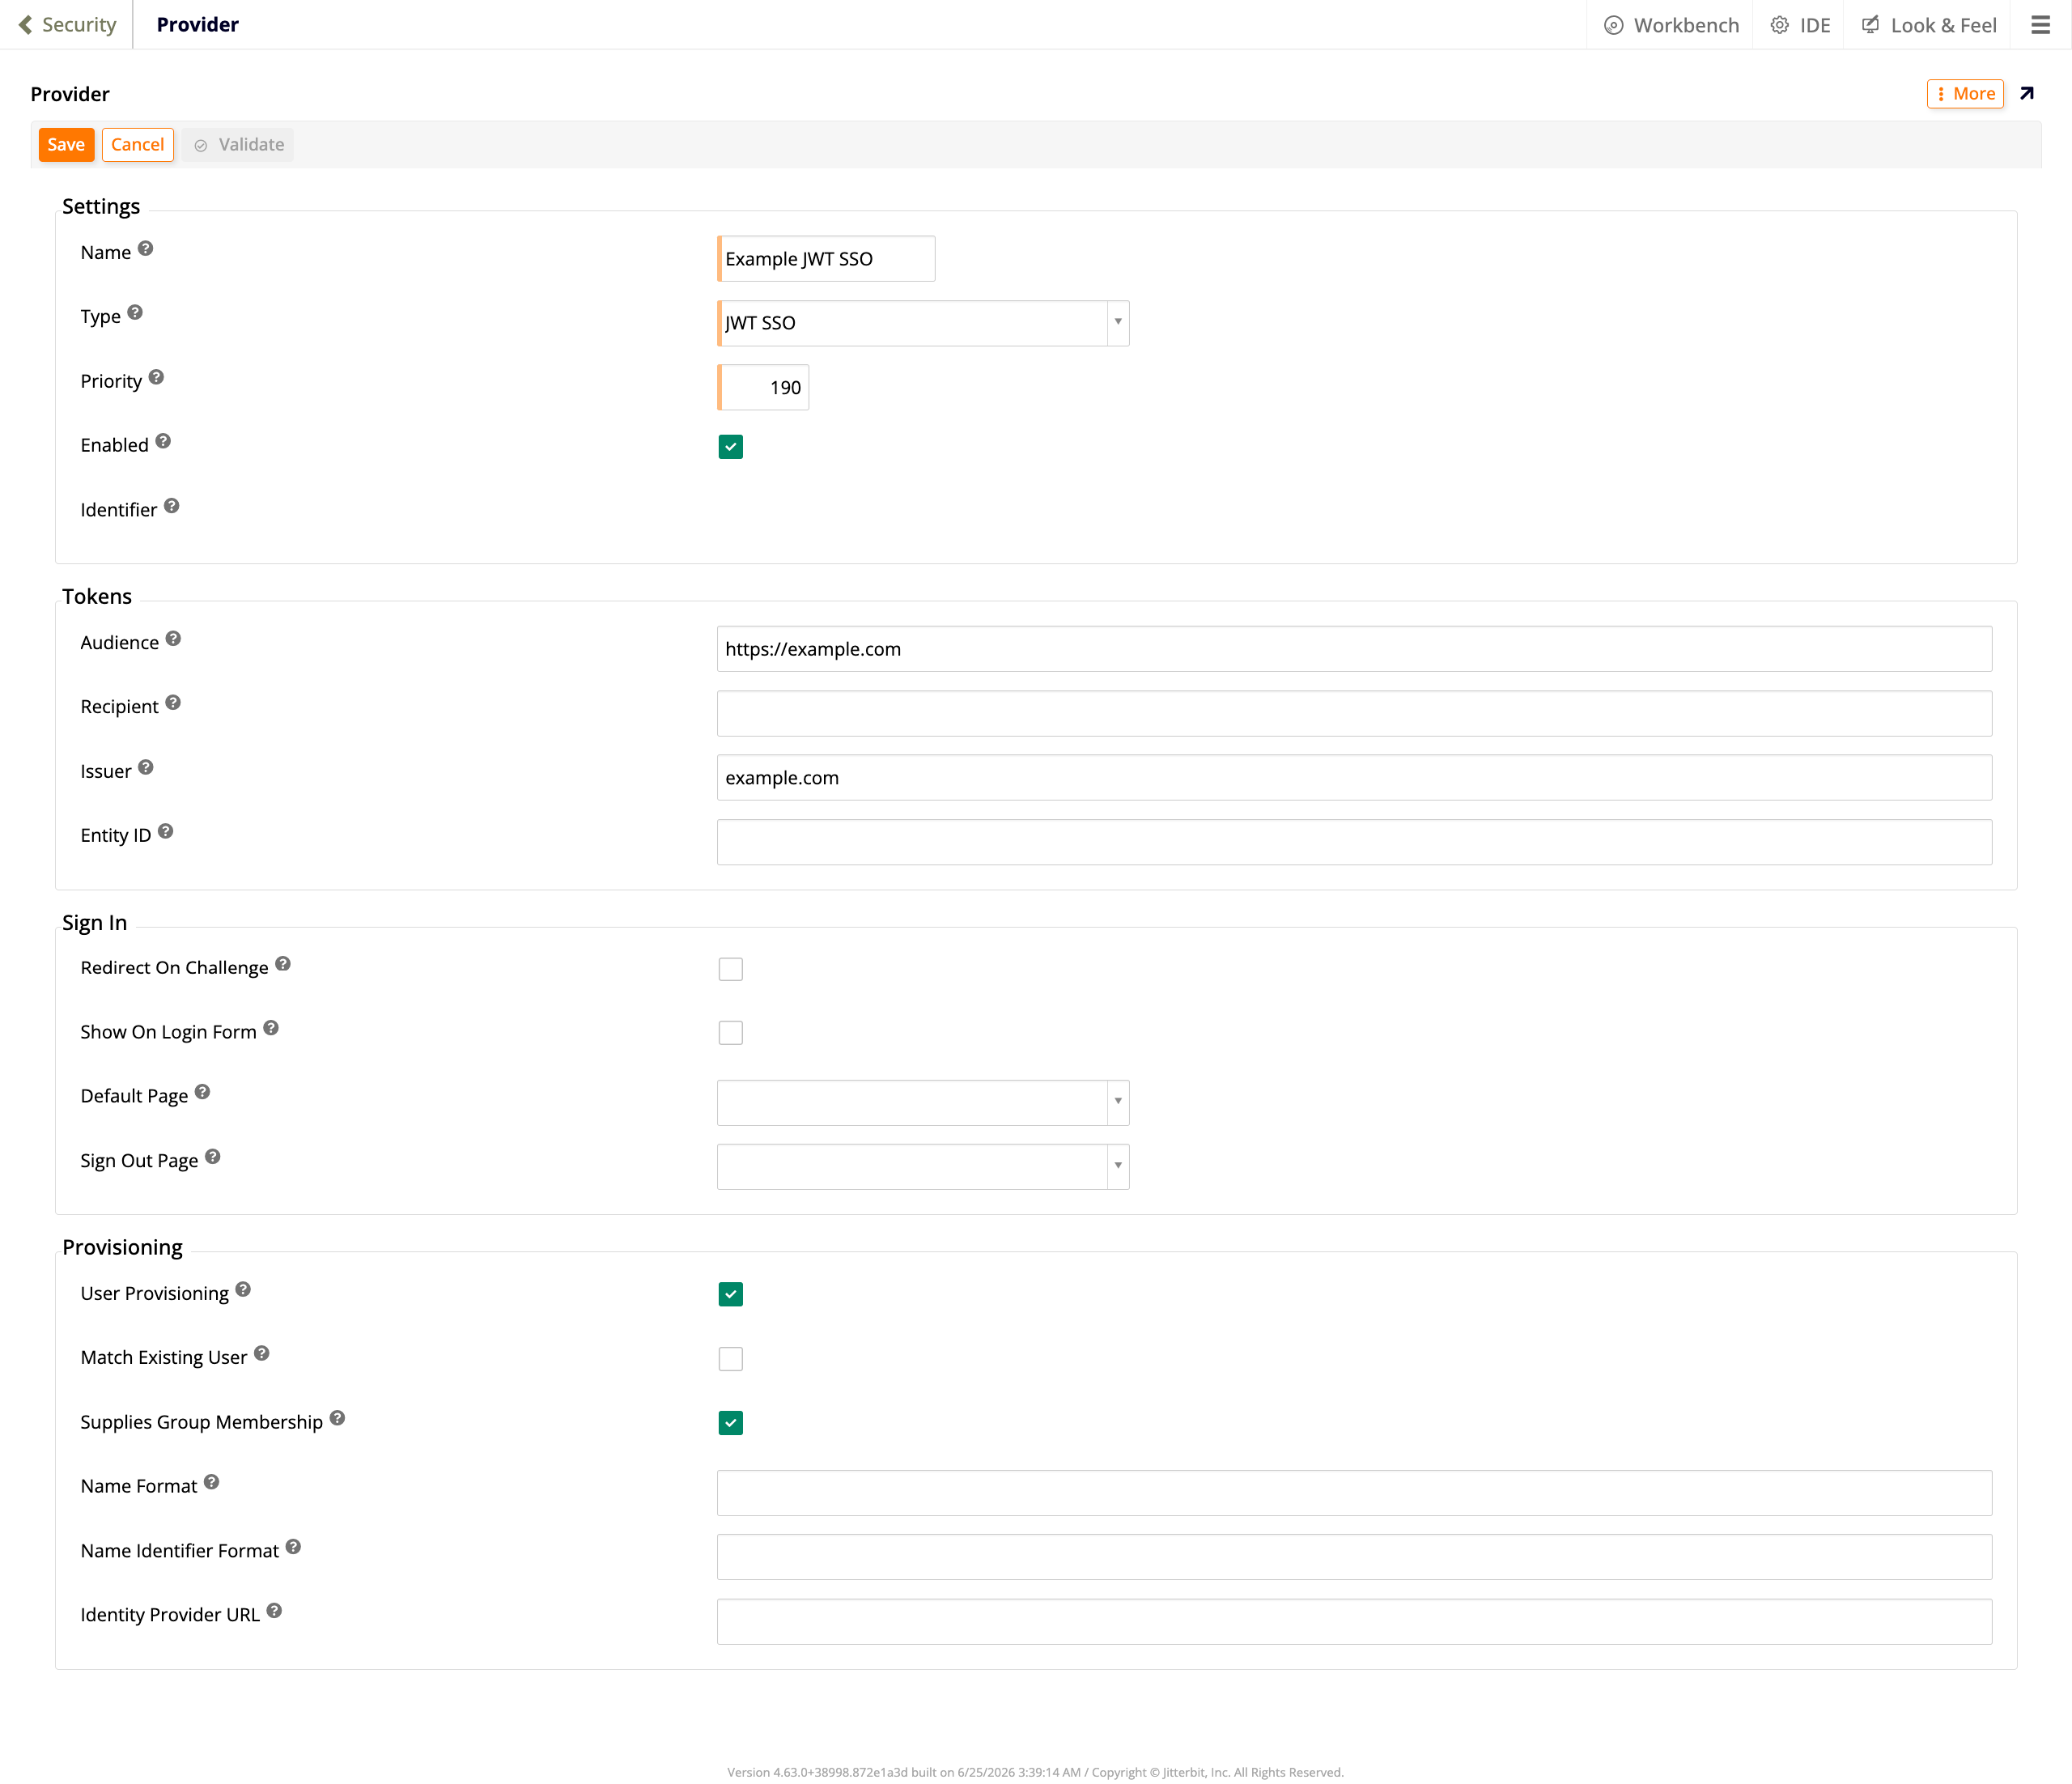
In the Settings section, configure the following:
- Name: Enter a name for the provider.
- Type: Select JWT SSO.
- Enabled: Select this checkbox.
- In the Tokens section, configure the following:
- Audience: Enter the base URL of your App Builder instance (for example,
https://example.com). - Issuer: Enter the issuer value configured in the host page's JWT generation settings (for example,
example.com). This must match theissclaim in the JWTs issued by the host page's authentication framework.
- Audience: Enter the base URL of your App Builder instance (for example,
- In the Provisioning section, select the User Provisioning and Supplies Group Membership checkboxes.
- Click Save to create the provider.
-
In the Certificates panel, click + Certificate (see JWT SSO security provider for details on certificate requirements) and configure the following:
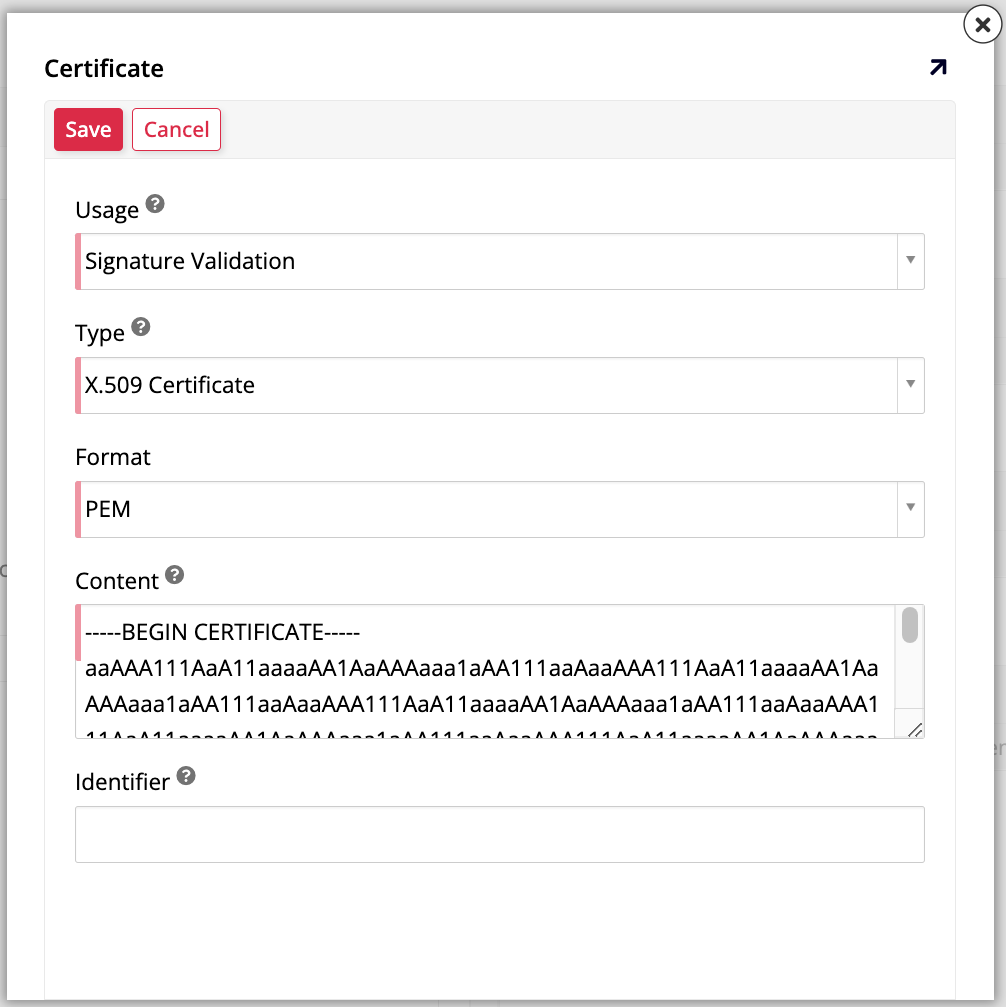
- Usage: Select Signature Validation.
- Type: Select X.509 Certificate.
- Format: Select PEM.
- Content: Paste the PEM-encoded certificate containing the RSA public key used to sign the JWTs issued by the host page's authentication framework.
- Identifier: Optionally, enter an identifier for the certificate. If specified, this value appears in the
kidparameter of JWT headers.
Click Save.
Note
The name you assign to the provider must match the value of the provider attribute in the embed snippet.
Next, update the embed snippet. Add the provider and jwt attributes to the <jitterbit-chat> element:
<script src="{base-url}/js/jitterbit-chat-loader.bundle.js" defer></script>

<jitterbit-chat
    base-url="{base-url}"
    agent-ids=""
    provider="{provider-name}"
    jwt="{JWT token}">
</jitterbit-chat>
{provider-name}: The name of the JWT SSO provider configured in the IDE.{JWT token}: The JWT token issued by the host page's authentication framework.
As with anonymous users, JWT-authenticated users need to be authorized to interact with the AI agent. To do that, start by adding an appropriate role and granting it the necessary permissions. Follow these steps:
- In the IDE, click Data Servers in the Connect panel.
- In the data servers list, select the AI agent data server.
- In the panel on the right, double-click the box containing the server name or click the icon on the box. A dialog opens.
-
Click Roles. The Roles dialog opens.
-
In the Role panel, under Role Information, enter a Name for the new role, then click Save.
- In the Permissions panel, click + Permission.
- Under Table, select the main endpoint of the AI agent data server (for example,
chat). Do not select subsidiary tables such aschat/referencesorchat/ResponseHeaders, which are used internally by App Builder. -
Verify that Read, Insert, Update, and Delete are all selected, then click to save.
Finally, grant the security group access to the role:
- In the IDE, click User Management in the Runtime panel.
- Select the Groups tab and click the group that JWT-authenticated users belong to (for example, Users).
- Click Manage Privileges.
- In the Privileges panel, click Create.
- In the Create Privilege dialog, select Data Source in the Type field.
-
In the Data Source dropdown, select the AI agent data source, then click Save.
-
Select the new privilege in the Privileges panel. The roles associated with it appear in the Roles panel.
-
Locate the role created above and click Grant.