App Builder connector in Jitterbit App Builder
Overview
App Builder connector is a feature that lets an application use tables and business objects from another App Builder application, or from an entirely separate App Builder environment, as though they were part of its own data source, without duplicating the underlying data.
Which variant you use depends on where that other application lives:
-
A local connector links two data sources on the same App Builder server. For example, if your server hosts both a
Northwindsdata source and a separateMy Application, andMy Applicationneeds to read (and optionally write) data fromNorthwinds, a local connector givesMy Applicationdirect access toNorthwinds's tables, without copying that data intoMy Application's own database. Because both applications run on the same server, App Builder handles the connection internally: no network call and no separate authentication step are required. -
A remote connector links two entirely separate App Builder environments, each with its own URL, over HTTP. For example, connecting your organization's App Builder server to a different App Builder installation, whether that's a separate environment, a different customer's installation, or any other independently hosted instance. Because the connection crosses the network to a separately secured App Builder instance, it authenticates using an API key, the same way any other external REST client would.
This page covers:
-
Local App Builder connector
Configure a connector between two data sources in the same environment. -
Remote connector
Configure a connector between two separate App Builder environments over HTTP.
In addition, this page also contains a Limitations section covering known restrictions to keep in mind before relying on App Builder connector, and a Troubleshooting section covering common errors and how to resolve them.
Warning
We recommend consulting your dedicated Jitterbit consultant before configuring an App Builder connector on your own.
Local App Builder connector
A local App Builder connector lets one application on your App Builder server directly use tables and business objects that live in another application's data source on that same server, without copying the data or setting up any network authentication. For example, if My Application needs to read data that lives in the Northwinds data source, both hosted on the same server, a local connector gives My Application direct access to Northwinds's public tables.
This section covers:
- Step 1: Create a local App Builder connector
- Step 2: Allow public access to the tables and business objects you want to use in your connector
- Step 3: Create a data source using the local App Builder connector
- Step 4: Import tables and business objects into your connector
- Step 5: Add your local App Builder connector as a data source to your application
- Step 6: Link your local App Builder connector data source and your relational database
Consider Extend Table instead
If you only need to pull in a table from another data source on the same server, Extend Table is usually the better choice: unlike a local connector, it doesn't require bundling and shipping both apps together whenever you release.
Step 1: Create a local App Builder connector
Set up the App Builder connector server, so App Builder knows to route requests for this connection locally rather than over HTTP:
- Select IDE > Data Servers.
-
Click + Server from the Data Servers panel. The Server dialog opens. Enter the following values:
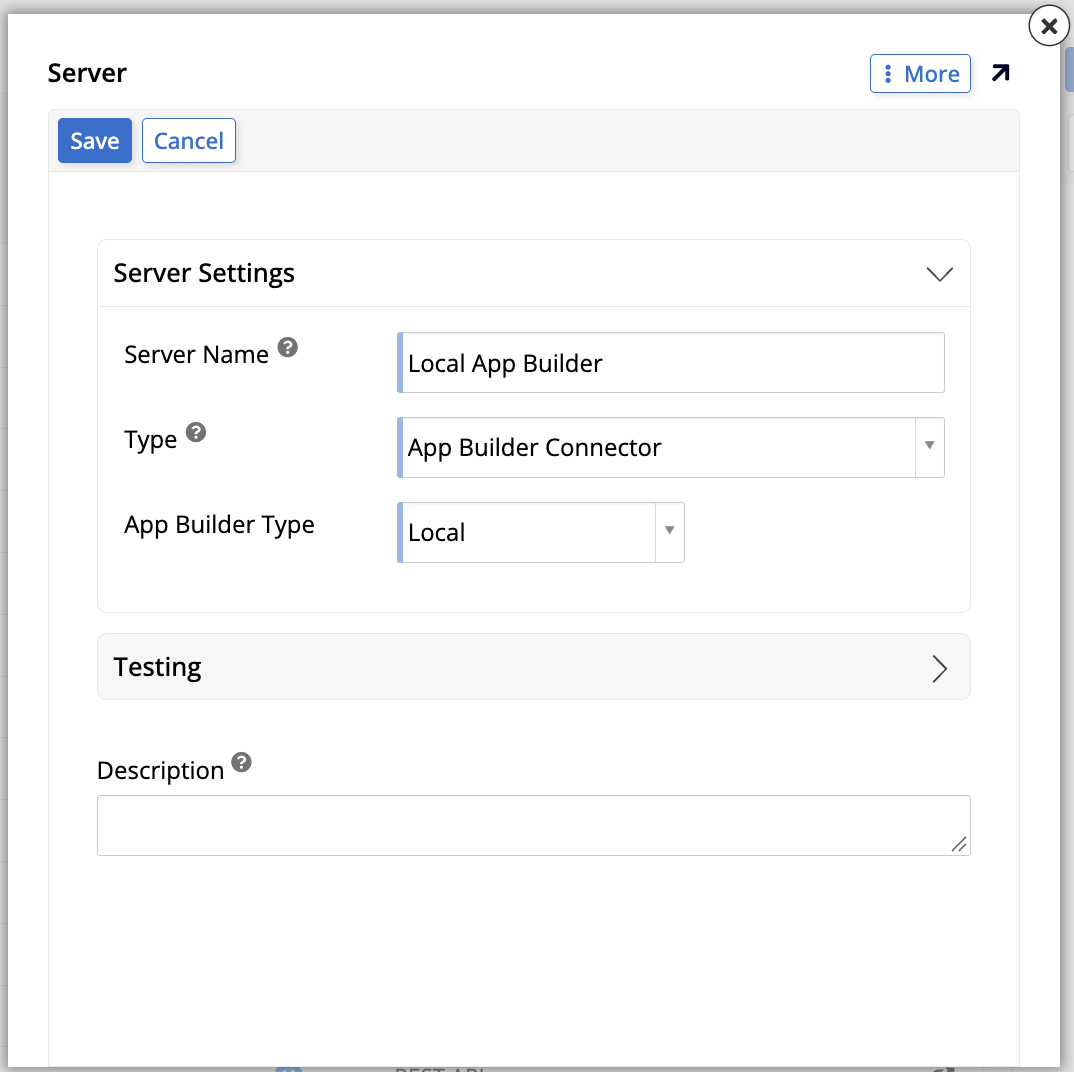
- Name: Assign your server connection a name. Jitterbit recommends
Local App Builder. - Type: Select App Builder Connector.
- App Builder Type: Select Local.
- Name: Assign your server connection a name. Jitterbit recommends
-
Click Save and exit the dialog.
Step 2: Allow public access to the tables and business objects you want to use in your connector
A table or rule must be marked Public before a connector can use it:
- Navigate to the App Workbench for the app you want to use.
-
Mark the tables or rules you want to use in your connector as Public:
-
To mark a table as public:
- Go to the Tables tab.
- Locate the table you're looking for in the Tables panel and click its edit icon or double-click its row. The Table Definition page for that table opens.
-
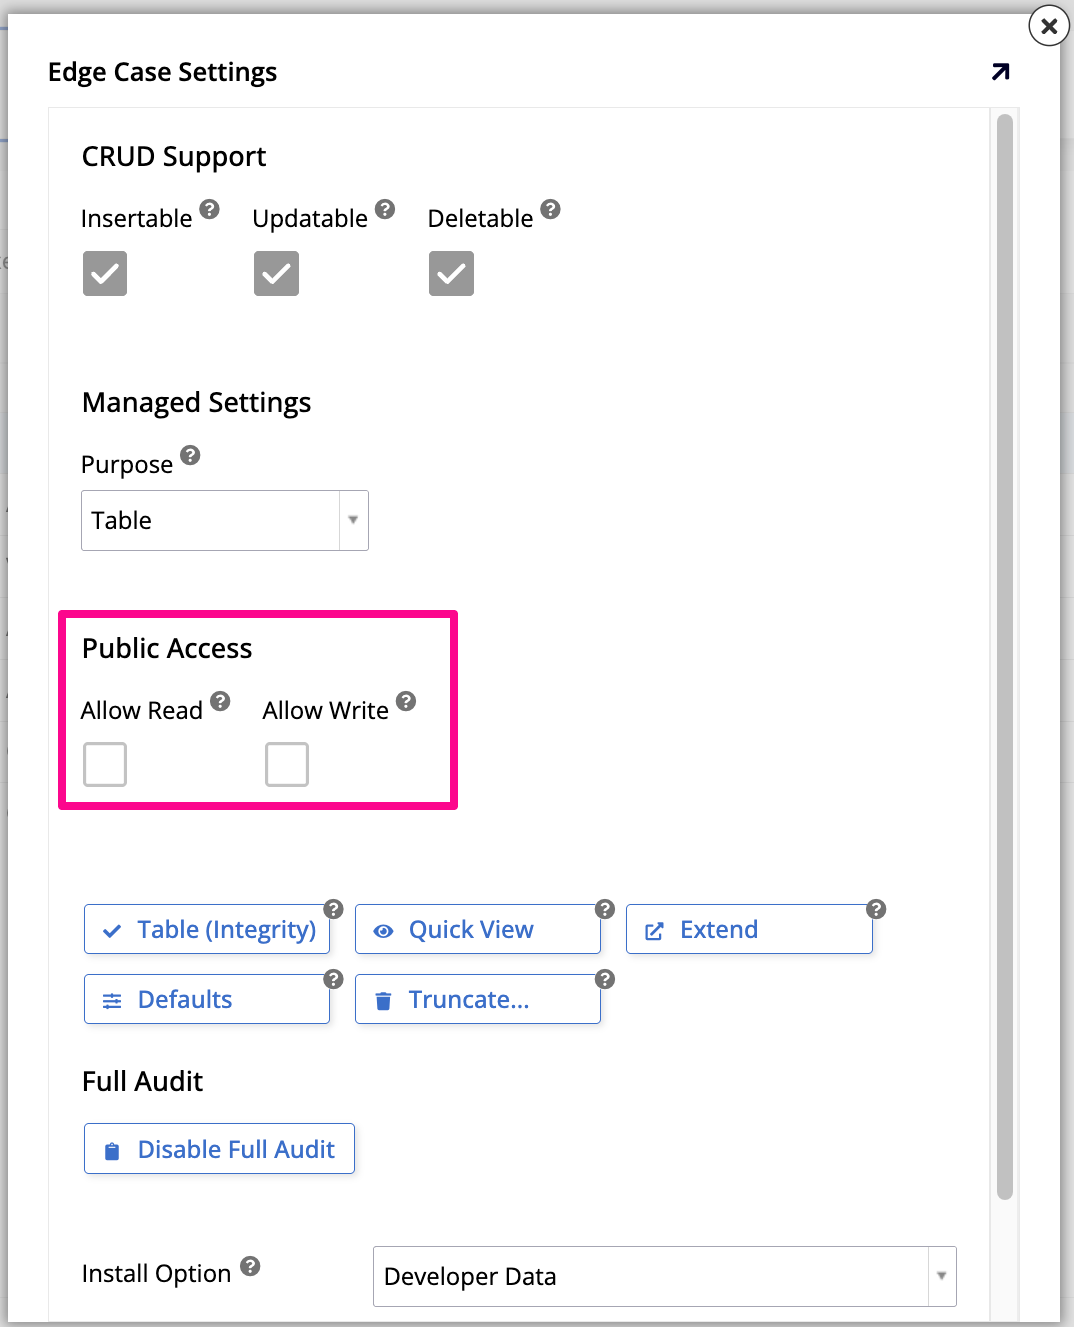
In the Table panel, click More > Edge Case. The Edge Case Settings dialog opens:
-
In the Public Access field group, check Allow Read and/or Allow Write as needed.
-
To mark a rule as public:
- Go to the Rules tab.
- Locate the rule you're looking for in the Rules panel and click its edit icon or double-click its row. The Rule Builder for that rule opens.
-
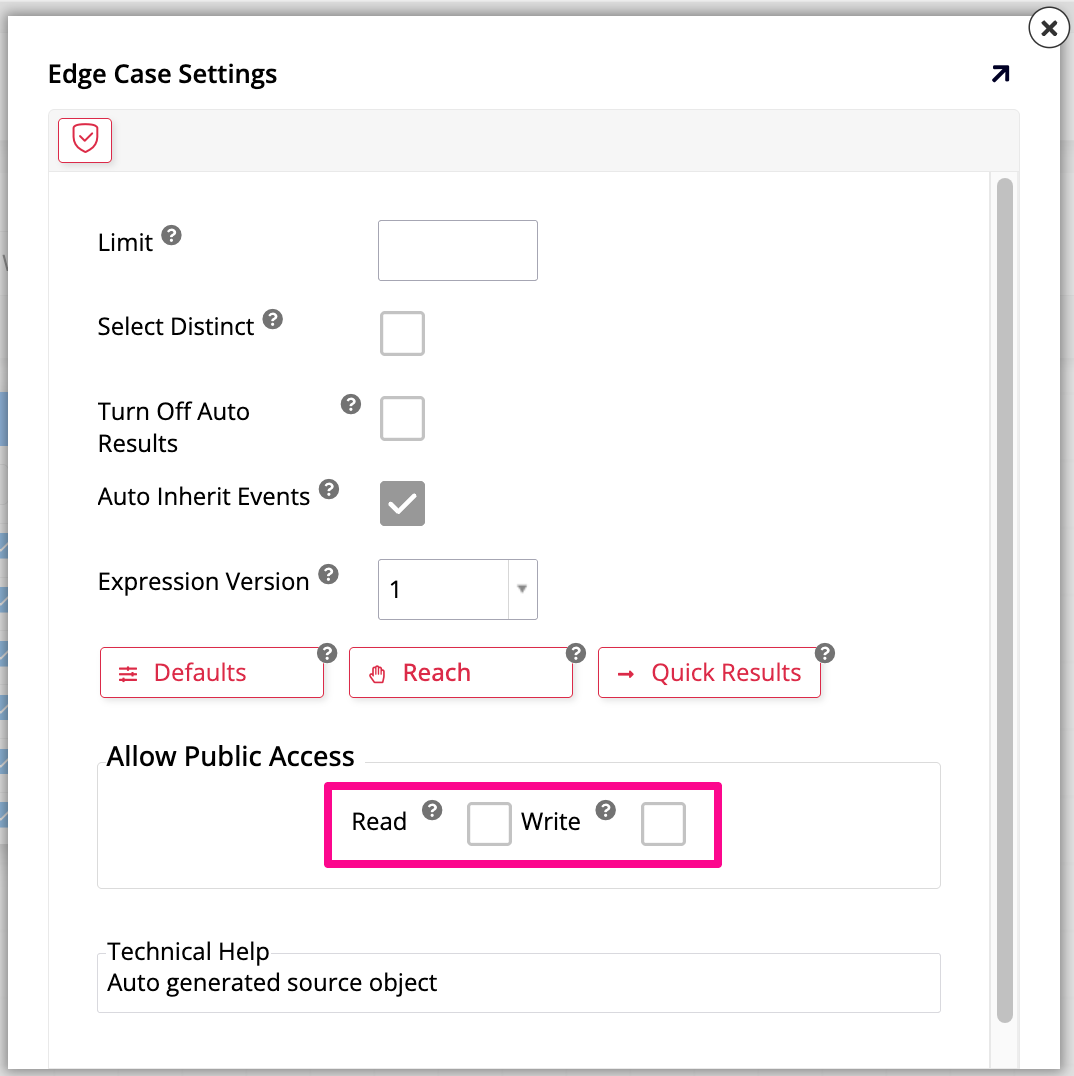
In the Rule panel, click More > Edge Case. The Edge Case Settings dialog opens:
-
In the Allow Public Access field group, check Read to allow reading the rule's data, and/or Write to allow modifying it.
-
Note
We highly recommend not modifying a public table or business object once it's been made public and used in a connector. See Limitations for more information.
Step 3: Create a data source using the local App Builder connector
With the connector server in place and your objects marked public, create a data source that points to the specific application whose data you want to use:
- Go to IDE > Data Servers.
- In the Data Servers panel, select Local App Builder.
-
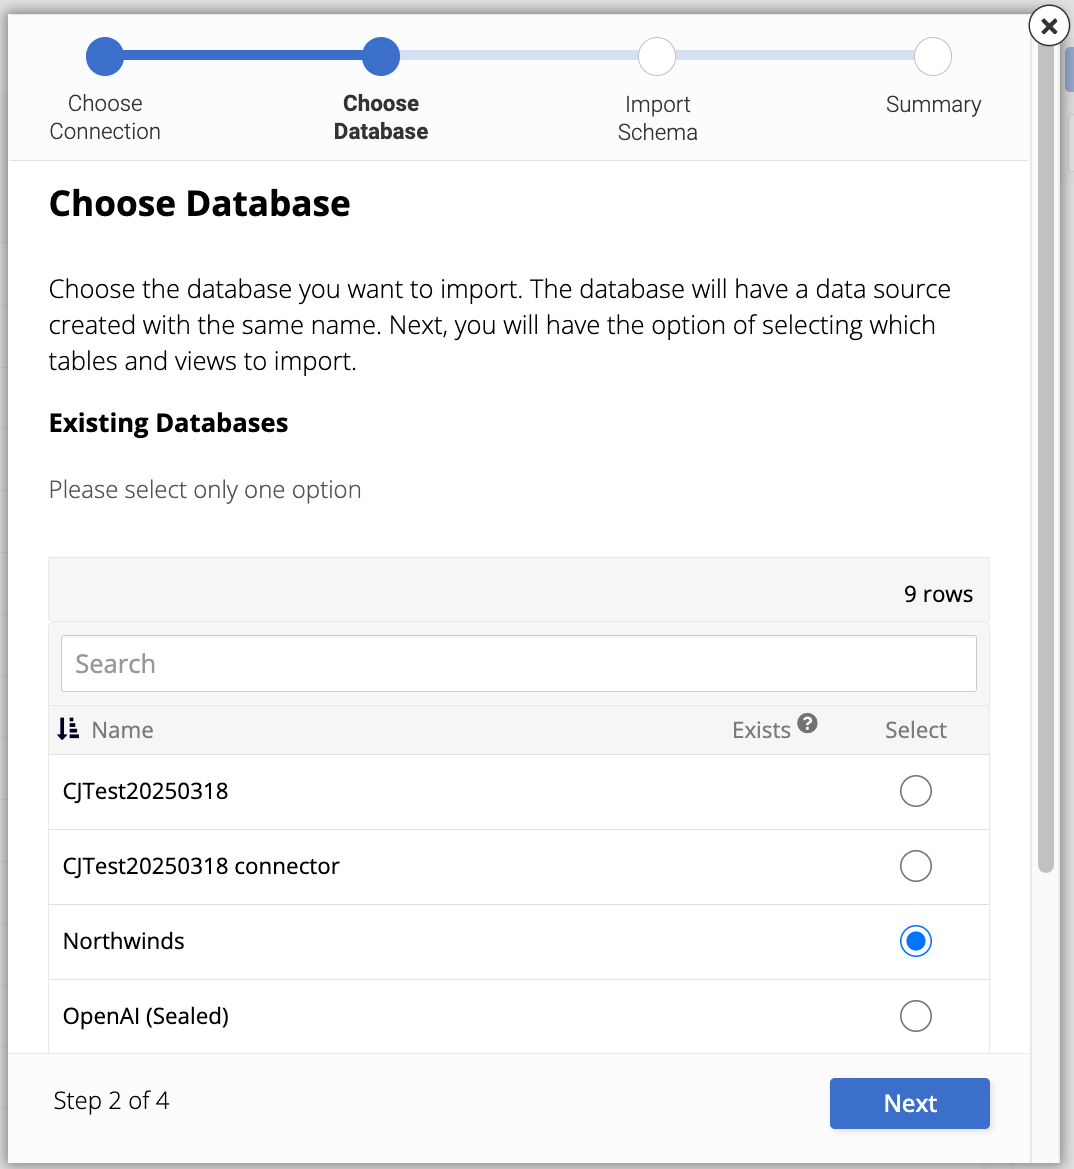
Click + Source. A wizard appears to walk you through the process:
-
Select a database to create a data source on. The data source is created with the same name as the database. Click Next.
Note
The relational database you're looking for must have at least one public table or rule (see Step 2); otherwise it isn't selectable.
-
In the next step of the wizard, choose which tables, views, and stored procedures to import into the newly created source, or click Import All to import everything. Click Next.
- The wizard presents a summary of the new data source. Click Done. The new data source now appears listed under + Source.
-
(Recommended) It's a best practice to rename the data source following the convention
[Data Source You're Connecting to] ([Application Using the Connector]). For example, a local connector for Northwinds, connecting to an application namedMy Application, would be namedNorthwinds (My Application). To rename your data source, follow these steps:-
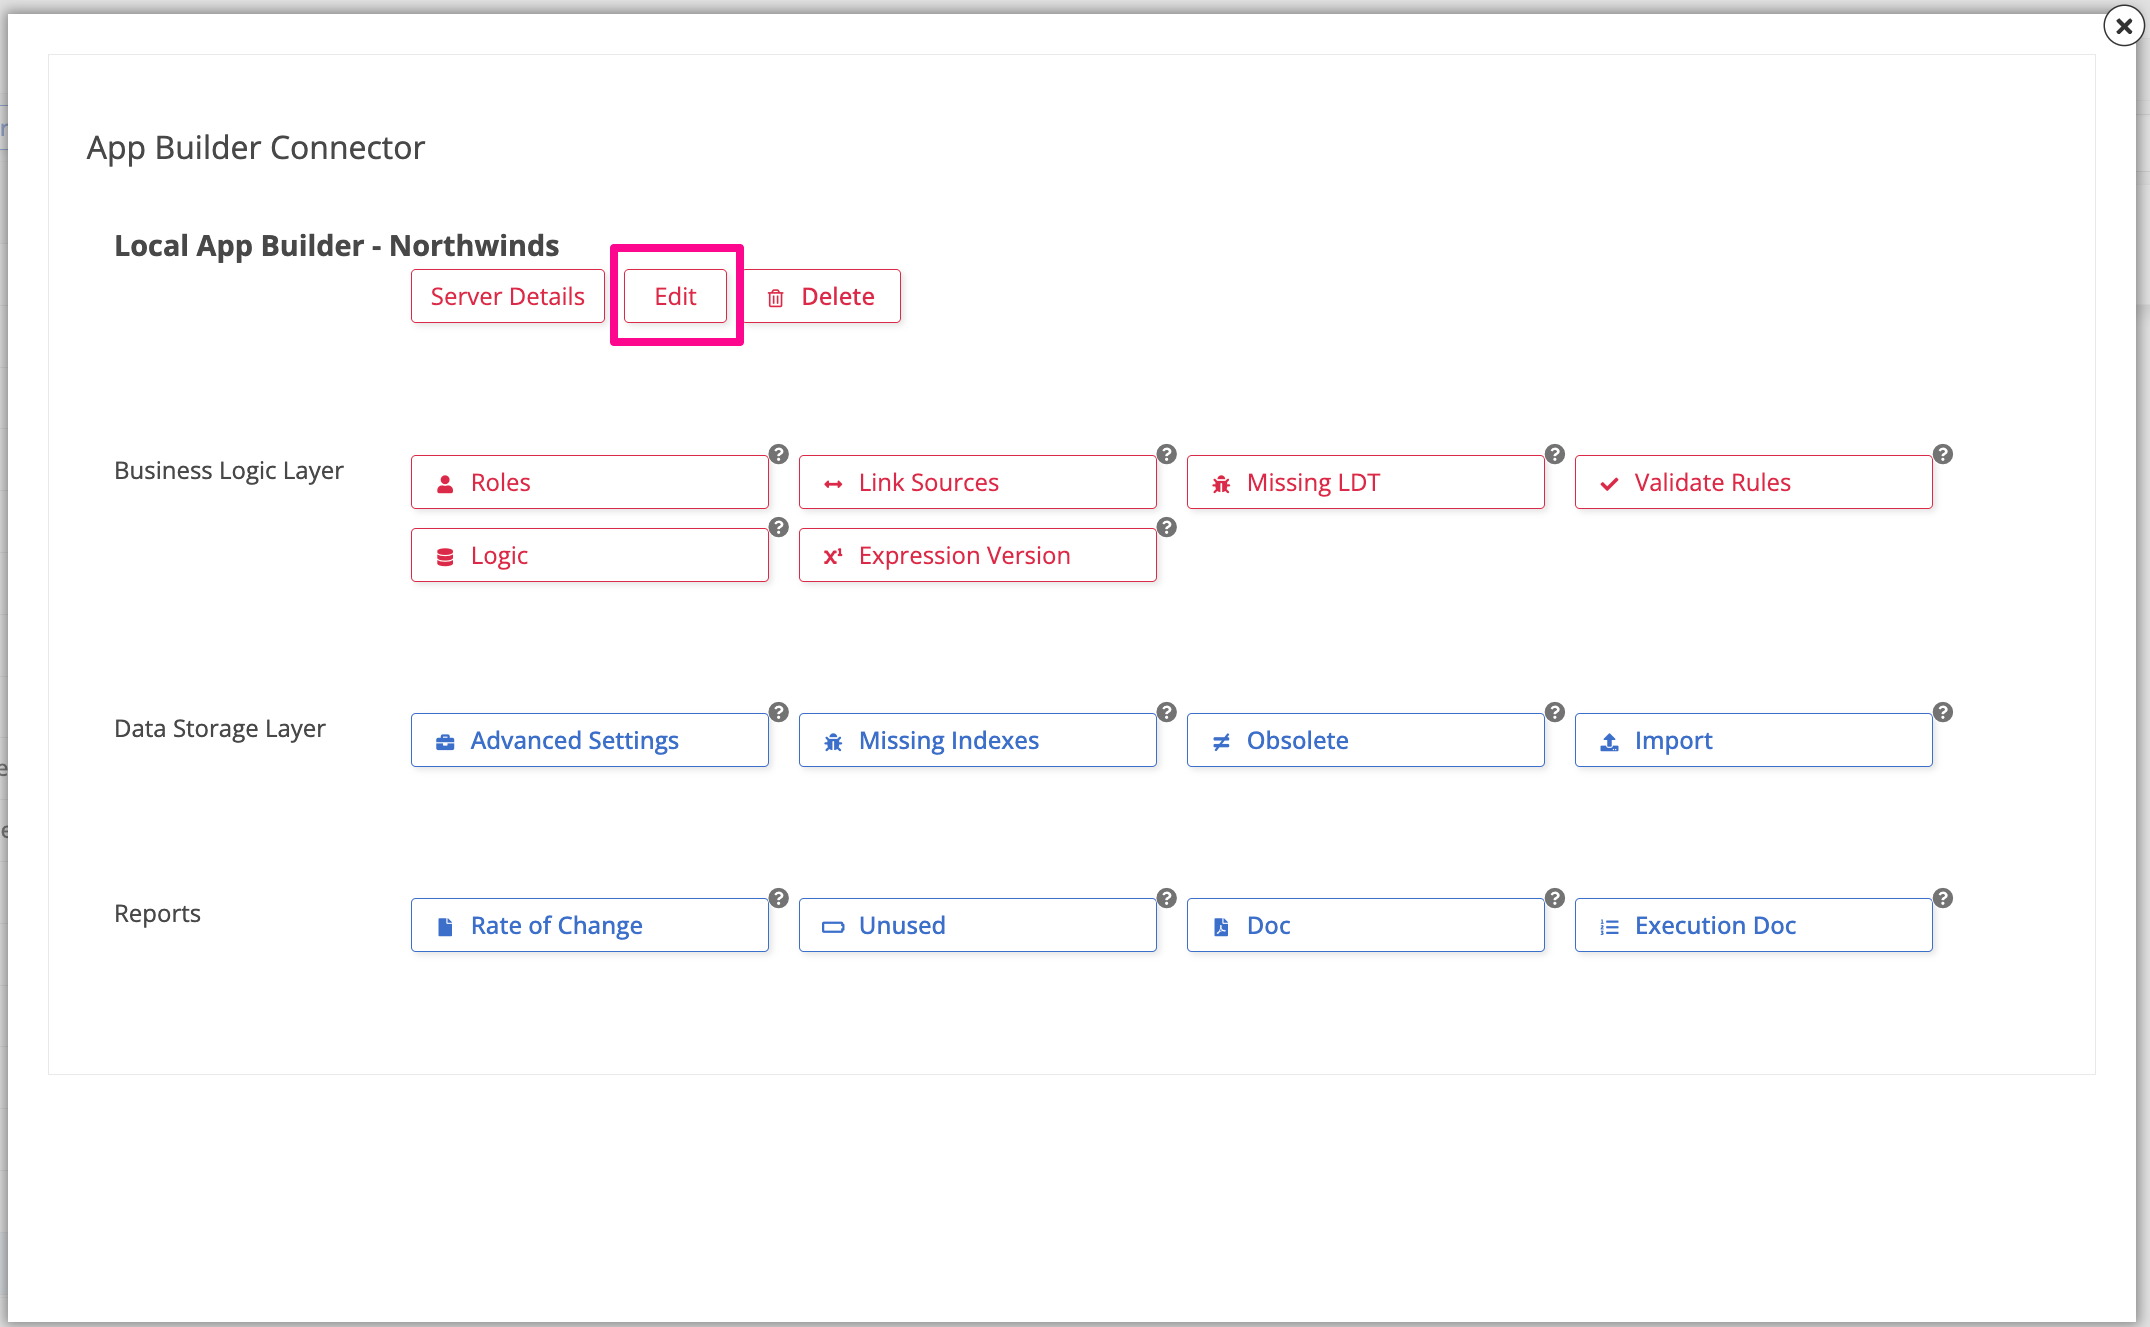
Click the new window icon on the data source's tile or double-click the tile itself. The App Builder Connector dialog opens:
-
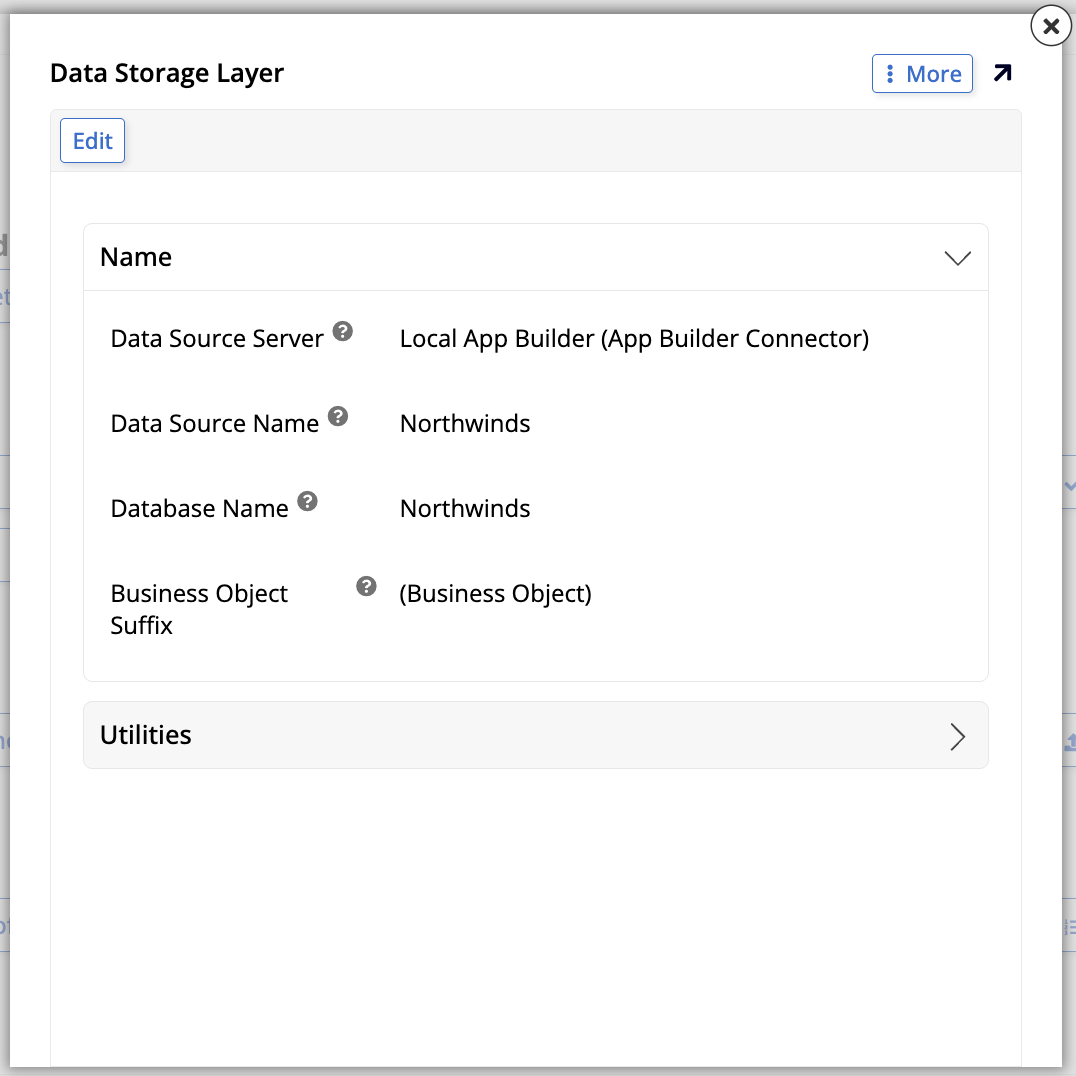
Click Edit. The Data Storage Layer dialog opens:
-
Click Edit again. Enter an appropriate name in the Data Source Name field.
- Click Save.
-
Tip
Create a separate data source each time you want to connect an application to another relational database, rather than reusing one across applications. For example, if two applications both need a local connection to Northwinds, create two data sources following the naming convention above: Northwinds (My Application 1) and Northwinds (My Application 2).
Step 4: Import tables and business objects into your connector
If you followed the steps above in order, the public tables and rules were imported when you created the data source. Proceed to Step 5. However, if you created the data source before allowing public access to the tables and rules you need, you can import them now.
- Go to IDE > Data Servers.
- In the Data Servers panel, select Local App Builder.
-
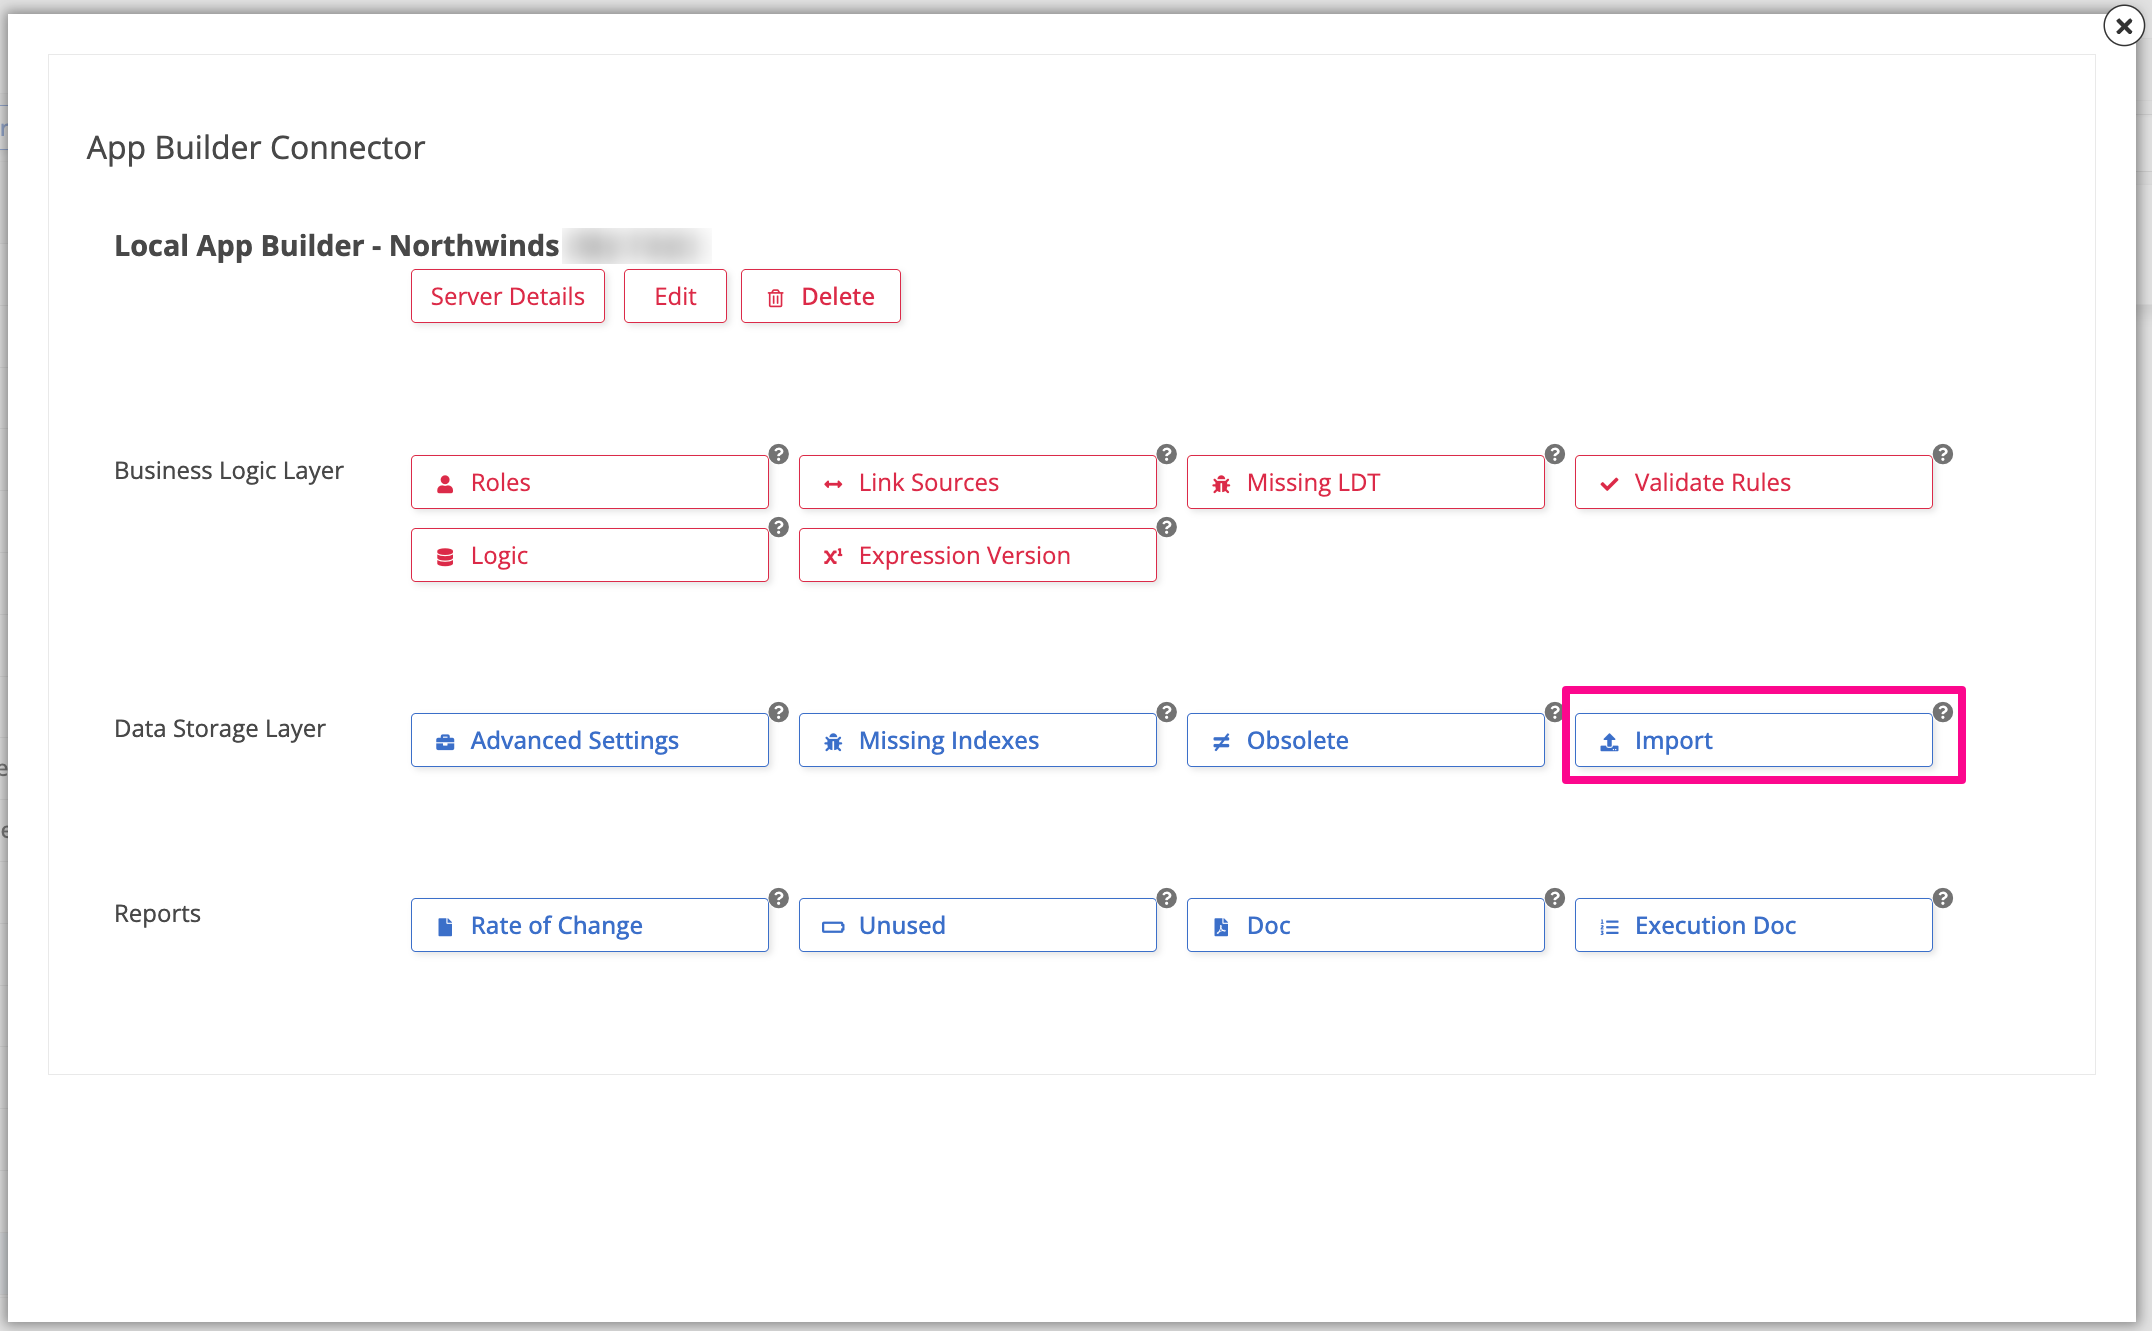
In the lateral panel, click the new window icon on the data source's tile or double-click the tile itself. The App Builder Connector dialog opens:
-
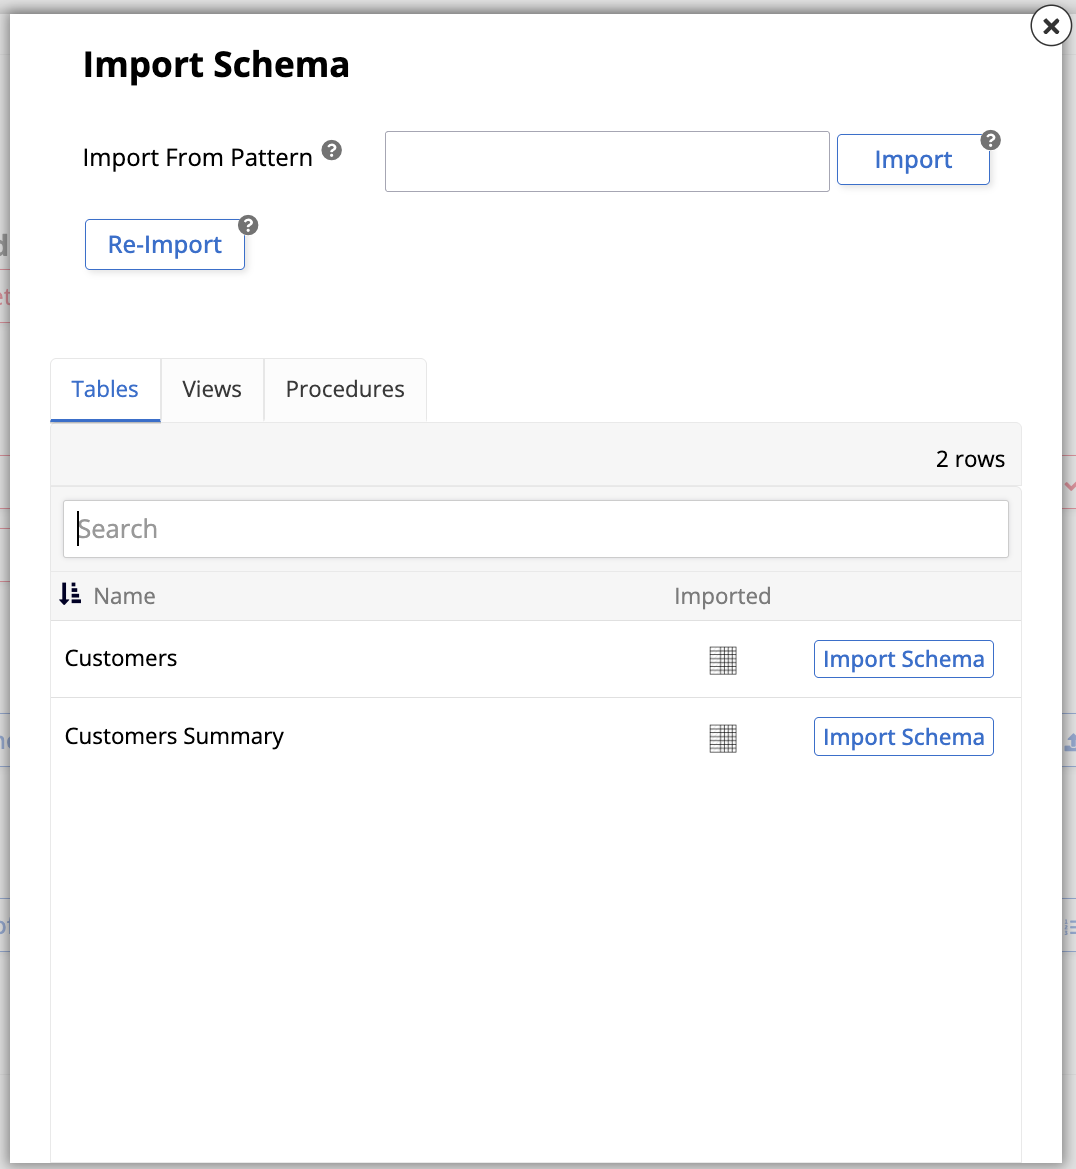
In Data Storage Layer, click Import. The Import Schema dialog opens:
-
To import every table you marked as public, click Import again from Import Capabilities.
-
To import only a subset, enter a table or business object name in the Import Pattern field first, then click Import from Import Capabilities.
-
-
Click Proceed. App Builder runs a background job to complete the import.
Step 5: Add your local App Builder connector as a data source to your application
The data source you created in Step 3 exists on the server, but your application can't use it until you explicitly add it as a source:
- Navigate to the App Workbench for the app you want to modify.
- Go to the Data Sources tab.
- In the Data Sources panel, click + Source. The Add a Source to your application dialog opens.
- Select Link to existing source, then click Next.
- Locate the data source you created in Step 3, then click Link 1 Source.
- Review the proposed update, then click Done.
Step 6: Link your local App Builder connector data source and your relational database
Linking sources lets you build cross-data-source rules in either direction:
-
To build rules with the relational database as the source, and your local App Builder connector data source as the target:
- Navigate to the App Workbench for the app you want to modify.
- Go to the Data Sources tab.
- Select the relational database you want to link to. The lateral panel populates with its options.
- In the Business Logic Layer field group, click Link Sources. The Linked Data Sources dialog opens.
- Click Create, then select the local App Builder connector data source you added to your application in Step 5.
- Click the checkmark to save the record.
Once linked, you can use tables and business objects from the local App Builder data source in business rules and XP CRUD rules built in the relational database, including XP CRUD rules whose source data source is the relational database and whose target data source is your local App Builder data source. Build these XP CRUD rules in the relational database.
-
To build rules in the opposite direction, with your local App Builder connector as the source and the relational database as the target:
- Navigate to the App Workbench for the app you want to modify.
- Go to the Data Sources tab.
- Select the local App Builder connector you want to link to. The lateral panel populates with its options.
- In the Business Logic Layer field group, click Link Sources. The Linked Data Sources dialog opens.
- Click Create, then select the relational data source you want to connect to.
- Click the checkmark to save the record.
Once linked, you can use tables and business objects from the relational database in business rules and XP CRUD rules built in the local App Builder connector, including XP CRUD rules whose source data source is the local App Builder data source and whose target data source is your relational data source. Build these XP CRUD rules in the local App Builder connector.
Remote connector
A remote connector lets an application in one App Builder environment use a shared object from a completely separate App Builder environment, reachable at its own URL, over HTTP. Unlike a local connector, the two environments don't share a server, so they must authenticate with each other explicitly using an API key. The steps below share an object on the source environment first, then connect to it from the remote one.
This section covers:
- Step 1: Create the object to share using App Builder connector
- Step 2: Enable remote App Builder connections
- Step 3: Confirm an API key security provider is configured
- Step 4: Create a role to share the object
- Step 5: Create a group and grant it access
- Step 6: Create a user, generate an API key, and add them to the group
- Step 7: Set up the connection from the remote environment
Step 1: Create the object to share using App Builder connector
Before a remote environment can pull any data from this one, you need something to share. This step creates a rule that defines exactly what gets exposed:
- Navigate to the App Workbench for the app you want to share from, then go to the Rules tab.
-
Click + Rule. The Rule Builder opens:
- Name: Assign a name for the rule. For example:
Customer (Remote). - Purpose: Select Business Object.
- Target: Select a target table for the rule. For example:
Customer.
- Name: Assign a name for the rule. For example:
-
Click Create.
- In the Tables panel, select the columns you want to share.
-
In the Rule panel, go to More > Edge Case. The Edge Case Settings dialog opens:
-
Under Allow Public Access, check Read and/or Write as appropriate, so the remote environment can access the object.
- Click Proceed.
Step 2: Enable remote App Builder connections
Sharing an object isn't enough on its own: the application must also be explicitly allowed to accept remote connector requests, and, since App Builder 4.67, associated with the providers allowed to authenticate them:
- Go to IDE > Additional Settings.
-
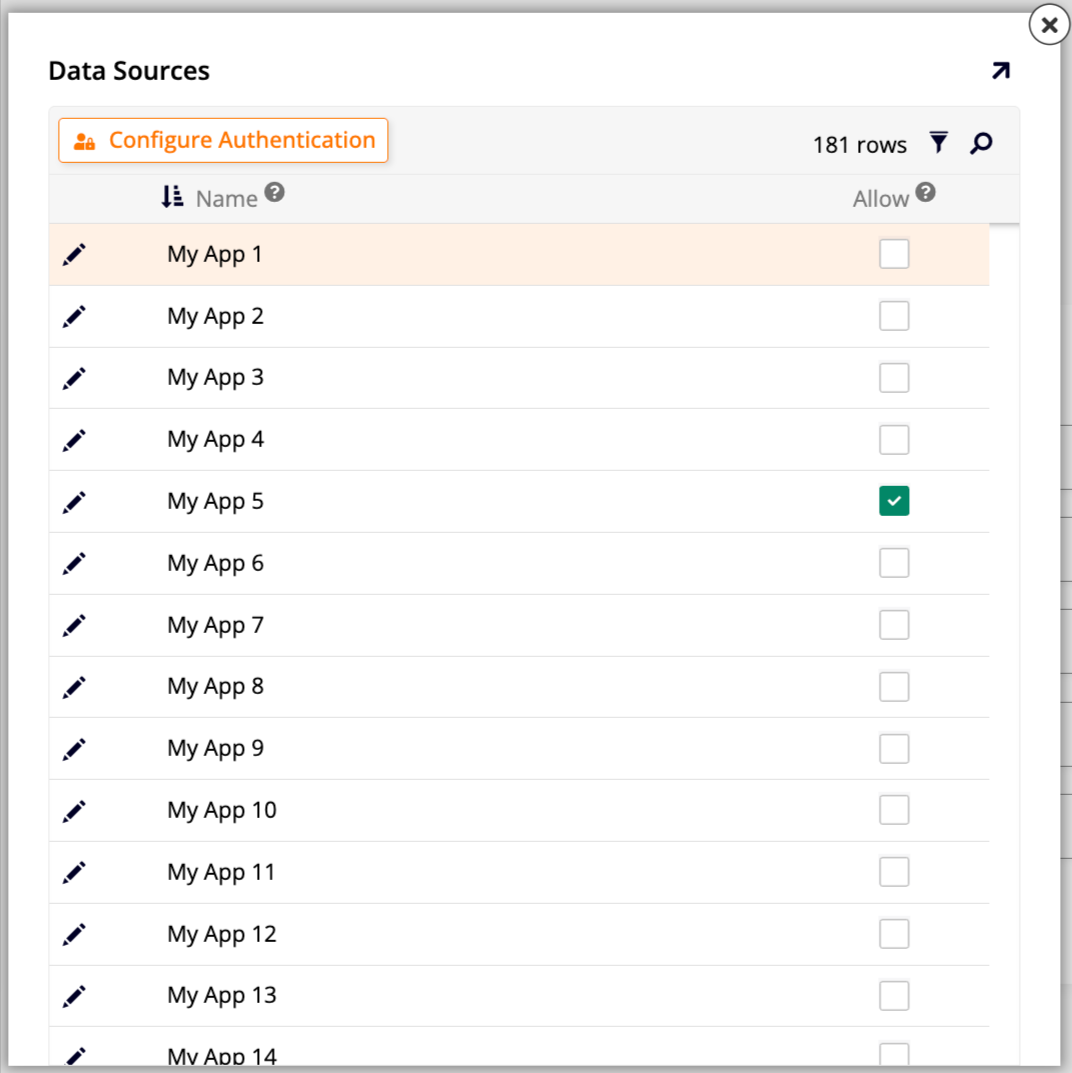
In the Configure panel, click Remote Connector. The Data Sources dialog opens:
-
Check the Allow column for the application you want to allow remote connections for.
- Click Proceed or the checkmark.
-
(Since App Builder 4.67.) Click the Configure Authentication button for the application. The Authentication Providers dialog opens. Add the API key, HTTP, or Authorization Server providers you want to allow to authenticate its Remote Connector requests. See Configure an endpoint for the exact steps.
Note
This option isn't available on a sealed application. For a sealed application, click the icon in its Web Service column on Manage Applications instead, which opens this same Authentication Providers dialog from outside the app.
Step 3: Confirm an API key security provider is configured
The remote environment authenticates to this one using an API key, so confirm this security provider exists and is enabled before generating one:
- Go to IDE > Security Providers.
- Confirm an enabled API Key security provider is configured. If not, configure one (see Security provider - API key to learn how to do so).
Step 4: Create a role to share the object
Steps 4 through 6 are a recommended best practice, not a requirement: they scope the remote environment's access to just the object you're sharing, by creating a dedicated role, group, and user, then generating the API key for that user. If you skip them and generate an API key for an existing user instead, and that user's data source has no roles configured, the key grants access to every object you marked Allow Read and/or Allow Write in Step 1, not just the one you're sharing here.
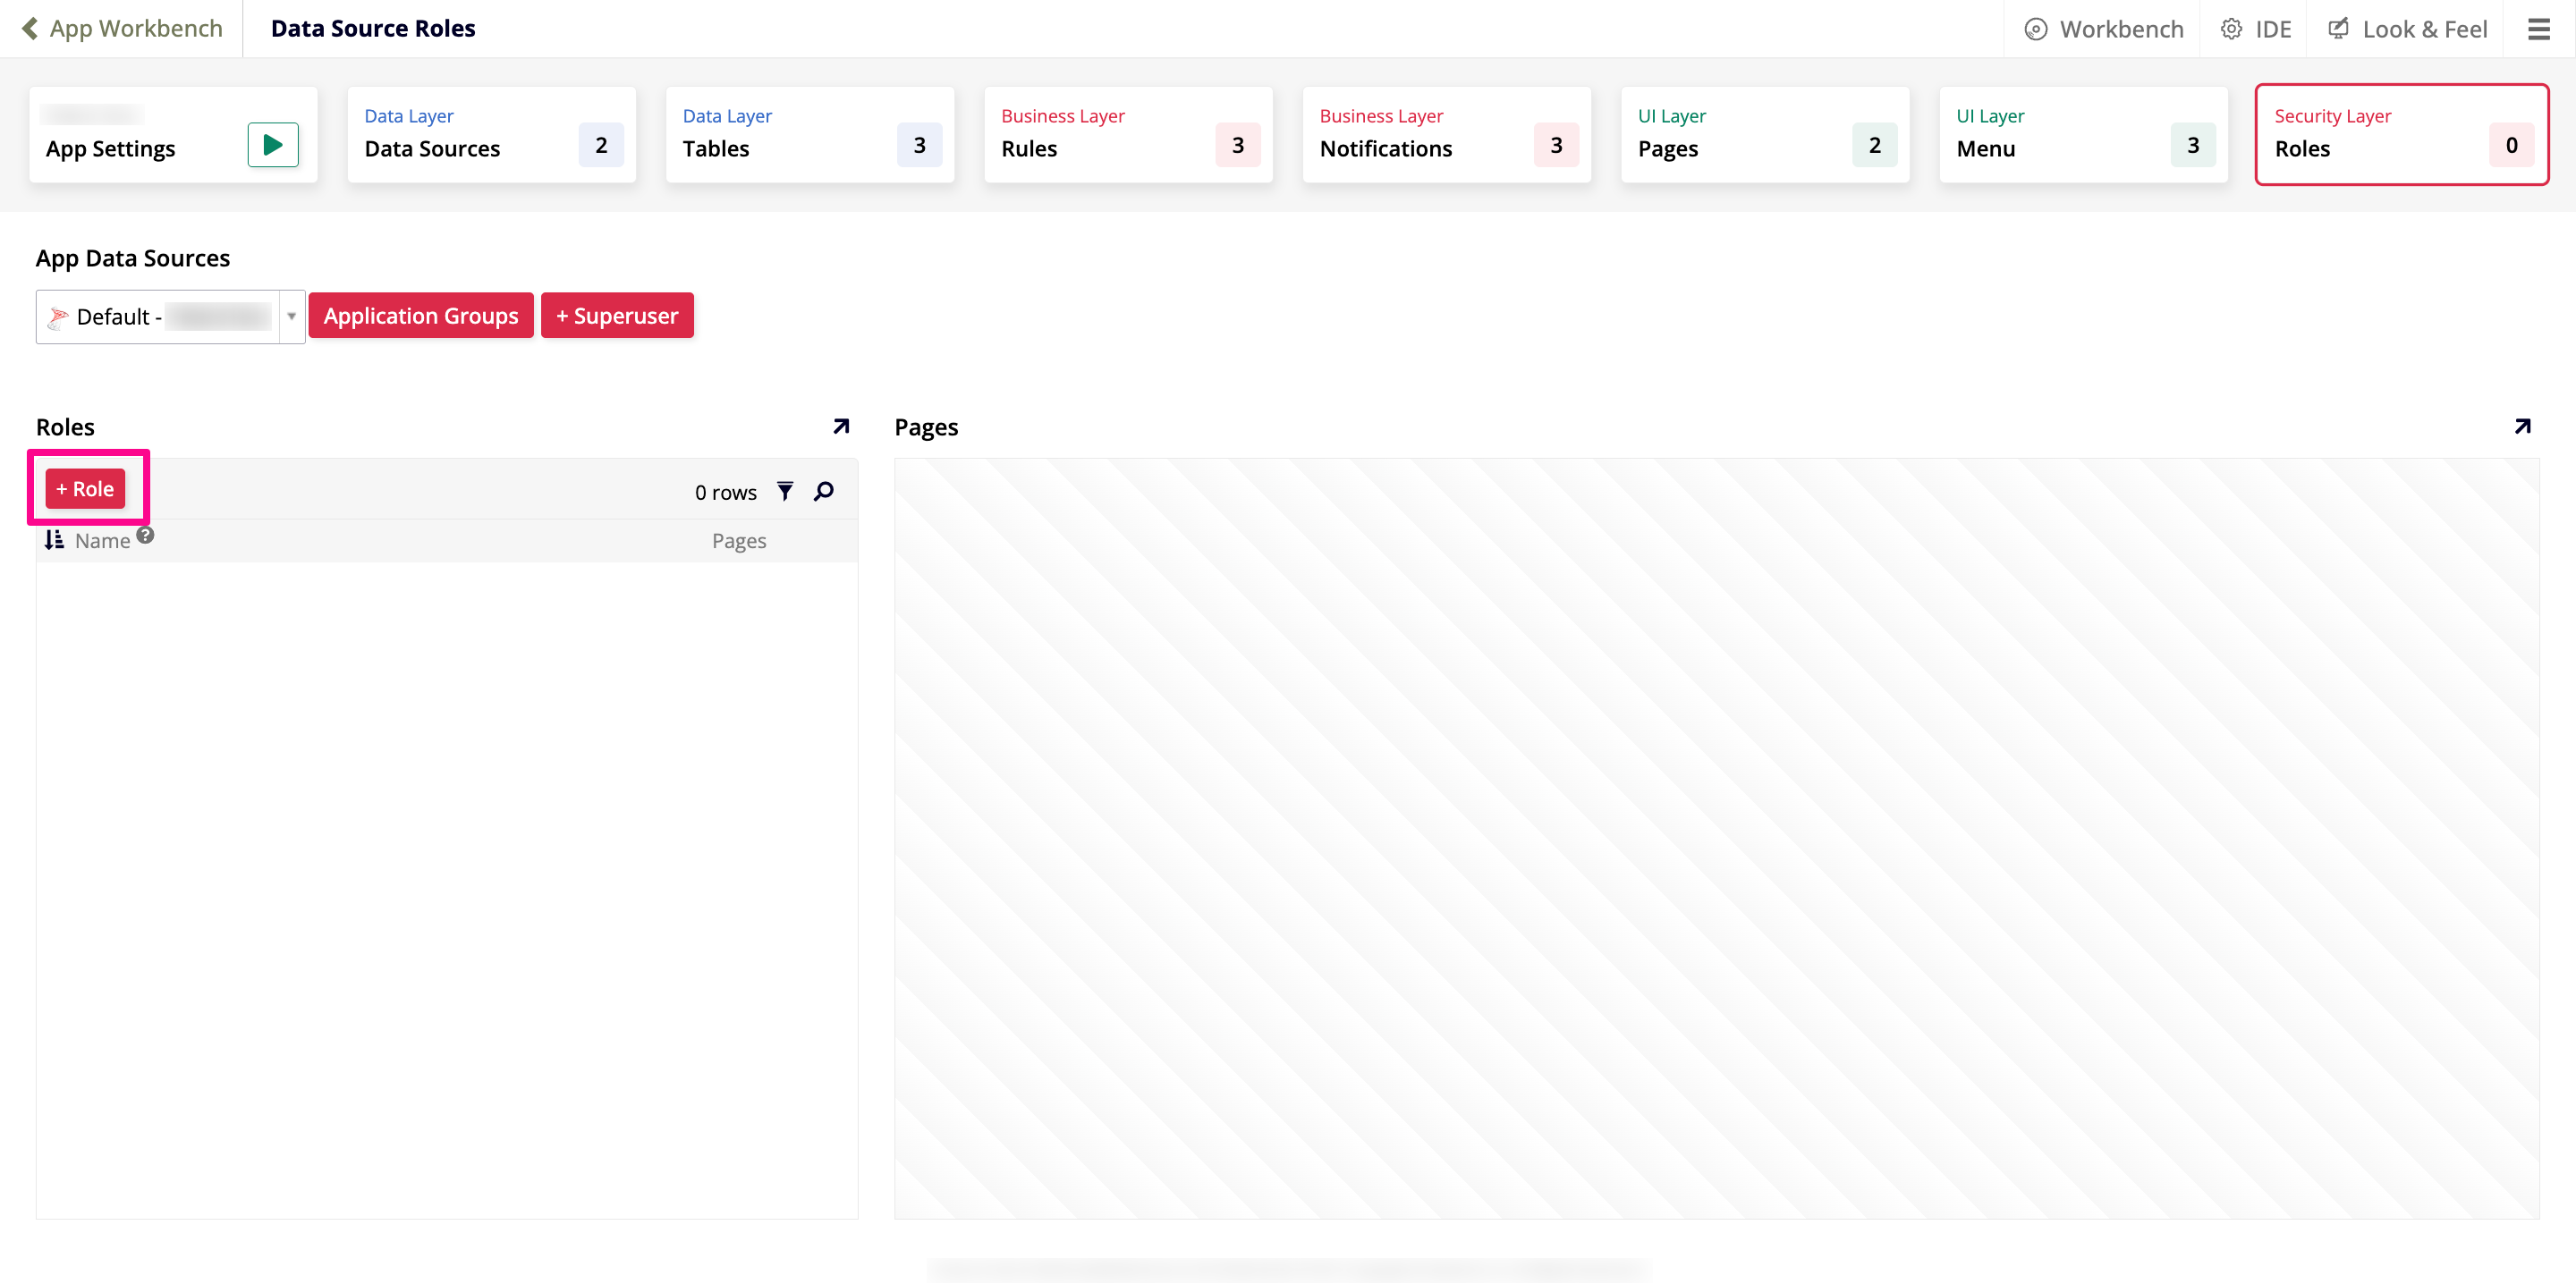
- Navigate to the App Workbench for the app, then go to the Roles tab. If the app has more than one data source, select the one the shared object belongs to from the data source menu at the top of the page.
-
Click + Role (shown below):
-
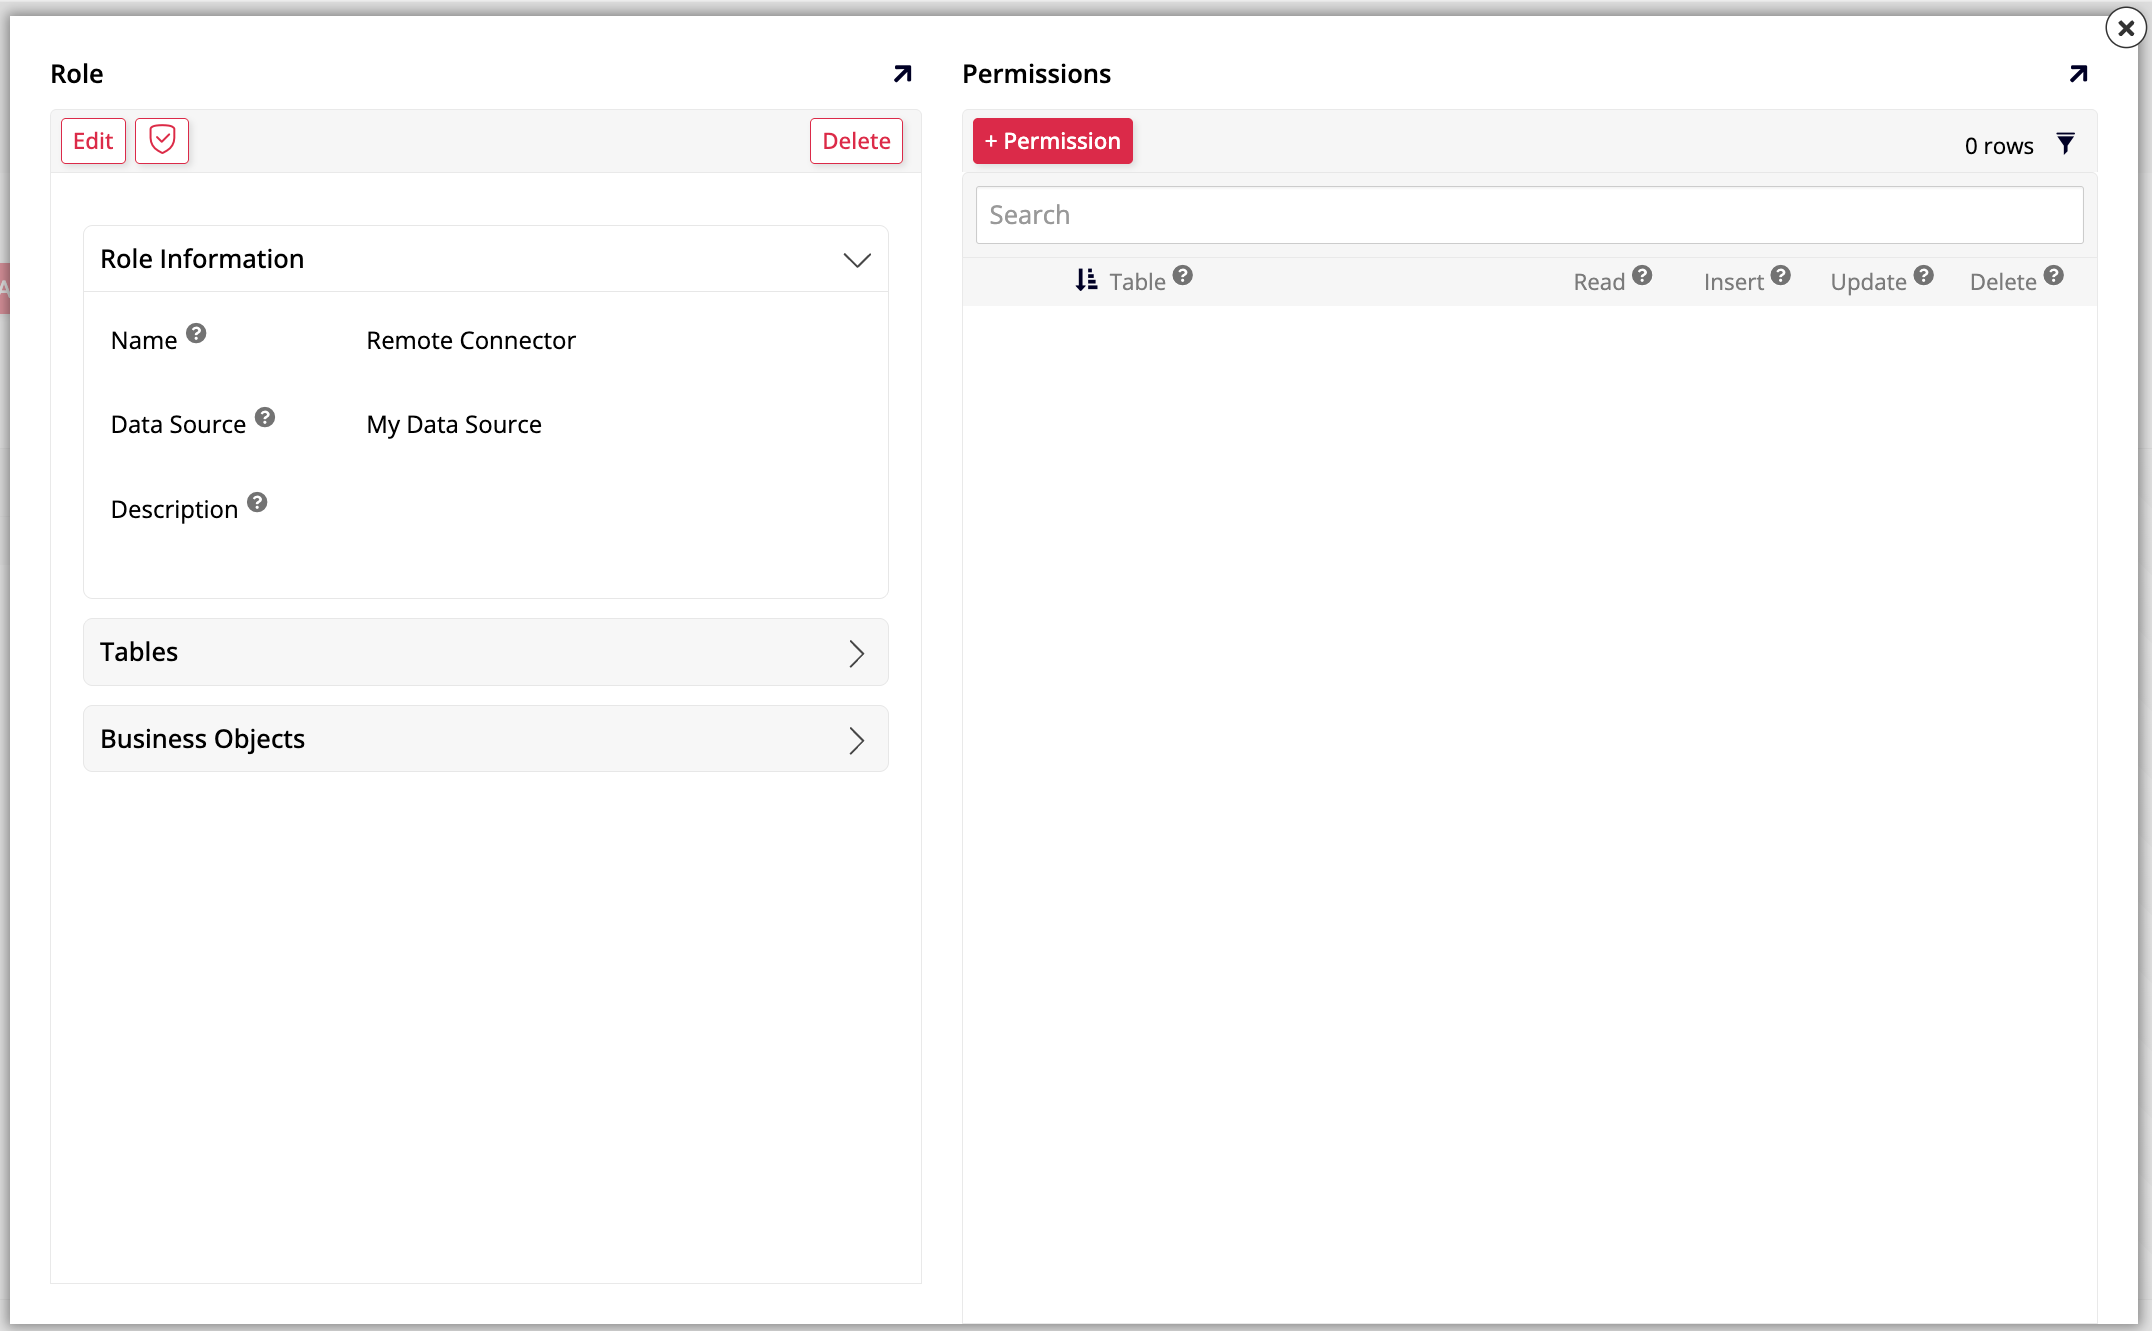
The Role dialog opens. Assign a Name for the role. For example:
Remote Connector. -
Click Save. The Permissions panel becomes available for interaction:
-
Click + Permission, select the object you created in Step 1, then check Read, Insert, Update, and/or Delete as needed.
- Click the checkmark to save.
Note
For more information on roles, see Roles.
Step 5: Create a group and grant it access
Create a dedicated group for the remote environment to authenticate as:
-
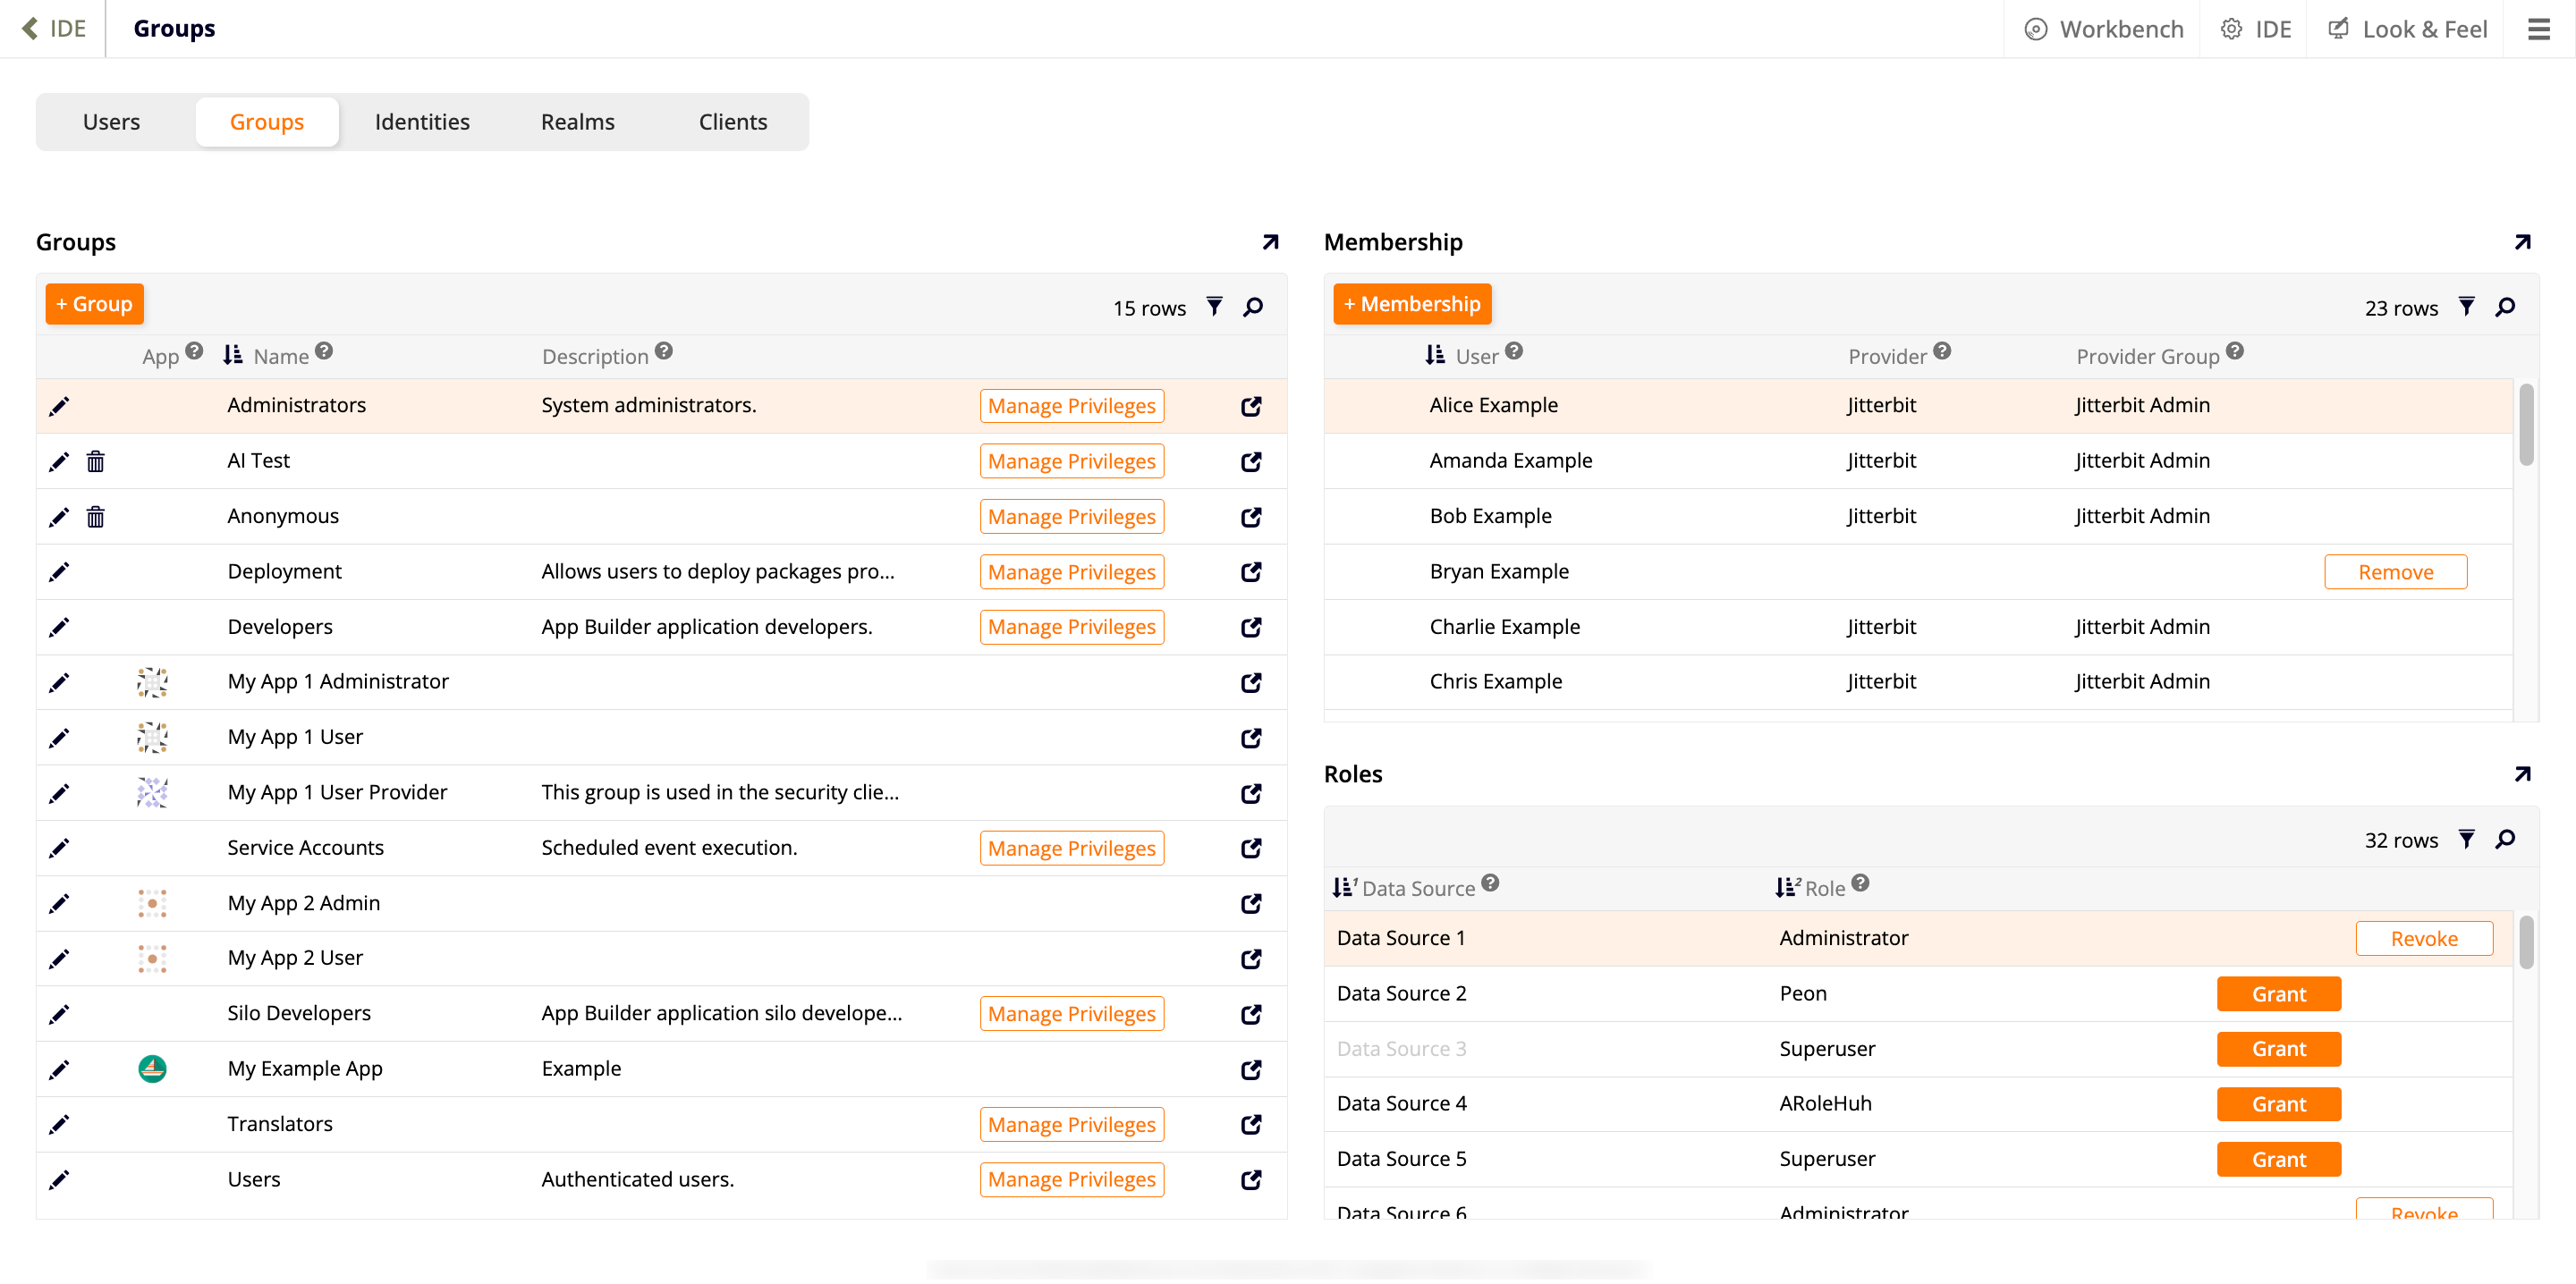
Navigate to the IDE > User Management, then select the Groups tab:
-
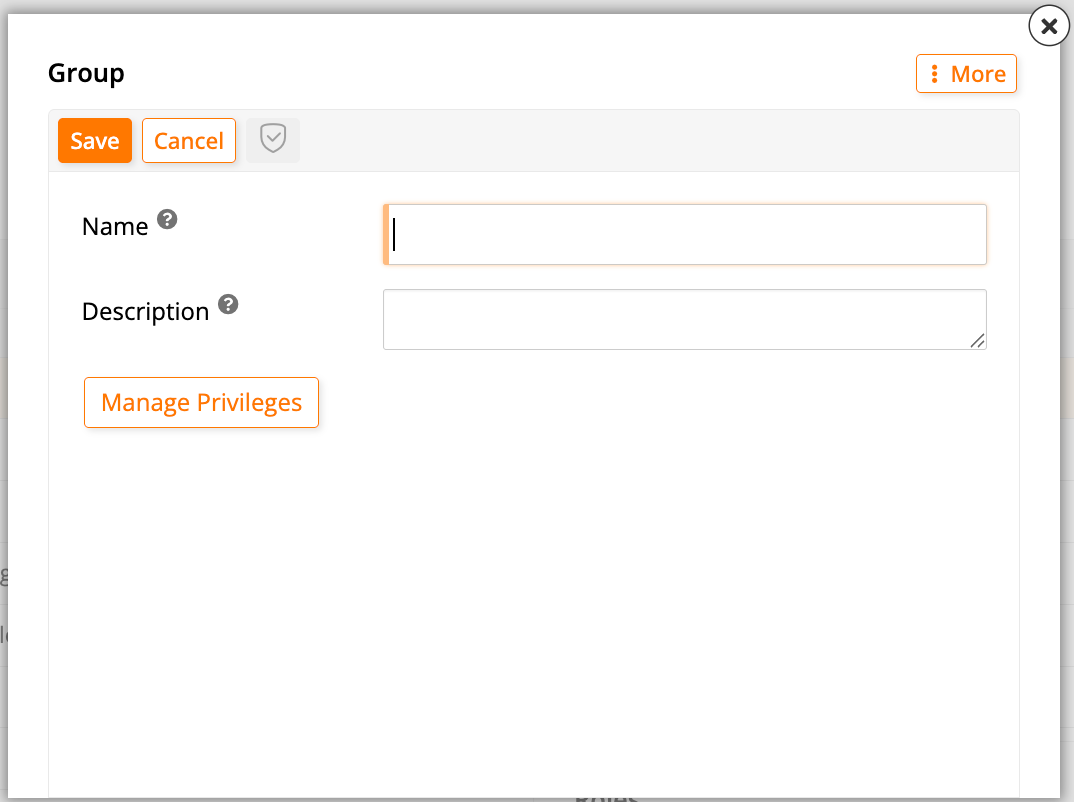
Click + Group. The Group dialog opens:
-
Assign a Name. For example:
Remote Connector. - Click Save.
- Click Manage Privileges. The Privileges and Roles panels open.
-
In the Privileges panel, click Create. The Privilege dialog opens:
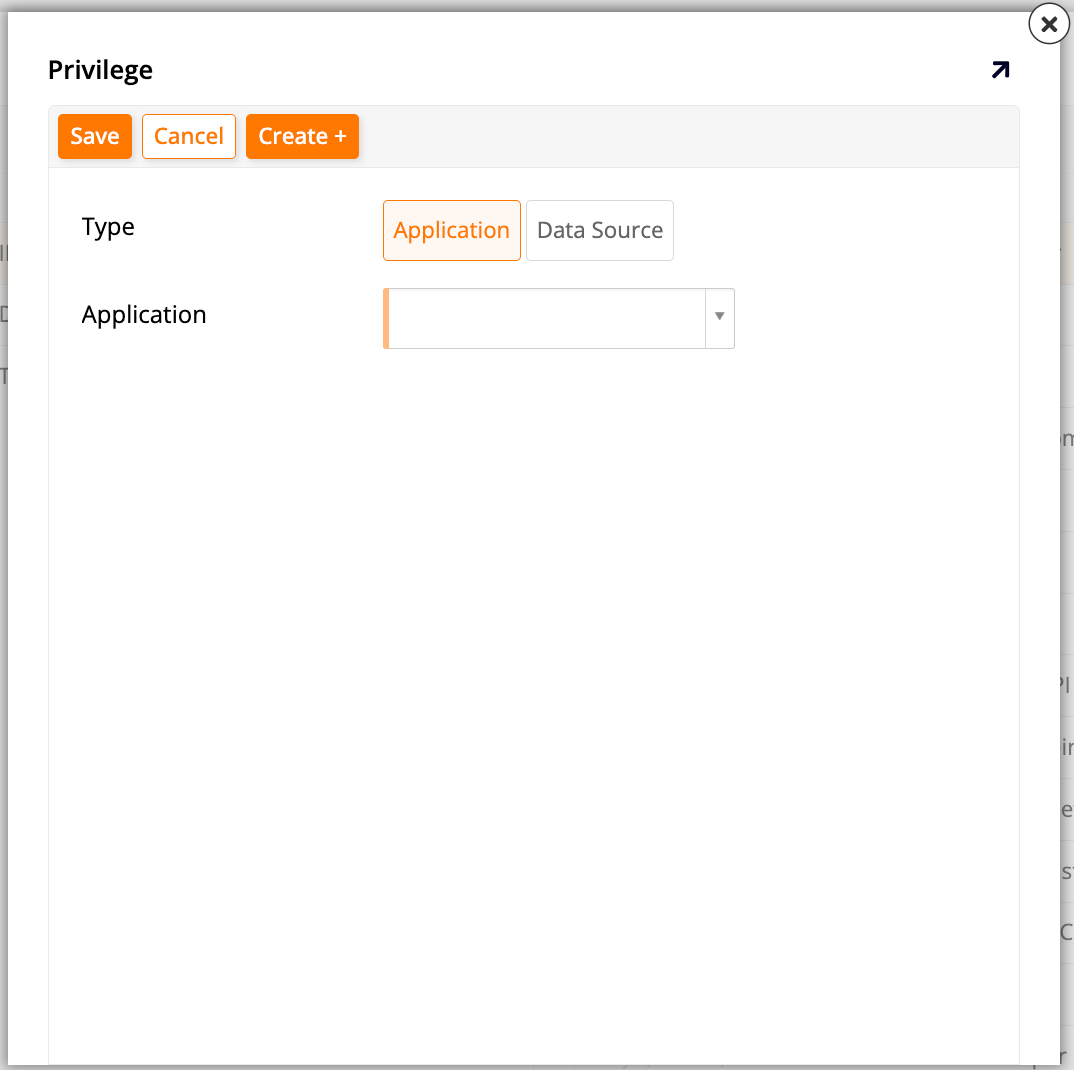
- Type: Select Application.
- Application: Select the application containing the object you're sharing. For example:
Global Imports.
-
Click Save.
- In the Roles panel, locate and click Grant for the role you created in Step 4.
Note
The remote environment also needs the built-in App Builder Remote Connector role, referenced in 403 forbidden error. If it isn't already granted, locate and click Grant for it too, in the same Roles panel.
Step 6: Create a user, generate an API key, and add them to the group
Create a dedicated user for the remote environment to authenticate as, and generate the credential it connects with:
-
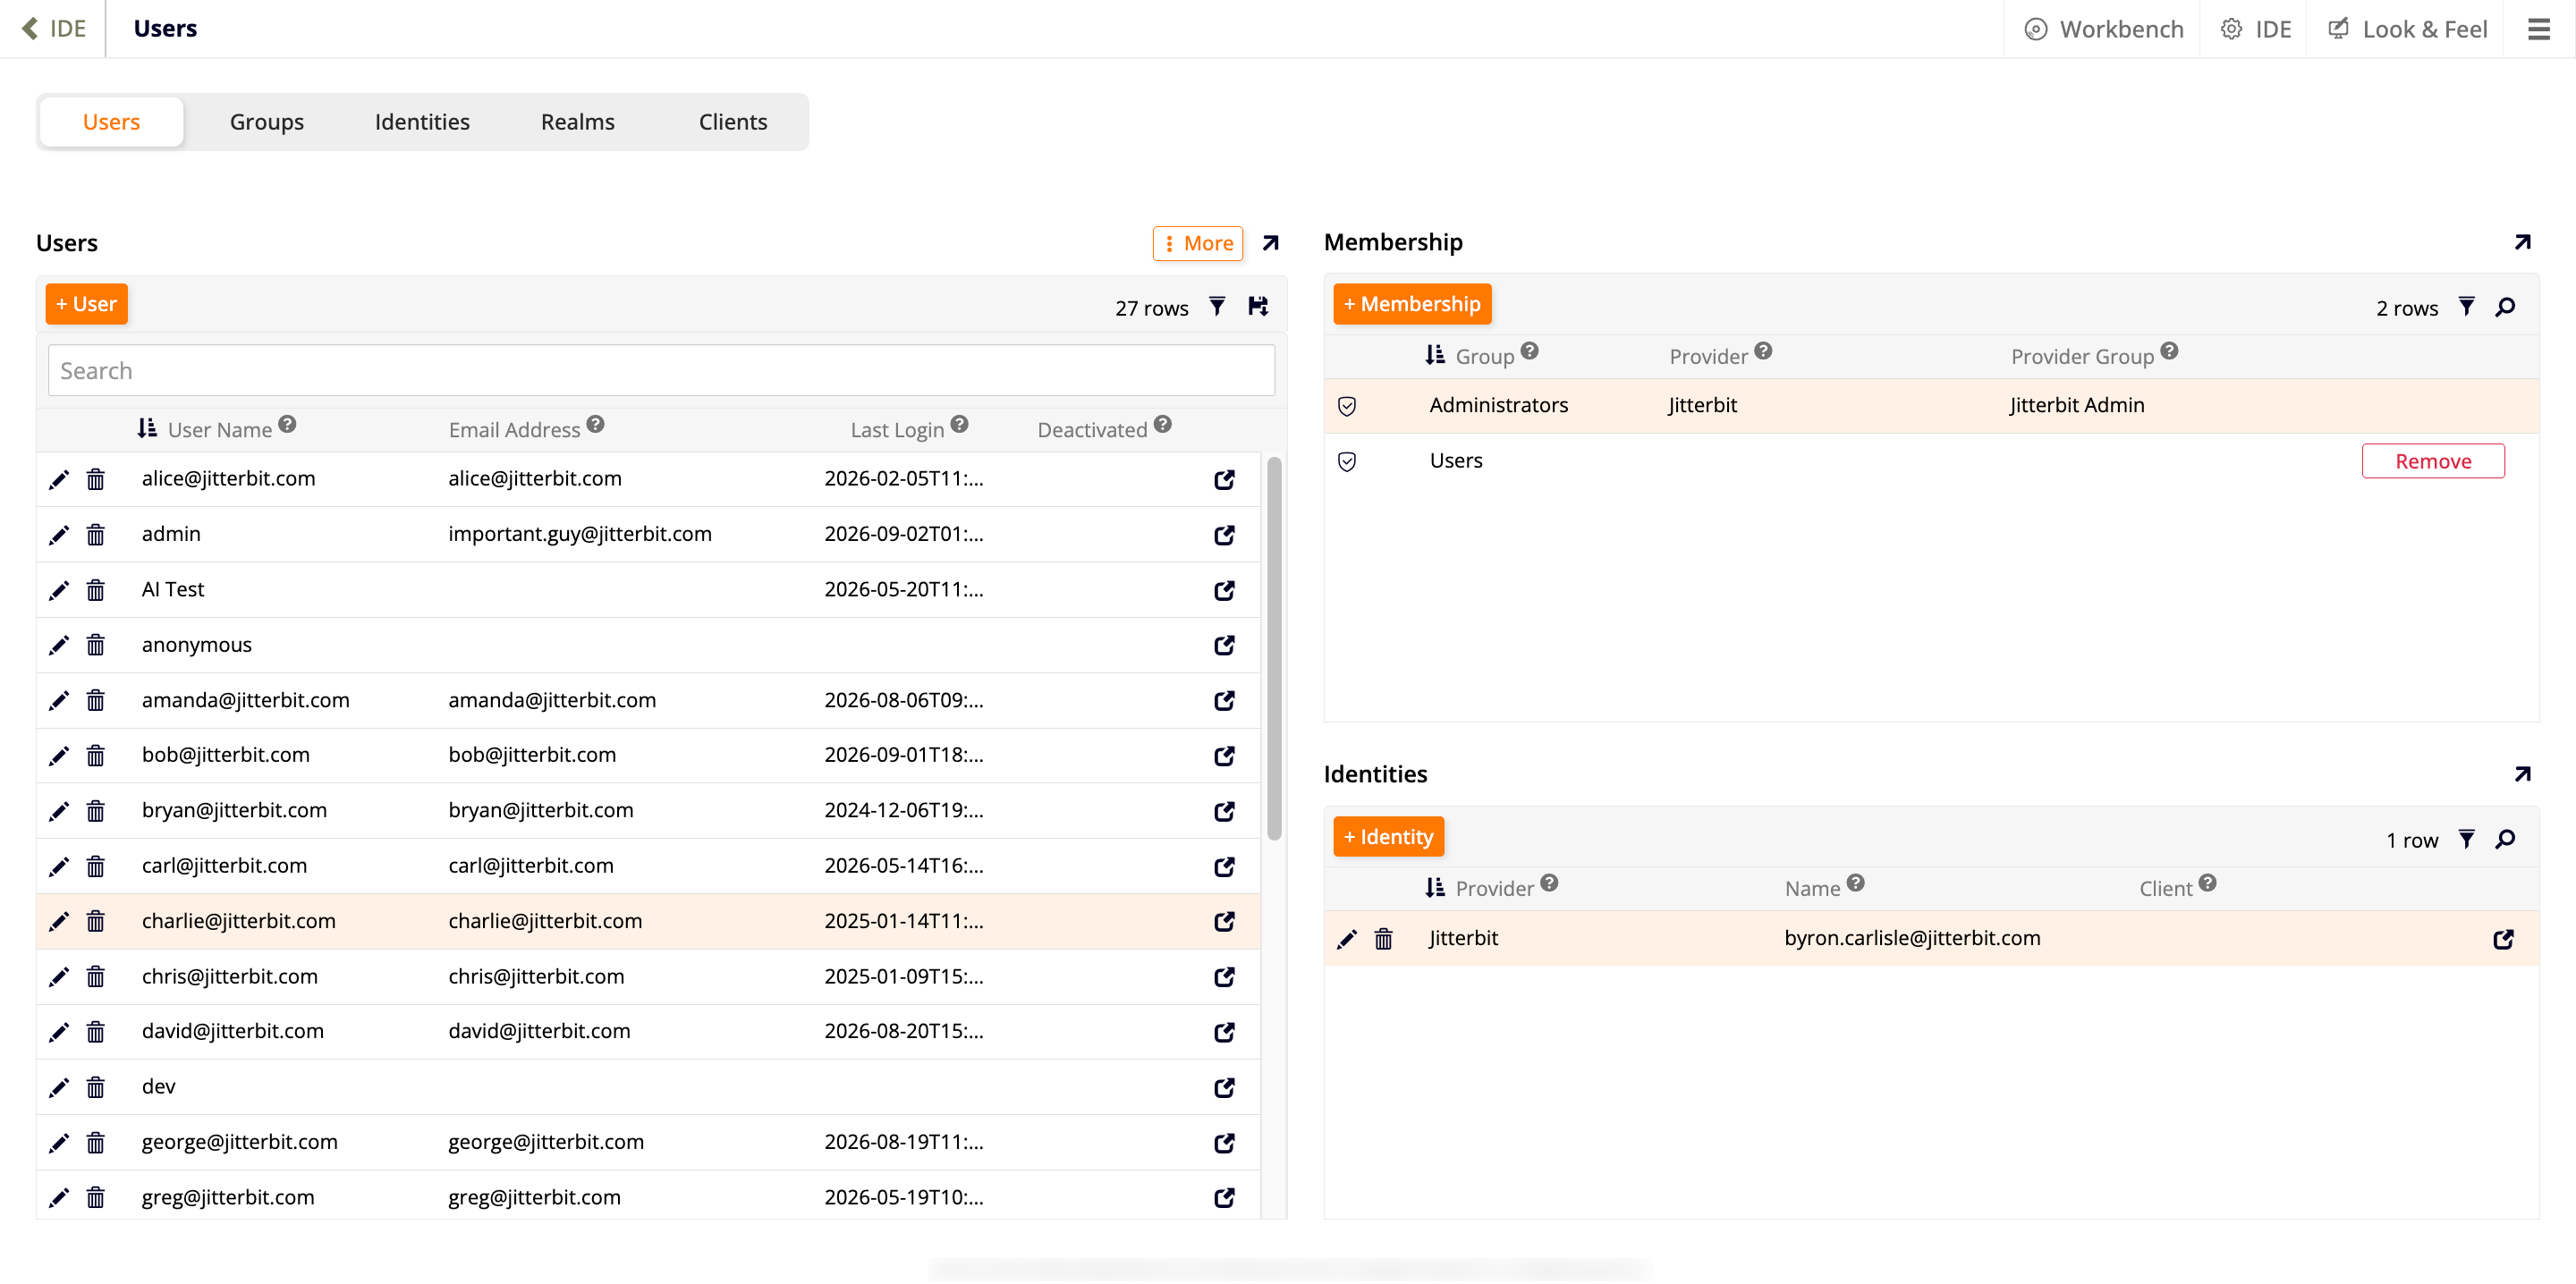
Select the Users tab:
-
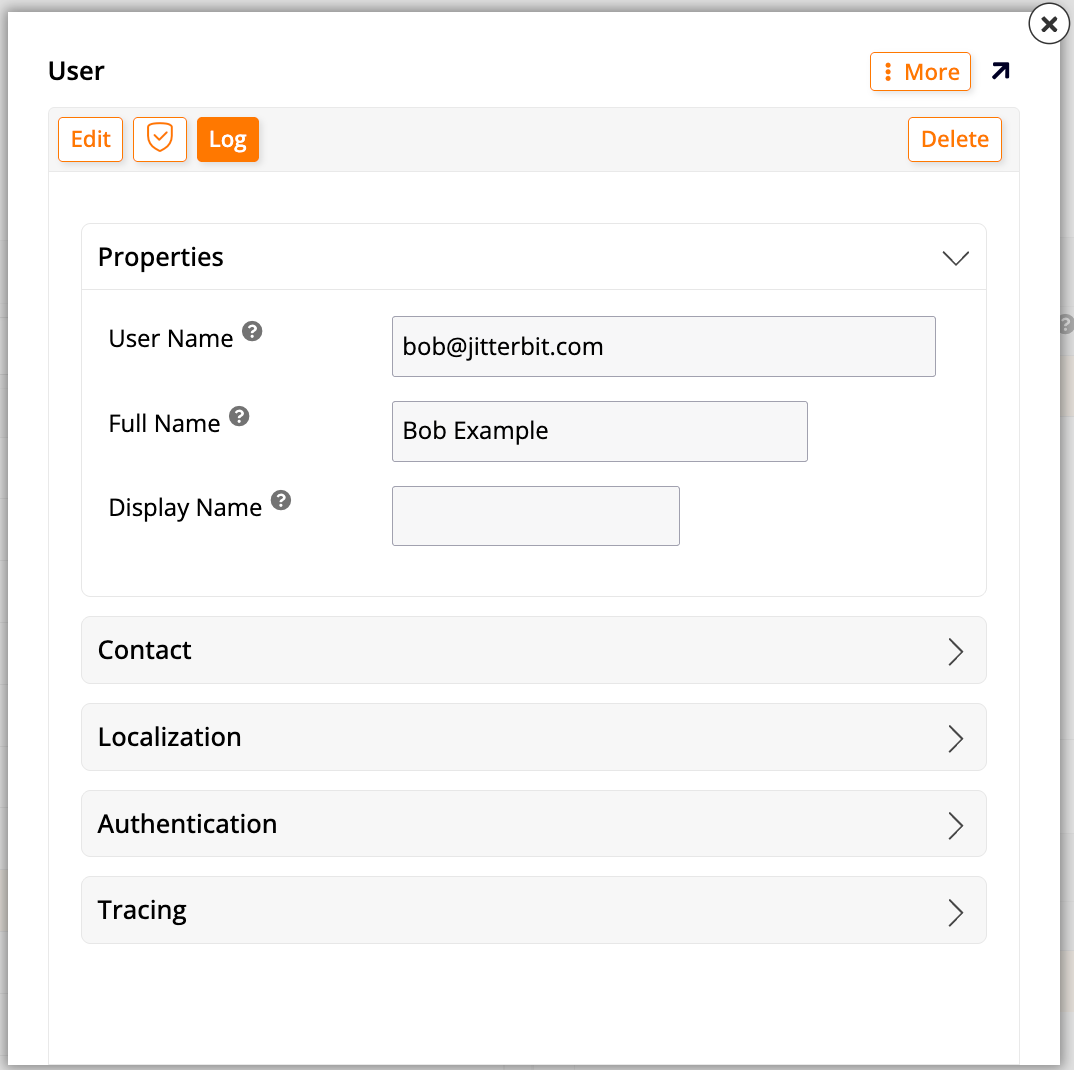
Click + User. The User dialog opens:
-
Assign a User Name. For example:
RemoteConnector. - Click Save.
- Click More > Keys.
-
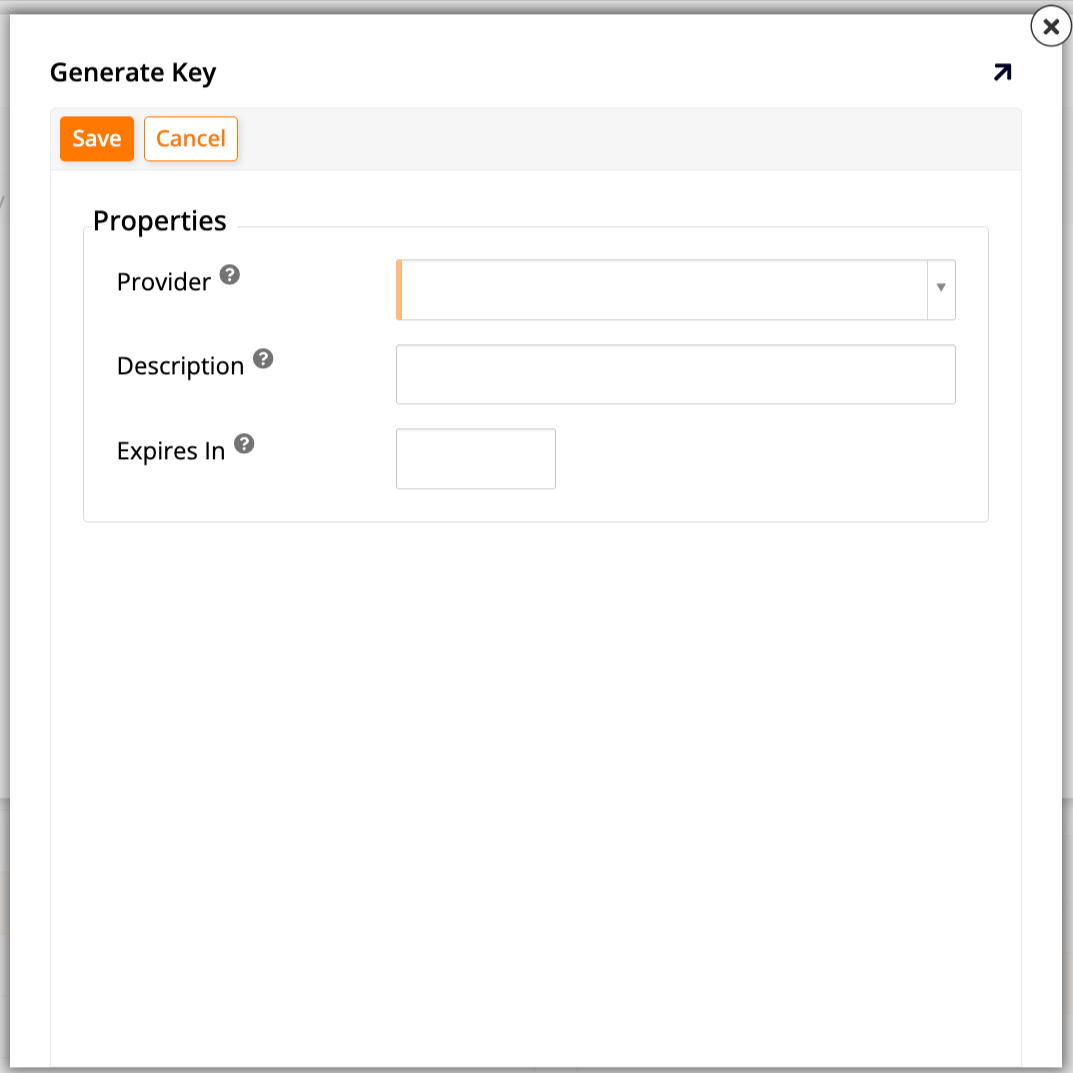
Click Create. The Generate Key dialog opens:
-
Select API Key as the Provider, then click Save.
-
Copy the generated Key value to your clipboard.
Caution
The generated key value cannot be retrieved again once you leave the Generate Key screen. If you lose it, you'll need to generate a new one.
-
Click + Membership, select the group you created in Step 5, then click the checkmark to save.
Step 7: Set up the connection from the remote environment
Every step so far took place in the environment sharing the object. This final step switches to the remote environment and uses the credentials you just created to establish the connection:
- Navigate to the remote environment you want to connect from, then go to the App Workbench for the app you want to connect, and select the Data Sources tab.
- Click + Source. A wizard opens to assist you.
- In the first screen of the wizard, select New Connection, then click Next.
-
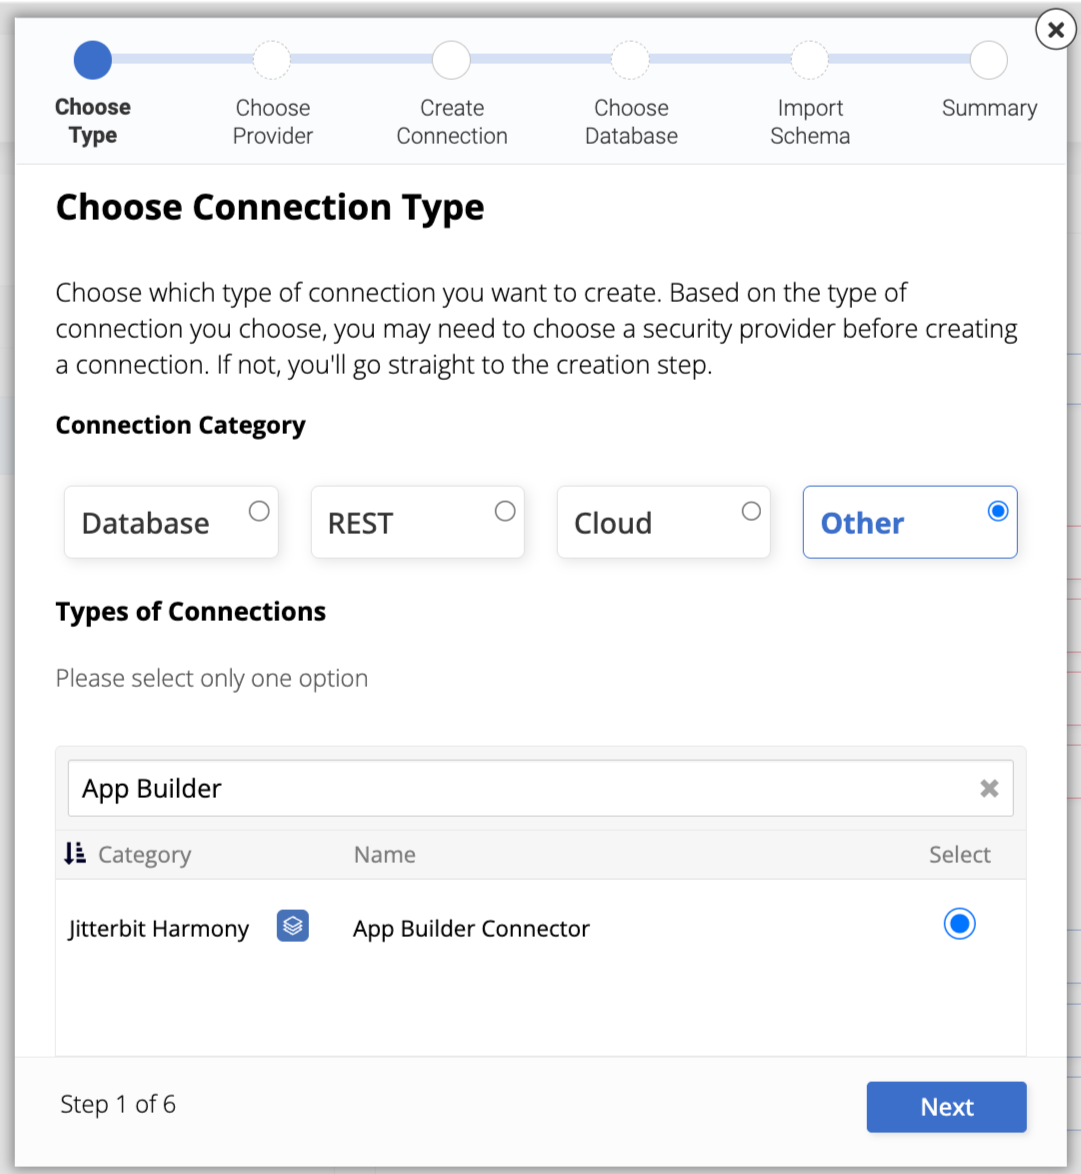
Select Other as the Connection Category, then search for and select App Builder Connector:
-
Click Next. The wizard skips the Choose Provider step for this connection type and goes straight to Create Connection.
-
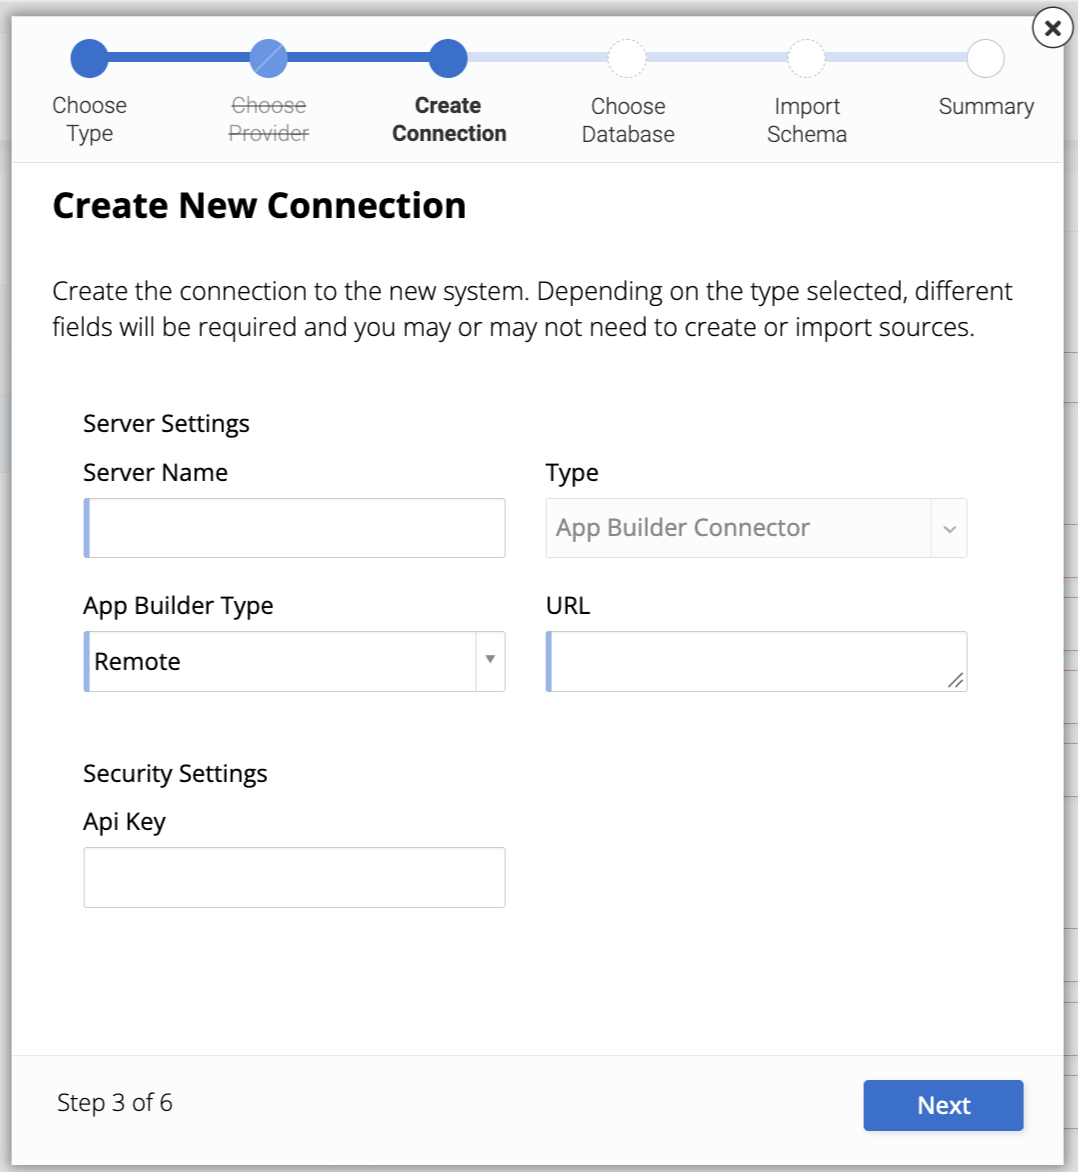
Enter the following values:
- Server Name: Assign a name. For example:
Remote. - App Builder Type: Confirm this is set to Remote.
- Url: Enter the URL of the environment you're connecting to. For example:
https://example.com. - Api Key: Paste the key value you copied in Step 6.
- Server Name: Assign a name. For example:
-
Click Next, then proceed through the wizard's remaining steps (Choose Database, Import Schema, and Summary) to select the database, import the tables, views, and stored procedures you want to connect, and confirm the new connection.
- Select the remote App Builder connector data source, then click Logic.
- Click the Results icon for an entry to confirm you see data.
- Test the connection: edit a record and save, then return to the other environment and confirm the update appears there too.
Limitations
Keep the following limitations in mind when working with App Builder connector:
- App Builder connector does not support Reach.
- App Builder connector supports Full audit, but Full audit must be enabled on the underlying table for it to work.
- For a local App Builder connector, both databases must be relational databases, and must exist on the same server environment.
- For a local App Builder connector, if you add or modify columns on a public table or business object, you must manually keep the corresponding tables or business objects on each side in sync.
Note
We recommend creating dedicated business objects for use with App Builder connector, rather than reusing existing ones. Once you've imported an object, change the public object only when necessary; if you do change it, make the same change to its counterpart in the local App Builder connector.
Troubleshooting
403 forbidden error
-
Symptom: Connecting to a remote App Builder environment using the App Builder connector returns a 403 Forbidden error.
-
Possible cause: The user account configured for the connector has not been granted the App Builder Remote Connector role in the source App Builder environment.
-
Resolution: Assign the App Builder Remote Connector role to that user. See Remote connector's Step 5: Create a group and grant it access for configuration steps.
Full error detail
Response status code does not indicate success
at void Vinyl.Business.Application.Events.RemoteEventRunner.AssertSuccessStatusCode(HttpResponseMessage response, string uri, EventTableRef eventTableRef)
at async Task<EventTableRef> Vinyl.Business.Application.Events.RemoteEventRunner.Invoke(EventTableRef eventTableRef, VinylConnectorEndpoint connectorEndpoint)
at async Task<EventTableRef> Vinyl.Business.Application.Events.RemoteEventRunner.InvokeCountAsync(EventTableRef eventTableRef)
at async Task<EventTableRef> Vinyl.DataSource.VinylConnector.VinylConnectorDataSourceServerHandler.CountPublicDataSourcesAsync(EventContext eventContext)
at async Task Vinyl.DataSource.VinylConnector.VinylConnectorDataSourceServerHandler.PingAsync(EventContext eventContext, CancellationToken cancellationToken)
at async Task Vinyl.DataSource.Plugins.DataSourceManagement.PingDataSourceServer.InvokeAsync(ValidationRule validationRule, EventInputRow input)

Reason
Forbidden
Status
403
Uri
https://{{App BuilderRootURI}}/connector/v1/count
Remote DataSourceId
19b4051a-b959-4b0c-9bd4-98b7cf2be132
Remote Table Name
DataSource_Public
Remote Event Name
null
Source
Vinyl.Business
For related troubleshooting, see App Builder Connector: Generated API key cannot be retrieved after leaving the screen in the App Builder troubleshooting guide.