App workbench Rules tab in Jitterbit App Builder
Introduction
Rules is the third tab in the App Workbench. It is the first tab that relates to the business layer of your application and is where you create business rules.
The image below illustrates the Rules tab of an application that has one configured business rule:
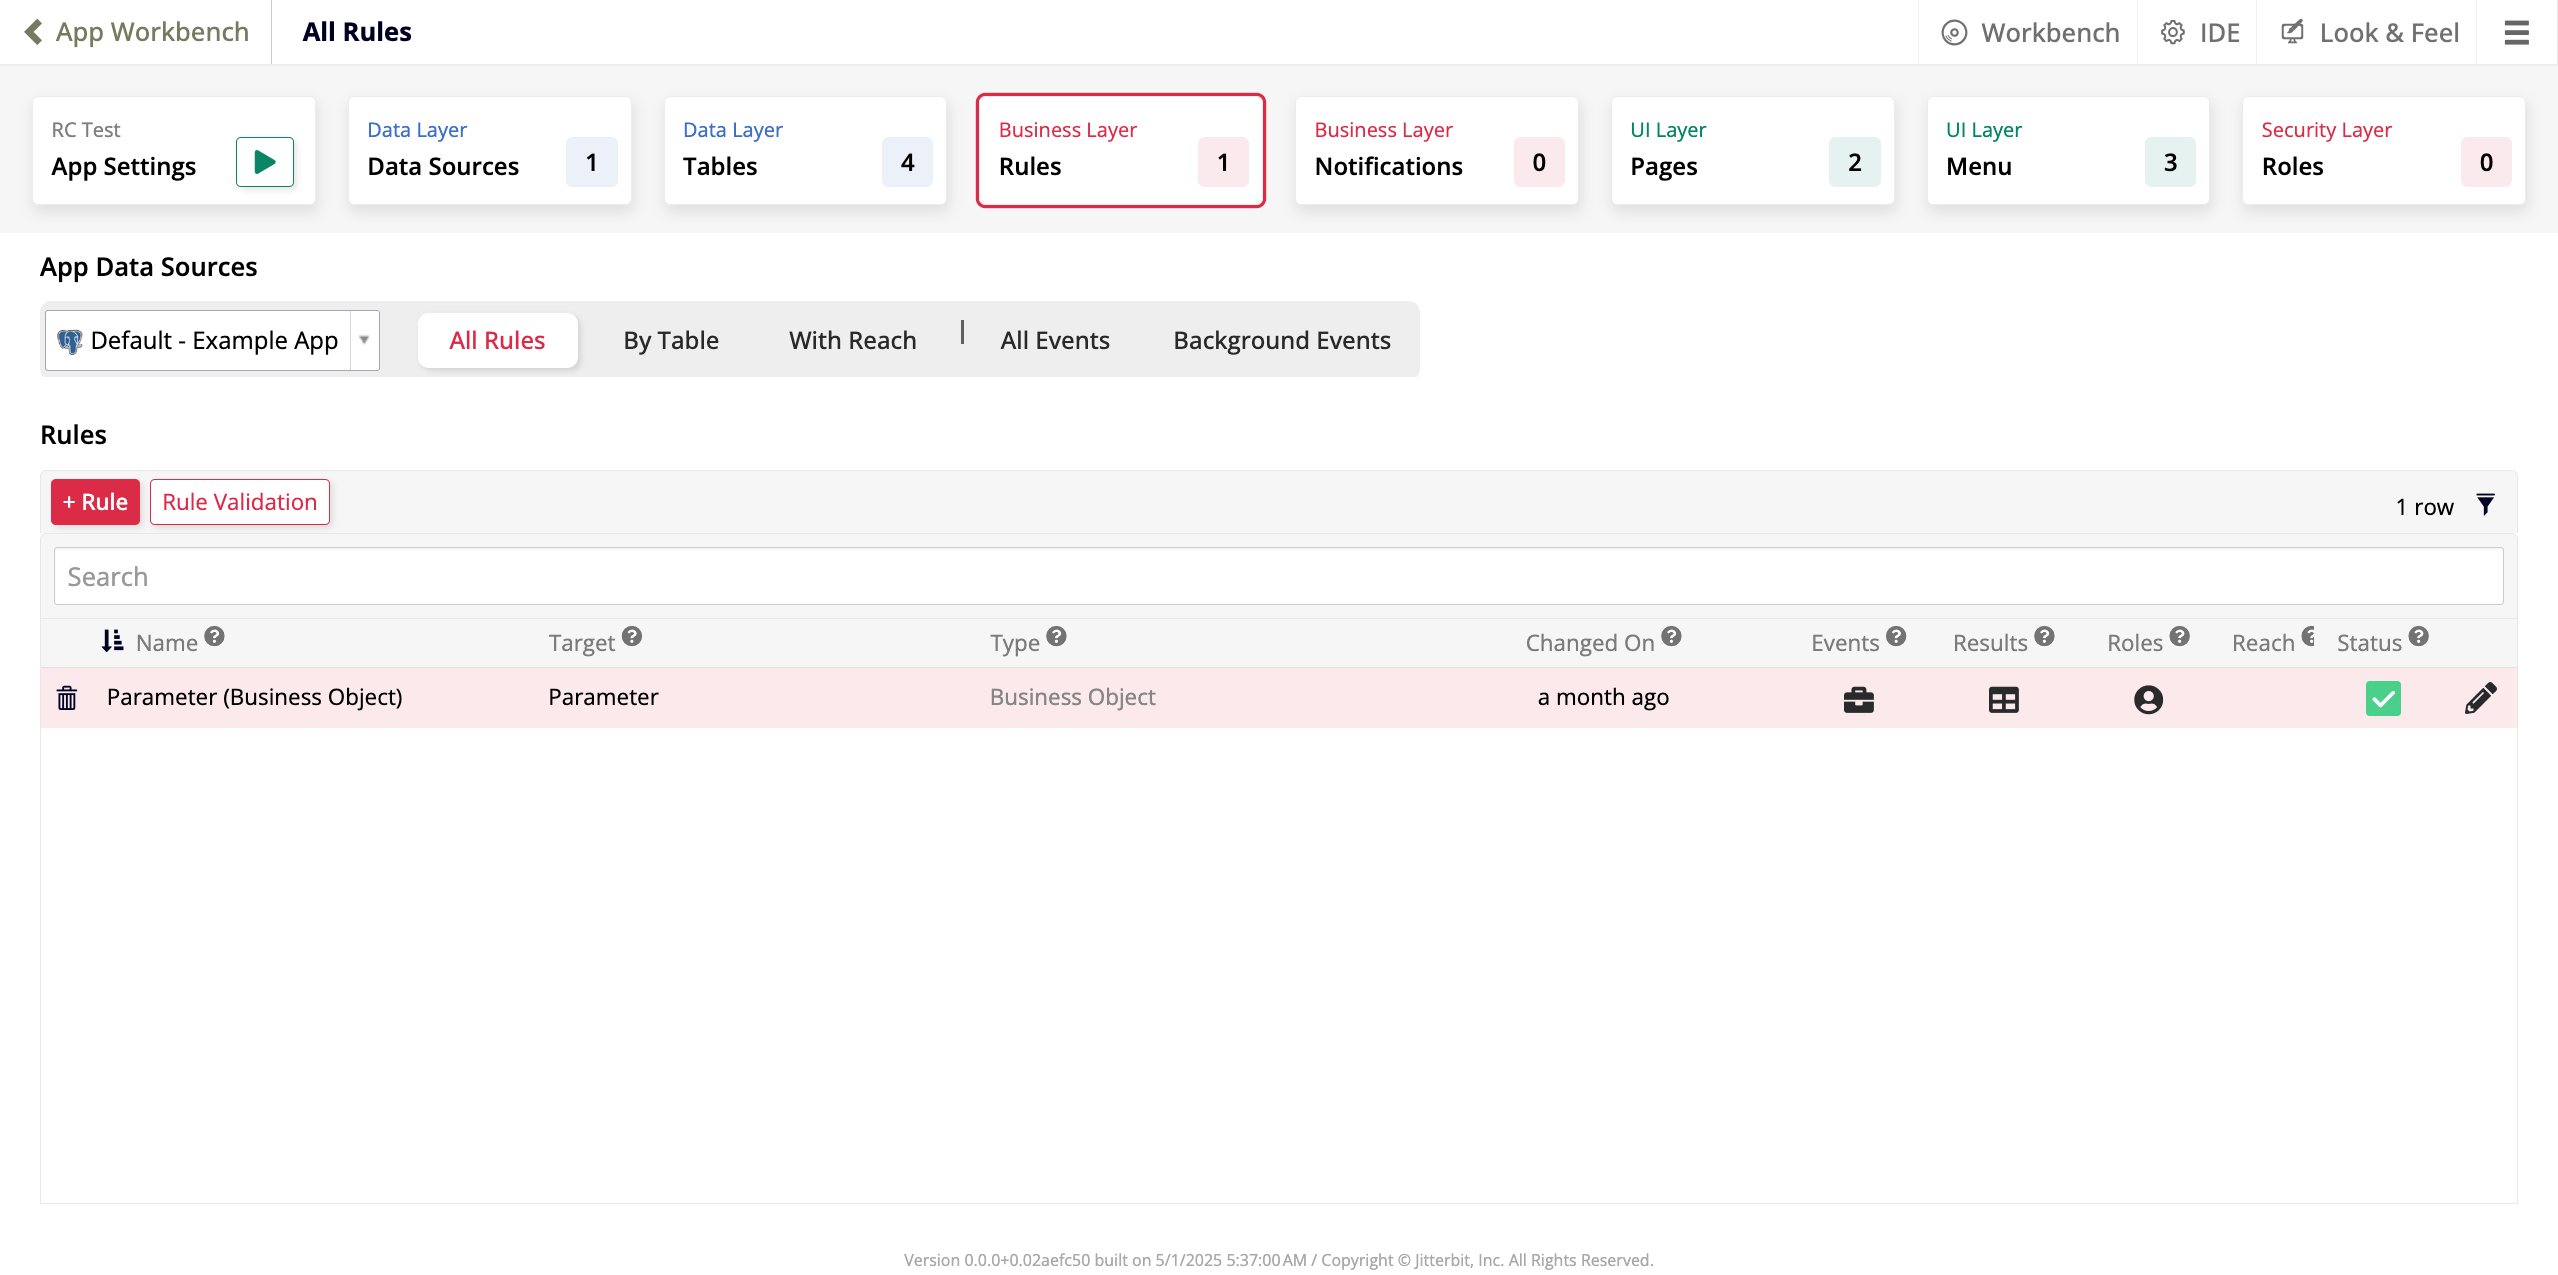
In the Rules tab the information is divided in two panels:
-
The App Data Sources shows a dropdown menu with all the data sources connected with the current application. The main data source is selected by default. The business rules shown in the next section will be the ones that are based on the tables present in that data source. Next to the dropdown, there are options to filter the list of rules:
-
All Rules: Shows all business rules.
-
By Table: Filters the business rules by table.
-
With Reach: Shows only the business rules that use reach.
-
All Events: Shows all business rules that have an associated event.
-
Background Events: Shows only the business rules that have an associated background event.
-
-
The Rules panel contains:
-
+ Rule: Click to open the Rule Builder, where you can add a new business rule.
-
Rule Validation: Click to validate the current rules.
-
A list of all the current business rules. The list can be filtered using the filter icon and the search bar allows you to look up a rule by its name. Each row on the list contains:
-
A trash icon to delete the business rule.
-
Name: The name of the business rule. It must be unique within the selected data source.
-
Target: The target or rule that this business rule references.
-
Type: Defines the type or purpose of the business rule.
-
Changed On: Shows when the most recent modification of the business rule occurred.
-
Events: Click the briefcase icon to configure the events, actions, or validations associated with the business rule.
-
Results: Click the table icon to see a view of all the records available in the business rule.
-
Roles: Click the user profile icon to configure the Read, Insert, Update, and Delete permissions.
-
Reach: Indicates with a green checkmark whether the business rule uses reach.
-
Status: Indicates with a green or red checkmark whether results were run after the most recent edit of the business rule.
-
Click the pen icon to edit the business rule.
-
-
Create a business rule
To create a new business rule from the App Workbench Rules tab, click the + Rule button in the Rules panel. The Rule Builder will open in create mode:
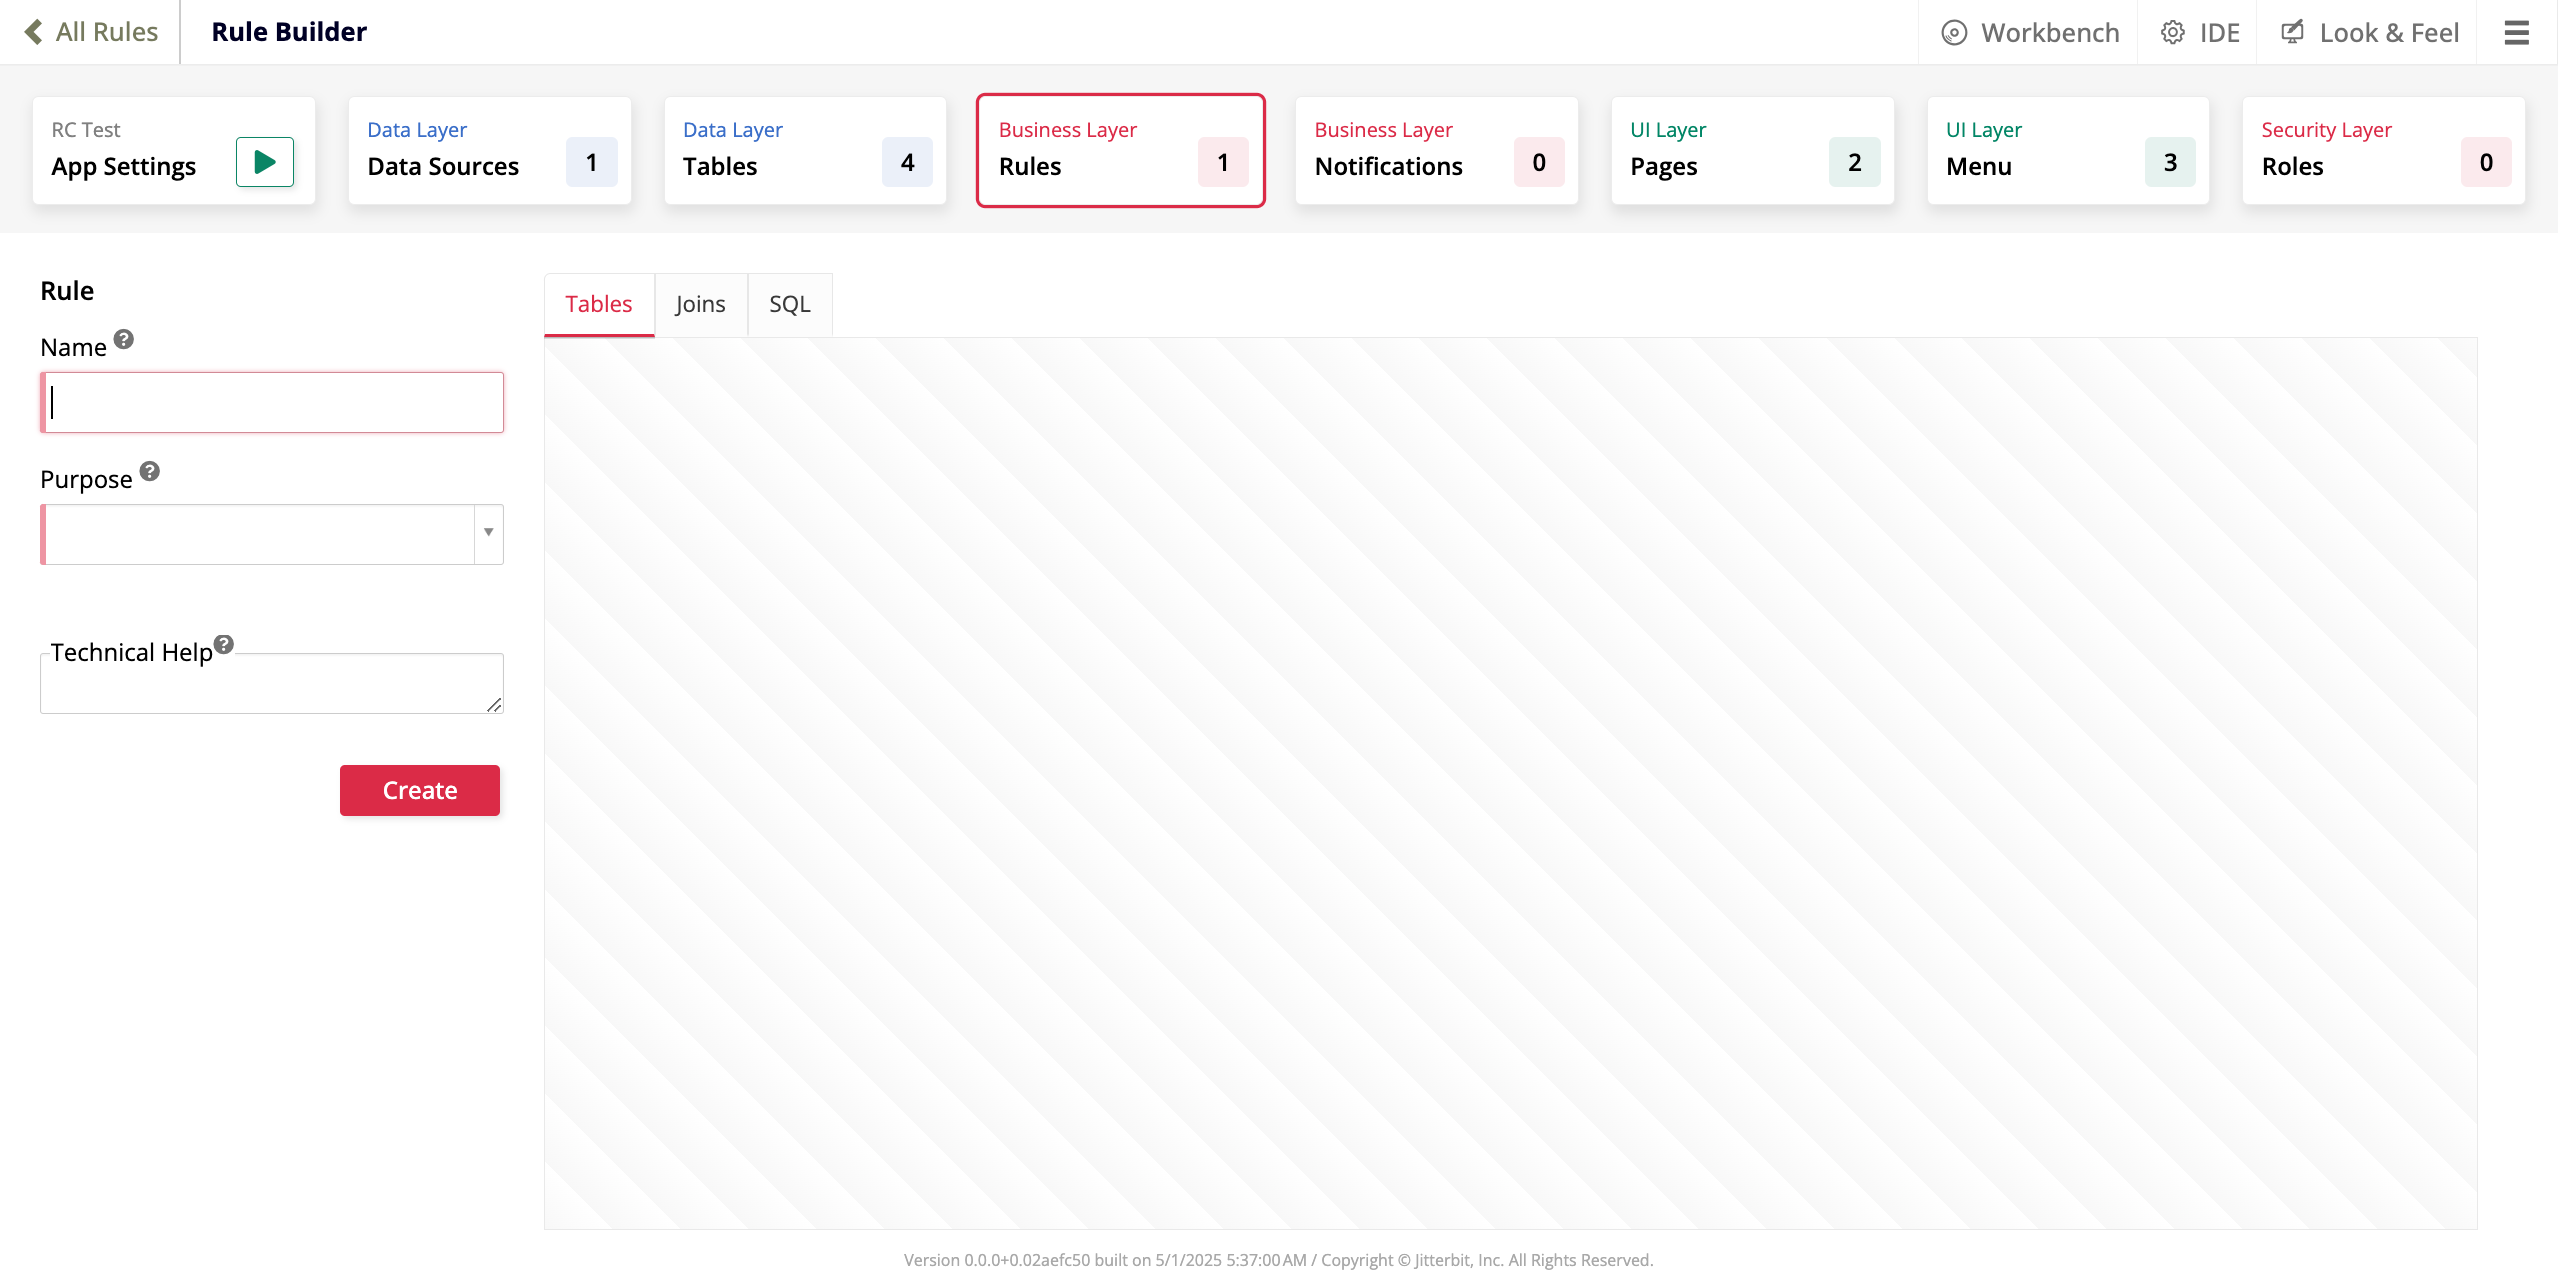
Enter basic information about the new business rule in the Rule panel:
-
Name: Enter a name for the business rule. It must be unique for each data source.
-
Purpose: Use the dropdown menu to define the business rule's intended use. When you select a purpose, two new fields appear:
-
Source Data Source: Select the data source that contains the table you want to reference.
-
Target: Select the table that the business rule should reference. (The table must be on one of the supported databases.)
-
-
Technical Help: A text box where you can enter additional information for other app developers about the business rule. This text is not seen by app users.
-
Create: Click to create the new business rule. After you click it, the Rule Builder will enter edit mode and you can edit the new rule like the existing ones.
Edit a business rule
To edit a business rule, locate it in the list under the Rules panel and click the pen icon. The Rule Builder will open in edit mode:
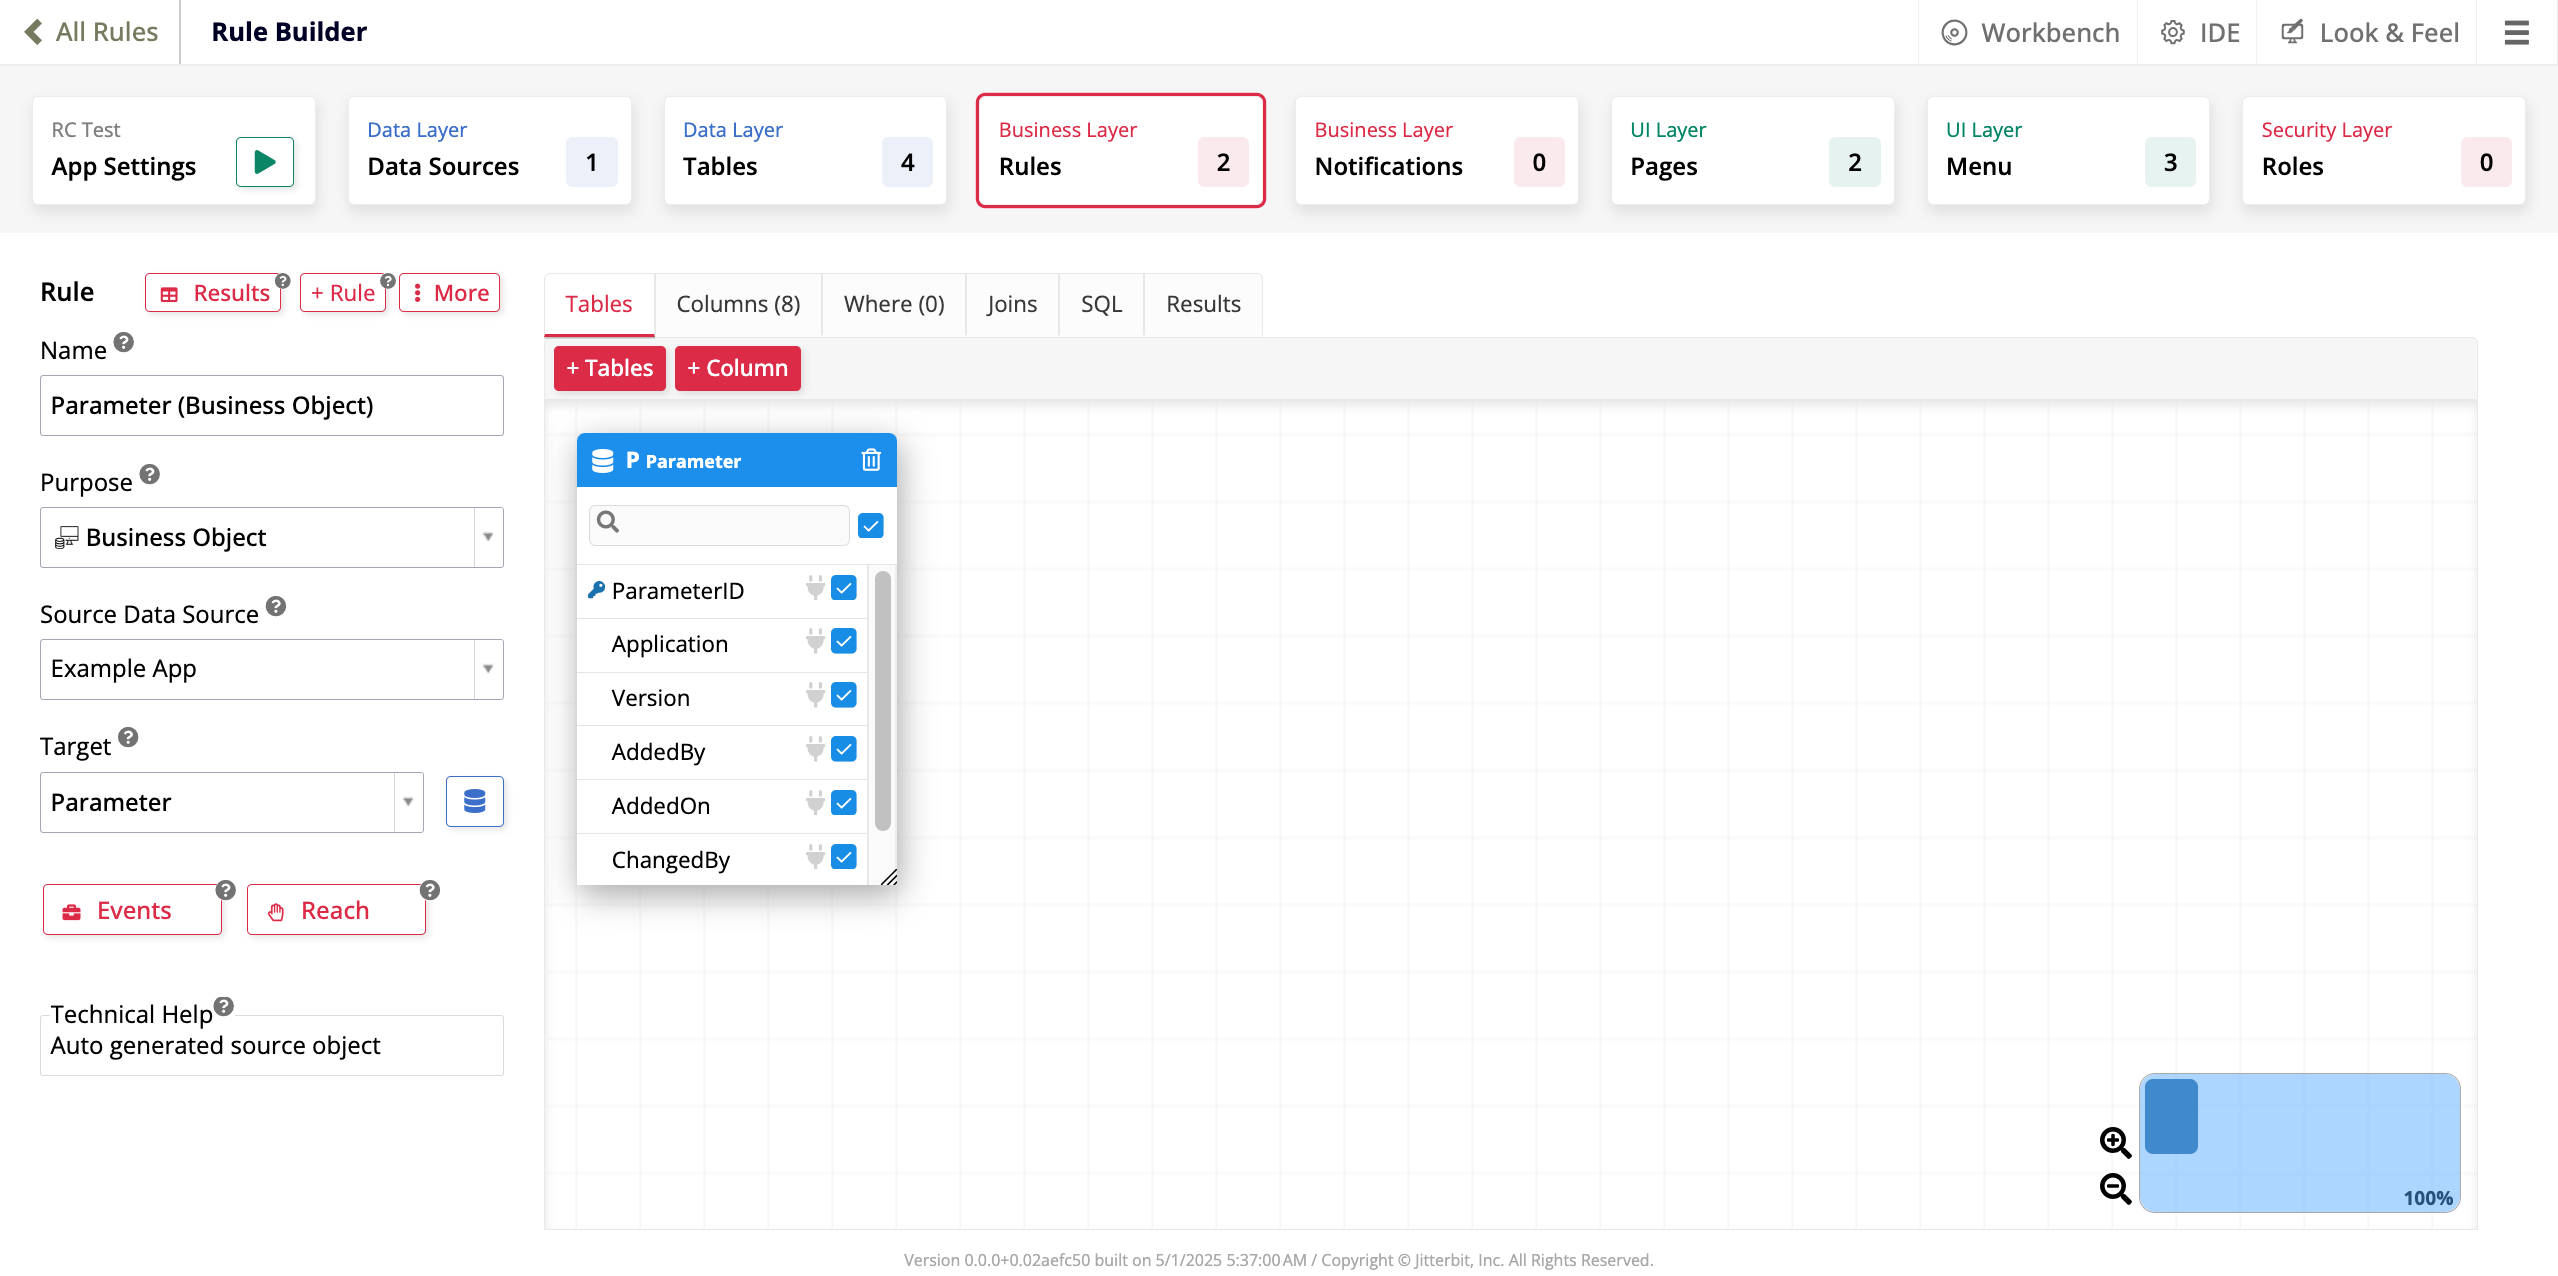
The Rule panel presents the following options:
-
Results: Click to see a view of all the records available in the business rule.
-
+ Rule: Click to add a new rule.
-
More: Click to see advanced options.
-
You can see several fields in edit mode that are also in create mode, with these additional options:
-
Next to the Target field, there is a icon. Click it to go to the Table Definition page in the data layer, where you can edit the currently selected database in the Target field.
-
Events: Click to configure the events, actions or validations associated with the rule.
-
Roles: Click to open the Roles dialog, where you can configure and maintain role or permissions level security for the business rule.
-
The main panel displays several tabs that you can use to configure the business rule:
-
In the Tables tab, you can configure and modify the relationship between the business rule and your tables.
-
+ Table: Click to add a table to the business rule. A dialog opens with a list of all tables. You can add tables from the current or other data sources.
-
+ Column: Click to add a new column. A dialog opens where you can select a function, pick an alias, among other settings.
-
The selected table's columns are listed. You can select or deselect individual columns to include or exclude them from the business rule.
-
-
In the Columns tab, there is a detailed view of the columns.
-
In the Where tab, you can add
whereclauses to filter the results. -
In the Joins tab, you can add or edit joins.
-
In the SQL tab, there is a view of the SQL statement being generated.
-
In the Results tab, there is a list of the results being returned.
Advanced options
Additional configuration options for the business rule are available by clicking the More button near the top of the Rule panel. Click it to show the following advanced options:
-
Edge Case: Click to configure additional, advanced settings using the Edge Case Settings dialog:
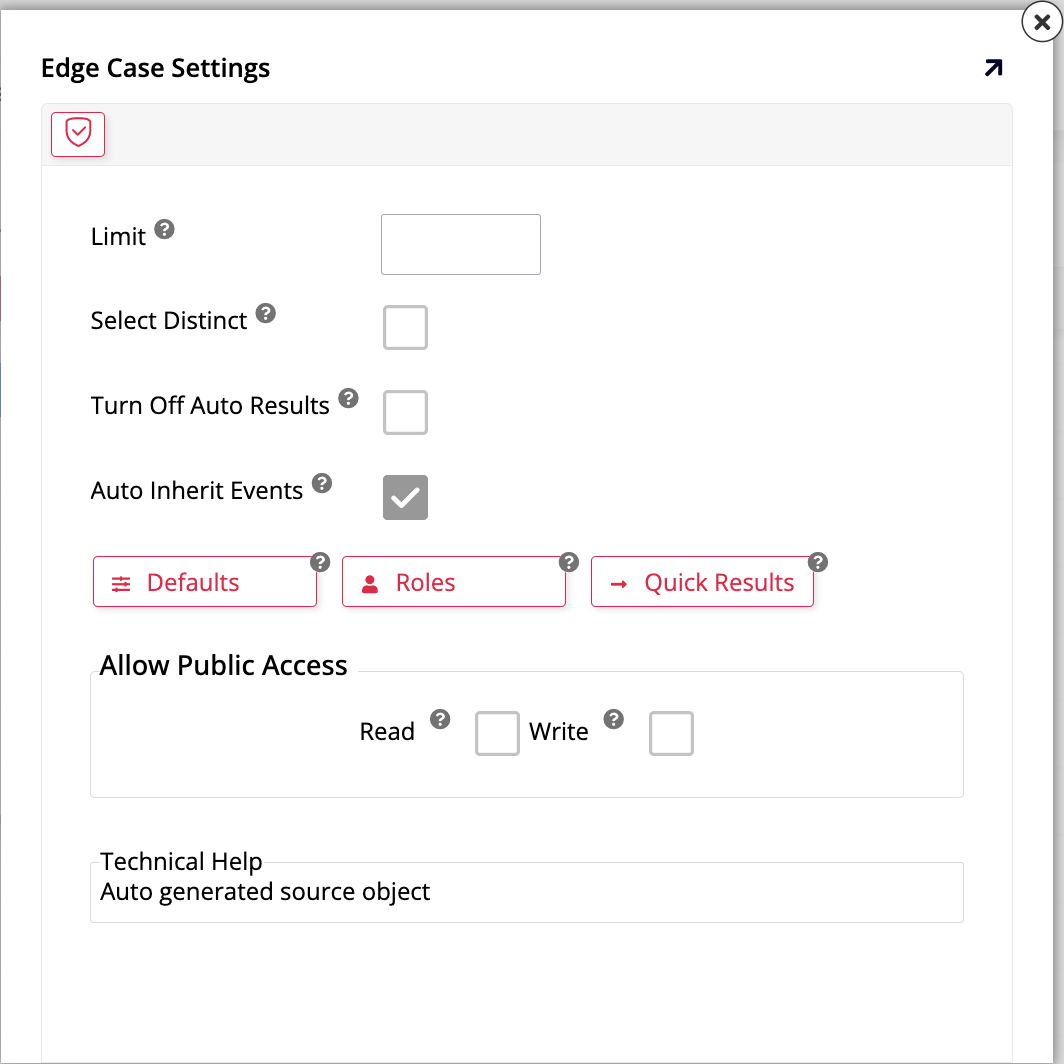
The following options are available for selection. Click the checkboxes to activate and deactivate or click the dropdown menu to choose:
-
Limit: Enter an integer to limit the number of records returned.
-
Select Distinct: Enable to make the rule return only distinct (or different) values.
-
Turn Off Auto Results: Enable to hide the quick grid view of the results on the bottom of the screen.
-
Auto Inherit Events: Enable to keep events in sync with the business rule.
-
Expression Version: The version used to interpret the expressions used in this rule.
The following buttons let you configure additional resources:
-
Defaults: Click to open the Defaults dialog, where you can configure and maintain dynamic default logic to control UI layer display. When you do, this button also becomes available in the rule builder and shows how many defaults you are currently using.
-
Reach: Click to configure and use the reach feature. When you do, this button also becomes available in the rule builder and shows how many reach rules you are currently using.
-
Quick Results: Click to open the Dynamic Quick page, where you can see the rule results in a quick grid format.
In the Allow Public Access section, you can configure the level of access to your rule:
-
Read: Select to make the rule accessible as a Read-only object in a CRUD rule.
-
Write: Select to make the rule accessible as a Write object in a CRUD rule.
(Optional) Enter text in the Technical Help text box to help other app developers. This text is not seen by app users.
-
-
Copy Rule: Click to create a copy of the rule in the app. A dialog opens where you can select options to copy the rule's events or roles.
-
Where Used: Click to see the Where Table Used page, where you can see an overview of all places in the current application where the rule is used.
-
Snapshot: Click to take a snapshot of the rule. Later, you can restore the rule to the state of the snapshot, retaining all settings.
-
Changelog: Click to see a dialog containing a list of all changes made to the rule, including who made changes and when.
-
Delete Rule: Click to delete the rule. You will be asked to confirm that you want to proceed.