Configure and validate business objects as API endpoints in Jitterbit App Builder
Overview
This page walks through a complete workflow for exposing App Builder data as a REST API and controlling what gets saved to it: configuring a business object as an endpoint external systems can call, adding a validation rule that rejects bad data before it's persisted, and testing the whole thing with a third-party API client. The example used throughout exposes an Order business object, and adds a rule that rejects any order whose Required Date is already in the past.
The steps are:
-
Configure the API endpoint
Create the security provider, application endpoint, and business object endpoint needed to expose data as a REST API, then generate a key so a specific user can authenticate against it. -
Create a custom validation rule
Add a business rule that validates incoming data before it's saved, and attach it to the endpoint's Save event. -
Test the API endpoint
Use Postman to confirm the validation rule rejects invalid data and the endpoint accepts valid data.
Configure the API endpoint
Before external systems can read or write data through App Builder's REST API, you need to expose a specific business object as an endpoint, and set up a way for callers to authenticate against it. This section covers the prerequisite steps to do both:
-
Step 1: Create an API key security provider
Set up the security provider callers authenticate against. -
Step 2: Define an application endpoint
Assign your application the base path segment used in its REST API URLs. -
Step 3: Publish a business object endpoint
Expose a specific table as a resource callers can read from and write to. -
Step 4: Generate a user-specific API key
Create the credential a specific caller uses to authenticate.
Step 1: Create an API key security provider
To authenticate requests made to your new endpoint, you first need an API key security provider, which App Builder uses to validate the key each caller presents. Follow these steps:
-
Select IDE > Security Providers.
-
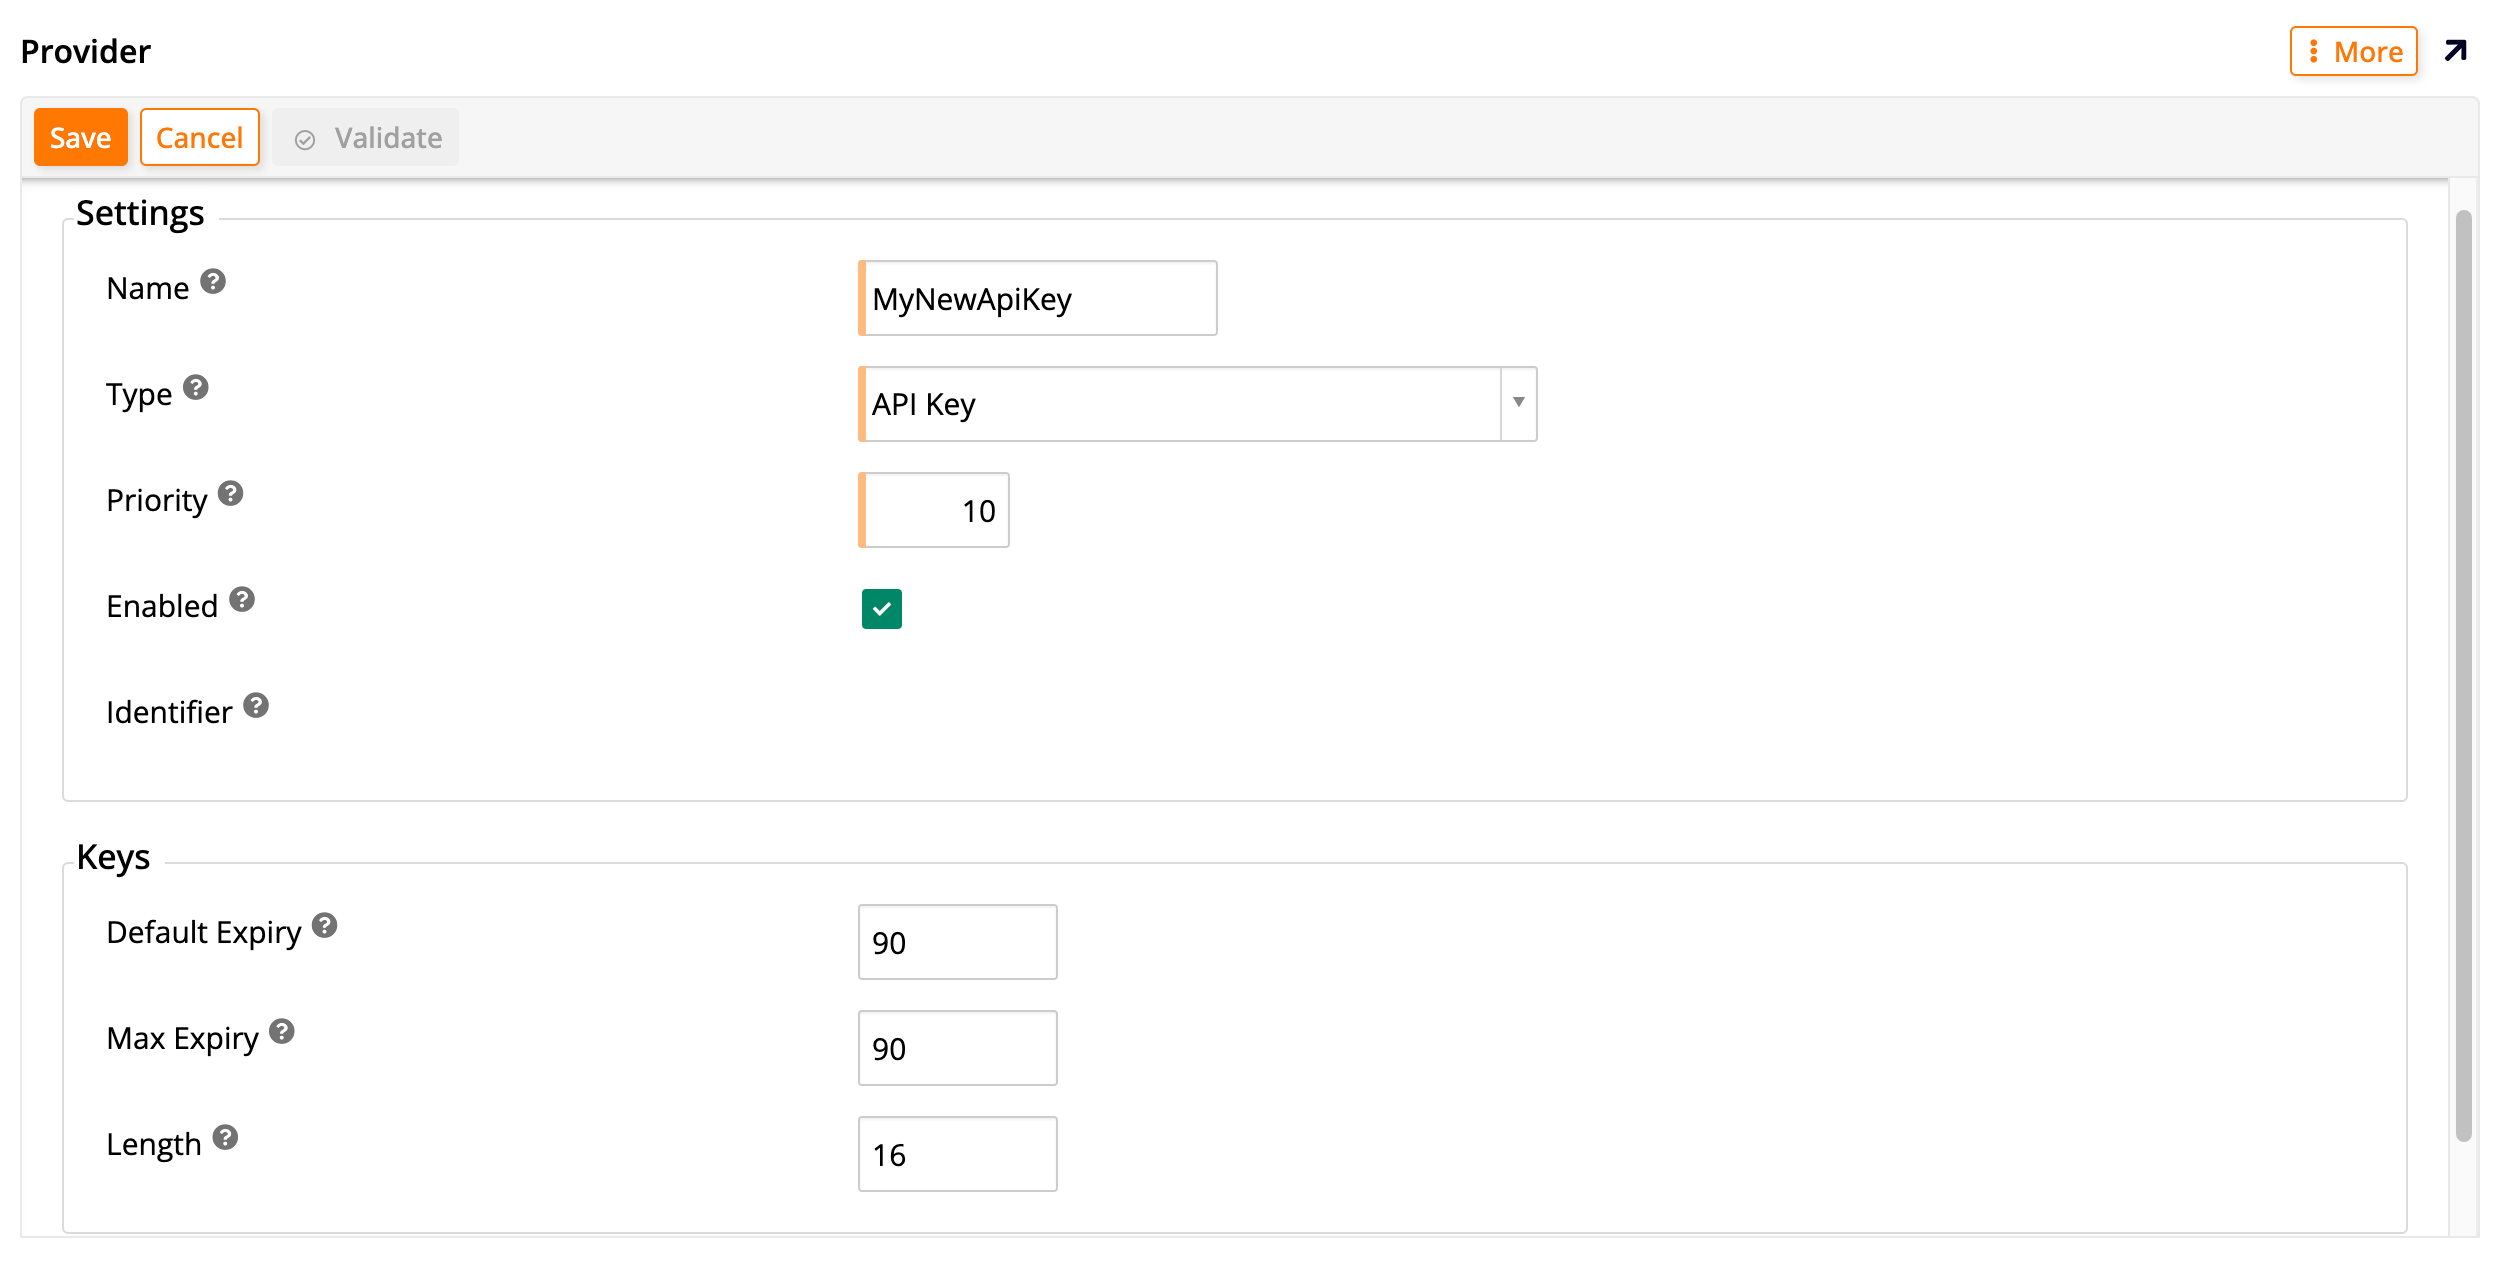
Under User Authentication, click + User Authentication. The Provider dialog opens:
-
Configure the provider with these settings:
-
Name: Enter a descriptive name, such as
API Key. -
Type: Select API Key.
-
Enabled: Select to enable the provider.
-
-
Click Save.
-
(Optional) Under Properties, click + Property to add and configure optional parameters for your API key.
Step 2: Define an application endpoint
Every application's REST API is reached through a base path segment, its application endpoint. Define one now if your application doesn't already have one:
-
Select IDE > REST APIs.
-
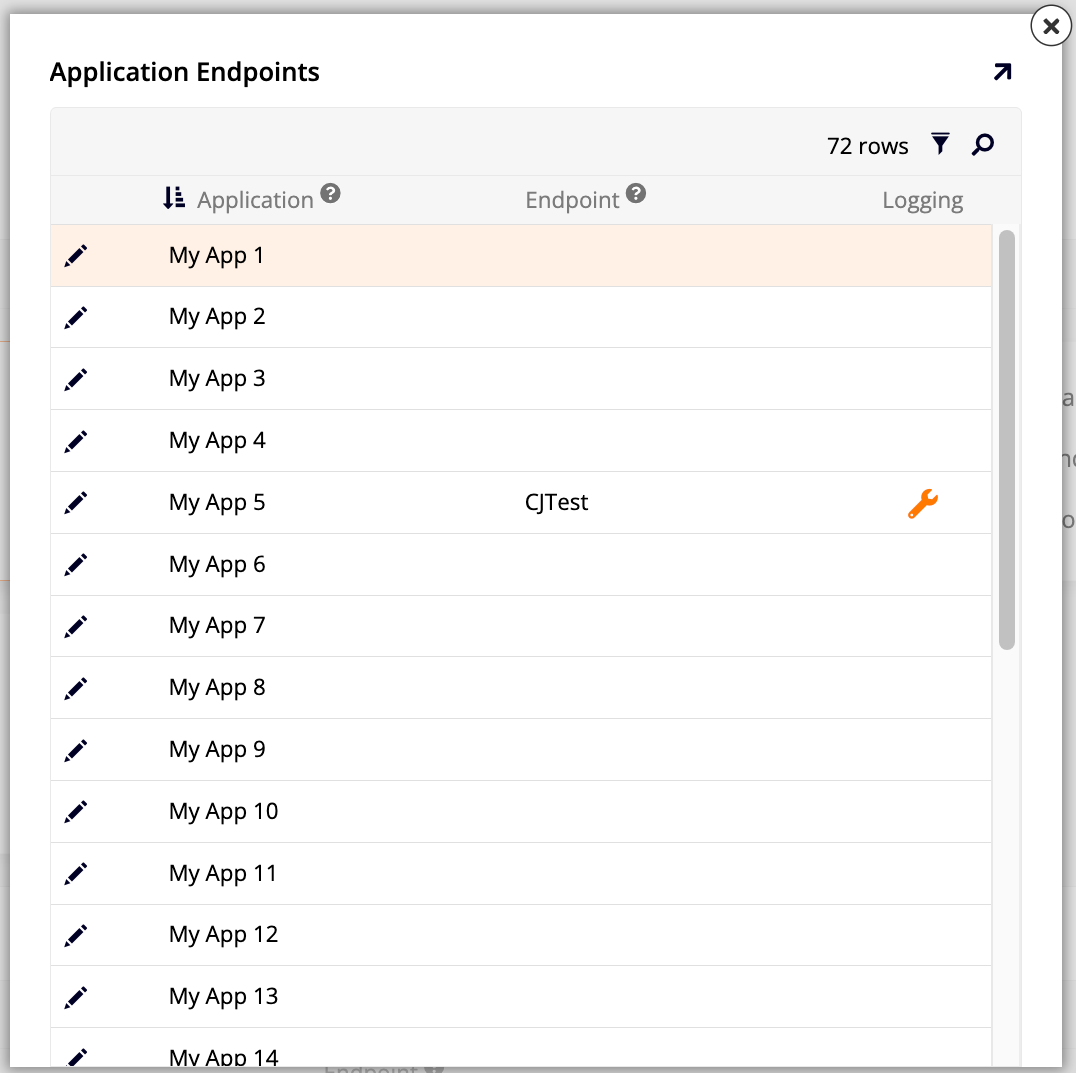
Click Manage Endpoints. The Application Endpoints dialog opens showing accessible applications and their endpoints:
-
Locate the application you want to expose and click its Edit icon.
-
Enter a name for the endpoint, such as
endpoint-example. -
Click the icon (or the Proceed button) to save the endpoint name.
-
Close the Application Endpoints dialog. A new entry for the endpoint appears under Services.
Step 3: Publish a business object endpoint
With an application endpoint in place, you can now publish a specific business object, such as a table, as a resource that callers can read from and write to:
-
In the Services panel, click the chevron icon on your application's tile. The REST API page for that application opens.
-
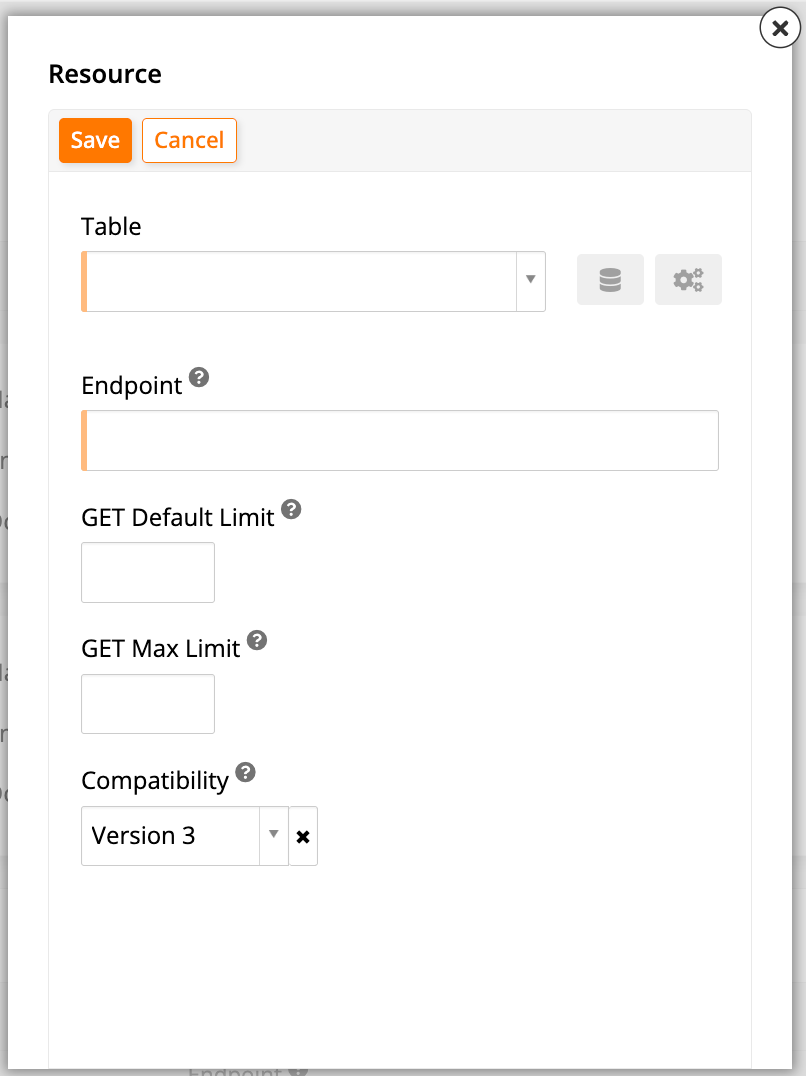
In the Resources panel, click + Resource. The Resource dialog opens:
-
Set the following values:
-
Table: Open the menu and select the table you want to expose.
-
Endpoint: Enter a name for the table's endpoint.
For a full description of all fields, see Step 3: Publish a resource in Publish a Jitterbit App Builder app as a REST API endpoint.
-
-
Click Save, then close the Resource dialog.
-
To find the full URL for your new endpoint, combine your instance's REST API base URL with your application's endpoint (from the previous step) and the resource's endpoint (from this step). See Data objects as resources for the exact URI pattern.
Step 4: Generate a user-specific API key
Finally, generate an API key tied to a specific user, so that user's identity and permissions apply to every request made with that key:
-
Select IDE > User Management.
-
Under Users, click the Open record icon for the user you want to grant API access to. The User dialog opens.
-
Expand the Authentication section and confirm that Login Type is set to Interactive.
-
Select More > Keys. The Keys dialog opens.
-
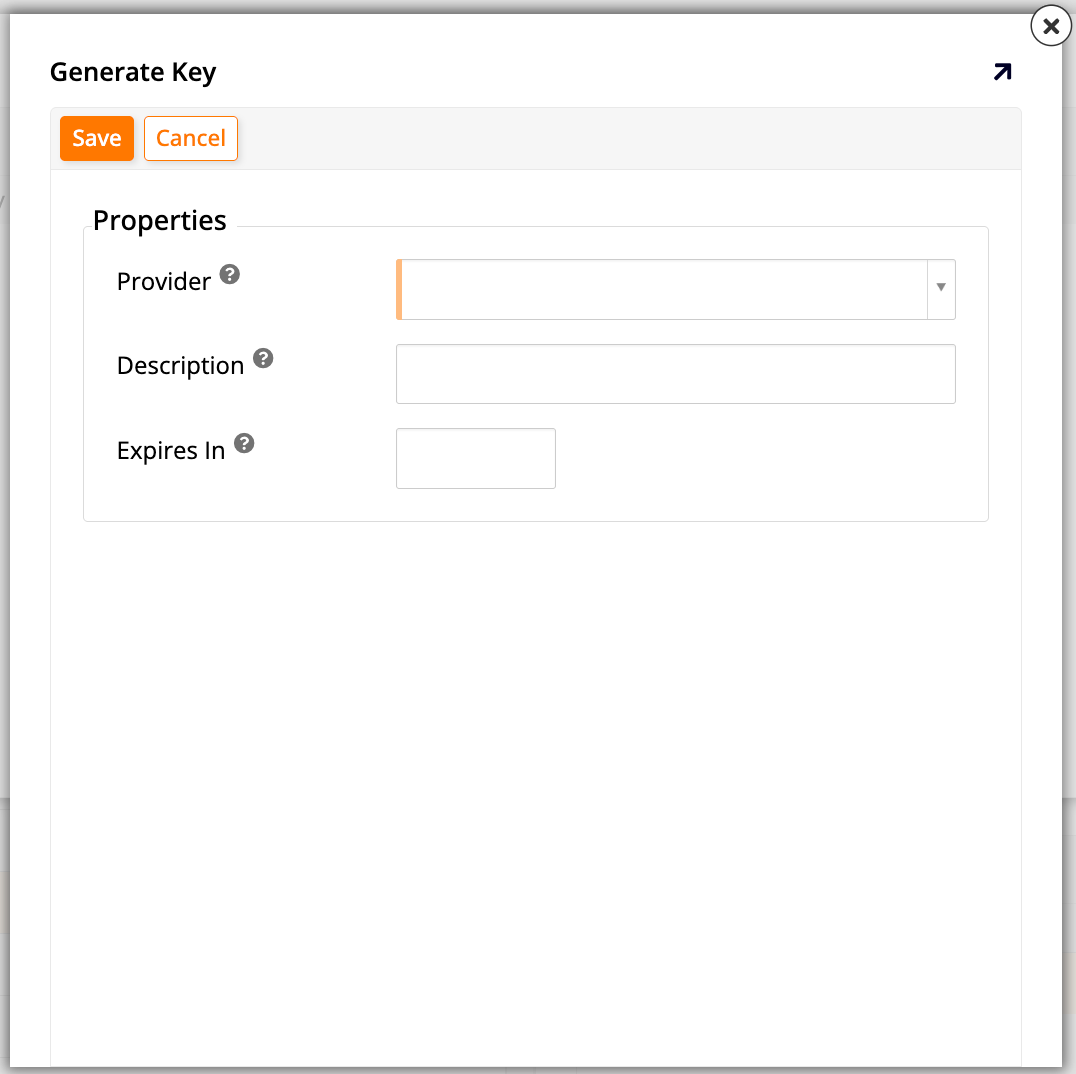
Click Create. The Generate Key dialog opens:
-
Set values for the following:
-
Provider: Select the security provider you created in Step 1 (for example,
API Key). -
(Optional) Description: Enter a description for this key.
-
-
Click Save. App Builder automatically generates a value for the key. Copy the generated key value to use for testing.
Important
Ensure you have copied the key before closing the Generate Key dialog, as it cannot be shown again.
Create a custom validation rule
A validation rule lets you reject bad data before it's ever saved, instead of after the fact. This example creates a rule that prevents a record from being saved if its Required Date is in the past, then attaches that rule to the endpoint's Save event so it actually runs.
Step 1: Create a business rule for validation
Business rules validate table data using SQL-style conditions over its columns. Create one now to define the check your endpoint should apply:
-
Open your app and select App Workbench > Rules.
-
Click By Table, then select the table you are exposing (for example,
Order). -
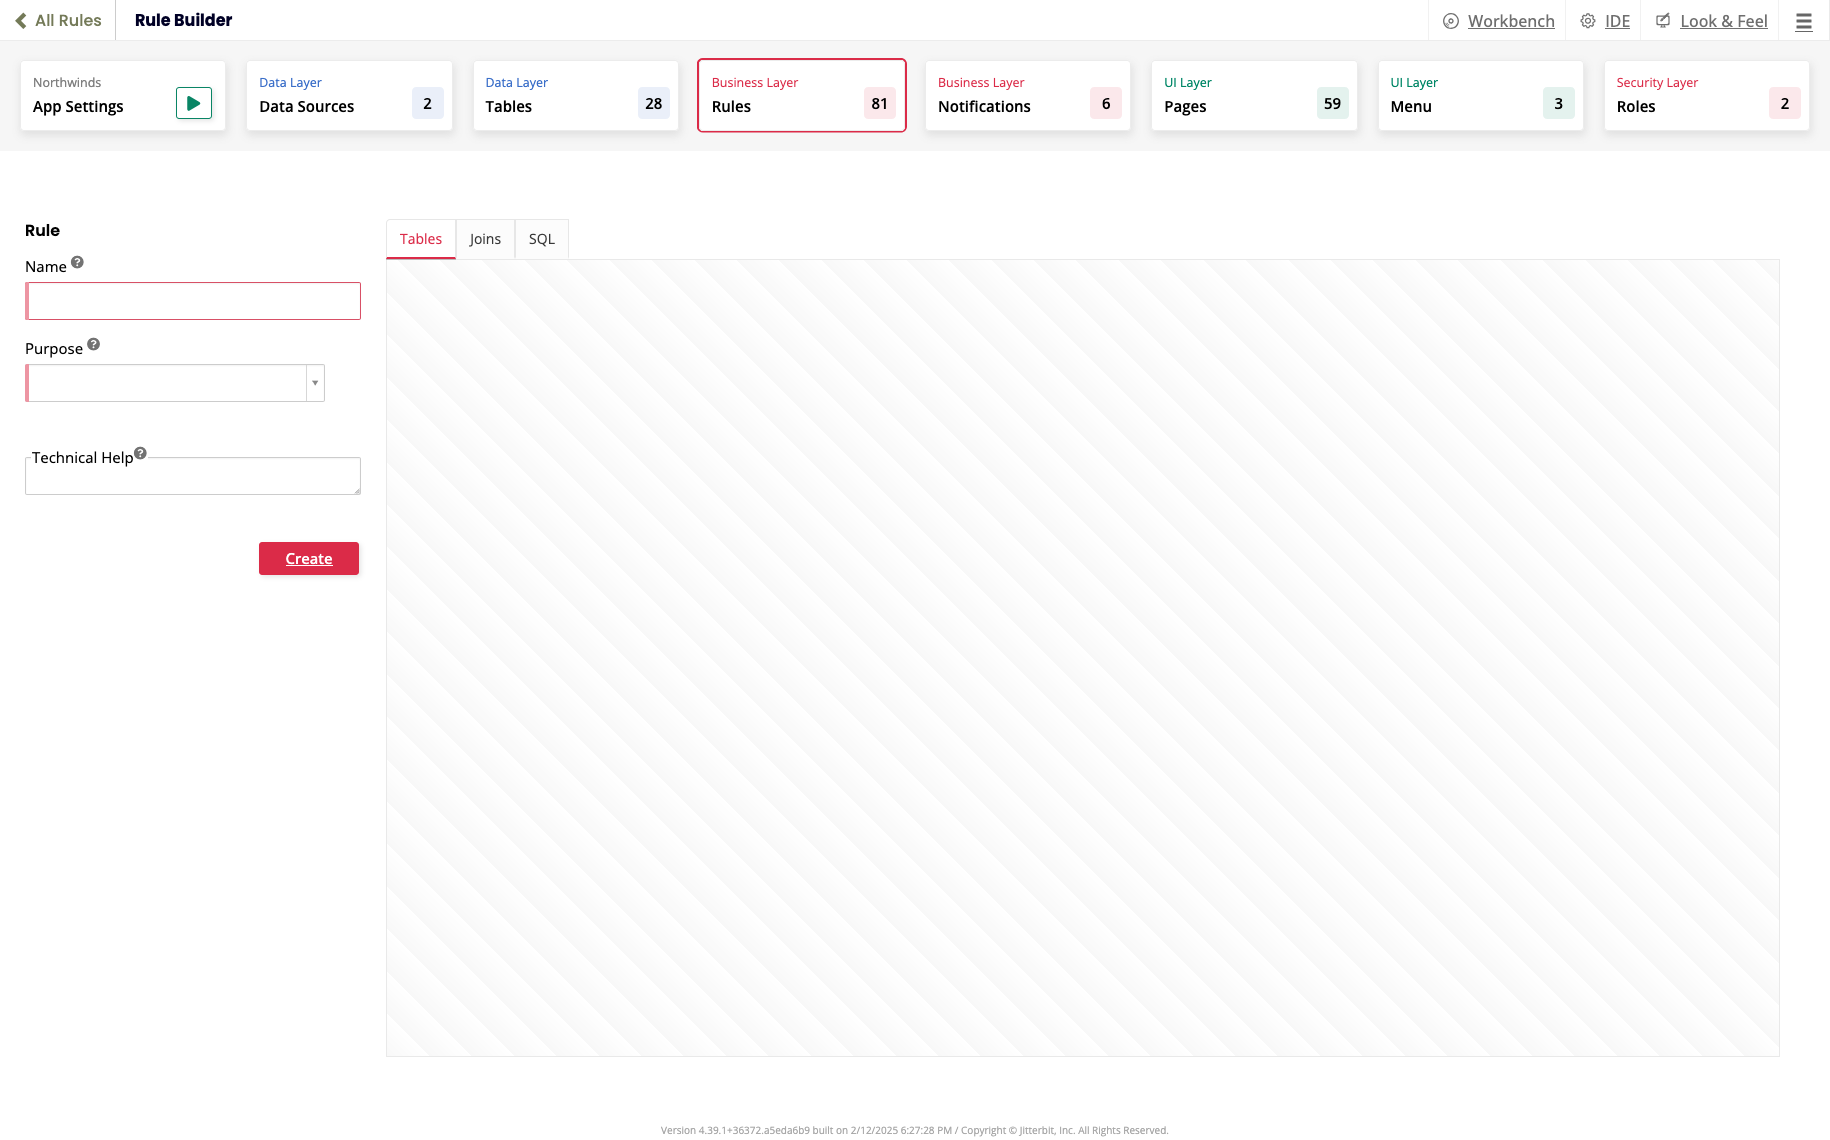
Under Rules, click + Rule. The Rule Builder opens:
-
On the Rule page, configure the rule's basic properties:
-
Name: Enter a descriptive name, such as
Validation: Date Not in Past. -
Purpose: Select Validation.
-
Target: The table should already be selected (for example,
Order).
-
-
Click Create.
-
Configure the rule's logic:
-
Select the Columns tab, then add the columns the rule needs. For this example, add
Order IDandRequired Date. -
Select the Where tab, then add a clause to define the failure condition. For this example, to check if the required date is in the past, add a condition where
Required Dateis less than or equal toNow().
-
-
(Optional) Click Validate.
Step 2: Attach the validation rule to an event
A validation rule doesn't run on its own. You must attach it to a specific event, in this case Save, so it actually executes when a record is about to be saved:
-
From App Workbench > Rules, with By Table selected, select the same table (
Orderin this example). -
Click the Events icon for (in this example)
Orders (Source). The All Events dialog opens. -
In the Save row, click Rule Event Detail.
-
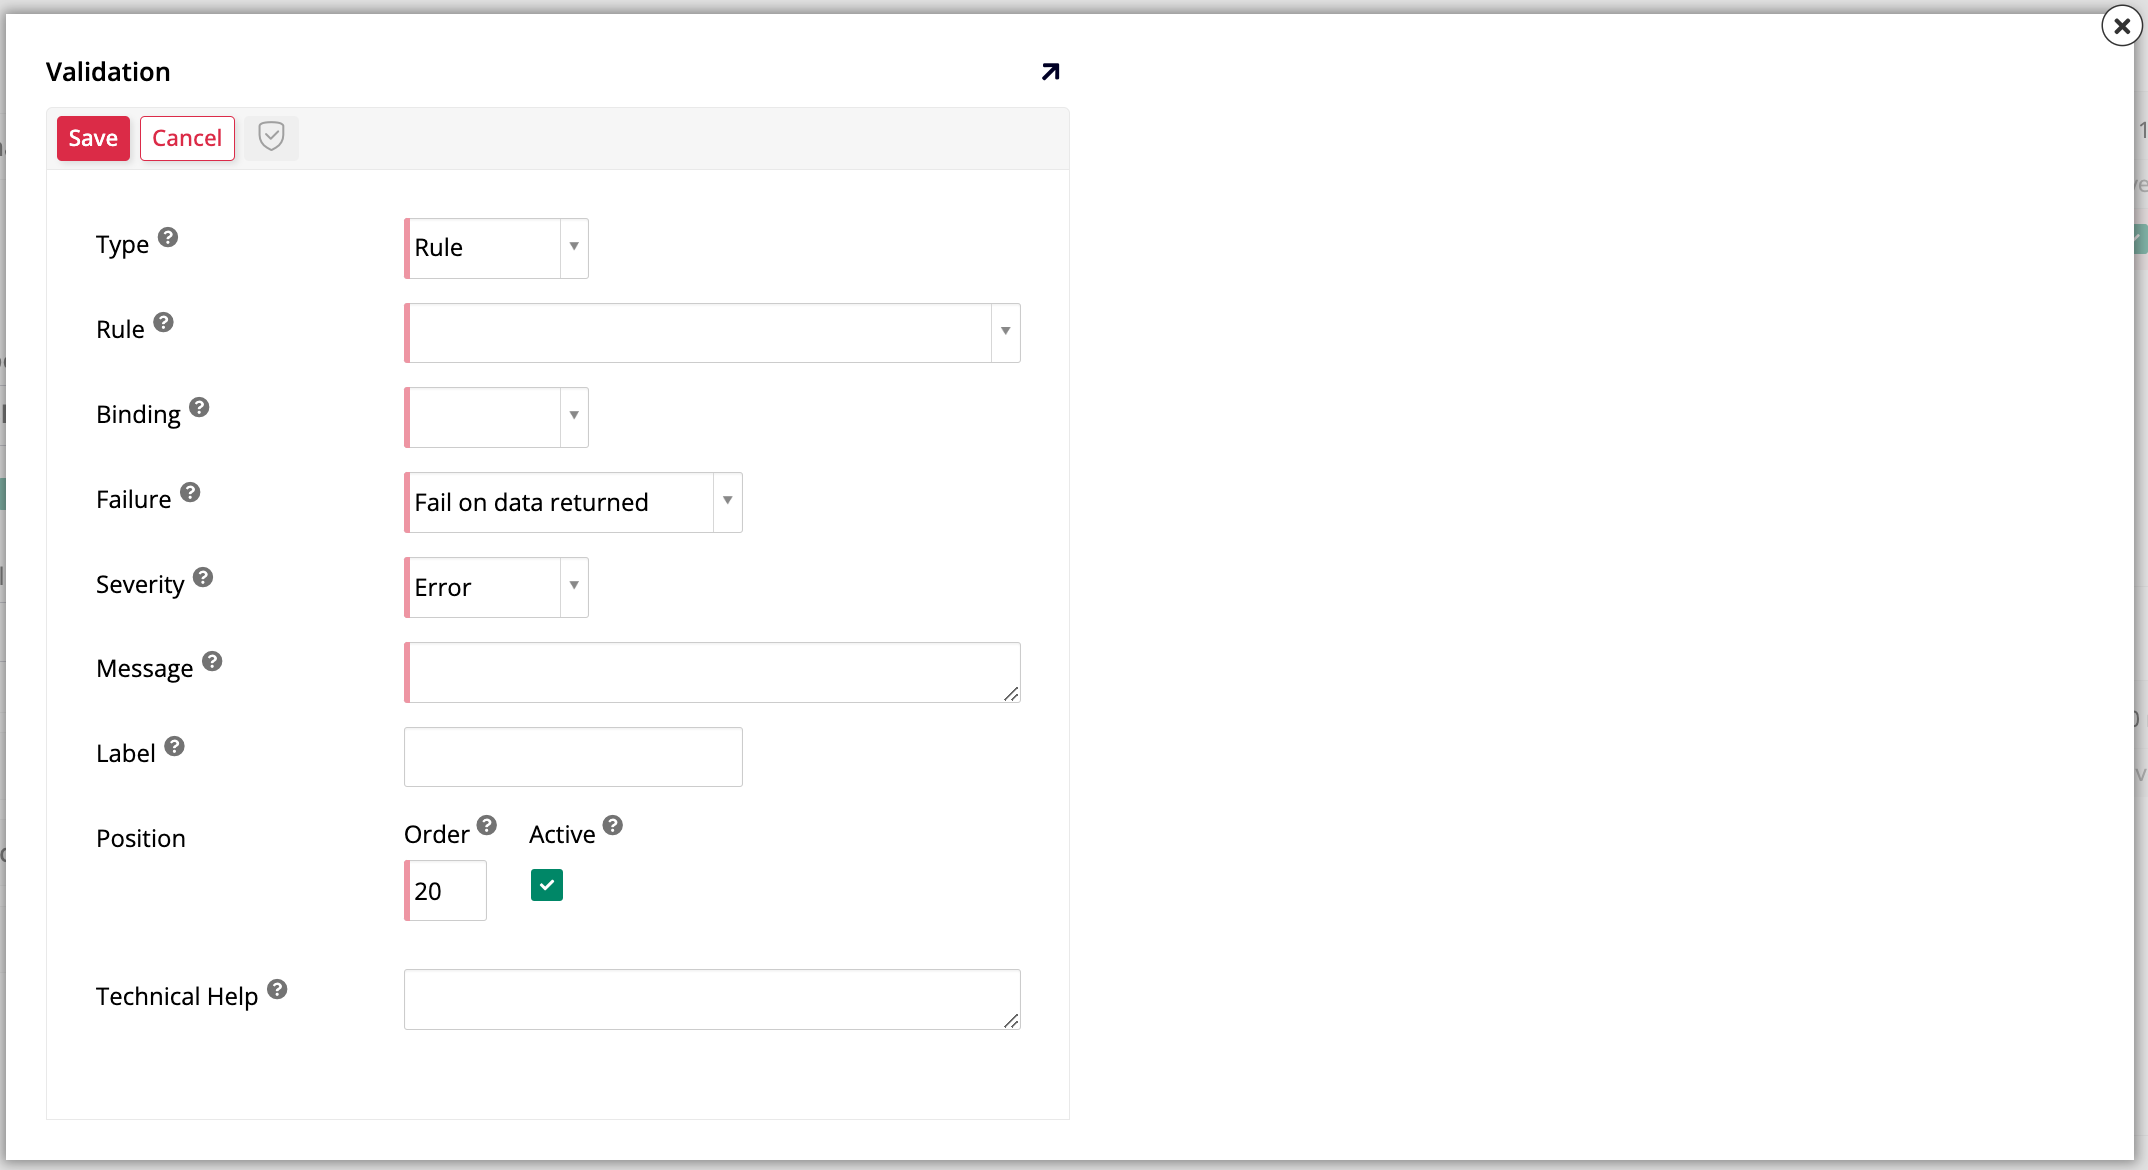
Under Validations, click Register. The Validation dialog opens:
-
From the Rule menu, select the validation rule you just created (
Validation: Date Not in Past). -
Configure the validation action as follows:
-
Binding: Select Implicit.
-
Failure: Select Fail on data returned.
-
Severity: Select Error.
-
Message: Enter the error message to display when the validation fails, such as
The required date cannot be in the past.
-
-
Click Save.
Test the API endpoint
With the endpoint published and the validation rule attached, confirm everything works end-to-end using a third-party API client. This section uses Postman, but the same requests work with any HTTP client capable of sending authenticated JSON requests.
Step 1: Configure the test client
Before sending any requests, set up Postman with the authentication and body format your endpoint expects:
-
In Postman, create a new
POSTrequest. -
In the URL field, paste the endpoint URL you copied in Step 3 of the previous section.
-
Configure the authorization:
-
Select the Authorization tab.
-
For Type, select API Key.
-
For Key, enter
X-API-Key. -
For Value, paste the user API key you copied in Step 4.
-
-
Configure the request body:
-
Select the Body tab.
-
Select the Raw radio button.
-
From the format dropdown, select JSON.
-
Step 2: Test the validation rule (failure case)
First, confirm the validation rule actually blocks bad data, by sending a request that should fail:
-
In the JSON body, paste a record to trigger the validation error. For this example, use a
Required Datethat is in the past.Example failure record{ "OrderID": 11255, "OrderDate": "2014-05-26T00:00:00", "RequiredDate": "2014-05-20T00:00:00", "ShippedDate": "2014-05-28T00:00:00", "ShipCost": 1000.50, "ShipName": "Test Site", "ShipAddress": "508 Main Street", "ShipCity": "Harwich", "ShipState": "MA", "ShipZip": "02630", "ShipCountry": "USA", "AddedOn": null, "AddedBy": null, "EmployeeID": "0f9c520c-1890-11f1-b283-ab1e4a99c4ce", "ShipperID": "f4b1df98-188f-11f1-90ba-7a85ad06b57c" } -
Click Send.
-
Review the response. You should see a validation error with the custom message you configured:
The required date cannot be in the past.The record is not created.
Step 3: Test the endpoint (success case)
Now confirm the endpoint accepts valid data once the same failing condition no longer applies:
-
In the JSON body, modify the data so that it is valid. For this example, change the
RequiredDateto a date in the future.Example success record{ "OrderID": 11255, "OrderDate": "2014-05-26T00:00:00", "RequiredDate": "2114-05-20T00:00:00", "ShippedDate": "2014-05-28T00:00:00", "ShipCost": 1000.50, "ShipName": "Test Site", "ShipAddress": "508 Main Street", "ShipCity": "Harwich", "ShipState": "MA", "ShipZip": "02630", "ShipCountry": "USA", "AddedOn": null, "AddedBy": null, "EmployeeID": "0f9c520c-1890-11f1-b283-ab1e4a99c4ce", "ShipperID": "f4b1df98-188f-11f1-90ba-7a85ad06b57c" } -
Click Send.
-
Review the response. You should see a
200 OKstatus, and the response body should not contain a validation error. -
To confirm, navigate to the data table in your App Builder application and verify that the new record was created successfully.