Custom API configuration in Jitterbit API Manager
Introduction
This page describes how to create and configure a custom API from the APIs page of Jitterbit API Manager. Custom APIs are one of the three types of APIs that you can configure through API Manager. For the two other types, OData API and proxy API, see OData API configuration and Proxy API configuration.
Alternatively, create custom APIs using the APIM AI Assistant or in Studio using the Publish as an API option from an operation's action menu.
Note
To use the APIM AI Assistant, your Harmony license must include the APIM AI Assistant option. Contact your Customer Success Manager (CSM) to add this option to your license.
Note
Once published, each custom API counts as an API URL against your Harmony subscription allowance.
API Manager displays custom APIs (published and draft) in these locations:
- The APIs page of API Manager.
- The project pane's Resources tab for the Studio project associated with the custom API.
Prerequisites
A custom API exposes a Harmony operation for consumption. You must first create and deploy this operation in Harmony before you can configure the custom API. The operation that a custom API triggers can be either a Studio or Design Studio operation.
For instructions on creating and deploying an operation, see these resources:
- Studio
- Design Studio
Create a new custom API
When you access the API Manager APIs page, if no custom APIs, OData APIs, or proxy APIs exist in the selected organization, this screen is blank.
To create a new custom API, click New and select one of the following options:
-
Build with AI: Opens the APIM Assistant to create an API using natural language prompts. For more information, see Using the AI Assistant.
Note
To use the APIM AI Assistant, your Harmony license must include the APIM AI Assistant option. Contact your Customer Success Manager (CSM) to add this option to your license.
API Manager displays the following option only if a corresponding API URL is available:
- Custom API: Opens the custom API configuration screen to manually create a new custom API. This option is enabled only if a corresponding API URL is available.

Note
This page documents the tab-based configuration interface accessible from list view and card view.
Configure a custom API
When you configure a custom API manually, the configuration screen includes multiple tabs. The configuration screen includes two required tabs and three optional tabs:
- Profile tab (required)
- Settings tab (optional)
- Services tab (required)
- Security profiles tab (optional)
- User roles tab (optional)
Profile tab
Use the Profile tab to enter basic information that identifies the API.
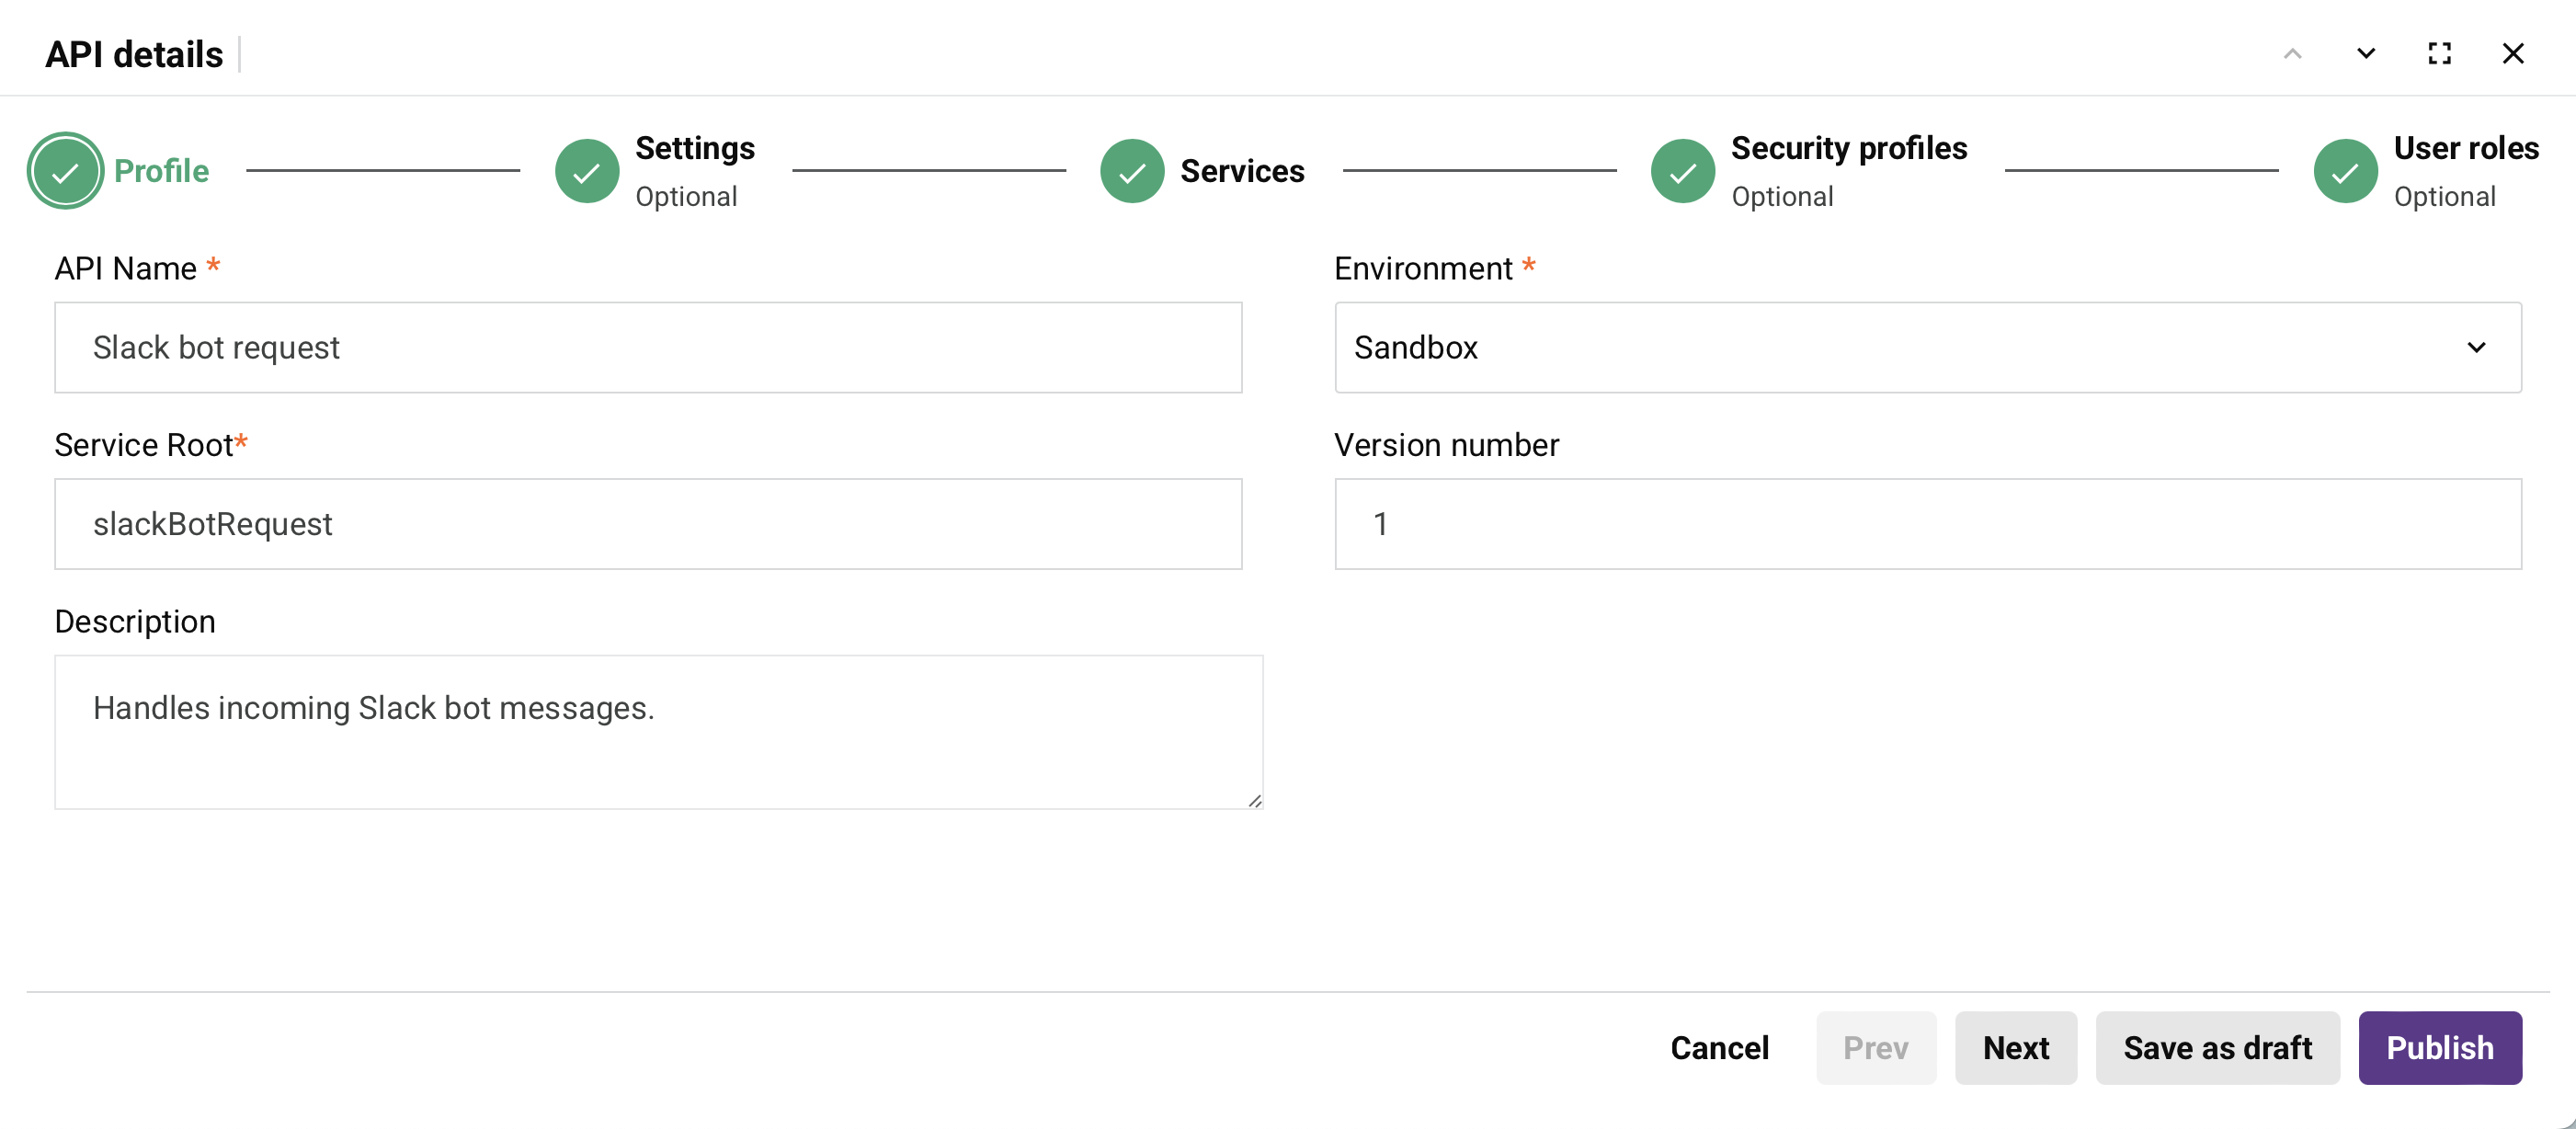
Configure the following settings:
-
API Name: Enter a name for the API to use for internal identification purposes. The following special characters are allowed:
()-_. -
Service Root: The public name of the API to use as part of the API's service URL. By default, this field is populated with the API Name converted to camel case. This field does not allow spaces or certain special characters. Using special characters other than an underscore (
_) is not recommended. The following special characters are allowed:._~()$;/?:@=&'!*,+-. -
Description: Enter an optional description for the API.
-
Environment: Use the menu to select the environment where the API will reside. You can type any part of the environment name into the menu to filter the list of environments. The menu results are filtered in real time with each keystroke.
Note
After API creation, you cannot change the environment. To move an API between environments, you can clone the API or export and import the API in another environment.
-
Version number: Enter an optional version to use as part of the API's service URL. This field allows a maximum of 48 characters and does not allow spaces or certain special characters. Using special characters other than a period (
.) or a hyphen (-) is not recommended. Common naming conventions include incrementing versions such asv1.0,v1.1,v1.2, or using a date that the API was published such as2025-08-28.
After you complete the Profile tab, click Next to proceed to the Settings tab, or click Save as draft to save your progress.
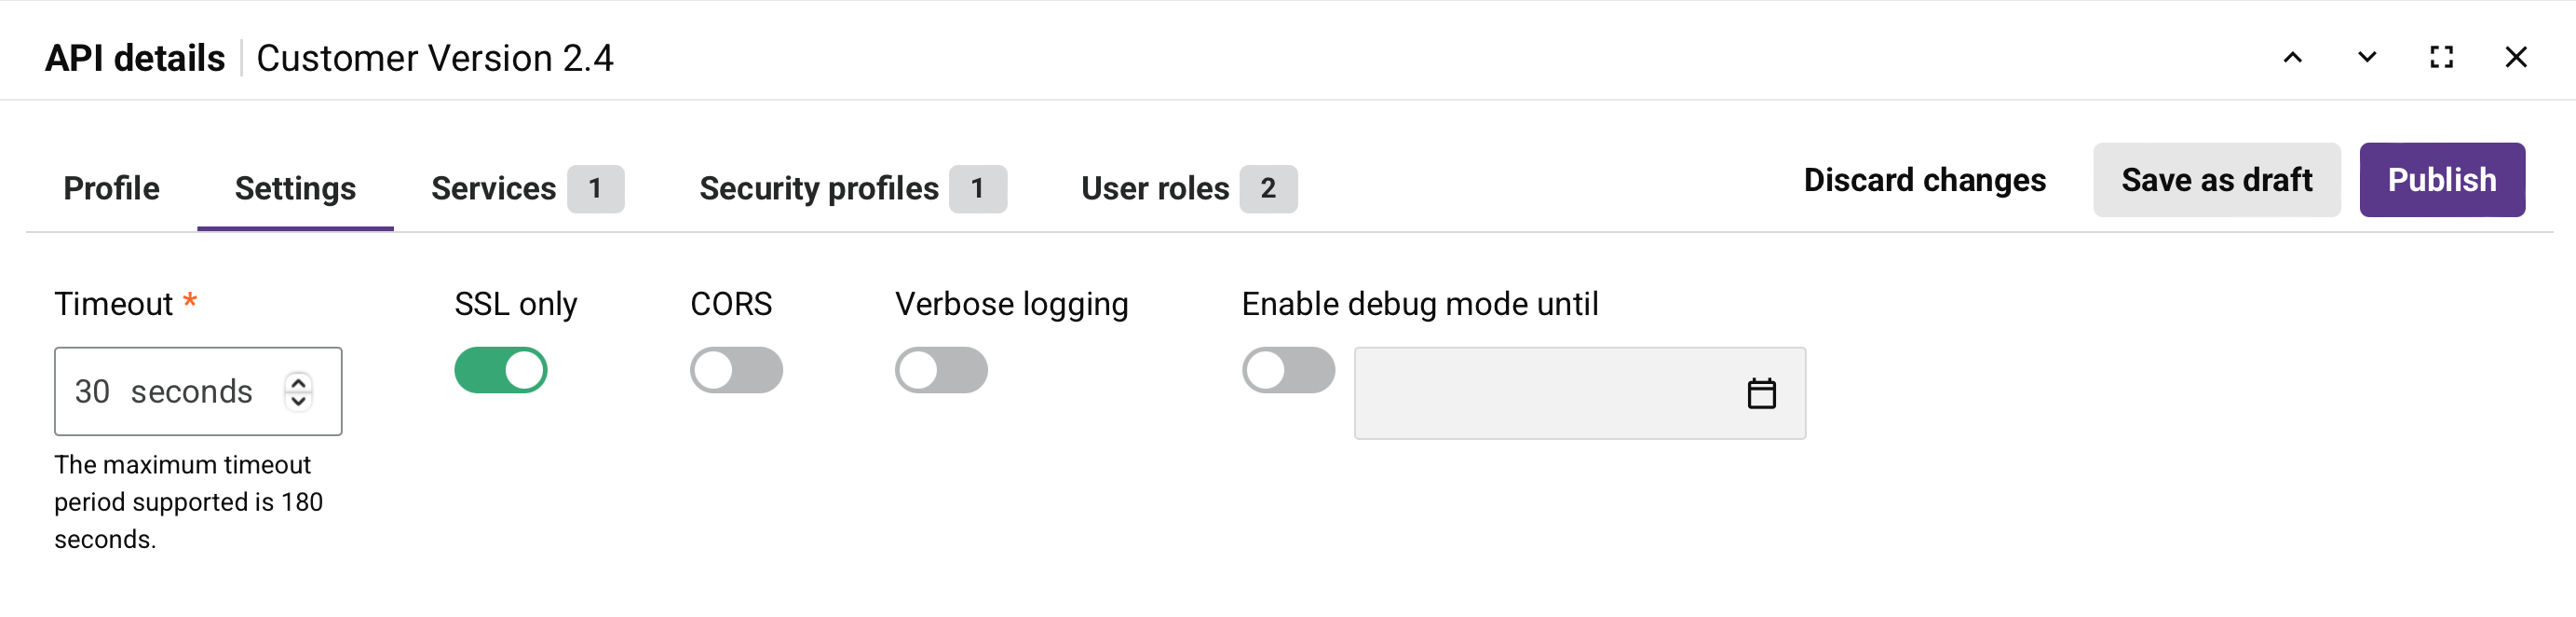
Settings tab
The Settings tab is optional and contains advanced configuration options for the API.
Configure the following settings as needed:
-
Timeout: Enter the number of seconds before the API times out. The default is 30 seconds. The maximum value allowed is
180seconds.Note
This setting is independent of the operation timeout setting in Studio or Design Studio. Operation timeout settings are not used unless a private agent is used and the
EnableAPITimeoutsetting in the private agent configuration file is enabled. -
SSL only: This toggle is enabled by default and requires HTTPS for the API. When enabled, data is encrypted through SSL, and an HTTP request returns an error. When disabled, both HTTP and HTTPS requests are supported.
Warning
When disabled, data passed through API requests and responses is not encrypted and can be intercepted and viewed by others. This could potentially expose sensitive information.
-
CORS: Enable this toggle to support CORS (Cross-Origin Resource Sharing). CORS is a mechanism that allows web applications running in a web browser on one domain to access resources from a server on a different domain.
Warning
Enabling CORS causes operations using the
OPTIONSmethod to run without authentication. -
Verbose logging: Enable this toggle to add raw request and response data — including headers, parameters, and bodies — to the call log when an API request is made. This data appears in the API Logs page and the Management Console Runtime page for both successful and unsuccessful runs. Verbose logging does not generate Studio operation log entries for successful runs. To log successful operation runs in Studio, use Enable debug mode until instead.
Warning
Verbose logging may include sensitive data such as authentication credentials or personally identifiable information. Use this setting carefully.
-
Enable debug mode until: Enable this toggle to turn on detailed logging for troubleshooting, then click the calendar icon to select a date up to two weeks from today when debug mode automatically turns off. When enabled, request and response data (kept for 30 days) appears in the API Logs page, the Management Console Runtime page, and Studio operation logs for both successful and unsuccessful runs. Activity-level debug logging is also enabled, capturing component input and output data in the Debug Logging tab. This setting overrides Verbose logging and Show Request & Response Payloads in Logs: when debug mode is enabled, request and response data is included in logs regardless of whether those settings are enabled.
Warning
Debug logs contain all request and response data, including sensitive information such as passwords and personally identifiable information (PII). This data appears in clear text in Harmony cloud logs for 30 days.
-
Show Request & Response Payloads in Logs: Enable this toggle to capture and display request and response payloads in the API Logs page and the Management Console Runtime page when an API request is made. The payloads appear in a formatted view with separate panels for the request and response bodies, for both successful and unsuccessful runs. This setting does not generate Studio operation log entries for successful runs. To log successful operation runs in Studio, use Enable debug mode until instead. This toggle applies to custom and OData APIs only.
Warning
Request and response payloads may include sensitive data such as authentication credentials or personally identifiable information. Use this setting carefully.
After you configure the Settings tab, click Next to proceed to the Services tab, or click Prev to return to the Profile tab.
Services tab
The Services tab is where you configure the API services that define how the API responds to requests. You can configure multiple services for a single custom API. Each service must have a unique combination of HTTP method and path.
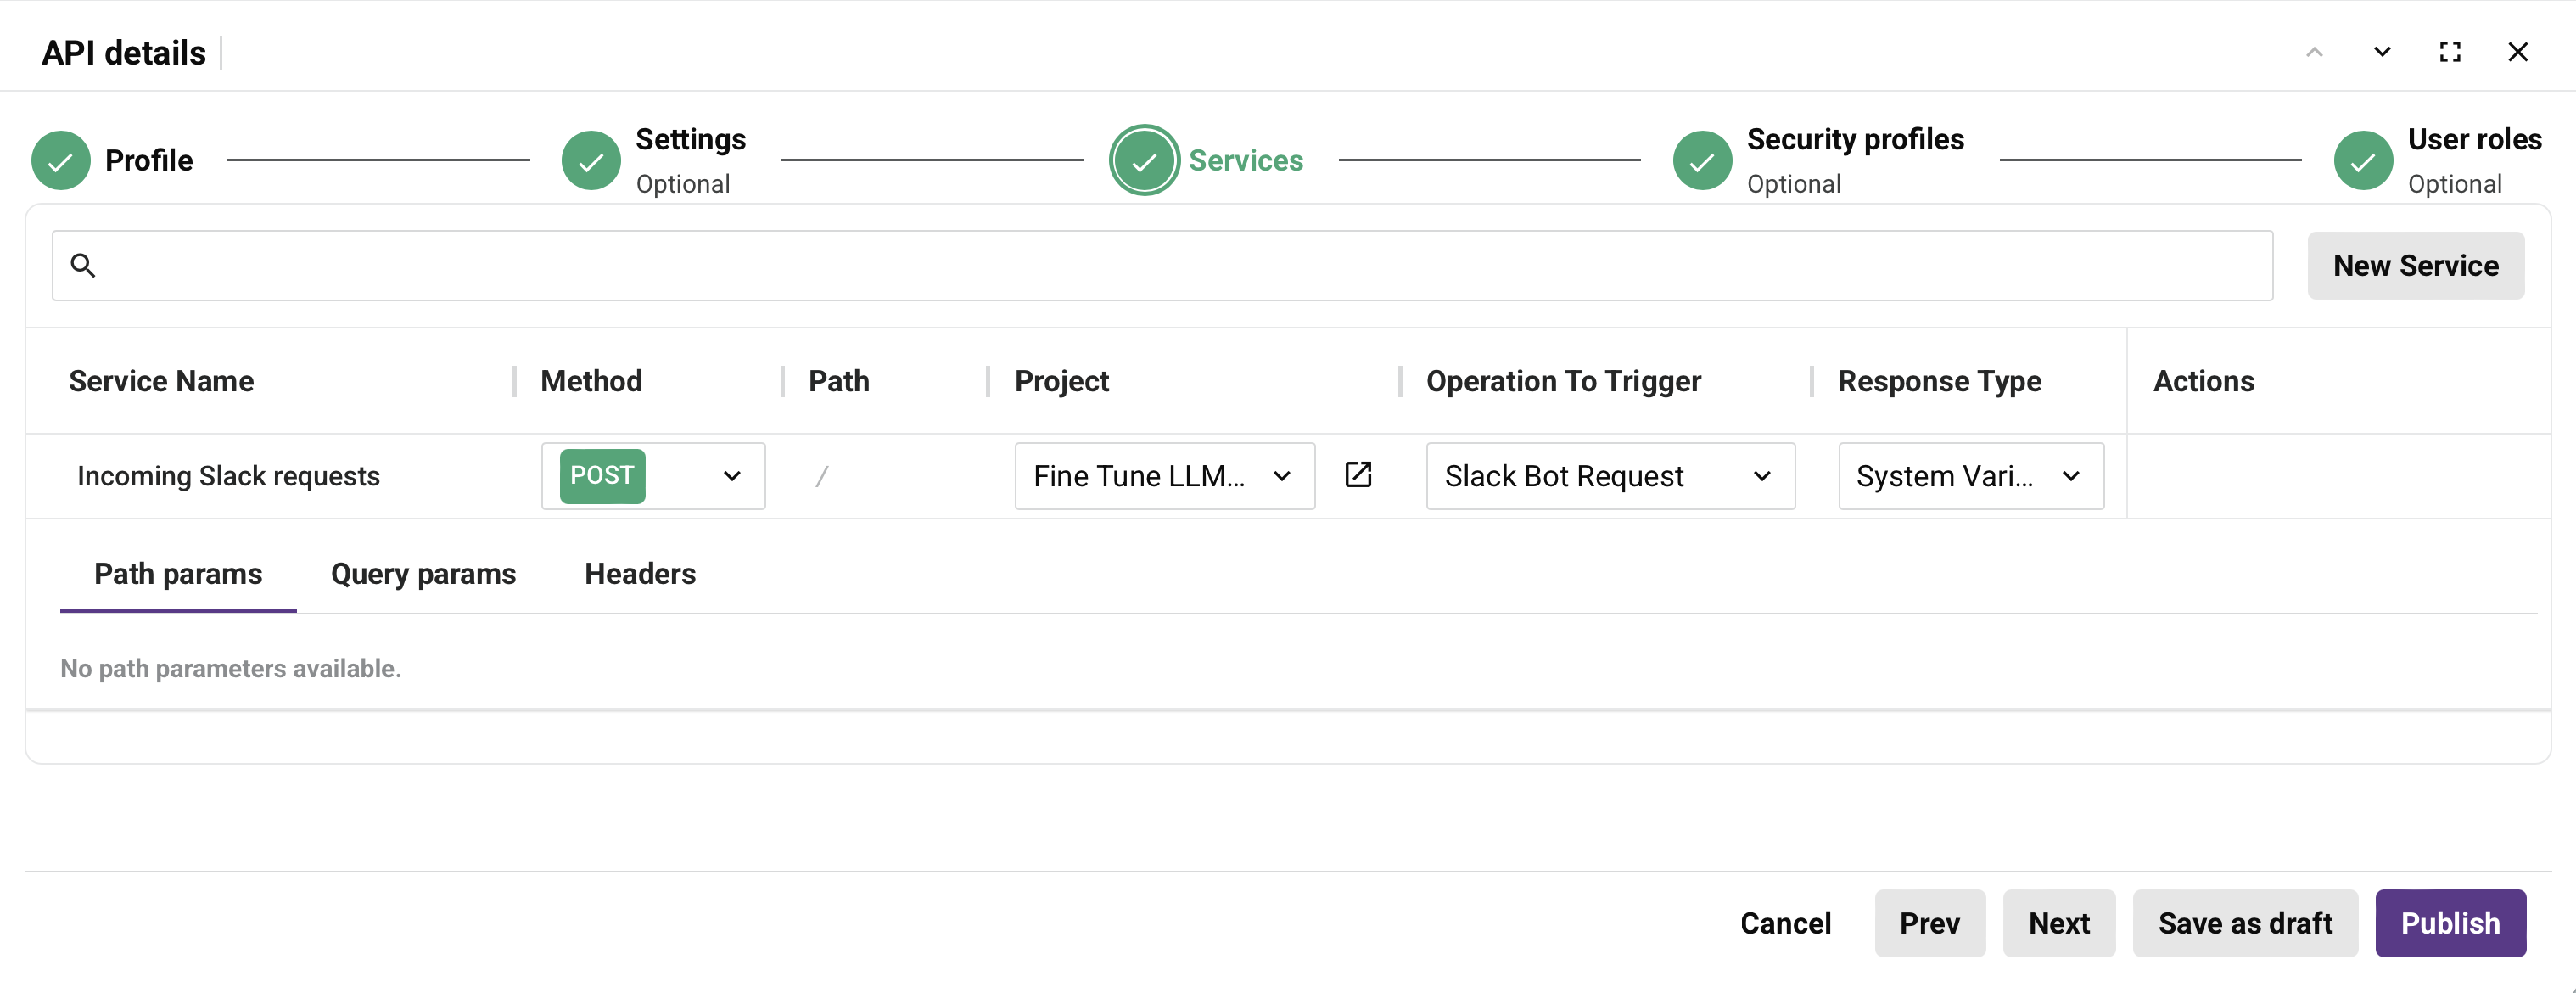
Click New Service to add a new API service. Configure the following settings for each service:
-
Service Name: Enter a descriptive name for this API service.
-
Method: Select the HTTP method for this service from the dropdown. Available methods include GET, POST, PUT, DELETE, and ALL. To use a method not listed, enter the method name in the Type a new method text box and press Enter.
-
Path: Enter the URL path that triggers this service. The path is appended to the service root in the API's service URL.
-
Project: Select the Harmony project that contains the operation this service triggers.
- Go to project: Click to open a Studio project in a new browser tab. This option is disabled for Design Studio projects.
-
Operation To Trigger: Select the specific operation from the chosen project that this service executes when called.
For information about what appears in operation logs for API-triggered operations and how to enable additional logging, see API request and response data in Operation logs.
-
Response Type: Select how the API returns the operation response. Available options include Final Target, System Variable, and No Response.
-
Final Target: The API response is the final target of the operation chain. When you select this response type, the selected operation must have, as the final target of the operation chain, a Studio API Response activity or Variable Write activity, or a Design Studio API Response target or Global Variable target. If the operation uses any other final target, the API response will be empty.
-
System Variable: The API response is set in a Jitterbit variable in the operation chain. When you select this response type, the selected operation must have, as part of the operation chain, a script that sets the Jitterbit variable
jitterbit.api.responseequal to the response that you want the API to return. If the script does not set this variable, the API response will be empty. -
No Response: The API response is blank. If the request to run the selected operation is accepted, the API will return an immediate empty response with HTTP code 202.
-
-
Actions: Hover over a service row to reveal additional actions.
- Copy API service URL: Click to copy the API's service URL.
- Go to API Service: Click to see a single page overview of the custom API's configuration.
- Duplicate: Click to duplicate the API service.
- Delete: Click to delete the API service.
After you configure the basic service settings, you can configure additional parameters using the tabs below the service configuration:
Path params tab
When request parameters are included in the Path, this tab displays the parameters defined in the path:

-
Parameter: Displays each request parameter defined in the Path.
-
Description: Optionally, enter a description for the request parameter.
Query params tab
This tab allows you to add query parameters to the API service:

-
Add Parameter: Click to add a query parameter to the API service. The following fields become available:
-
Parameter: Enter the name of the query parameter.
-
Description: Optionally, enter the description of the query parameter.
-
Delete: Click the delete icon next to a query parameter to delete that parameter.
-
Headers tab
This tab allows you to add request headers to the API service:

-
Add Header: Click to add a request header to the API service. The following fields become available:
-
Parameter: Enter the name of the request header.
-
Description: Optionally, enter a description for the request header.
-
Required: Select the checkbox to make this header required for API requests.
-
Delete: Click the delete icon next to a request header to delete that header.
-
You can configure multiple services for a single custom API. Each service must have a unique combination of HTTP method and path.
Use the Actions column to edit or delete existing services.
After you configure the Services tab, click Next to proceed to the Security profiles tab, or click Prev to return to the Settings tab.
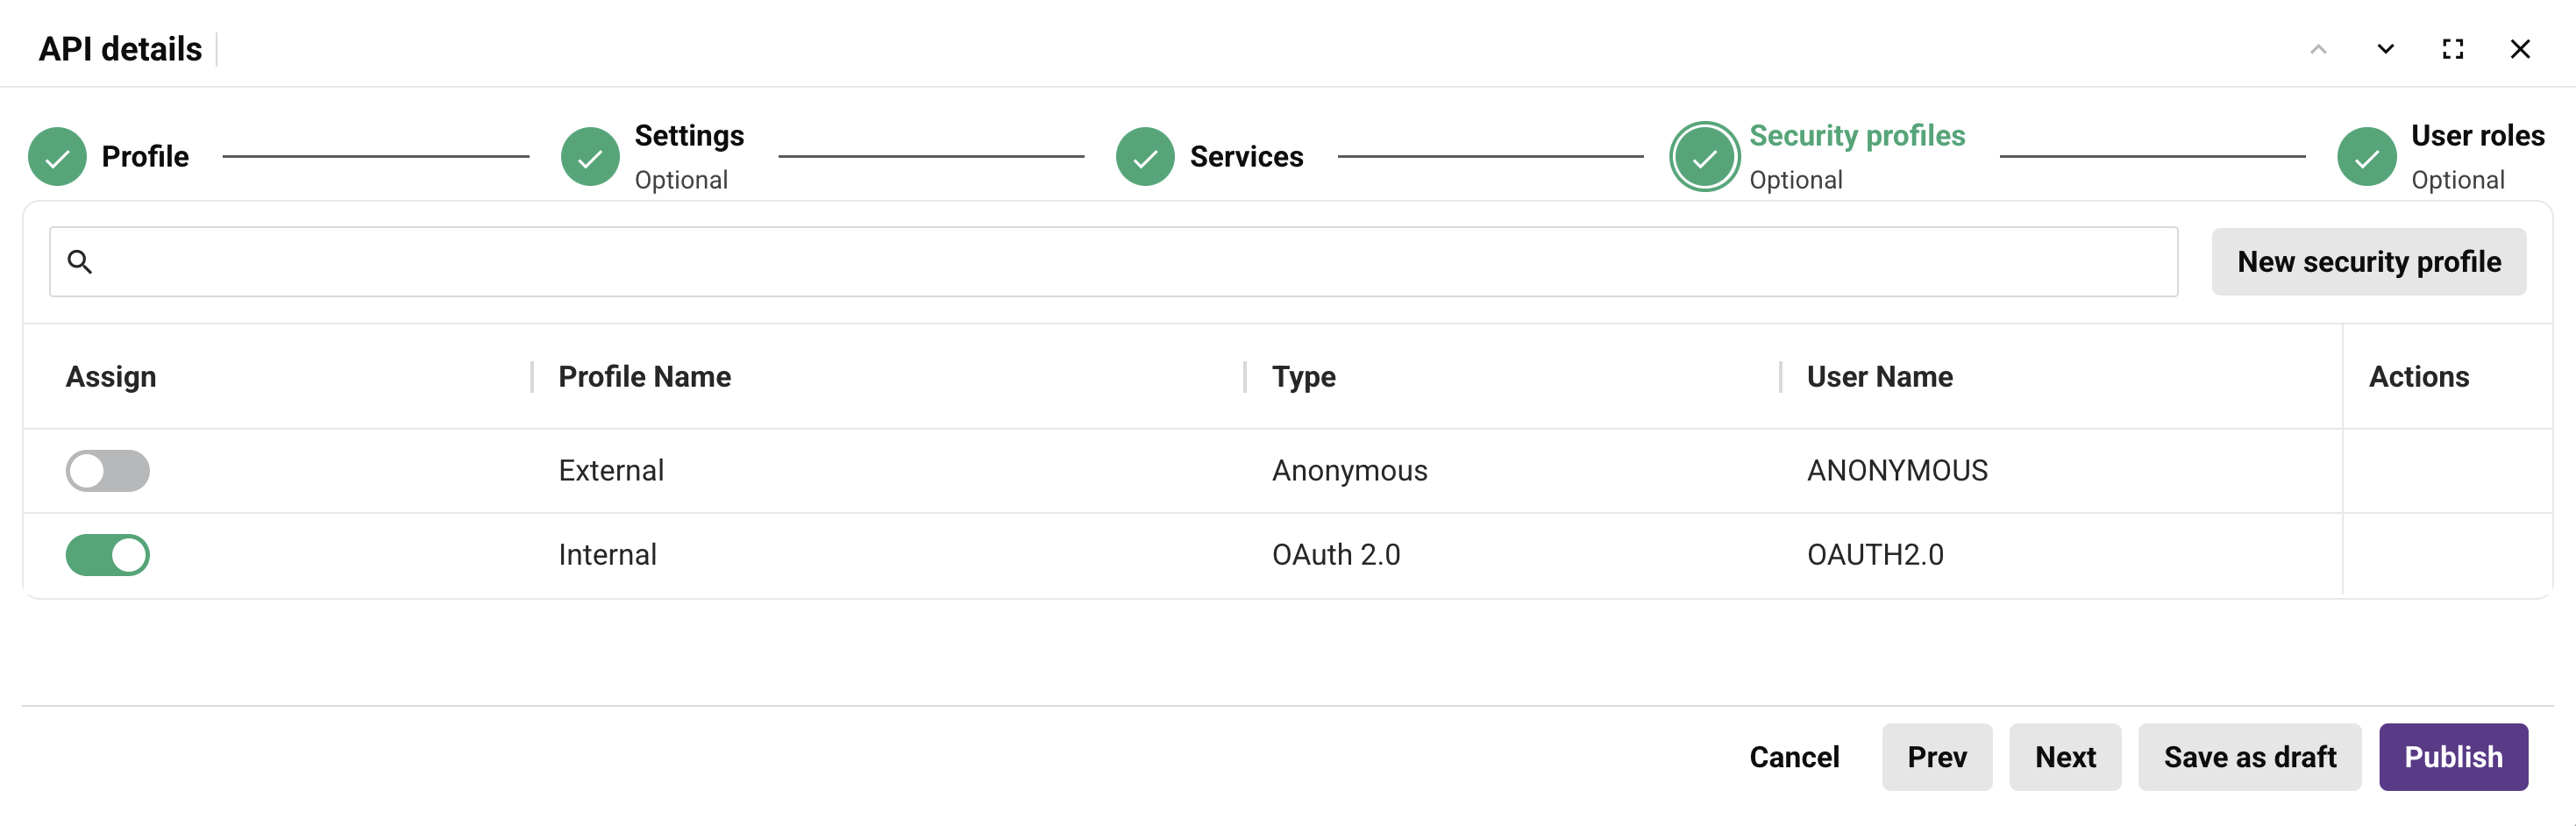
Security profiles tab
The Security profiles tab is optional and allows you to restrict access for consumption of the API.
Configure the following settings:
-
Assign: Use the toggle to assign or unassign security profiles for the API.
-
Profile Name: The name of the security profile as configured in Security Profiles.
-
Type: The authentication type for the security profile, such as Basic, OAuth 2.0, or API Key.
-
User Name: For basic authentication, this displays the username. For other authentication types, this displays the same value as the Type column.
-
Actions: Hover over a security profile row to reveal additional actions.
- Go to security profile: Click to open the security profile's configuration.
Depending on the Harmony organization's policies, you may be required to assign a security profile in order to save the API.
Click New security profile to create a new security profile. For instructions, see Configure security profiles.
Tip
Changes to security profile assignments are saved as drafts. You must publish the API using Save and Publish to apply the changes and allow deletion of previously assigned profiles. Security profiles cannot be deleted while they appear in any API's published configuration, even if you have unassigned them in a draft version.
After you configure the Security profiles tab, click Next to proceed to the User roles tab, or click Prev to return to the Services tab.
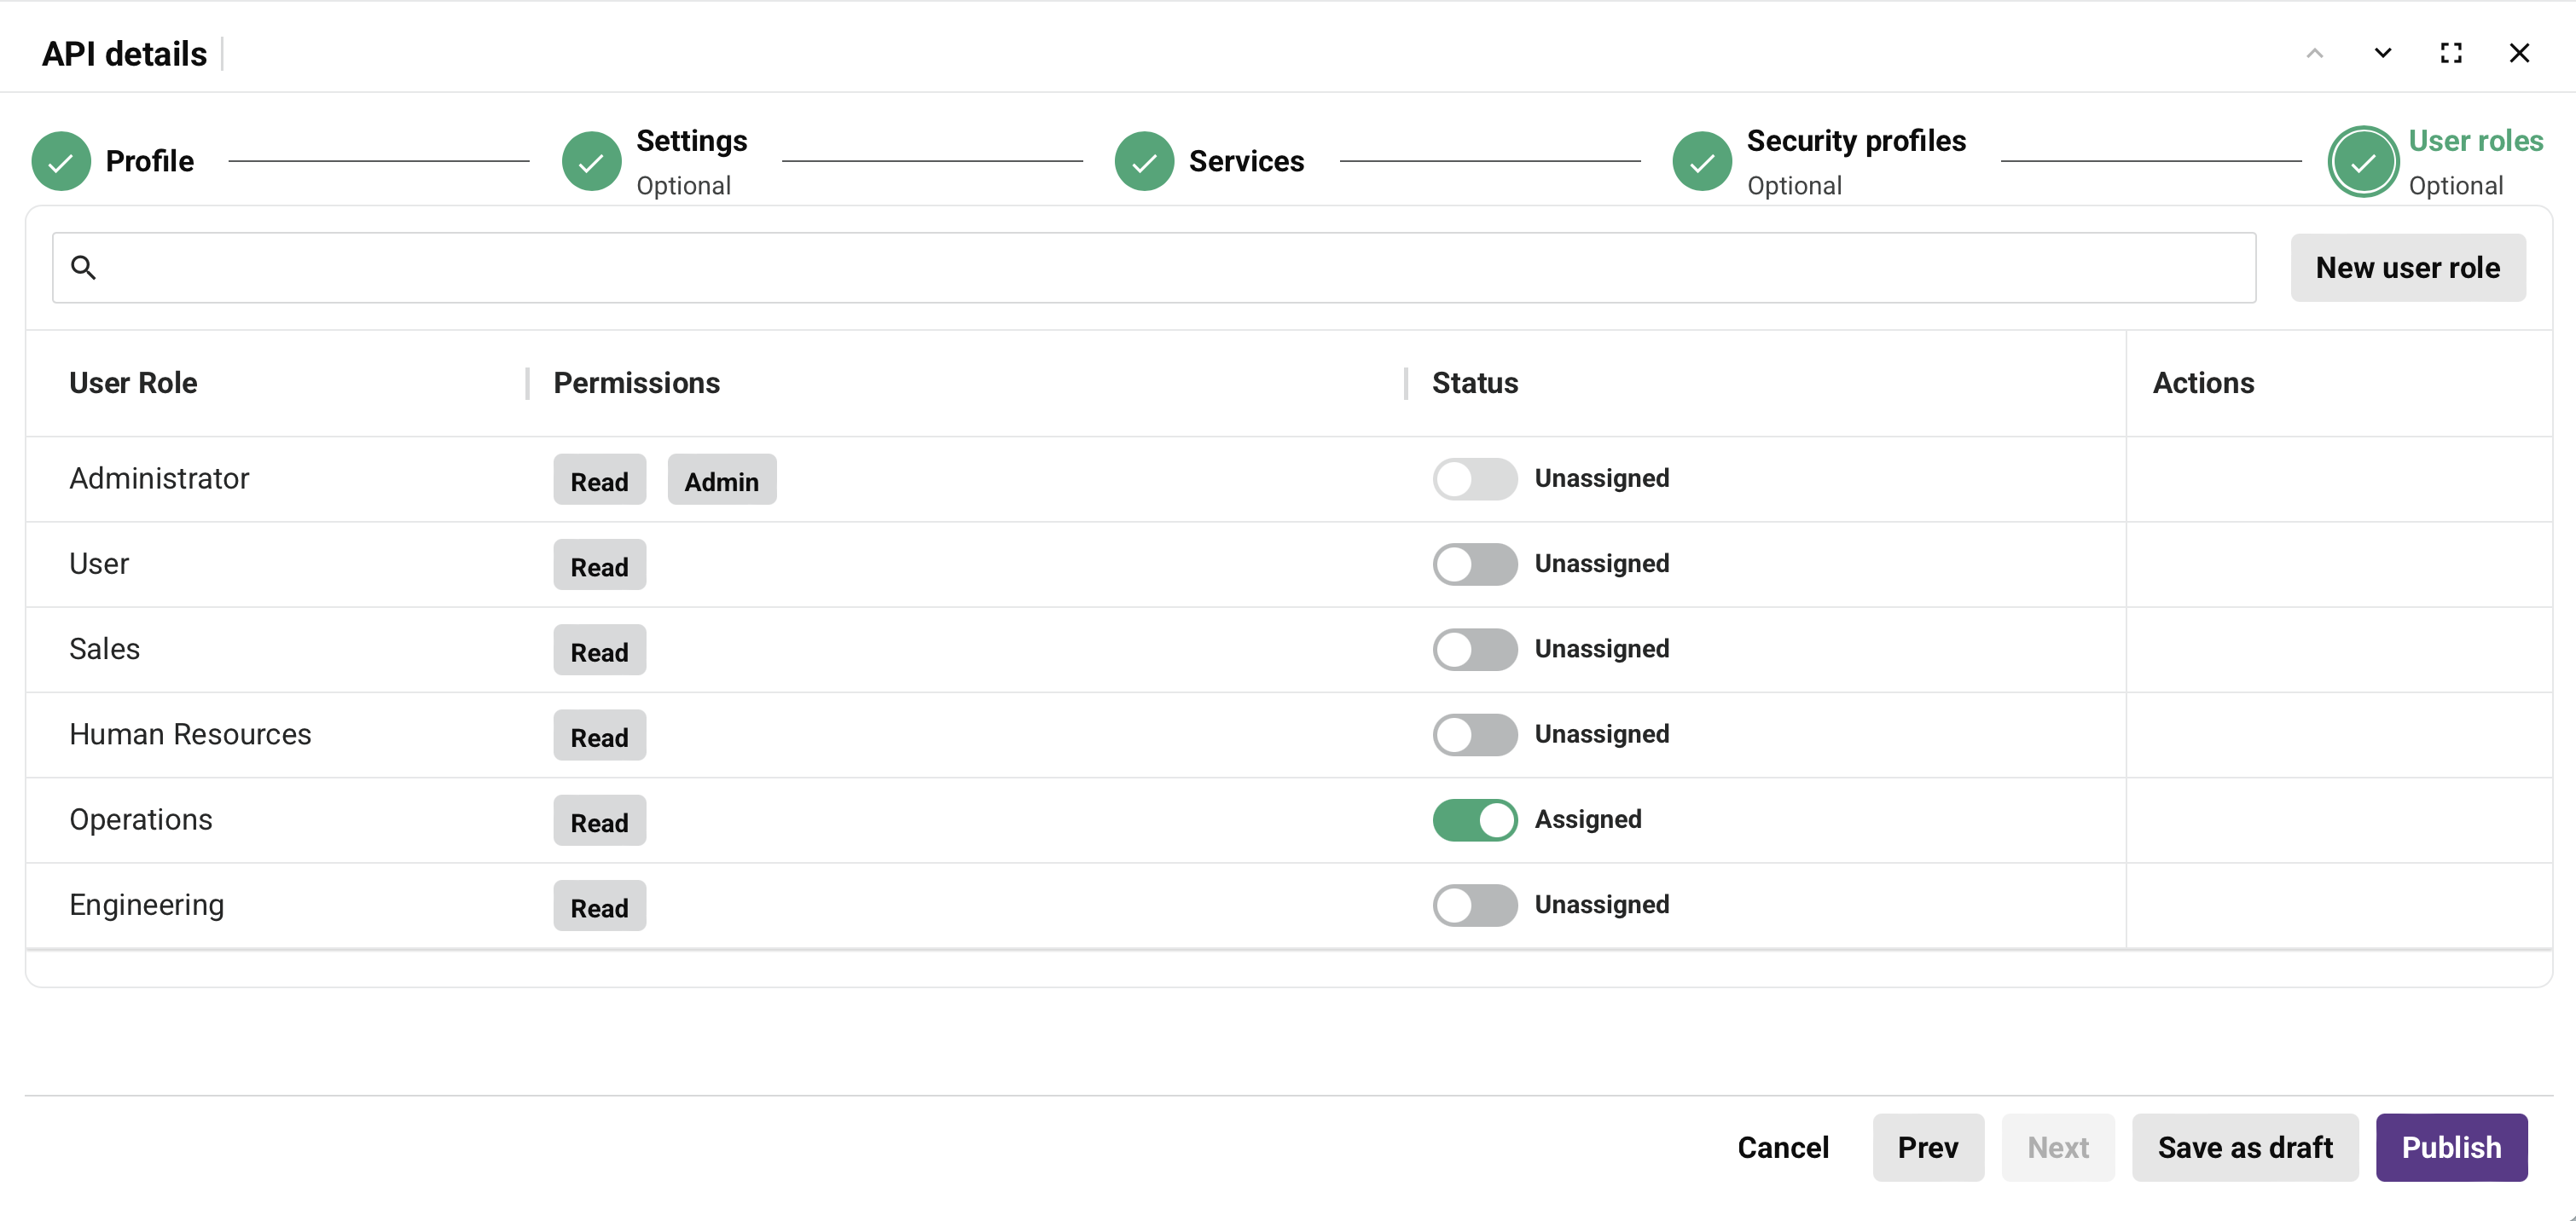
User roles tab
The User roles tab is optional and determines which organization roles have access to the API within API Manager.
Configure the following settings:
-
User Role: The name of the organization role as defined on the Roles tab of the User Management page.
-
Permissions: The permissions assigned to this role, such as Read or Admin.
-
Status: Indicates whether the role is assigned to this API. Toggle the status to assign or unassign roles.
-
Actions: Hover over a user role row to reveal additional actions.
- Go to user role: Click to open the user role's configuration.
The roles you select here determine access to this specific API from these pages:
- APIs
- Portal Manager, including generation of API documentation
- API Portal
- API Logs
- Analytics
Access to the Security Profiles page and access to consume the API are unaffected by this selection. Access to consume an API is controlled by security profiles.
Any defined user roles with the Admin permission always have full access to all APIs and therefore cannot be cleared from selection.
Click New user role to create a new user role. For instructions, see Roles in User Management.
After you configure the User roles tab, click Publish to publish the API, or click Save as draft to save your progress.
Save and publish options
After you configure all required tabs, you can save or publish the API:
-
Save as draft: Saves the API in Draft status or Published with Draft status. Draft APIs do not count against your API URL subscription limit. An API whose status was Published at the time you use Save as draft is saved as Published with Draft. A published API counts against your API URL subscription limit, even though its draft is not accessible.
-
Publish: Saves the API in Published status. The API is live and accessible within five minutes. A published API counts against your API URL subscription limit. A dialog indicates the API is live:
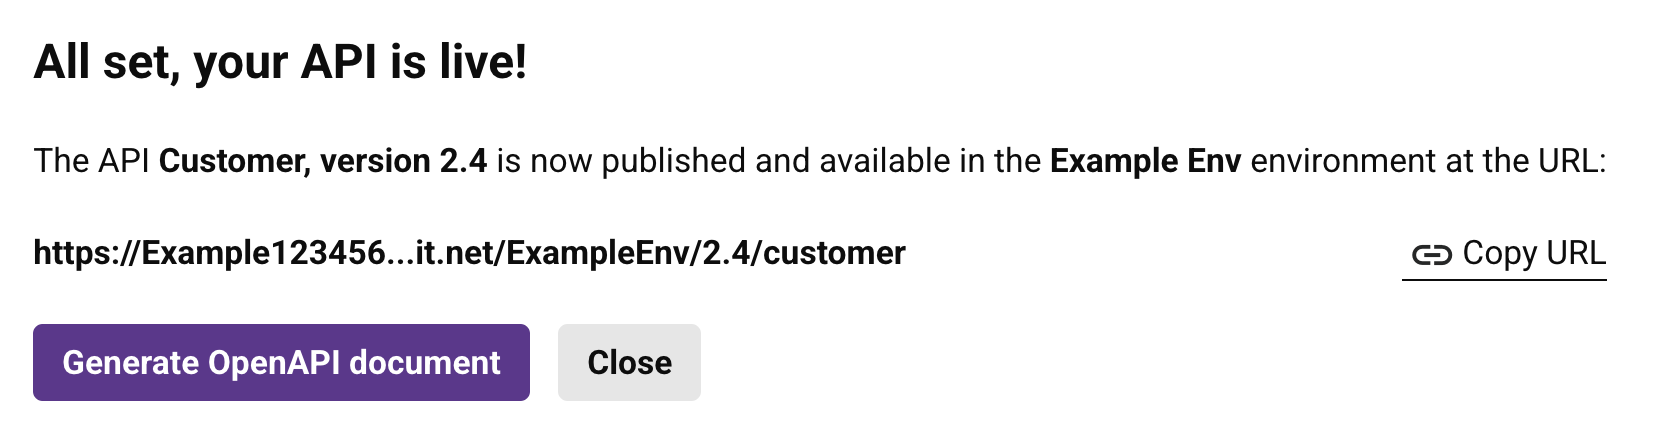
The dialog provides these options:
- Copy URL: Copies the API's service URL to your clipboard.
- Generate OpenAPI Document: Opens the Portal Manager page, where you can generate API documentation for all APIs in an environment. To generate documentation for individual APIs, use the Documentation tab when editing the API from the APIs page.
- Close: Closes the dialog.
Edit the API
After you save the API, you can edit it from these locations:
- Using card view in the APIs page, click the card.
- Using list view in the APIs page, click Edit in the Actions column.
When editing a published API from list view, a Documentation tab is also available. Use this tab to view, edit, and publish OpenAPI documentation for individual APIs. For details, see Documentation tab on the APIs page.