Connect a Jitterbit AI agent to Microsoft Copilot Studio
Overview
Any Jitterbit AI agent that is exposed through a Jitterbit API Manager custom API can be consumed from Microsoft Copilot Studio by registering the agent as a REST API tool. For a list of available agents, see Licensed and Learning agents.
Prerequisites
Before you begin, ensure you have the following:
-
Access to Microsoft Copilot Studio.
-
An OpenAPI specification file for the Jitterbit AI agent you want to consume (see the sample specification below).
-
The credentials required by the security profile configured on your Jitterbit custom API, if authentication is required.
Note
Microsoft Copilot Studio does not support basic authentication. If your security profile uses basic authentication, use a different authentication type or configure your custom API without a security profile before proceeding.
-
The service URL of your Jitterbit custom API, available in the API details drawer using the Copy API service URL icon on the Services tab.
Sample OpenAPI specification
Use the following OpenAPI 3.0.3 specification as a template. Before uploading, replace the placeholder values with the values for your specific agent:
- Replace
<AGENT_TITLE>with the name of your agent (for example,Jitterbit Knowledge Agent). - Replace
<AGENT_DESCRIPTION>with a brief description of what the agent does. - Replace
<YOUR_AGENT_BASE_URL>with the service URL of your Jitterbit custom API.
{
  "openapi": "3.0.3",
  "info": {
    "title": "<AGENT_TITLE>",
    "description": "<AGENT_DESCRIPTION>",
    "version": "1.0.0"
  },
  "servers": [
    {
      "url": "<YOUR_AGENT_BASE_URL>",
      "description": "Production server"
    }
  ],
  "paths": {
    "/externalBot/chat": {
      "post": {
        "summary": "Send a user prompt",
        "description": "Sends the prompt along with the username to the API.",
        "security": [
          {
            "ApiKeyAuth": []
          }
        ],
        "requestBody": {
          "required": true,
          "content": {
            "application/json": {
              "schema": {
                "$ref": "#/components/schemas/PromptRequest"
              },
              "example": {
                "username": "user@example.com",
                "prompt": "Your question here"
              }
            }
          }
        },
        "responses": {
          "200": {
            "description": "Request processed successfully",
            "content": {
              "application/json": {
                "schema": {
                  "$ref": "#/components/schemas/PromptResponse"
                },
                "examples": {
                  "success": {
                    "value": {
                      "message": "This is the response message...",
                      "status_code": "200"
                    }
                  }
                }
              }
            }
          },
          "400": {
            "description": "Bad request - invalid input",
            "content": {
              "application/json": {
                "schema": {
                  "$ref": "#/components/schemas/ErrorResponse"
                }
              }
            }
          },
          "401": {
            "description": "Unauthorized - invalid API key",
            "content": {
              "application/json": {
                "schema": {
                  "$ref": "#/components/schemas/ErrorResponse"
                }
              }
            }
          },
          "500": {
            "description": "Internal server error",
            "content": {
              "application/json": {
                "schema": {
                  "$ref": "#/components/schemas/ErrorResponse"
                }
              }
            }
          }
        }
      }
    }
  },
  "components": {
    "securitySchemes": {
      "ApiKeyAuth": {
        "type": "apiKey",
        "in": "header",
        "name": "api-key"
      }
    },
    "schemas": {
      "PromptRequest": {
        "type": "string",
        "required": ["username", "prompt"],
        "properties": {
          "username": {
            "type": "string",
            "format": "email",
            "description": "Email of the user"
          },
          "prompt": {
            "type": "string",
            "description": "The prompt to send to the API"
          }
        }
      },
      "PromptResponse": {
        "type": "string",
        "required": ["message", "status_code"],
        "properties": {
          "message": {
            "type": "string",
            "description": "Response message from the API",
            "example": "This is the response message..."
          },
          "status_code": {
            "type": "string",
            "description": "Status code of the response",
            "example": "200"
          }
        }
      },
      "ErrorResponse": {
        "type": "string",
        "required": ["status", "message"],
        "properties": {
          "status_code": {
            "type": "string",
            "description": "Error status"
          },
          "message": {
            "type": "string",
            "description": "Descriptive error message"
          }
        }
      }
    }
  }
}
Procedure
-
Create a new agent or open an existing one, then navigate to the Tools tab.
-
In the Tools tab, click + Add a tool to open the tool dialog. Then click REST API to open the Upload REST API specification wizard.
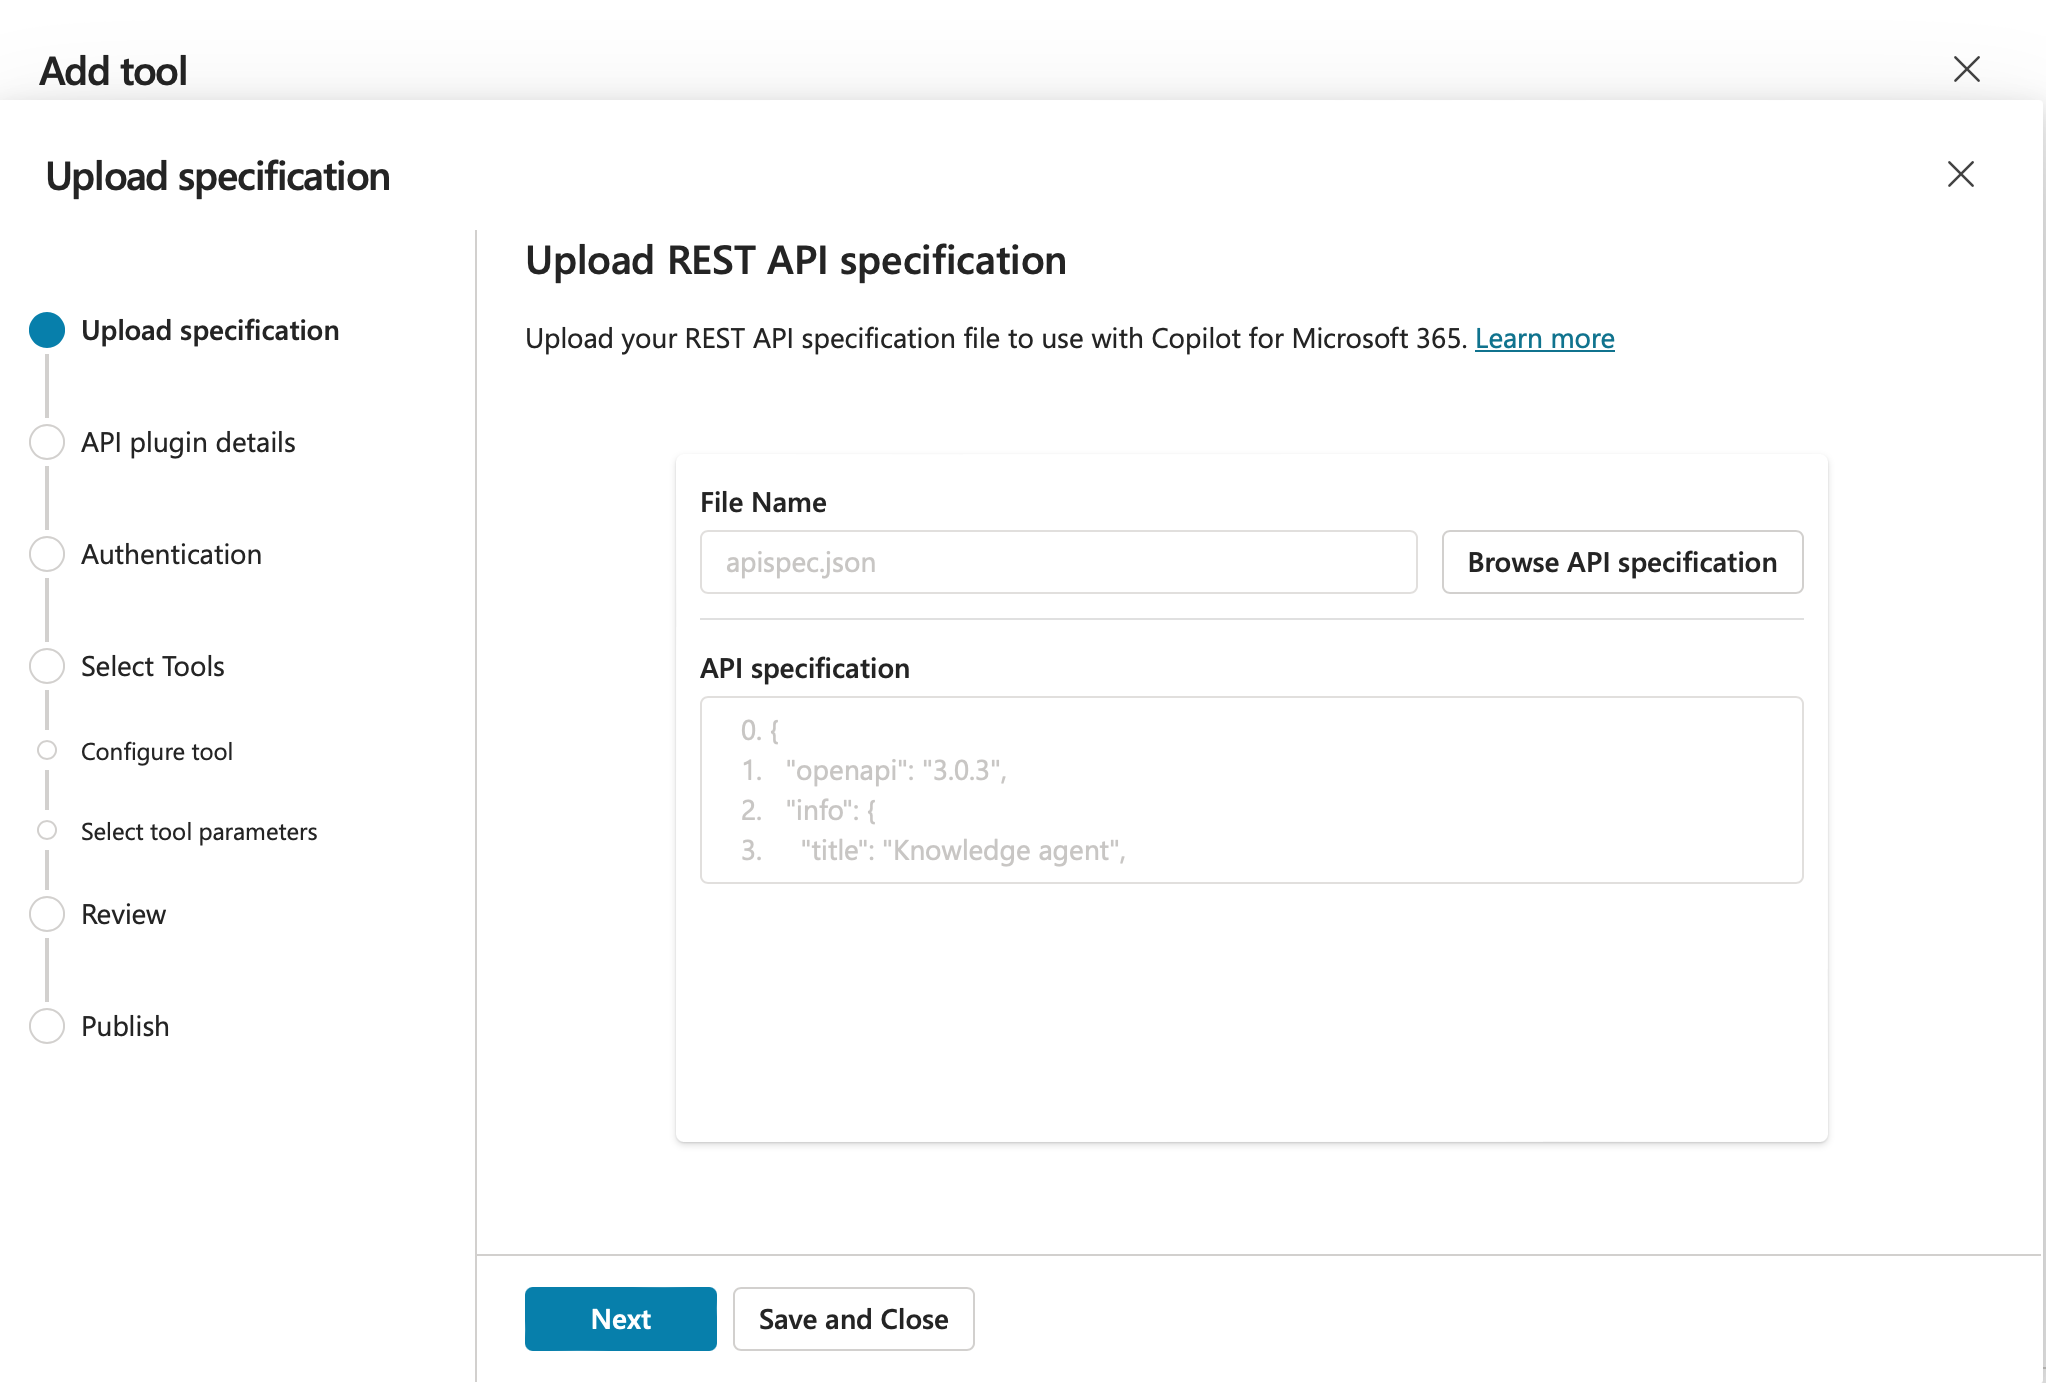
-
In the Upload specification dialog, drag and drop your OpenAPI specification file into the upload area, or click to browse and select the file. The maximum supported file size is 5 MB:
-
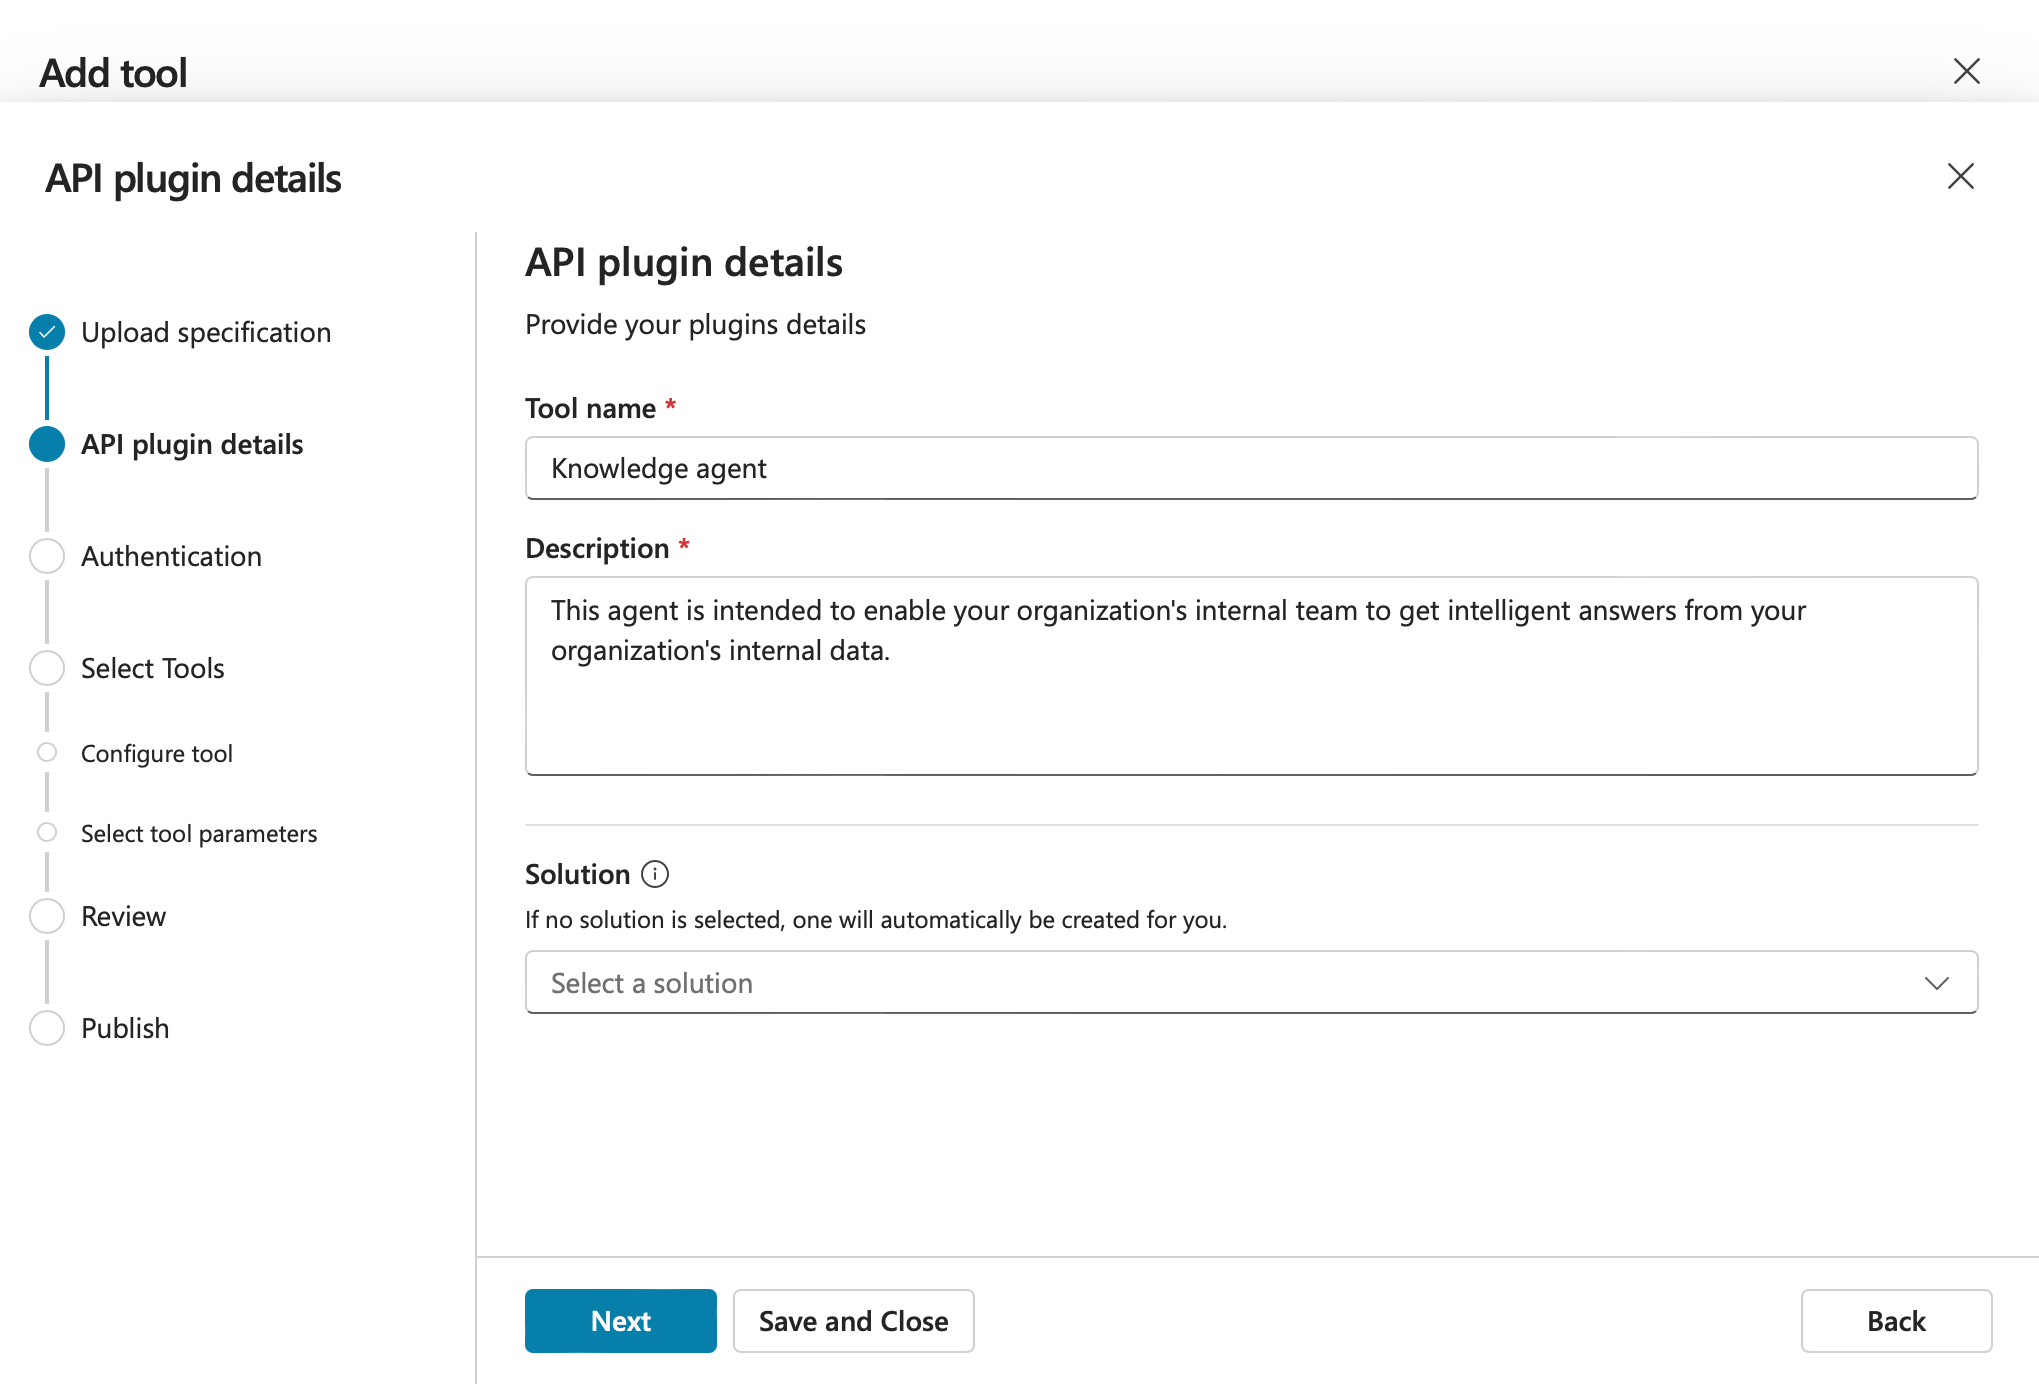
On the API plugin details screen, verify or update the Tool name and Description fields, then click Next:
-
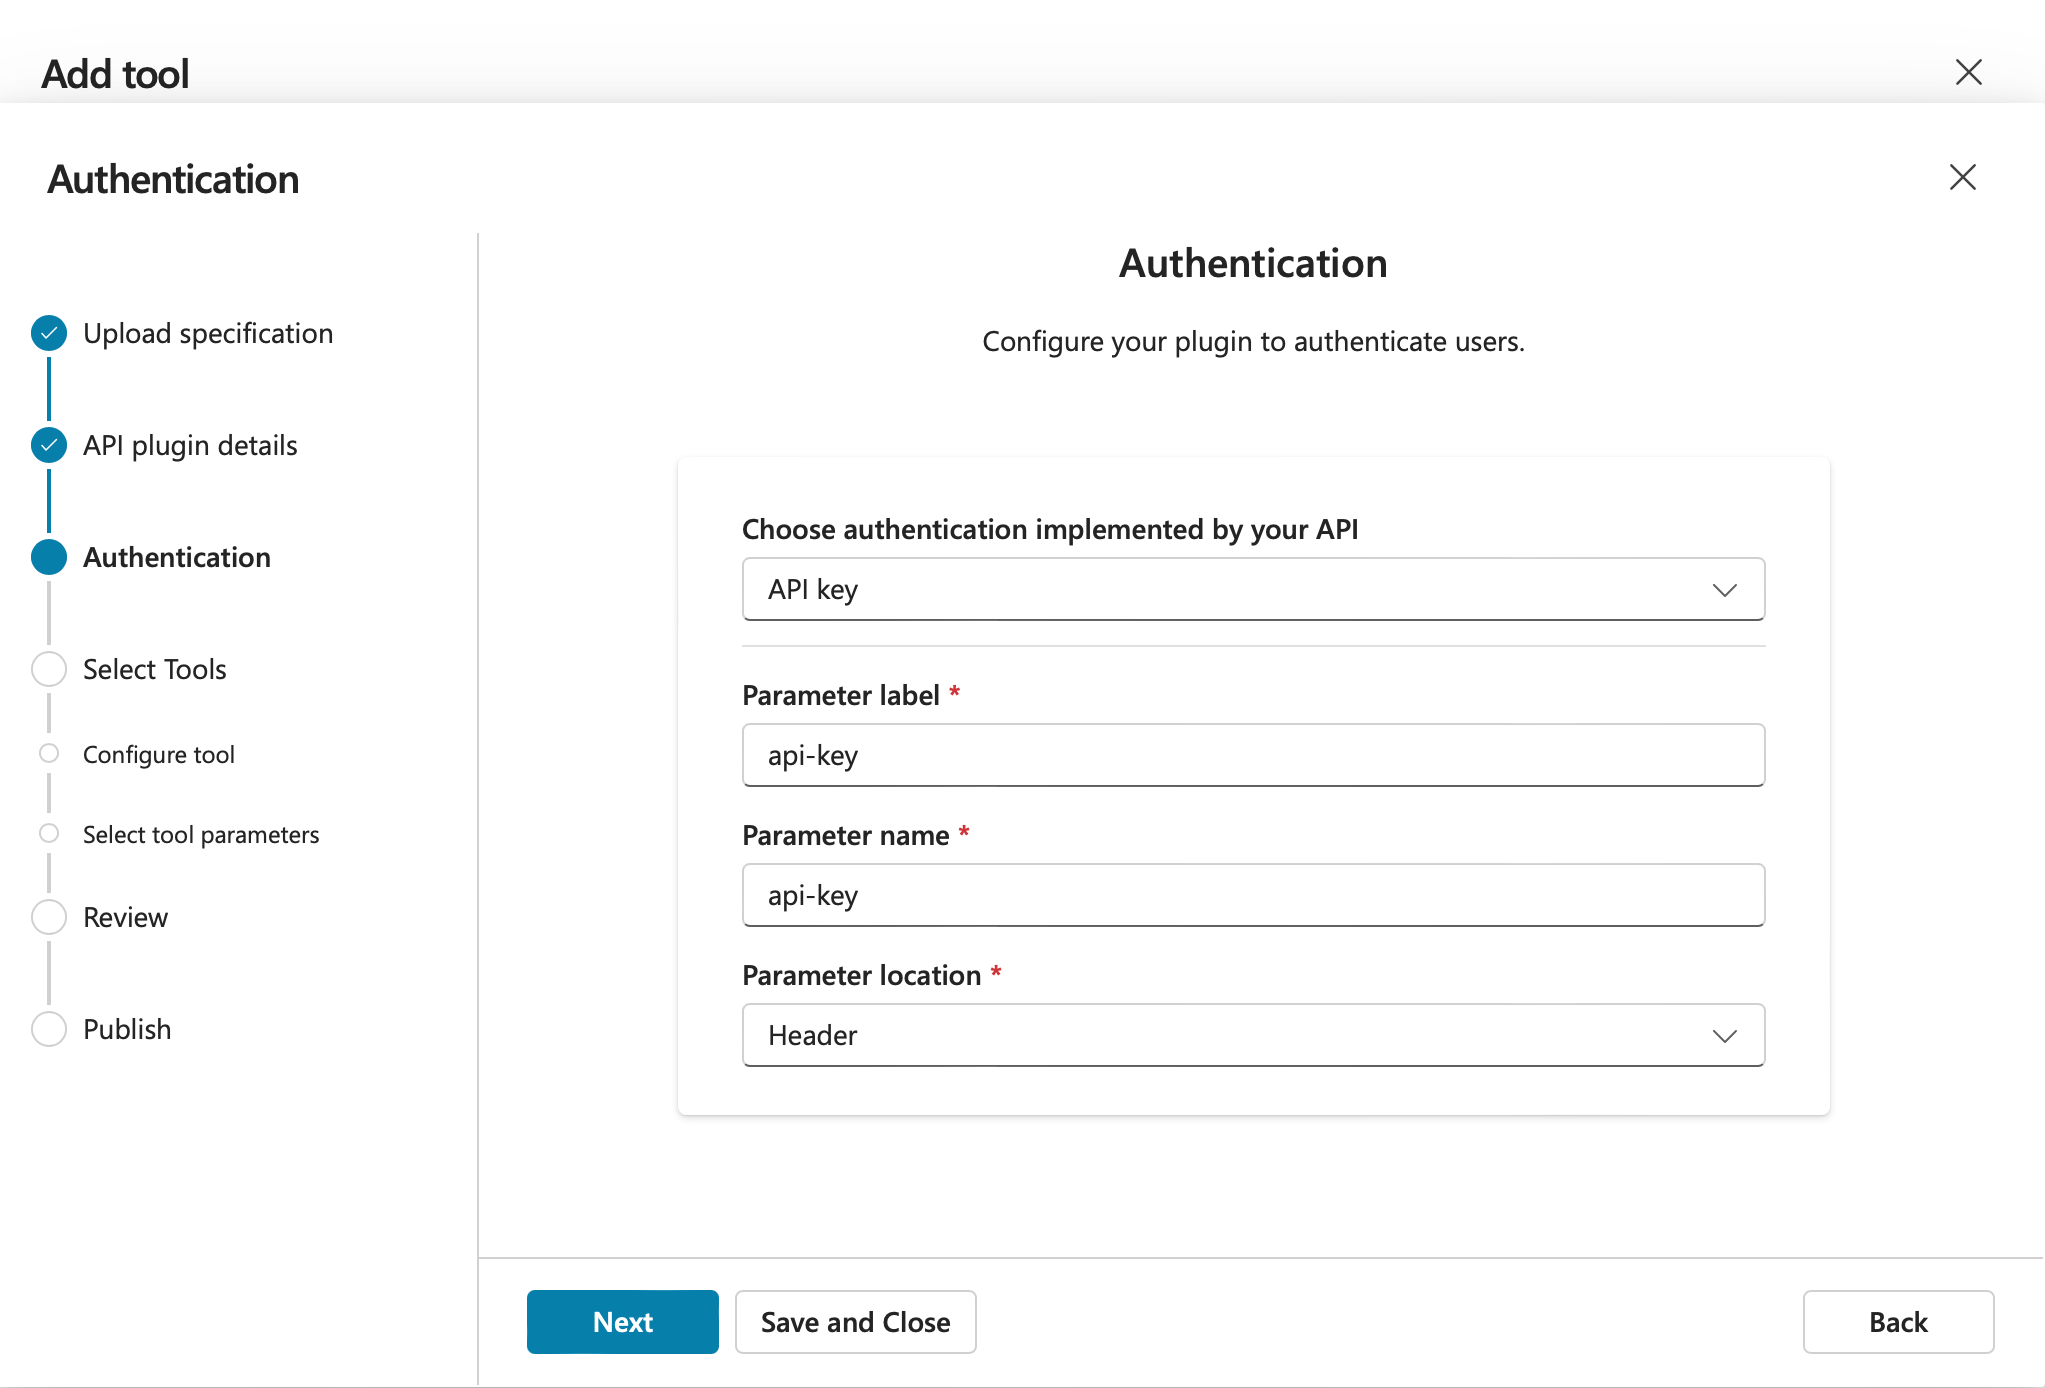
On the Authentication screen, configure the Choose authentication implemented by your API setting to match the security profile configured on your Jitterbit custom API, then click Next:
-
If no security profile is configured, or if the security profile uses Anonymous authentication, select None.
-
If the security profile uses API key authentication, select API key and configure the following settings to match your security profile:
-
Parameter label: Enter the key name configured in your security profile.
-
Parameter name: Enter the key name configured in your security profile.
-
Parameter location: Select Header.
-
-
If the security profile uses OAuth 2.0 authentication, select OAuth (2.0).
-
-
On the Select Tools screen, select Send a user prompt from the list of available tools, then click Next.
-
On the Select tool parameters screen, review the input and output parameters to confirm they match the values below, then click Next.
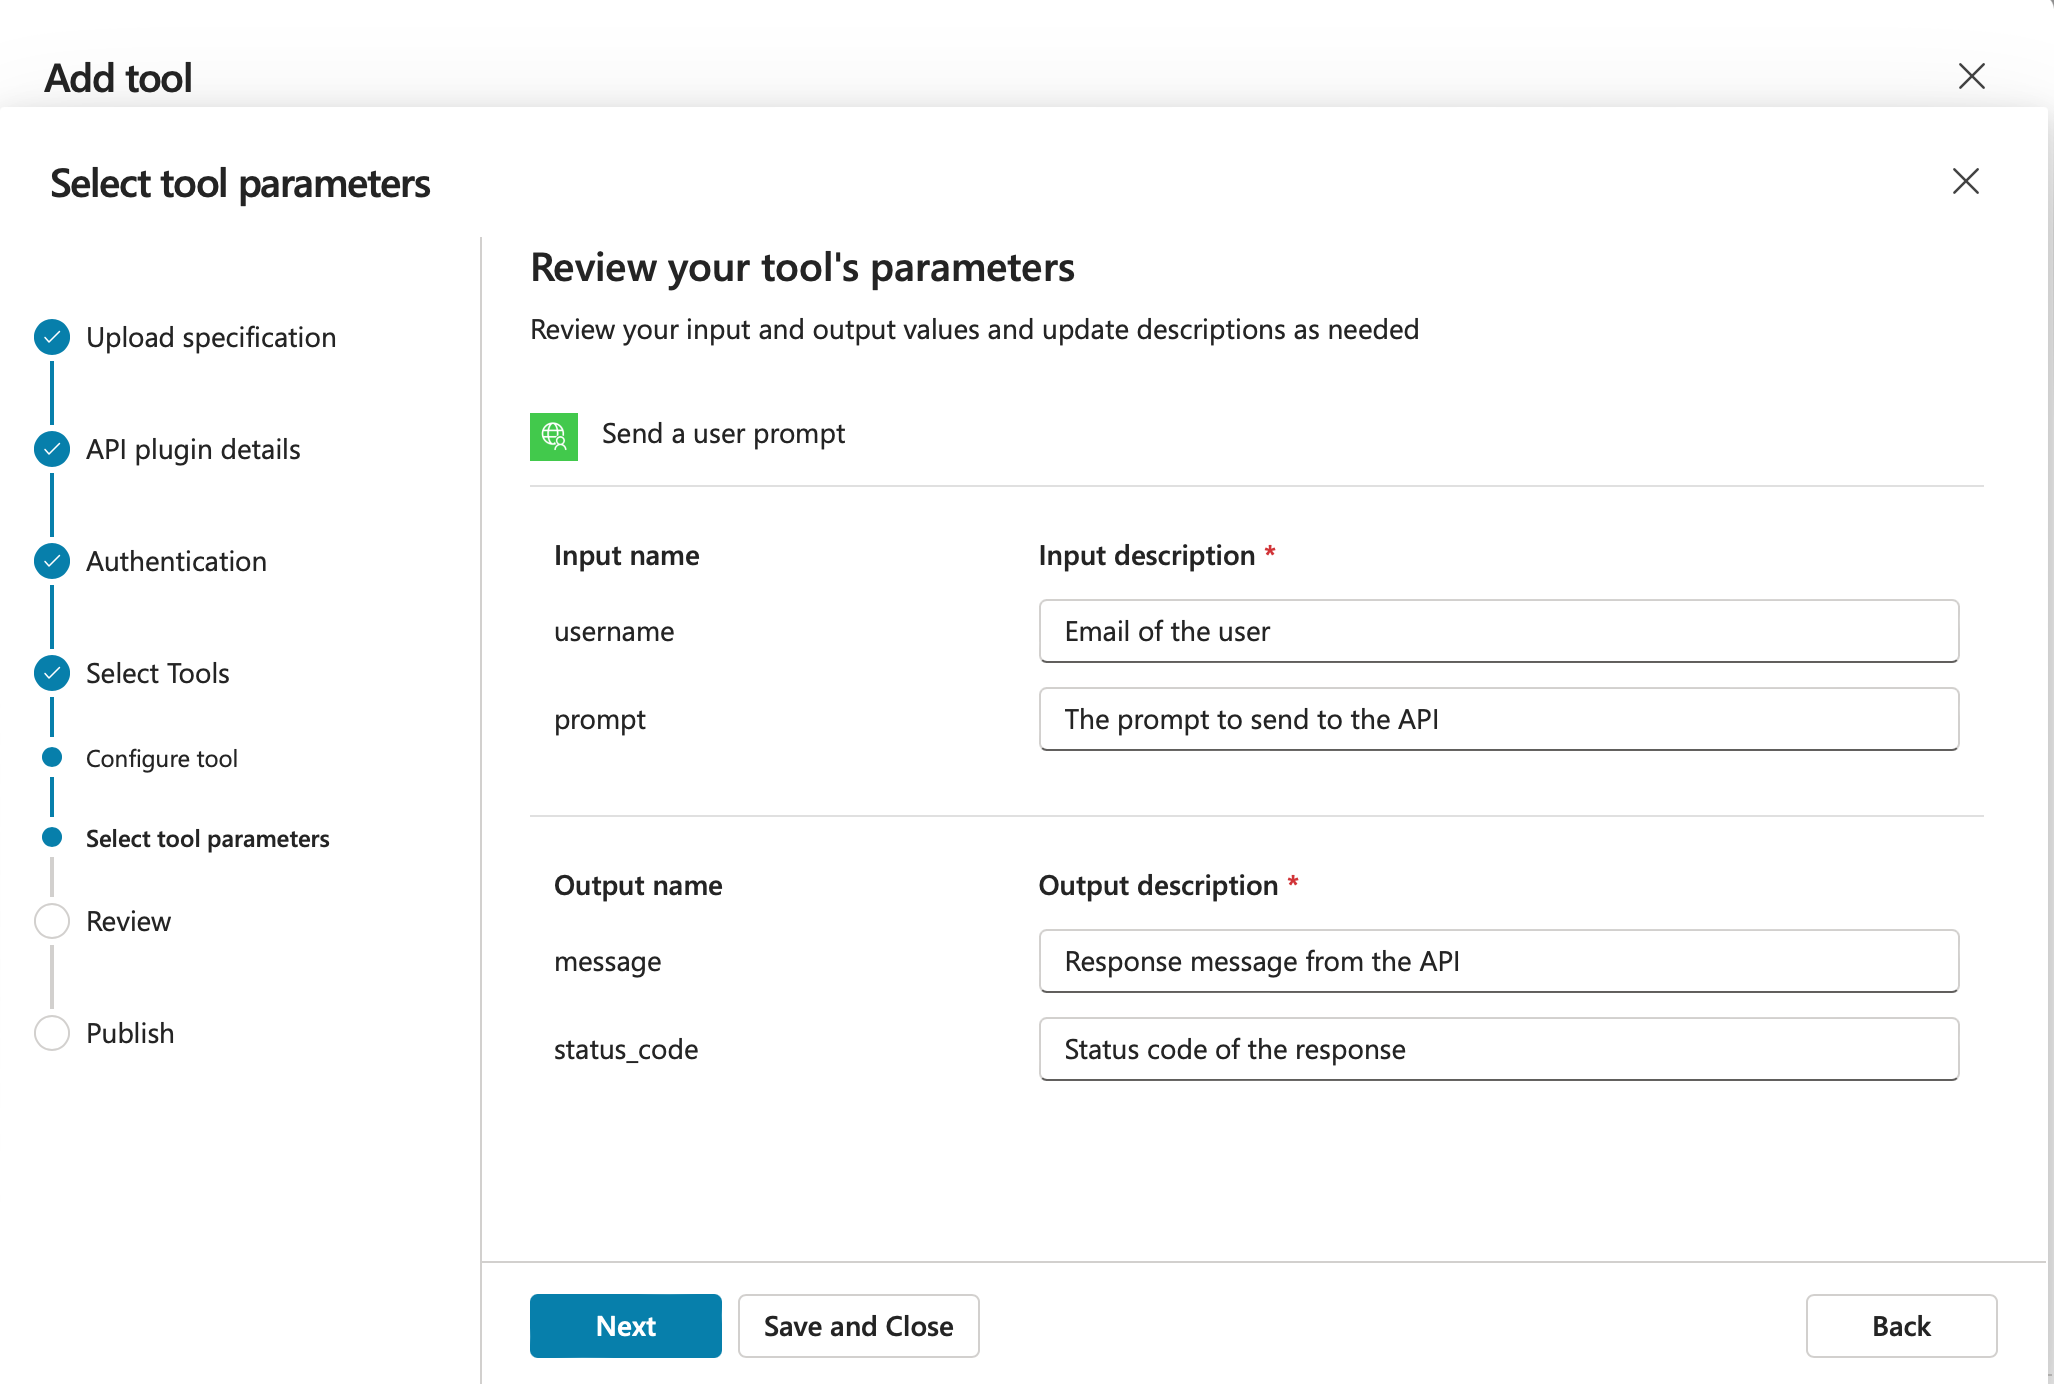
Parameter type Name Description Input usernameEmail address of the user Input promptThe prompt to send to the API Output messageResponse message from the API Output status_codeStatus code of the response -
The wizard returns to the Select Tools screen. Without selecting additional tools, click Next.
-
On the Review screen, verify the tool name, description, and selected tools, then click Next to begin publishing.
-
Wait for the tool to finish publishing. The Publish screen displays a confirmation message when the process is complete.
-
Go back to your agent and click Add tool. In the REST API section, select the newly published tool.
-
If your custom API uses a security profile, provide the required credentials when prompted to create a new connection. After the connection is established, the tool is added to your agent and ready for testing.